Alarm and Starter System
www.firstechdata.com
CM900 Master Guide
Copyright 2018 Fi rst ech ,
LLC.
Page 8
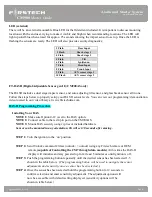
LED (external)
There will be an external mountable Blue LED for theft deterrent included. It is important to discuss mounting
locations with the end user, trying to make it visible and bright when recommending locations. The LED will
light up solid blue when armed for approx. 25 seconds allowing the impact sensor to set up. Once the LED is
flashing the sensors are ready. The LED will also provide security diagnostics:
2 Flash
Door Input
3 Flash
Shock stage 1
4 Flash
Shock stage 2
5 Flash
Tilt
6 Flash
Ignition on
7 Flash
Hood Input
8 Flash
Trunk Input
9 Flash
AUX sensor stage 1
10 Flash
AUX sensor stage 2
FT-DASII (Digital Adjustable Sensor gen II) (CM900AS only)
The DASII includes a dual stage impact sensor, and auto adjusting tilt sensor, and glass break sensor all in one.
Follow the steps below to properly setup your DAS II sensor levels. You can view our programming/ demonstration
video located in our video library at www.firstechdata.com.
DAS-II Programming Procedure
Installing Your DAS
NOTE 1: Make sure Option 4-12 is set to the DAS option.
NOTE 2: Connect cable to the red 4 pin port on the CM900AS.
NOTE 3: Mount DAS securely using zip ties or included hardware
Sensor can be mounted in any orientation, tilt will set 30 seconds after arming.
STEP 1:
Turn the ignition to the ‘on’ position
STEP 2: Send Unlock command 2 times (unlock => unlock) using any Firstech remote or OEM
remote (capable of Controlling the CM7 through data module) At this time the DAS-II
display will initialize and stay powered up for at least 5 minutes or until ignition is off.
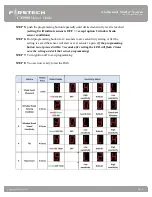
STEP 3: Push the programming button repeatedly until the desired sensor has been selected 1-5
shown in the table below. (The programming button will be used to navigate the sensor
adjustments and sensitivity once a sensor has been selected.)
STEP 4: Once the sensor has been selected hold the programming button for 2 seconds to
confirm selection and enter sensitivity adjustment. The adjustment options will
now be accessible with default setting displayed. (sensitivity options will be
shown in table below.)


