7
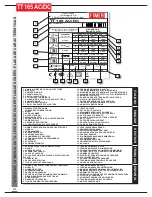
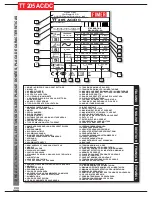
5. Setting Indicator:
Slope-Up Indicator:
Lit when the Slope-Up time, increasing
from the Initial Current (Is) value to I2.
6. Setting Indicator:
Pulse Frequency
Indicator:
Lit when the pulse frequency has been set
using button 14.
7. Setting Indicator:
Welding current.(I2)
Lit when the welding current value has
been set using button 14.
8. Setting Indicator:
Slope-Down Time.
Lit when the Slope-Down time, decreasing
from I2 to final welding current value (If),
has been set using button 14.
9. Setting Indicator:
Final Welding Curent (If)
Lit when the final current value has been
set set using button 14.
10. Setting Indicator:
Post-Gas Time:
Lit when the Post-Gas duration has been
set using button 14.
11. Thermal Protection Signal and low
mains voltage:
this lights up when the unit overheats.
Usually this occurs when the welder duty-
factor has been exceeded. Check that the
air-intake grills (34) on the frontand back of
the welder are not clogged. Leave the
welder switched on to allow the internal
components to cool down. When the LED
goes off, normal welding operations can be
resumed.
Should the letters ‘E.Ln’ appear on the
display panel 13 and the LED 11 lights up,
it means the power supply is below the
standard required.
12. Power Inverter Runnig LED:
MMA welding:
This lights up when the unit
is ready to weld.
TIG welding:
This lights up as soon as an
arc is created.
13. Display panel:
Shows welding current
value during normal operations.
During the setting of TIG welding (button
14) shows the value of the parameter.
The following information will also be
displayed:
- When unit is switched on, welder model
and firmware version.
- Should the letters ‘E.Ln’ appear on the
display and the LED 11 lights up, it means
the power supply is below the standard
required.
14. Welding Parameter Selector
The parameter to be adjusted can be
selected. The button is used together
with Knob 25 to select the required
setting, and the settings can be checked
via LEDs 3 to 10.
LEDs 15 to 19:
Arc Generation and 2T - 4T mode indicator:
Lit when arc generation (2T or 4T) has
been selected, pressing button 20
repeatedly.
Indicator details:
15. Bi-Level Arc Mode Indicator:
Lit when Bi-Level 4T (Lift or HF) arc
generation has been selected.
16. 2T Lift-Arc Indicator :
Lit when 2T Lift-Arc generation has been
selected.
17. 4T Lft-Arc Indicator :
Lit when 4T Lift-Arc generation has been
selected.
If LED 15 is not lit it means normal 4T Lift-
Arc generation has been set. If lit, 4T
Bi-Level Lift-Arc generation has been set.
18. 2T HF Arc Generation Indicator
Lit when 2T HF arc generation has been
selected.
19. 4T HF Arc Generation Indicator
Lit when 4T HF arc generation has been
selected.
If LED 15 is not lit it means normal 4T HF
arc generation has been set. If lit, 4T HF
Bi-Level arc generation has been set.
LEDs 21, 22 and 23:
Welding Mode
Indicators.
Lit when a welding mode has been
selected pressing button 24 repeatedly
21. MMA Welding indicator.
22. Non-Pulse TIG Welding Indicator.
23. Pulsed TIG Welding Indicator.
24. MMA/TIG Mode Selector:
Repeatedly pressing this button
alternates the welding mode, ie. MMA
mode (LED 21 on). normal TIG mode
Содержание TT165 AC/DC
Страница 1: ...InstructionManual TT165 AC DC TT205 AC DC TT165 AC DC TT205 AC DC ...
Страница 4: ......
Страница 5: ...TT165 AC DC TT205 AC DC ...
Страница 10: ...X ...
Страница 12: ......
Страница 30: ...20 NOTE ...
Страница 32: ...Cod 910 100 333GB REV00 ...


