background image

3.      Installation

3−17

Festo  P.BE−VIFB11−03−EN      en  0503g

Before  connecting  the  power  supply,  please  note  the  follow
ing:

S

Avoid  long  distances  between  the  power  unit  and  the
valve  terminal.  If  necessary,  calculate  the  maximum  per
mitted  distance  as  described  in  Appendix  A.

S

The  following  apply  as  orientation  values  for  your  valve
terminal.

Cross−sectional  area  of
cable

Distance

1.5  mm

2

2.5  mm

2

  8  m


14  m

Current  consumption  (at  V

B

  =  24  V):

Operating  voltage  (pin  1)  =  2.2  A
Operating  voltage  (pin  2)  =  10  A

S

If  necessary,  calculate  the  complete  current  consumption
as  shown  in  the  table  below  and  then  select  a  suitable
power  unit  and  suitable  cable  cross−sectional  area.

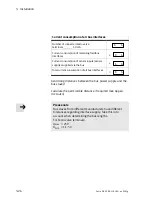
3.3.1 Calculating  the  current  consumption

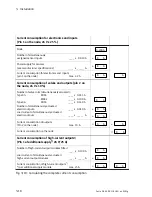
The  table  below  shows  you  how  to  calculate  the  complete
current  consumption  for  the  valve  terminal.  The  values  speci
fied  have  been  rounded  up.  If  you  wish  to  use  other  valves  or
modules,  please  refer  to  the  relevant  technical  specifications
for  their  current  consumption.

Содержание IFB11-03

Страница 1: ...Electronics manual Valve terminal with Fieldbus connection Type IFB11 03 Fieldbus protocol DeviceNet Philips DIOS Selectron SELECAN Manual 163 956 en 0503g Valve terminal type 03 04 B...

Страница 2: ......

Страница 3: ...03 EN Order no 163 956 E Festo AG Co D 73726 Esslingen Federal Republic of Germany 2000 Internet http www festo com E Mail service_international festo com The copying distribution and utilization of...

Страница 4: ...Contents and general instructions II Festo P BE VIFB11 03 EN en 0503g...

Страница 5: ...MIDI pneumatic modules 1 5 1 2 3 Type 03 MAXI pneumatic modules 1 6 1 2 4 Type 04 B ISO pneumatic modules 1 7 1 3 Method of operation 1 8 2 Fitting 2 1 2 1 Fitting the modules and components 2 3 2 1...

Страница 6: ...he valve terminal 4 3 4 1 1 Ascertaining the configuration data 4 3 4 1 2 Address assignment of the valve terminal 4 6 4 1 3 Address assignment after extension conversion 4 11 4 2 General instructions...

Страница 7: ...4 Testing the valves 5 11 5 3 Status bits 5 14 5 3 1 Short circuit overload 5 17 5 4 Error treatment 5 18 5 4 1 Reaction to errors in the control system 5 18 5 4 2 Position of the status bits 5 19 5...

Страница 8: ...kets B 25 B 4 Accessories B 28 B 5 OverviewDeviceNet Specifications B 32 B 6 Details on DeviceNet Objects B 35 B 6 1 Identity Object Class Code 01 0x01 B 35 B 6 2 Router Object Class Code 02 0x02 B 38...

Страница 9: ...ans of the input modules Use the valve terminal only as follows in accordance with designated use in faultless technical condition without any modifications by the user If additional commercial compon...

Страница 10: ...s intended exclusively for technicians trained in control and automation technology with experience in instal ling commissioning programming and diagnosing program mable logic controllers and fieldbus...

Страница 11: ...egories Warning This means that there is a danger of serious human injury and damage to property if these instructions are not ob served Caution This means that there is a danger of human injury and d...

Страница 12: ...ions tips and references to other sources of information Accessories information on necessary or useful accessories for the Festo product Environment information on the environmentally friendly use of...

Страница 13: ...solenoid sub base Type 03 Pneumatic sub base for two valves Type 04 B Manifold sub base with Intermediate solenoid plate MUH and pneuma tic valve with hole pattern as per ISO 5599 2 size 1 2 or 3 incl...

Страница 14: ...For most of the drawings in this manual we have used a simplified representation of a type 03 valve terminal with four pneumatic sub bases and four input output modules standard fitting 1 Input output...

Страница 15: ...modular valve terminal Festo designation Title product P BE MIDI MAXI 03 Pneumaticsmanual Valve terminal type 03 MIDI MAXI P BE VIISO 04 B Pneumaticsmanual Valve terminal type 04 B ISO 5599 2 P BE VIE...

Страница 16: ...ule with 4 8 or 16 inputs PNP or NPN 4 pin or 5 pin with without electronic fuse VIGA 03 FB Output module with 4 outputs PNP or NPN 4 pin or 5 pin VIGV 03 FB Additional supply module 24 V 25 A for hig...

Страница 17: ...00 DIOS Selectron PMC 40 MAS PC IPC CPU 42 CPU 751 752 PCI 701 RCD SELECAN SELECAN Fig 0 5 Overview of possible controllers fieldbus protocols extract Notes regarding the DeviceNet fieldbus protocol P...

Страница 18: ...Contents and general instructions XVI Festo P BE VIFB11 03 EN en 0503g...

Страница 19: ...Summary of components 1 1 Festo P BE VIFB11 03 EN en 0503g Chapter 1...

Страница 20: ...ts 1 1 1 1 Summary of multifunctional Festo valve terminals 1 3 1 2 Description of components 1 4 1 2 1 Types 03 04 B Electric modules 1 4 1 2 2 Type 03 MIDI pneumatic modules 1 5 1 2 3 Type 03 MAXI p...

Страница 21: ...ules Pneumatic modules type 03 fitted with Sub bases MIDI and MAXI fitted with 5 2 way single solenoid valves 5 2 way double solenoid valves 5 3 way mid position valves with auxiliary pilot air or cov...

Страница 22: ...o electric inputs PNP or NPN 2 Red LED error display per input module with electronic fuse 3 Two green LEDs one LED per input 4 Input socket for one electric input PNP or NPN 5 Green LED per input 6 O...

Страница 23: ...ments can be found on the pneumatic MIDI modules type 03 1 2 3 4 1 Yellow LEDs per valve solenoid coil 2 Manual override per valve solenoid coil either locking or non locking 3 Valve location inscript...

Страница 24: ...ic MAXI modules type 03 1 2 3 4 5 1 Yellow LED per valve solenoid coil 2 Manual override per valve solenoid coil either locking or non locking 3 Unused valve location with cover plate 4 Valve location...

Страница 25: ...type 04 B 2 Fuses for the valves 3 Power supply connection 4 1 Yellow LEDs per pilot solenoid 14 2 Yellow LEDs per pilot solenoid 12 5 1 Manual override per pilot solenoid 14 non locking 2 Manual over...

Страница 26: ...wer supply it performs the system settings of the valve terminal An automatic valve test and further node dependent func tions can be set it controls data transfer to from the field bus module of your...

Страница 27: ...he pneumatic modules perform the following functions they form the common channels for supply and exhaust air they supply electric signals from all the valve solenoid coils Work connections 2 and 4 ar...

Страница 28: ...1 Summary of components 1 10 Festo P BE VIFB11 03 EN en 0503g...

Страница 29: ...Fitting 2 1 Festo P BE VIFB11 03 EN en 0503g Chapter 2...

Страница 30: ...to P BE VIFB11 03 EN en 0503g Contents 2 Fitting 2 1 2 1 Fitting the modules and components 2 3 2 1 1 Earthing the end plates 2 4 2 2 Fitting onto a hat rail type 03 2 6 2 3 Fitting the valve terminal...

Страница 31: ...le all modules and components of the valve terminal with the utmost care Pay particular attention to the follow ing Make sure that screws are not distorted and not sub jected to mechanical stress Make...

Страница 32: ...to extend con vert the type 03 valve terminal earth the end plates of the valve terminal as described below You thereby avoid faults caused by electromagnetic in fluences Earth the end plates after e...

Страница 33: ...ng 2 5 Festo P BE VIFB11 03 EN en 0503g 1 2 3 4 1 1 Seals 2 Contact for the earth cable 3 Ready fitted earth cable 4 Fastening screws max 1 Nm Fig 2 1 Fitting the end plates example of type 03 valve t...

Страница 34: ...ally against sliding down and use the locking screws item 3 to protect it against unintentional loosening opening Please note If the valve terminal is fitted in a horizontal position and if the load i...

Страница 35: ...aned with spirit S Make sure that the flat head screws item 3 are tight ened After fitting S Fasten the lever with a locking screw item 7 2 3 4 5 6 1 1 1 Lever 2 O ring 3 Flat head screw 4 Self adhesi...

Страница 36: ...urface at least every 100 mm 5 Hang the valve terminal onto the hat rail Fasten the valve terminal on both sides with the hat rail clamping unit to prevent it from tilting or sliding see Fig 2 3 6 If...

Страница 37: ...minal weigh or calculate Reference values Valve terminal module Type 03 per pneumatic module incl valves MIDI 0 8 kg MAXI 1 2 kg Type 04 B manifold sub bases Adapter plate and right hand end plate per...

Страница 38: ...brackets for the modules approximately every 200 mm Type 04 B with two M6 screws on the left hand end plate with three M6 screws ISO sizes 1 and 2 or M8 ISO size 3 on the adapter plate and on the rig...

Страница 39: ...Installation 3 1 Festo P BE VIFB11 03 EN en 0503g Chapter 3...

Страница 40: ...tting the fieldbus baud rate 3 12 3 2 6 Setting the fieldbus protocol 3 13 3 2 7 Setting the compatibility DeviceNet configuration 3 14 3 2 8 Analog I O modules 3 15 3 3 Switching on the power supply...

Страница 41: ...e work switch off the following the compressed air supply the operating voltage supply for the electronics pin 1 the operating voltage supply for the outputs valves pin 2 You can thereby avoid uncontr...

Страница 42: ...tance dependent on the selected baud rate for the DeviceNet protocol Precise details can be found in the man ual for your control system Baud rate Max length f th i Branch line length of the main cabl...

Страница 43: ...ters Chapter 3 Installation Section Connecting the operating voltages Calculating the current consumption Power unit layout Cable lengths and cross sections Chapter 3 Installation Section Connecting t...

Страница 44: ...ng voltage supply for the outputs valves pin 2 You can thereby avoid uncontrolled movements of loose tubing unexpected movements of the connected actuators non defined switching states of the electron...

Страница 45: ...Please note The cover is linked to the internal printed circuit boards by means of the cable for the operating supply connection and cannot therefore be removed completely Opening Unscrew and remove t...

Страница 46: ...3 there is an LED and a switch for setting the configuration 1 Green LED 2 Red LED 3 Address selector switch Station no 4 Baud rate 5 Protocol 6 Compatibility DN configuration 7 Board 4 8 Board 3 9 F...

Страница 47: ...on the address selector switches indicate the units or tens figure of the station number set 1 Address selector switches UNITS figures 2 Address selector switches TENS figures 1 2 Fig 3 3 Address sel...

Страница 48: ...s module 1 29 Fig 3 4 Station numbers Proceed as follows 1 Switch off the operating voltage 2 Assign an unused station number to the valve terminal 3 Use a screwdriver to set the arrow of the relevant...

Страница 49: ...be used to set the following func tions Fieldbus baud rate Fieldbus protocol Compatibility DN configuration The DIL switch is composed of four switch elements These are numbered from 1 to 4 The ON po...

Страница 50: ...ud rates produced with the various proto cols Warning With the Selecan protocol if you use the PMC 40 as the master set a baud rate higher than 20 kBaud This prevents uncontrolled switching on off of...

Страница 51: ...d others Philips Selectron Protocol DeviceNet DIOS Selecan Setting the DIL switch Compatible with Version V1 3 1 41 Current Version V2 01 delivery status Current Version V2 01 with support of analog I...

Страница 52: ...er you can switch current fieldbus nodes to the older software version and therefore create com patibility with an older DeviceNet configuration Please note If you replace a valve terminal with an ear...

Страница 53: ...livery status Fig 3 9 Setting the compatibility DeviceNet configuration 3 2 8 Analog I O modules For applications with analog I Os on the DeviceNet a maxi mum of 8 analog inputs and 8 analog outputs c...

Страница 54: ...ch guarantee reliable electrical isolation of the operating voltage as per IEC DIN EN 60204 1 By the use of PELV circuits protection against electric shock protection against direct and indirect conta...

Страница 55: ...2 5 mm2 8 m 14 m Current consumption at VB 24 V Operating voltage pin 1 2 2 A Operating voltage pin 2 10 A S If necessary calculate the complete current consumption as shown in the table below and the...

Страница 56: ...MIDI ____ x 0 055 A MAXI ____ x 0 100 A Type 04 MIDI ____ x 0 140 A Number of simultaneously actuated electric outputs ____ x 0 010 A Load current of simultaneously actuated electric outputs ____ x _...

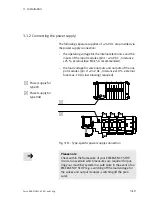
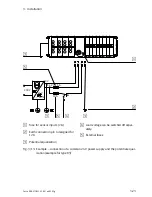
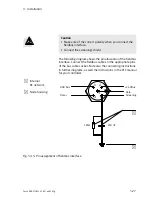
Страница 57: ...voltage for valve outputs and outputs of the out put modules pin 2 24 V DC tolerance 10 external fuse max 10 A slow blowing required 1 Power supply for type 03 2 Power supply for type 04B 1 2 Fig 3 1...

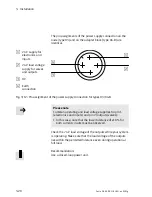
Страница 58: ...Pin assignment of the power supply connection for types 03 04 B Please note Common operating and load voltage supplies for pin 1 electronics and inputs and pin 2 outputs valves S In this case note tha...

Страница 59: ...ge connection S Connect the earth connection of the left hand end plate to the earth potential with low impedance short cable with large cross sectional area S By means of low impedance connections yo...

Страница 60: ...slow blowing against short circuit overload the power supply for the electronics and the inputs should be protected with an external fuse of 3 15 A against short circuit overload recommendation the po...

Страница 61: ...3 4 5 3 24 V 5 3 1 Fuse for sensor inputs 2 A 2 Earth connection pin 4 designed for 12 A 3 Potentialequalization 4 Load voltage can be switched off separ ately 5 External fuses Fig 3 13 Example connec...

Страница 62: ...s bus that the bus interface is supplied with voltage via the fieldbus plug Bus connection is made using a branch line with a 5 pin M12 socket with PG 9 screw connector This can be ordered from FESTO...

Страница 63: ...3 Installation 3 25 Festo P BE VIFB11 03 EN en 0503g 1 2 3 4 5 1 Power supply bus interface 2 Fieldbus 3 Screening shield 4 Branch line 5 T adapter Fig 3 14 Bus interface structure...

Страница 64: ...puts sensor supplies supplied via the bus A Total current consumption of all bus interfaces A Avoid long distances between the bus power supply and the bus slaves Calculate the permissible distance if...

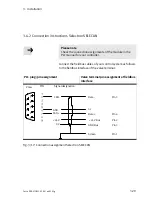
Страница 65: ...ram shows the pin allocation of the fieldbus interface Connect the fieldbus cables to the appropriate pins of the bus cable socket Note also the connecting instructions in further diagrams as well the...

Страница 66: ...your controller Connect the fieldbus cables of your control system as follows to the fieldbus interface of the valve terminal PLC plug pin assignment Valve terminal pin assignment of fieldbus interfac...

Страница 67: ...ual for your controller Connect the fieldbus cables of your control system as follows to the fieldbus interface of the valve terminal PLC plug pin assignment Valve terminal pin assignment of fieldbus...

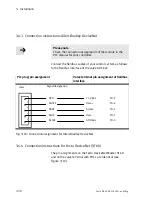
Страница 68: ...he fieldbus interface of the valve terminal PLC plug pin assignment Valve terminal pin assignment of fieldbus interface RED BARE BLUE BLACK 24 V Bus Pin 2 Data Pin 4 Data Pin 5 GND Bus Pin 3 Screen Pi...

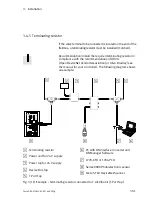
Страница 69: ...ations of ODVA Open DeviceNet Vendor Association or Allen Bradley see the manual for your controller The following diagram shows an example 1 2 3 4 5 1 6 7 8 9 1 Terminating resistor 2 Power unit for...

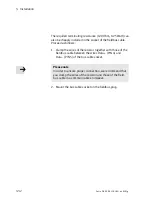
Страница 70: ...oceed as follows 1 Clamp the wires of the resistor together with those of the fieldbus cable between the wires Data PIN 4 and Data PIN 5 of the bus cable socket Please note In order to ensure proper c...

Страница 71: ...Commissioning 4 1 Festo P BE VIFB11 03 EN en 0503g Chapter 4...

Страница 72: ...ips DIOS 4 20 4 3 4 Diagnosis with Philips Dios 4 24 4 3 5 Status bits with Philips Dios 4 26 4 4 Selectron SELECAN Principles of commissioning and diagnosis 4 29 4 4 1 General information 4 29 4 4 2...

Страница 73: ...ote S The status bits must be treated like inputs and occupy four additional input addresses S The maximum possible extension of the valve terminal is limited by the addressing limits of the relevant...

Страница 74: ...ub base 4 output module 4 digital outputs 4 input module 4 digital inputs 8 input module 8 digital inputs 16 input module 16 digital inputs Multi I O module Status bits 2O 4O 1O 2O 4O 4I 8I 16I 12I 8O...

Страница 75: ...lenoid sub bases MIDI MAXI ________ x 4 8 Number of type 04 B single solenoid sub bases ________ x 1 9 Number of type 04 B double solenoid sub bases ________ x 2 Note the possible address reservations...

Страница 76: ...I O modules only valves only digital I O modules The basic rules described below apply to the address assign ment of these fitting variants A detailed example is given after each of these basic rules...

Страница 77: ...alve solenoid coils can be addressed Type 03 Single solenoid sub bases always occupy 2 addresses Double solenoid sub bases always occupy 4 addresses Type 04 B Single solenoid sub bases always occupy 1...

Страница 78: ...s does not depend on the outputs 2 Address assignment of the input modules Assign the addresses in ascending order without gaps Counting begins on the node from right to left On the individual modules...

Страница 79: ...ss as signment as an example 1 2 3 4 5 6 1 4 input module 2 8 input module 3 4 output module 4 Single sub base 5 Double sub base 6 Round up Fig 4 2 Address assignment of a valve terminal with digital...

Страница 80: ...can be addressed The last two locations on the valve side are not rounded up Valve terminals without input modules do not require a configuration for the inputs The status bits are not therefore avai...

Страница 81: ...c sub bases are added or removed at a later stage types 03 04 B Type 03 when a pneumatic sub base for two single solenoid valves is replaced by a sub base for two double solenoid valves or vice versa...

Страница 82: ...enoid sub bases have been added to the valve side An 8 input module and a 4 output module have been removed from the electric I Os 1 2 3 4 5 4 3 6 1 4 input module 2 4 output module 3 Single sub base...

Страница 83: ...s these specifications during the syntax check of a program in order to avoid addressing errors Configuration of the CP system requires a very accurate pro cedure as different configuration specificat...

Страница 84: ...grammable logic controller and that for the fieldbus slaves is switched on either sim ultaneously or in the sequence indicated below Please observe the following points when switching on the power sup...

Страница 85: ...ps DIOS the following features must be noted The addresses of all network modules detected i e in cluding the valve terminals are assigned in sequence without gaps The input and output addresses are a...

Страница 86: ...es e input 4 4 4 4 4 5 5 5 5 output ossible 5 5 5 5 4 4 4 4 4 sible o ax pos 6 6 6 3 3 3 3 3 3 possi Ma 7 7 2 2 2 2 2 2 2 Max 8 1 1 1 1 1 1 1 1 0 0 0 0 0 0 0 0 0 Possible output bytes Please refer to...

Страница 87: ...oded error messages are transferred to the DLC 100 200 It is possible to compare the calculated number of bus slaves and the calculated number of input and output bytes with the number determined by t...

Страница 88: ...ssing the button CONF the seven segment display of the DLC 100 200 shows the following sequential figures 4 number of recognised network modules 12 number of input bytes 10 number of output bytes If t...

Страница 89: ...4 Commissioning 4 19 Festo P BE VIFB11 03 EN en 0503g Fig 4 4 I O configuration DLC 100...

Страница 90: ...he following diagram shows the assignment of the valve terminal I Os on the I O address range of the Philips P8 for the valve terminal configuration shown in Figure 4 8 I O address range Philips P8 Ad...

Страница 91: ...mple Valve terminal 4 Input byte 6 0 6 1 7 0 Output byte 6 0 6 1 Valve terminal 5 Input byte 7 1 8 0 Output byte 7 0 7 1 I 7 0 I 7 1 I 7 2 I 7 3 I 6 9 I 6 8 I 6 11 I 6 10 I 6 12 I 6 13 I 6 14 I 6 15 I...

Страница 92: ...VIFB11 03 EN en 0503g Q7 15 Q7 14 Q7 12 Q7 13 Q7 11 Q7 10 Q7 8 Q7 9 I 7 8 I 7 9 I 7 10 I 7 11 I 7 12 I 7 13 I 7 14 I 7 15 I 8 0 I 8 1 I 8 2 I 8 3 Q7 0 Q7 1 Q7 4 Q7 5 Q7 2 Q7 3 Q7 6 Q7 7 Fig 4 7 Examp...

Страница 93: ...N en 0503g Program example Philips Dios Addressing a valve terminal with 20 inputs 4 status bits and 16 outputs 12 valve coils 4 electric outputs Network module number 4 1 Input address 6 0 1 Output a...

Страница 94: ...DLC 100 200 Bus errors are displayed by the two seven segment displays on the DLC 100 200 Fig 4 9 DLC 100 seven segment displays The valve terminal behaves in the DIOS like equivalent Philips DIOS mod...

Страница 95: ...tions available when diagnosing with the user program Diagnosis object of system Status bits of valve terminals Diagnosis object of system The following diagram shows the diagnosis object of the sys t...

Страница 96: ...ves outputs 10 V Short circuit overload of min one electric output Under voltage sensor supply 10 V Further details can be found in Chapter 5 Diagnosis and error treatment Chapter 5 3 Status bits The...

Страница 97: ...ter minal are shown in the following table Number of input bytes Available address space Addresses of the status bits None No address space for inputs No status bits available 1 input byte 0 7 4 5 6 7...

Страница 98: ...tion of the inputs outputs and status bits Q7 15 Q7 14 Q7 12 Q7 13 Q7 11 Q7 10 Q7 8 Q7 9 I 7 8 I 7 9 I 7 10 I 7 11 I 7 12 I 7 13 I 7 14 I 7 15 I 8 0 I 8 1 I 8 2 I 8 3 Q7 0 Q7 1 Q7 4 Q7 5 Q7 2 Q7 3 Q7...

Страница 99: ...features must be noted The I O addresses of all recognised node modules in cluding the valve terminals are assigned according to the node number set station number The input and output addresses are a...

Страница 100: ...put by ble inp 4 4 4 4 4 5 5 5 5 e outp possibl 5 5 5 5 4 4 4 4 4 ossible Max po 6 6 6 3 3 3 3 3 3 ax pos M 7 7 2 2 2 2 2 2 2 Ma 8 1 1 1 1 1 1 1 1 0 0 0 0 0 0 0 0 0 Possible output bytes Please refer...

Страница 101: ...input stages are mounted The 4 inputs provide status information with which internal coded error messages are transferred to the PMC 40 There is also the option of querying the number of recognised b...

Страница 102: ...outputs alone or with outputs and inputs The maximum number of 64 I Os must not be exceeded The I O addresses are composed of Node number 1 29 Module number 0 3 Input Output number 0 15 Please note T...

Страница 103: ...04 I19 01 07 I19 01 06 I19 01 05 I19 00 08 I19 00 09 I19 00 11 I19 00 10 I19 00 15 I19 00 13 I19 00 14 I19 00 12 I19 00 03 I19 00 07 I19 00 02 I19 00 06 I19 00 01 I19 00 05 I19 00 04 I19 00 00 O19 00...

Страница 104: ...inputs 4 status bits and 16 outputs 12 valve coils 4 electric outputs Node number 4 1 Input address I04 00 00 1 Output address O04 00 00 Stopper in front transport band on L I 04 00 08 Lift GS AN I 0...

Страница 105: ...to diagnosis Special error messages are not output Diagnosis via user program With the user program you can request diagnosis information from a bus slave using the following operands System flag Sta...

Страница 106: ...t circuit overload node 1 SM12 02 for short circuit overload node 2 etc For error treatment see Chapter 5 Diagnosis error treatment section 5 4 Error treatment 4 4 5 Status bits with Selectron SELECAN...

Страница 107: ...ic zero The addresses of the status bits in the address space of a valve terminal dependent on the structure of the valve ter minal are shown in the following table Number of input bytes Available add...

Страница 108: ...00 11 I04 00 09 I04 00 12 I04 00 14 I04 00 15 I04 00 13 Addresses of the status bits I04 00 00 I04 00 01 I04 00 02 I04 00 04 I04 00 06 I04 00 03 I04 00 05 I04 00 07 O04 00 14 O04 00 15 O04 00 12 O04...

Страница 109: ...oted The addresses of all recognised DeviceNet slaves can be assigned freely in the scan list of the PLC operands The address allocation of a network slave is assigned in rising sequence Addresses may...

Страница 110: ...features manually Install EDS files CD ROM A CD ROM is included with this manual to expand the EDS library The CD ROM contains an EDS file and an image file Icon and Bitmap for the valve terminal File...

Страница 111: ...features manually When installing an EDS file the following information about the DeviceNet slave is added to the EDS library This informa tion can also be entered manually Information Description Va...

Страница 112: ...canners The slave must be assigned to a scanner 3 Specify the I O parameters of the slave The following data are required S Data of the number of I O bytes being transmitted The following applies for...

Страница 113: ...ontroller integrated in the SF 60 corresponds to an SLC5 02 with DeviceNet scanner 1747 SDN from Allen Bradley Please note All steps set out for the Allen Bradley scanner 1747 SDN apply for the SF 60...

Страница 114: ...f I O bytes transmitted The number of transmitted I O bytes can be calculated or read online Calculation rules can be found in Chapter 4 1 1 To read the data online proceed as follows 1 Ensure that th...

Страница 115: ...0503g 4 Click on the tab Device Parameters and note down the value for the I O bytes Configure this number of I O bytes in the DeviceNet con figuration and the PLC controller to control the valve ter...

Страница 116: ...en 0503g Assigning a slave to a scanner Double click on the required scanner in the network to open a dialog box where you can assign the slave present to the scanner 1 1 Buttons for assigning the sl...

Страница 117: ...meters of the slave Fig 4 18 Dialog box Edit I O parameters The following applies for the valve terminal with FB11 Communication type Polled Strobed or Change of State data are not supported The numbe...

Страница 118: ...esto P BE VIFB11 03 EN en 0503g Assign the I O addresses of the slave Use the register cards Output und Input to assign the I O addresses of the valve terminal to the PLC operands Fig 4 19 Input addre...

Страница 119: ...11 I 2 4 08 09 I 2 4 07 I 2 4 00 I 2 3 15 I 2 3 08 I 2 3 07 I 2 3 00 O 2 3 15 O 2 3 12 O 2 3 00 O 2 3 01 O 2 3 02 O 2 3 03 O 2 3 05 O 2 3 04 O 2 3 07 O 2 3 06 O 2 3 09 O 2 3 08 O 2 3 11 O 2 3 10 vacan...

Страница 120: ...be found in the documentation for your scanner 4 5 5 Diagnosis with the DeviceNet The following bus diagnoses are available Diagnosis via DeviceNet scanner Diagnosis via user program Diagnosis via Dev...

Страница 121: ...is interrupted or disturbed The following applies for the valve terminal the error bit is set if the valve terminal is voltage free if the bus connection is interrupted e g plug removed or if the bus...

Страница 122: ...4 Commissioning 4 52 Festo P BE VIFB11 03 EN en 0503g...

Страница 123: ...Diagnosis and error treatment 5 1 Festo P BE VIFB11 03 EN en 0503g Chapter 5...

Страница 124: ...the bus node 5 4 5 2 2 LEDs of the valves 5 7 5 2 3 LEDs of the input output modules 5 9 5 2 4 Testing the valves 5 11 5 3 Status bits 5 14 5 3 1 Short circuit overload 5 17 5 4 Error treatment 5 18 5...

Страница 125: ...0 1 0 1 x 0 x x x x No error KZ UVEN 21 6 V UAUS 10 V USEN 10 V x not relevant Abbreviated description The four status bits are cyclically transmitted as inputs with the normal inputs to the module T...

Страница 126: ...is 5 2 1 LEDs on the bus node The LEDs on the cover of the node indicate the operating status of the valve terminal 1 Green LED display for bus power supply 2 Green LED display for power supply 3 Gree...

Страница 127: ...e con nection for the electronics bus plug pin 2 and pin 3 MOD NETSTATUS LED ON OFF Operating status normal data exchange running or Operating status normal but valves do not switch Possible causes Co...

Страница 128: ...e terminal back on OFF ON Lights up once after switching on LED test Timeout ended no valid tele gram received within timeout time bus error communication error or communication loss Possible error du...

Страница 129: ...LEDs of the valves There is a yellow LED for each valve solenoid coil on the valve terminal This shows the switching status of the valve sole noid coil Valve terminal type LEDs of the valve solenoid...

Страница 130: ...erating voltage of outputs lies below permitted tolerance range 21 6 V 26 4 V DC or compressed air supply not correct or pilot exhaust blocked or servicingrequired Fig 5 6 LEDs for the status display...

Страница 131: ...the relevant connections on the input output mod ules there are one or two LEDs status displays in the co lours green status display of the digital inputs yellow status display of the digital outputs...

Страница 132: ...play of the inputs green out green alight logical 0 no signal logical 1 signal present 3 Switching status display of the outputs yellow out yellow alight Output without short circuit overload Short ci...

Страница 133: ...lly in the valve ter minal All the valves are switched on off cyclically None of the programmed lockings or further switching conditions will be taken into account The terminal provides the following...

Страница 134: ...5 Switch on the power supplies pins 1 and 2 6 Set the required test routine with the address selector switches as follows Test routine Address to be set Parallel 0 1 or 2 Serial 3 Fig 5 9 Setting the...

Страница 135: ...VIFB11 03 EN en 0503g Please note If the yellow LED of the valves does not light up the following causes may apply The LED or the solenoid coil is defective Type 04 B only The internal 0 315 A fuse in...

Страница 136: ...available when the terminal is equipped with input modules The status bits are configured as inputs and always occupy the four highest value addresses in the available address space If the inputs of...

Страница 137: ...ce Status bits Diagnostic information 27 26 25 24 0 0 0 0 no error X 0 1 X Short circuit overload at output X 1 0 X Vvalves 21 6V X 1 1 X Voutputs 10V 1 X X X VSensor 10 V X not relevant The status bi...

Страница 138: ...c trical outputs VUoutputs 2x 10V Load voltage on pin 2 valves and outputs of the operating voltage connection 10 V Monitors the load voltage for valves and electrical outputs no voltage present e g e...

Страница 139: ...iagnosis status registers bytes words Most of the field bus protocols can therefore detect and evaluate a short circuit see Chapter 5 4 Short circuit overload at an IO module Valve terminals type 03 o...

Страница 140: ...electric outputs are reset immediately Philips DIOS Valves and electric outputs remain set out has elapsed Selectron SELECAN Valves and electric outputs are reset Fig 5 12 Reaction of the valve termi...

Страница 141: ...tput stage In the event of a short circuit or overload the digital output will be switched off the red LED will light up the four status bits will be assigned the error code Short circuit overload In...

Страница 142: ...base Each single solenoid mani fold sub base is fitted with one fuse each double solenoid manifold sub base is fitted with two fuses Replacing defective burnt through 0 315 A fuses In order to replace...

Страница 143: ...1 1 2 3 1 Fastening screws of the cover 2 Left hand fuse for pilot solenoid coil 12 3 Right hand fuse for pilot solenoid coil 14 Fig 5 14 Replacing a fuse for a pilot solenoid coil Further informatio...

Страница 144: ...5 Diagnosis and error treatment 5 22 Festo P BE VIFB11 03 EN en 0503g...

Страница 145: ...Technical appendix A 1 Festo P BE VIFB11 03 EN en 0503g Appendix A...

Страница 146: ...n 0503g Contents A Technical appendix A 1 A 1 Technical specifications A 3 A 2 Cable length and cross sectional area A 6 A 3 Examples of circuitry A 12 A 3 1 Power supply type 03 internal layout A 13...

Страница 147: ...and IEC 721 3 5 mm path at 2 8 Hz 1 g acceleration at 8 25 Hz 0 35 mm path at 25 57 Hz 5 g acceleration at 57 150 Hz 1 g acceleration at 150 200 Hz 30 g at 11 ms duration Elektromagneticcompatibility...

Страница 148: ...m internal current consumption of inputs 2 A slow blowing P W 0 2 A Iinputs 24 V min 20 ms Load voltage for outputs valves pin 2 load voltage connection Rated value protected against incorrect polarit...

Страница 149: ...ype serial asynchronous half duplex Protocol Allen BradleyDeviceNet Philips DIOS Selectron SELECAN Transmission speed depends on protocol Cablelength depends on baud rate and cable type max 1000 m Cab...

Страница 150: ...This can cause the voltage at pin 1 or pin 2 of the power supply connection to be outside the permitted tolerance Recommendation S Avoid long distances between the power unit and the valve terminal S...

Страница 151: ...t puts valves I2 2 Calculate the lowest voltage to be expected during oper ation VBmin on the power unit When doing this please note the load dependency of the power unit the fluctuations in the prima...

Страница 152: ...3 EN en 0503g VBmin Cable length Current I 2 A V m Fig A 1 Calculating the maximum cable length for cross sectional area 1 5 mm2 VBmin Cable length Current I 2 A m V Fig A 2 Calculating the maximum ca...

Страница 153: ...d electronics I1 as well as of the outputs valves I2 2 Calculate the lowest voltage to be expected during oper ation Vmin on the power unit When doing this please note the load dependency of the power...

Страница 154: ...15 A AC DC RL1 VL1 RL2 VL2 RI1 RL2 RL0 VL2 VL1 0 V Vvalve terminal I1 I2 I0 Power supply Valve terminal Equivalent circuit diagram L VB 1 2 3 1 Line resistance outgoing RL1 RL2 2 Line resistance inco...

Страница 155: ...m w 21 6 V VBmin minimum supply voltage at the power unit l1 current for electronics and inputs I2 current for outputs valves A cable cross sectional area uniform e g 1 5 mm2 conductance value of cabl...

Страница 156: ...ix A 12 Festo P BE VIFB11 03 EN en 0503g A 3 Examples of circuitry 1 24 V supply for electronics and inputs 2 24 V load voltage supply for valves and outputs 3 0 V 4 Earth connection 1 2 3 4 Fig A 4 P...

Страница 157: ...tion of node type 03 4 Potential equaliz ation 5 Load voltage can be switched off separately 6 Power unit e g central power supply 7 24V electronics fused internally 8 Electric inputs sensors fused in...

Страница 158: ...eity fused internally 4 Power supply connection adapter plate type 04 B 5 Potential equaliz ation 6 Load voltage can be switched off separately 7 Power unit e g central power supply 8 24V electronics...

Страница 159: ...Accessories B 1 Festo P BE VIFB11 03 EN en 0503g Appendix B...

Страница 160: ...Structure of the analog word B 16 B 2 3 Status bits with analog modules B 24 B 3 Connecting the cable to the plug sockets B 25 B 4 Accessories B 28 B 5 OverviewDeviceNet Specifications B 32 B 6 Detail...

Страница 161: ...6 02 99 for earlier versions as per Chapter 3 2 Setting the compatibility 2 Enter the valve terminal manually in the software RSNetWorx according to the following section EDS library Enter slave manua...

Страница 162: ...ou can check the actual product code of the valve terminal during online operation with the function Properties To expand the EDS library 1 Activate the EDS Wizard in the Tools menu 2 Select the funct...

Страница 163: ...ct Code enter the individually de termined decimal value for the valve terminal The entries in the fields Vendor Name and Product Type String will be entered automatically by the program later Please...

Страница 164: ...lculate the number of input bytes and output bytes for the valve terminal as per Chapter 4 1 rounded up to full bytes S Compose the Product Code as a four place hexadecimal number as follows xyIO hex...

Страница 165: ...ed Connection mode 7 Recommendation enter the number of calculated I O bytes for Input Out put Size under Polled Connection see Point 3 8 If you want to install the Festo Icon for the valve terminal t...

Страница 166: ...B Accessories B 8 Festo P BE VIFB11 03 EN en 0503g Note that the number of I O bytes cannot be read from the fieldbus nodes with the FB11 with a software version V1 3 or earlier...

Страница 167: ...lease note For applications with analog I Os on the DeviceNet a maxi mum of 8 analog inputs and 8 analog outputs can be used in one valve terminal Channel addressing of analog I O modules on the Devic...

Страница 168: ...s The following sections contain specific information on analog I O modules Behaviour after switching on Controlling the analog I Os with DeviceNet Analog value representation Behaviour of analog I O...

Страница 169: ...the operating voltage the following options for access to the analog I O module data are avail able Input data Output data Voltage Current Access options immediate selected channel Data output after P...

Страница 170: ...P Output value Output current 4 mA 0 mA 0 20 mA 4095 DeviceNet voltage Power ON ON OFF 1 2 1 Start up behaviour After Power ON the output current is 0 mA 4 mA is only output once the value 0 is transm...

Страница 171: ...ue Output voltage 4095 DeviceNet voltage 0 0 V 10 V 1 2 3 4 ON OFF 1 Short circuit analog output voltage LED L I lights up 2 Reset the short circuit message by output value 0 LED L I off 3 Output of a...

Страница 172: ...current 4095 DeviceNet voltage 0 ON OFF 1 2 4 3 1 DeviceNet voltage supply interrupted 2 Voltage present again 3 Output value must be written again by PLC 4 If the bus communication is interrupted or...

Страница 173: ...for analog inputs and analog outputs must be identical Output The master can output the next analog value OW n 1 when the previous data exchange has been suc cessfully completed OW n IW n Input The r...

Страница 174: ...1 12 13 15 14 9 8 MUX I O LSB 12 Bit analog value MSB Bit Meaning 15 4 12 Bit analog value MSB most significant Bit LSB least significant Bit 3 Direction control bit I O 0 read the selected analog cha...

Страница 175: ...1 1 4 1 0 0 5 1 0 1 6 1 1 0 7 1 1 1 Maximum 8 analog inputs and 8 analog outputs are per mitted These are assigned according to the position of the analog module in the valve terminal VIAP 1IO 1OO VI...

Страница 176: ...UX 19 992 4094 1 1 1 1 1 1 1 1 1 1 1 0 0 x x x 12 000 2048 1 0 0 0 0 0 0 0 0 0 0 0 0 x x x 4 078 2 0 0 0 0 0 0 0 0 0 0 1 0 0 x x x 4 000 0 0 0 0 0 0 0 0 0 0 0 0 0 0 x x x MSB most significant Bit LSB...

Страница 177: ...B9B8 MSB Low Byte B7 B6 B5 B4 B3 B2 B1 B0 LSB I O MUXMUXMUX 9 9975 4095 1 1 1 1 1 1 1 1 1 1 1 0 0 x x x 5 000 2048 1 0 0 0 0 0 0 0 0 0 0 0 0 x x x 0 00244 1 0 0 0 0 0 0 0 0 0 0 0 1 0 x x x 0 000 0 0 0...

Страница 178: ...ominal values Output value in mA Units High byte B15 B14 B13 B12 B11 B10 B9B8 MSB Low Byte B7 B6 B5 B4 B3 B2 B1 B0 LSB I O MUXMUXMUX 19 984 not possible 19 984 4095 1 1 1 1 1 1 1 1 1 1 1 1 1 x x x 12...

Страница 179: ...7 B6 B5 B4 B3 B2 B1 B0 LSB I O MUXMUXMUX 9 9975 not possible 9 9975 4095 1 1 1 1 1 1 1 1 1 1 1 1 1 x x x 5 000 2048 1 0 0 0 0 0 0 0 0 0 0 0 1 x x x 0 00244 1 0 0 0 0 0 0 0 0 0 0 0 1 1 x x x 0 000 0 0...

Страница 180: ...3 AO1 2 1 AI0 AO0 I0 I7 1 Select input channel 0 7 Write value of output word 16 bit to B0 B2 MUX Reset write read bit to 0 Bit B3 I O Wait until input channel is read and transferred Mask input word...

Страница 181: ...output channel 0 7 Write value of output word 16 bit to B0 B2 MUX Reset write read bit to 1 Bit B3 I O Wait until output value is trans ferred and acknowledged Read input word unmasked XXXXXXXXXXXXXXX...

Страница 182: ...IFB11 03 EN en 0503g B 2 3 Status bits with analog modules If the FB 11 is operated in analog mode the status bit lie under the 16 bit analog value transfer Further information on status bits can be f...

Страница 183: ...in assignments can be found in the following chapters After selecting a suitable cable connect it to the plug socket following the steps below 1 Open the Festo plug socket as follows see figure Power...

Страница 184: ...e figure External cable diameter PG7 4 0 6 0 mm PG9 6 0 8 0 mm PG13 5 10 0 12 0 mm Connector socket straight or angled Power supply socket PG7 9 or 13 5 Sensor plug PG7 Bus cable socket PG7 9 or 13 5...

Страница 185: ...rom the cable ends 4 Fit cable end sleeves to the stranded wires 5 Connect the cable ends 6 Insert the connection socket back in the housing of the plug socket and screw both parts together Pull the c...

Страница 186: ...ection Bus connection is made using a branch line with a 5 pin M12 socket with PG 9 screw connector This can be ordered from FESTO Type FBSD GD 9 5POL Part No 18324 Alternatively ready to use bus cabl...

Страница 187: ...e bus with T adapters T Tap The following T Taps are recommended for the speci fied bus cables Manufacturer Type Lumberg TAP 50 RK Turck RSM 2RKM 57 Woodhead DN 3000 T adapters with terminal screws ar...

Страница 188: ...pany 1090 Brevik Place Mississauga Ontario Canada L4W 3Y5 England Aero Motive U K Ltd 9 Rassau Industrial Estate Ebbw Vale Gwent NP3 5SD U K Germany H F Vogel GmbH Tullastrasse 9 75196 Remchingen Lumb...

Страница 189: ...S Germany Hans Turck Gmbh Co KG Witzlebenstra e 7 D 45472 M lheim an der Ruhr Philips Netherlands PMANederland Gebouw TQIII 4 Postbus 80025 NL 5600 JZ Eindhoven Germany Philips Industrial Electrionics...

Страница 190: ...ntain the DeviceNet specifica tions of the Festo field bus nodes IFB11 02 and IFB11 03 These nodes are used for the Festo valve terminals manifolds types 02 03 and 04 B Their current DeviceNet Specifi...

Страница 191: ...essage 10xxxxxx101 Master I O Poll Command Message 10xxxxxx100 Master Explicit Request Message xxxxxx Node Address 0 63 in binary mode 000000 111111 DeviceNet Class and Instance Services As a group 2...

Страница 192: ...ect Classes The IFB11 02 03 device supports the follow ing DeviceNet object classes CLASS CODE OBJECT TYPE of Instances 01D 0x01 Identity 1 02D 0x02 Router 1 03D 0x03 DeviceNet 1 04D 0x04 Assembly 2 1...

Страница 193: ...Object is required on all devices and provides information for identifying the device as well as general in formation about the device Identity Object Class Attributes Attribute Access Name Type Valu...

Страница 194: ...19H 3 Get Product Code UINT see 1 4 Revision STRUCT OF Major Revision USINT 2 Minor Revision USINT 0 5 Get Device Status UINT see 2 6 Get Serial Number UINT see 3 7 Get Product Name STRUCT OF Length...

Страница 195: ...owned allocated bit 1 reserved 0 bit 2 configured 0 bit 3 reserved 0 bit 4 7 vendor specific 0 bit 8 minor cfg fault 0 no fault 1 minor fault bit 9 minor dev fault 0 no fault 1 minor device fault bit...

Страница 196: ...n the physical device can be addressed Router Object Class Attributes Attribute Access Name Type Value 1 Get Revision UINT 1 6 Get Max ID of Class Attribute UINT 7 7 Get Max ID of Instance Attibute UI...

Страница 197: ...ision UINT 2 Router Object Instance 1 Attributes Attribute Access Name Type Value 1 Get MACID USINT Rotary Switch 2 Get Baud Rate USINT DIP Switch 3 Get Set Bus Off Interrupt BOOL see 3 4 Get Set Bus...

Страница 198: ...ve Router Object Instance 1 Attributes further explanations 3 Bus Off Interrupt BOI will be triggered when the bus off state occurs The following values will be supported BOI Action 0 Hold chip in OFF...

Страница 199: ...he following table shows the I O Assembly data attribute format for the input data containing multiple discrete inputs Discr Input 0 N and multiple status inputs Stat Input Instance Byte Bit 7 Bit 6 B...

Страница 200: ...Pneum Outp 6 Pneum Outp 5 Pneum Outp 4 Pneum Outp 3 Pneum Outp 2 Pneum Outp 1 Pneum Outp 0 1 Pneum Outp 15 Pneum Outp 14 Pneum Outp 13 Pneum Outp 12 Pneum Outp 11 Pneum Outp 10 Pneum Outp 9 Pneum Outp...

Страница 201: ...jects manage the characteristics of each communication connection As a slave of group 2 the valve terminals only support an explicit message connection as well as a POLL message There are two instance...

Страница 202: ...NT 0x83 4 Get Production Connection ID UINT see 2 5 Get Consumed Connection ID UINT see 2 6 Get Initial Comm Char USINT 0x21 7 Get Production Size UINT 07 8 Get Consumed Size UINT 07 9 Get Set Expecte...

Страница 203: ...d Connection ID UINT see 2 6 Get Initial Comm Char USINT 0x1 7 Get Production Size UINT number of Inp bytes 8 Get Consumed Size UINT number of Outp bytes 9 Get Set Expected Packet Rate UINT 12 Get Set...

Страница 204: ...Class Number USINT 0x04 Assembly Log Seg Instance USINT 0x24 Instance Number USINT 0x02 Output Log Seg Attribute USINT 0x30 Attribute Number USINT 0x03 17 Get Production Inhibit UINT 0 Common Services...

Страница 205: ...4 timed out 2 Connection ID s Con 1 Produced Con ID 10xxxxxx011 Con 1 Consumed Con ID 10xxxxxx100 Con 2 Produced Con ID 01111xxxxxx Con 2 Consumed Con ID 10xxxxxx101 xxxxxx Node Address 3 Watch Dog T...

Страница 206: ...B Accessories B 48 Festo P BE VIFB11 03 EN en 0503g...

Страница 207: ...Index C 1 Festo P BE VIFB11 03 EN en 0503g Appendix C...

Страница 208: ...C Index C 2 Festo P BE VIFB11 03 EN en 0503g C Index C 1...

Страница 209: ...g Philips DIOS 4 20 Selectron Selescan 4 32 Analog I O modules DeviceNet B 9 B Baud rate 3 12 C Cable connection to socket plug B 25 Fieldbus 3 4 3 24 Operating voltage 3 4 Selection 3 4 Cables Load v...

Страница 210: ...nosis 5 4 Allen Bradley DeviceNet 4 50 Bus nodes 5 4 LEDs 5 4 Philips DIOS 4 24 Selectron Selescan 4 35 DIL switch 3 11 E Earthing Components 3 4 Potentialequalization 3 21 EDS file B 3 EDS library 4...

Страница 211: ...3 22 Internal 3 22 G General information Allen Bradley 4 39 H Hat rail 3 6 I Inputs calculating 4 5 INTERBUS Addressing 4 13 Configuration 4 13 L LED display Inputs 5 10 Nodes 3 8 5 4 5 5 5 6 Outputs...

Страница 212: ...ble length A 6 Switching on 4 14 power supply connection 3 19 Power unit 3 16 Protocol 3 13 S Screening shield Fieldbus 3 27 Service VIII Short circuit rectification 5 19 Station numbers 3 10 Status b...

Страница 213: ...C Index C 7 Festo P BE VIFB11 03 EN en 0503g V Valves ISO 3 7 MAXI 3 3 3 6 MIDI 3 3 3 5 Voltage Selecting the cables 3 16...

Страница 214: ...C Index C 8 Festo P BE VIFB11 03 EN en 0503g...

Отзывы: