- 15 -
Mi 2438
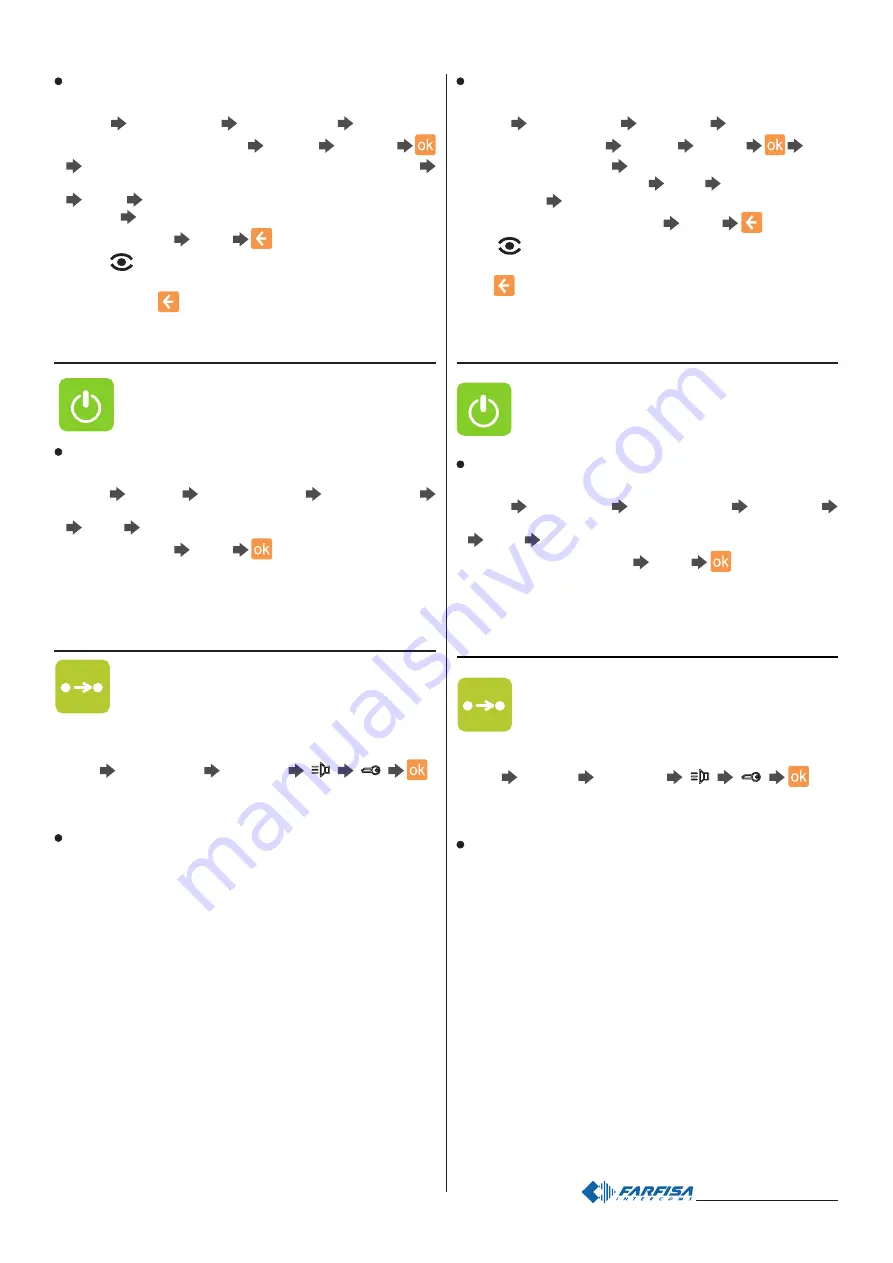
Per modificare il nome o gli indirizzi degli ingressi videocitofonici già
memorizzati occorre seguire la procedura seguente:
"menu"
"videocitofonia"
"elenco ingressi"
selezionare la
casella dell'ingresso modificare
"opzioni"
"modifica"
premere "modifica" in corrispondenza della casella nome
tramite tastiera scrivere il nome dell'ingresso (
es. entrata second.)
"salva"
premere "modifica" in corrispondenza della casella
indirizzo
tramite tastiera inserire l'indirizzo (se diverso da quello
proposto -
es. 232)
"salva"
.
Premere
per collegarsi con il nuovo ingresso e verificarne il
funzionamento.
Premere più volte
o C per tornare alla pagina principale.
Pulsanti
Se nell’impianto sono installati uno o più attuatori (art.2281),
occorre informare il videocitofono della loro presenza ed
attribuire loro indirizzi differenti (da 211 a 230).
Per programmare il nome e gli indirizzi degli attuatori occorre
seguire la procedura seguente:
"menu"
"pulsanti"
"gestione pulsanti"
"nuovo pulsante"
tramite tastiera scrivere la funzione del pulsante (
es. luce giardino)
"salva"
tramite tastiera inserire l'indirizzo (se diverso da quello
proposto -
es. 212)
"salva"
.
Attenzione. Gli indirizzi memorizzati nel videocitofono devono
corrispondere a quelli programmati negli attuatori.
Impostazioni avanzate
Nelle pagine seguenti sono presenti informazioni ed
impostazioni utili per il funzionamento del sistema, le relative
programmazioni devono pertanto essere eseguite
dall’installatore o da personale esperto.
Per accedere al menu è necessario eseguire la seguente procedura:
"menu"
"impostazioni"
"avanzate"
"
"
"
"
.
Si accede ad una pagina dove sono elencate le seguenti funzioni:
Home page - si possono scegliere, selezionandole da un elenco, le
3 funzioni da associare ai 3 tasti che compaiono nella pagina
principale e loro posizione sullo schermo (in alto, al centro o in basso).
Le funzioni che possono essere selezionate sono le seguenti:
- Elenco note
- Rubrica
- Link a Postazione permette di visualizzare sulla Home Page il
pulsante di chiamata di un utente specifico della rubrica o quello di
un posto esterno videocitofonico.
- Telecamera permette di visualizzare sulla Home Page il pulsante
telecamera dell’ingresso videocitofonico.
- Elenco Ingressi
- Quadro Pulsanti
- Link a Pulsante permette di visualizzare sulla Home Page un
pulsante
- Nuovo nota/memo
- Invia Messaggio
- Silenzioso
- Chiamate
- Foto
- Rimuovi Memory Card
- Immagini
To change the name and addresses of the videointercom entrances
that are already save you must follow the procedure below:
“menu”
“videointercom”
“monitor list”
select the box of the
entrance to be changed
“options”
“modify”
press
“modify” in the name box
use the keypad to enter the entrance
name (i.e. secondary entrance)
“save”
press “modify” in the
address box
use the keypad to enter the address (if different
from the proposed one – i.e. 232)
“save”
.
Press
to connect with the new entrance and check its
functionality.
Press
or C repeatedly to go back to the main page.
Push buttons
If one or more actuators (art.2281) are installed in the
system, you must inform the videointercom of their
presence, giving them different addresses (from 211 to
230).
To programme the name and addresses of the actuators you must
follow the procedure below:
“menu”
“push buttons”
“manage buttons”
“new button”
use the keypad to enter the function of the button (i.e.light garden)
“save”
use the keypad to enter the address (if different from
the proposed one – i.e. 212)
“save”
.
Warning. The addresses stored in the videointercom must correspond
with the addresses that are programmed in the actuators.
Advanced settings
The following pages contain information and settings that
are useful for the operation of the system. Programming
operations must be therefore carried out by the installer
or by expert users.
To access the menu you must carry out the following procedure:
“menu”
“settings”
“advanced"
"
"
"
"
.
You go to a page where the following functions are listed:
Home page – you can select from a list the 3 functions to be
associated with the 3 buttons that are displayed in the main page,
together with their position on the screen (up, centre, down).
The following functions can be selected:
- Notes
- Directory
- Link to Station allows for displaying the call button of a specific
user from the agenda or the call button of an external videointercom
station on the Home Page.
- Monitor allows for displaying the monitor button of one of the
videointercom entrances on the Home Page.
- Monitor List
- Buttons Panel
- Link to Button allows for displaying a button on the Home Page
- New note/memo
- SMS sending
- Silent
- Calls
- Gallery
- Remove Memory Card
- Backgrounds
Содержание myLogic PL72
Страница 24: ...24 Mi2438...
Страница 26: ...26 Mi2438...


