background image

- 12 -

Mi 2438

 Procedura di blocco/sblocco delle programmazioni

Per poter bloccare o sbloccare le programmazioni protette occorre
eseguire la procedura seguente:
"menu" 

 "impostazioni" 

 "avanzate" (videocitofonia 


 serratura


 "varie" 

 selezionare "protezione attiva" 

 "modifica"

 NO per sbloccare le programmazioni (o SI per bloccarle) 


 "menu". Per maggiori dettagli vedere il paragrafo "

protezione attiva"

a pagina 17.

Modalità di programmazione

Programmazione alla prima accensione

Alla prima accensione il videocitofono, dopo una fase di caricamento
dati (circa 15 secondi), avvia una procedura semplificata che guida
l’installatore nella programmazione dei dati necessari per il corretto
funzionamento del dispositivo. In sequenza devono essere inseriti:

-

Lingua – selezionare con un tocco la lingua da un elenco (di fabbrica

è selezionata la lingua italiana) e premere 

;

-

Data – impostare la data corrente; dopo aver selezionato con un
tocco l’anno il mese e il giorno; essi possono essere variati usando

le frecce su e giù (di fabbrica 01/01/2010) e premere 

;

-

Ora – impostare l’ora corrente; dopo aver selezionato con un tocco
le ore ed i minuti; essi possono essere variati usando le frecce su e

giù (di fabbrica 00:00) e premere 

.

-

Nome Stazione – dopo aver selezionato con un tocco “modifica”
introdurre il nome che si desidera attribuire al videocitofono (di
fabbrica myLogic) e premere SALVA. Per l’uso della tastiera vedi
capitolo Sostituzione nominativo utente. Se il nome di fabbrica è
accettato non procedere con “modifica”, ma passare direttamente
alla programmazione dell’indirizzo.

-

Indirizzo - dopo aver selezionato con un tocco “modifica” introdurre
l’indirizzo (di fabbrica 100) e premere SALVA. Per l’uso della tastiera
vedi capitolo Memorizzazione/Sostituzione indirizzo
appartamento. 
Se l’indirizzo di fabbrica è accettato non procedere
con “modifica”, ma passare direttamente alla programmazione del
numero di stanza.

-

Numero stanza - dopo aver selezionato con un tocco “modifica”
introdurre il numero di stanza richiesto (di fabbrica 0) e premere
SALVA. Per l’uso della tastiera vedi capitolo Memorizzazione/
Sostituzione numero di stanza. 
Se il numero di stanza impostato
di fabbrica è accettato non procedere con “modifica”, ma passare
direttamente al punto successivo.

Premere 

, sarà visualizzata la pagina principale (Home page).

Attenzione: questa procedura semplificata sarà avviata dal videocitofono
anche a tutte le accensioni del dispositivo dopo un lungo periodo di
tempo senza alimentazione, periodo nel quale il dispositivo perde i dati
correnti dell’ora e della data (circa 2 giorni).

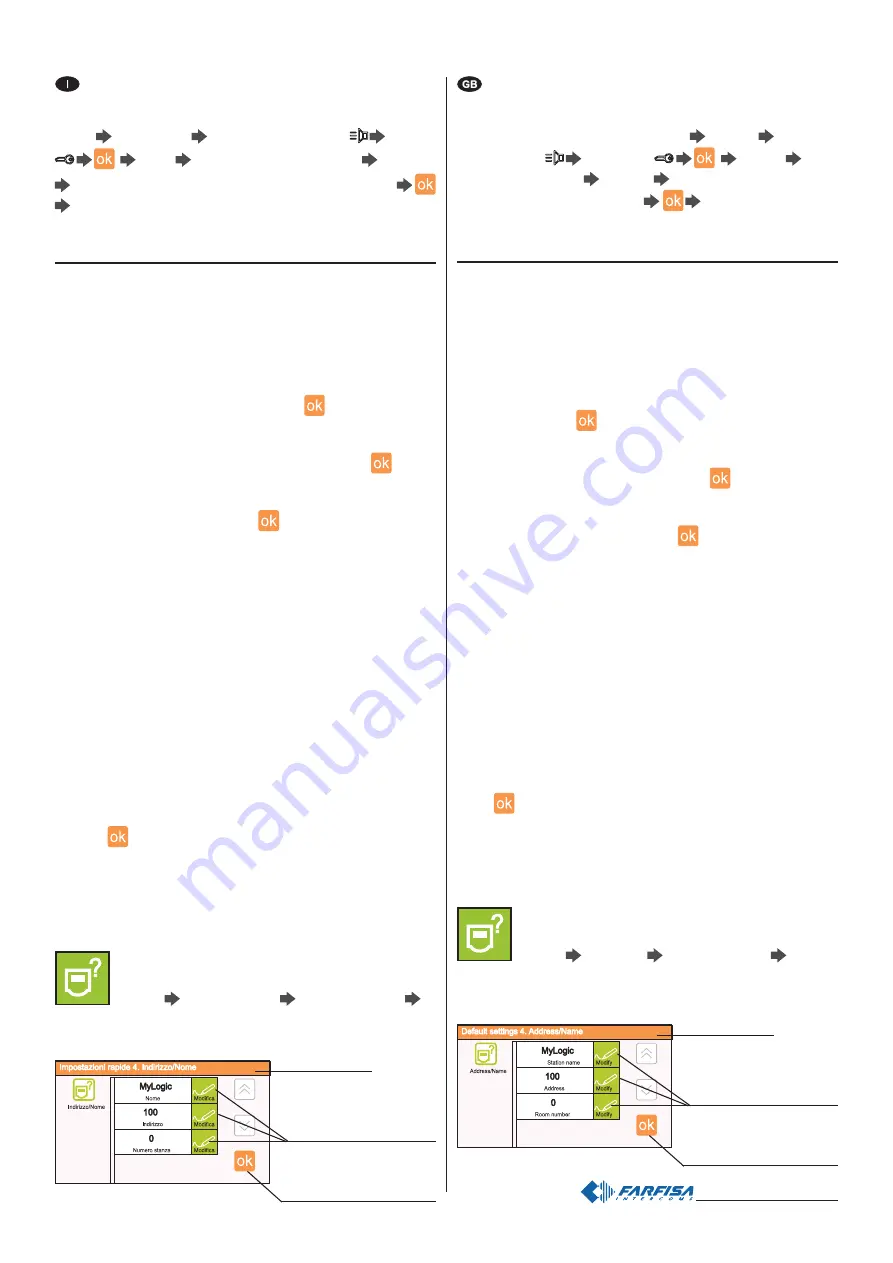
Programmazione Indirizzo, Nome utente, Numero stanza

Oltre al metodo descritto in precedenza 

"Programmazione

alla prima accensione", è possibile variare i dati dell'utente
procedendo nel seguente modo:
"menu" 

 "impostazioni " 

 "Indirizzo/Nome" 

 si

accede ad una pagina dove compare il Nome, l’Indirizzo ed

il Numero di stanza del dispositivo; premere i tasti "modifica" per
cambiare nome ed indirizzi.

premere "modifica" per
cambiare le impostazioni
presenti

premere “OK” per confer-
mare i dati visualizzati e
memorizzarli

barra di stato

 Procedure used to lock/unlock programming

operations

The following procedure must be carried out to block or unblock the
protected programming operations:  “menu” 


“settings” 


“advanced”

(videointercom 


lock release 


“others” 


select

“protection activated” 


“modify” 


NO to unblock programming

operations (or YES to block them)  


“menu”. For more details

see the section “active protection” on page 17.

Programming modes

Programming operations upon first switch-ON

When you switch-ON the videointercom for the first time, after a data
loading operation (approximately 15 seconds), the videointercom
starts a simplified procedure that guides the installer during
programming of necessary data for the correct operation of the
device. In sequence you must enter:

- Language – touch to select the language from the list (Italian by

default) and press 

;

- Date – set the current date; after you have touched to select the

year, month and day, you can change them with the up and down

arrows (01/01/2010 by default) and press 

;

- Time – set the current time; after you have touched to select the

hour and minutes, you can change them with the up and down

arrows (00:00 by default) and press 

.

- Station Name – touch to select “modify” and enter the name you

want to give to the videointercom (myLogic by default) and press
SAVE. For info on how to use the keypad please refer to User Name
Replacement  
section.  If the default name is accepted, do not
proceed with “modify”, and go to address programming directly.

- Address – after you have touched to select “modify” you can enter

the address (100 by default) and press SAVE. For info on how to
use the keypad please refer to Save/Replace Apartment Address.
If the default address is accepted, do not proceed with “modify”, and
go directly to programming room number.

- Room number – after you have touched to select “modify” you can

enter the room number (0 by default) and press SAVE. For info on
how to use the keypad please refer to Save/Replace Room
Number
. If the default room number is accepted, do not proceed
with “modify”, and go to the next operation directly.

Press 

, the Home Page is displayed.

Warning: this simplified procedure is started by the videointercom
also when the device is switched ON after a long power failure in which
the devices loses the current time and date settings (approx. 2 days).

How to programme Address, User Name, Room Number

In addition to the method described about in “Programming
operations upon first switch-ON”

, you can change the user

data as indicated below:
“menu” 


“settings” 


“Address/Name” 


you will

access a page with the Name, Address and Room Number

of the device; press the “modify” buttons to change name and
addresses.

press “modify” to change
the current settings

press “OK” to confirm and
save the displayed settings

status bar

Содержание myLogic PL72

Страница 1: ...erronei ed irragionevoli Nonlasciareallaportatadeibambinilepartidell imballaggio sac chettidiplastica polistiroloespanso ecc Nonaprirel apparecchioquando acceso L esecuzione dell impianto deve essere...

Страница 2: ...een for DUO digital system Technical characteristics Power supply directly from the line Operatingcurrent 0 2A Screen 4 2 LCD touch screen Televisionstandard PAL Horizontalfrequency 15625Hz Verticalfr...

Страница 3: ...fissaggiodel videocitofono Remove the frontal plastic frame to approach the four fixing points of the video intercom 6 Fissareilvideocitofonoallascatoladaincassoutilizzandole4viti forniteacorredodelpr...

Страница 4: ...supplementare cavocoassiale M massa video schermo coassiale EC comando positivo telecamera supplementare EM comandonegativotelecamerasupplementare VD2120CPL Camera with integrated audio module Technic...

Страница 5: ...imentazioneallatosuperioretenendoibordi frontali a filo e a piombo dell intonaco finito 1 2 Muraturaepassaggiodeicavi Flush mounting and cables placing Posizione delle aperture passacavo Openings for...

Страница 6: ...z Power 22VA Outputvoltage 13Vac 1 Maximumcurrent 1A Outputprotection PTC Approved by according to the Safety Standard EN60065 Housing 3 module ADIN Operatingtemperature 0 40 C Maximumadmissiblehumidi...

Страница 7: ...rincipale quello con il codice 0 e si accender automaticamente alla chiamata da esterno mentreilvideocitofonoconilcodice 1 pu visionareecomunicareconl esternopremendo To make a one way installation wi...

Страница 8: ...ine 2 3 chiusura 15 termination 15 3 4 chiusura 100 di fabbrica termination 100 default Collegamento di una soneria supplementare Connection of one additional ringer 12Vac 12 24Vdc 1A Applicando tra i...

Страница 9: ...so possibilevisionarel ingresso premendoilpulsante qualorasidesidericomunicareconl esterno premereilpulsante VIDEOINTERCOM OPERATION Check that the connections of the installation are correct Operate...

Страница 10: ...gliindirizzideidispositivimemorizzatinelvideocitofono devonocoincidereconquelliprogrammatinegliingressivideocitofonici vedere le programmazioni del posto esterno da pag 20 a 26 TheML2062videointercomm...

Страница 11: ...ocitofonico ingresso indirizzodell ingressovideocitofonico 231 accensionetelecamere inizio e fine conversa zione serratura apriporta paginaprecedente menuopannellodicontrollo Main function buttons nav...

Страница 12: ...Indirizzoed il Numero di stanza del dispositivo premere i tasti modifica per cambiarenomeedindirizzi premere modifica per cambiare le impostazioni presenti premere OK per confer mare i dati visualizz...

Страница 13: ...oresulnumerodainserire o correggere premere per passare ai caratteri di punteggia tura ripremere per ritornare ai caratteri alfabetici premere per passare ai caratteri numerici ripremere per ritornare...

Страница 14: ...edwiththesameapartmentaddress i e 15 andchange the room number enter 0 for the main device and then 1 2 7 for the secondary devices Intercom SMS Inordertocommunicateorsendmessagesbetweenthe usersinthe...

Страница 15: ...droPulsanti Link a Pulsante permette di visualizzare sulla Home Page un pulsante Nuovonota memo InviaMessaggio Silenzioso Chiamate Foto RimuoviMemoryCard Immagini Tochangethenameandaddressesofthevideo...

Страница 16: ...pitolo Programmazione indirizzo nome utente numerostanza Perinserireulteriori indirizzialternativi seguirelastessaprocedura precedente Per eliminare un indirizzo alternativo selezionarlo toccando brev...

Страница 17: ...iseguito premere modifica alladestradellacasellatestocheriportailnome dellafunzione scegliere SI perrilanciarelasoneriaefarsuonare ancheglialtrivideocitofonidell appartamento scegliere NO per nonrilan...

Страница 18: ...schermo Utilizzarelostiloindotazioneper toccare3volteilpuntinocheapparir sugliangolidelloschermo La precisionedeltoccoconsentediaverelamigliorecalibrazionedello schermo Attenzione durantelaproceduradi...

Страница 19: ...Ilivellifonicisonoregolatiinfabbrica modificareleregolazioniposte sulretrodell apparecchiosolamenteincasodieffettivanecessit The audio levels are set in the factory settings on the back of the device...

Страница 20: ...di MS1 e MS2 su OFF e riportare il ponticello J1 dalla posizione 1 2 alla 2 3 posizionedeimicrointerruttoriMS1 MS2edelponticello J1 per uscire dalla fase di programmazione The CD2131PL digitizer modu...

Страница 21: ...morset ti EC EM ved program mazione 1E tabella 1 ordinary management of terminals EC EM see programming1E table1 tempo di azionamento della serratura supple mentare 3 secondi supplementarydoorlock act...

Страница 22: ...22 Mi2438 Esempio di programmazione del codificatore digitale CD2131PL Example of programming for digital encoder CD2131PL...

Страница 23: ...Mi2438 Tabella 3 Table 3 Corrispondenza tra i codici assegnati ai pulsanti e la posizione dei microinterruttori di MS1 e MS2 Cross reference table between codes and microswitches position of MS1 and...

Страница 24: ...24 Mi2438...

Страница 25: ...eguita programmazione invio chiamata apriporta in conversazione prolungamento tempo di conversazione End of conversation wrong programming Indicates an error during the programming phase or that the c...

Страница 26: ...26 Mi2438...

Страница 27: ...Videointercom button It is used to monitor the door station of the system or the last calling door station in case of multiple entrances enable voice communication after receiving a call or monitorin...

Страница 28: ...llegate all Home Page raggiungibili comunque anche dal Pan nellodiControllo Toccandoalcentrodelloschermosiacce dedirettamentealPannellodiControllo HomePageNavigation By moving the touch screen pen or...

Страница 29: ...t to left Intercom Directory Fromhereyoucanaccessthelist of internal stations Dal basso verso l alto Blocco note Daquisiaccededirettamenteal l applicazioneBlocconote Fromdownup NotePad Fromhereyoucand...

Страница 30: ...cezionedellechiamatelefoto vengonoscattateautomaticamenteomanualmente L iconabiancaindicaqualedelledueopzioni attiva Videocitofonia Daquestomenu possibileaccedereallefunzionitipichedella videocitofoni...

Страница 31: ...tion can also be activated by pressing the videointercom button By touching the centre of the screen you can activate the full screen display mode Also the call from the door station besides activatin...

Страница 32: ...ounditopervariare leregolazioni PremereOKperconfermarle Chiudi Siinterrompeilcollegamentoesitornaallaschermataprece dente Manual Youcantakeaphotooftheframedimage Youcansaveinthe system approximately 6...

Страница 33: ...l icona manuale l utente durante la chiamata pu scattareunafotopremendol iconaconlamacchinafotografica L iconasusfondobiancoindicaqualedelledueopzioni attiva Monitor list Gallery Tochangethenameofthe...

Страница 34: ...attarelevostreimmaginipersonalinelformato myLogicimage mli etramitelamemorycardinserirlenella galleria Lamemorycardpu essereusataanchecomeveicolo peresportareimmaginidamyLogic comelefotodellechiamate...

Страница 35: ...ima Qualora l elenco fosse composto da pi di quattro utenze si potr scorrerelalistaconitasti su e gi postisulladestradello schermo Senoncisonoutentinellarubricalapaginarisultavuota Intercom SMS Menude...

Страница 36: ...rmocomparir peralcuni secondilascritta Inviomessaggiofallito Intalcasoilmessag gio viene salvato nelle Bozze e sar necessario inviarlo nuovamente Messaggi SMS Calling It is used to make a call by dire...

Страница 37: ...etter un segnalediavviso Intalcaso l iconamemoapparir inHome Page toccandolavienemostratoilcontenutoesipu arrestare il segnale di avviso segna come completato posticiparlo o eliminarlo ReceivedSMS Iti...

Страница 38: ...e notes or draw using the following tools Opens a new post it note Exits without saving Activates the writing tool Activates the eraser tool Increase the thickness of the writing tool Changes the colo...

Страница 39: ...ulsanticonpossibilit di modificarne ogni singolo nome Scorrere l elenco toccando i tastifrecciasuegi Percambiarenomealpulsantepremere dettagli indirizzo nome epoi modifica Tramitelatastiera che appari...

Страница 40: ...ldispositivomyLogicedimodificare l indirizzoeilnumerodistanza consigliatoperquestedue ultimefunzionilamodificadapartedell installatore Impostazionirapide Veloce sequenza di configurazione che include...

Страница 41: ...ddownbuttonsorthe bar directly to change the setting Ringingtones Here you can choose the ringer for Call from external door station Call from internal from other apartments Intercom call from other s...

Страница 42: ...t audiodesideratatoccandounadelle dueicone L iconabiancaindicaqualedelledueopzioni attiva Ringsduration Here you can choose the ringing time for Call from external door station Call from internal from...

Страница 43: ...ogic Premendoqualsiasitastosicancellal appuntolasciato Elenconote sonovisualizzateinsequenzaordinatalenote e i memo Schermo Nobackgroundimage TouchtheicontorestorethedefaultscreenimageintheHome Page W...

Страница 44: ...bottom Forexample inordertoaddthedirectcalltotheneighbouron the Home Page bottom key go to Control Panel Intercom SMS and Directory and hold the handset button next to the namepressedfor10seconds You...

Отзывы: