background image

- 29 -

Mi 2459

I

T

ALIANO

E

NGLISH

F

RANÇAIS

E

SP

AÑOL

P

ORTUGUÊS

D

EUTSCH

Te l e c a m e r a
I n g r e s s o
A p e r t u r a c a n c e l l o

A p e r t u r a c a n c e l l o
I m p o s t a z i o n i

Vo l u m e

V i d e o

I m p o s t a z i o n i

A p e r t u r a c a n c e l l o

A p e r t u r a c a n c e l l o
I m p o s t a z i o n i

Vo l u m e

I m p o s t a z i o n i

C a m e r a
E n t r a n c e
G a t e
S e t t i n g s

A u d i o l e v e l

A u d i o l e v e l

V i d e o

S e t t i n g s

G a t e
S e t t i n g s

A u d i o l e v e l

A u d i o l e v e l

S e t t i n g s

Ordinamento dei nominativi
Per cambiare l'ordinamento dei nominativi presenti in rubrica occorre,
all'interno della pagina "Contatti", selezionare "Ordinamento" e preme-
re OK - selezionare il nominativo da spostare e premere OK -  con i
tasti 

 spostare il nominativo nella posizione desiderata e premere

OK per la conferma. Premere   per tornare alla pagina precedente.

Audio - procedura descritta a pagina 24.
Lingua - procedura descritta a pagina 26.


Carattere - procedura descritta a pagina 27.

Sorting of names
To change the order of names in the contact list it is necessary to
select “Sorting” in the “Contact” menu and press OK – select the name
to move and press OK – with 

 buttons move the name up or down

until it reaches the desired position and press OK to confirm.
Press   to go back to the previous page.

Audio - procedure described on page 24.
Language - procedure described on page 26.

  Font size - procedure described on page 27.

(premere per
meno di 4 secondi)

(press for less than
4 seconds)

CONTATTI

CONTACTS

ELENCO NOMI

NAME LIST

CAMPANELLO

DOOR BELL

ELENCO LINGUE

LANGUAGE LIST

ETICHETTA

LABEL

ELENCO SUONERIE

RINGING MELODY LIST

SELEZIONARE NOME

SELECT THE NAME

MODIFICA

EDIT

MODIFICA

EDIT

DISABILITATO

DISABLED

NORMALE

NORMAL

REGOLARE LIVELLO

ADJUST THE LEVEL

SPOSTARE CON

MOVE WITH

ANNULLA

CANCEL

AUDIO

AUDIO

ORDINAMENTO

SORTING

SUONERIA

RING TONE

DURATA SUONERIA

RING TONE PERIOD

SUONO TASTI

KEY TONE

VOLUME SUONERIA

RING TONE LEVEL

VOLUME TONI

TONE LEVEL

ABILITATO

ENABLED

GRANDE

LARGE

SALVA

SAVE

NON SALVARE

DON'T SAVE

LINGUA

LANGUAGE

CARATTERE

FONT SIZE

ANNULLA

CANCEL

SALVA

SAVE

NON SALVARE

DON'T SAVE

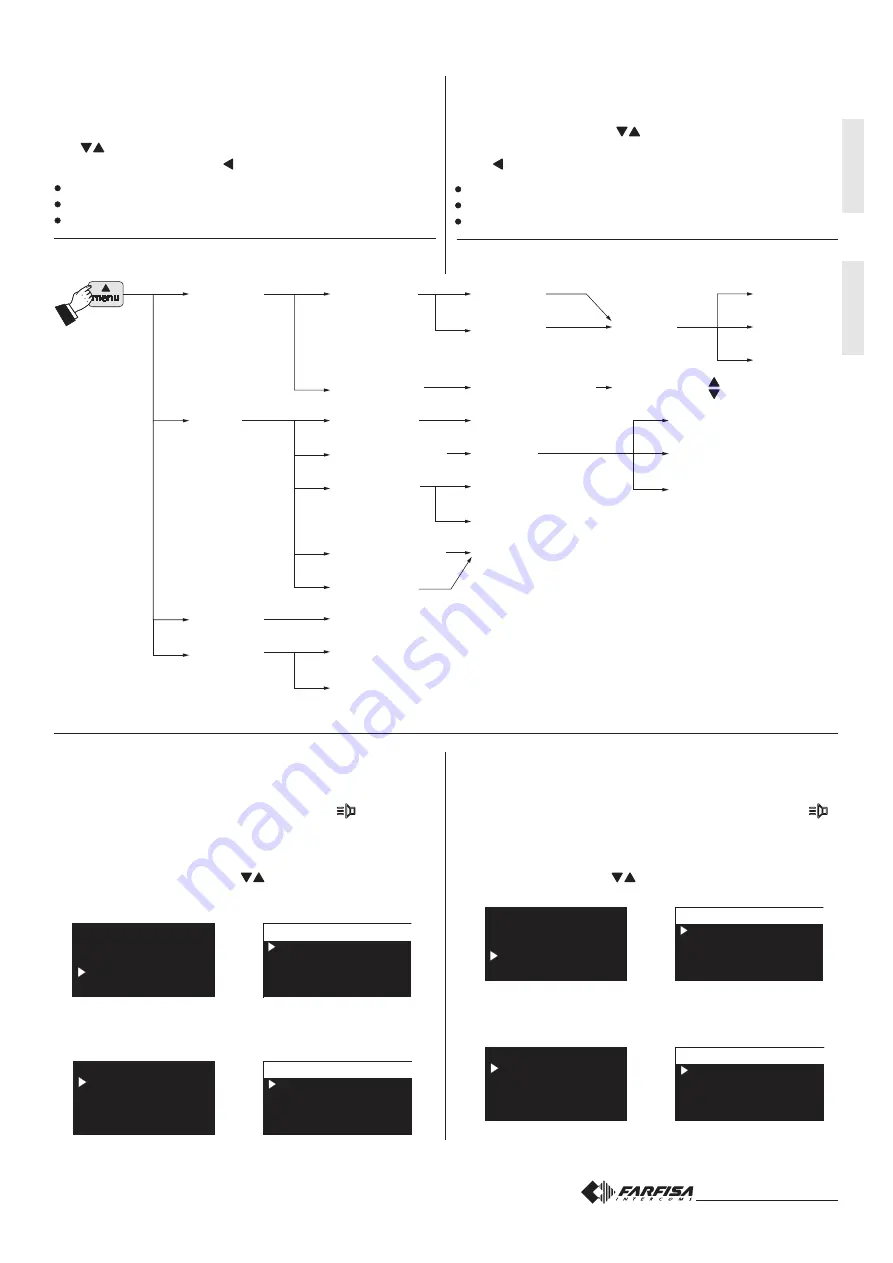
MENU IMPOSTAZIONE

SETUP MENU

Regolazioni audio-video

Per accedere alle regolazioni audio e video occorre che il videocito-
fono sia acceso e connesso con un posto esterno tramite una chiamata
dalla pulsantiera od accensione di controllo (tasto 

).

Premere "menu"; appare il seguente elenco: telecamera, elenco
ingressi e servizi (se inseriti - vedere paragrafo "contatti" a pagina 22),
impostazioni. Selezionare "impostazioni" e premere OK - selezionare
volume per regolare, tramite i tasti 

, il livello della fonia proveniente

dall'esterno (altoparlante) o selezionare video per regolare la lumino-
sità, il contrasto ed il colore dell'immagine.

Audio-video adjustments

To adjust audio and video parameters it is necessary that the
videointercom will be ON and connected to an external door station
after a call from the door station or a monitor function (button 

).

Press “menu”; the following list will be displayed: camera, list of
entrances or services (if previously stored – see paragraph “contacts”
on page 22), settings. Select “settings” and press OK – select “volume”
to adjust, pressing buttons 

, the volume level (loudspeaker) or

select “video” to adjust contrast, brightness and colour of the image.

If the videointercom, instead of communicating with the door station
is intercommunicating with another user, pressing “menu” only audio
adjustments are displayed (because there is no image on the screen).

Se il videocitofono sta intercomunicando con un altro apparato,
premendo "menu", si visualizzano solo le voci riguardanti le abilitazioni
e regolazioni audio (elenco dei servizi ed impostazioni audio).

Содержание myLogic ONE - Agora ML2002AGC

Страница 1: ... con OSD Videointercom with OSD Moniteur avec OSD Videoportero con OSD Vídeo porteiro com OSD Videohaustelefon mit OSD ML2083 Scatola da incasso Back box Boîted encastrement Caja de empotrar Caixa para encaixe Unterputzgehäuse Alimentatori Power supplies Alimentations Alimentadores Alimentadores Netzgeräte 2221ML Alimentatore di linea Line power supply Alimentation de ligne Alimentador de línea Al...

Страница 2: ...lación valerse de personalespecializado El aparato está conforme a las directivas CEE marca europea CE AVISOSDESEGURANÇA Leiaatentamenteosavisoscontidosno presente manual porque trazem impor tantesinformaçõesquantoàsegurança em termos de instalação utilização e manutenção Guarde onumlugarseguro paraeventuaisconsultas PosicioneovídeoporteiromyLogicnum ambientesecoelongedefontesdecalor oudeequipamen...

Страница 3: ...3 2 1 J1 2 Toglierelamorsettieradalvideocitofono Unplug the terminal block from the video intercom Enleverlebornierduvidéophone Extraer la caja de bornes del videoportero Retiraracaixadeterminaisdovídeo porteiro KlemmenbrettervomVideosprechgerätentfernen GC LM A1 LM GN GE 2 1 3 4 J2 3 2 1 J1 4 Reinserirelamorsettierasulvideocitofono Plug in back the terminal block on the videointercom Réintroduire...

Страница 4: ...gativochiamatadipiano A1 Ingressopositivochiamatadipiano GE Uscitanegativaperfunzionisupplementari GC Uscitapositivaperfunzionisupplementari Terminal boards LM LM Lineinputs GN Floorcallnegativeinput A1 Floor call positive input GE Negativeoutputforadditionalfunctions GC Positive output for additional functions Bornes LM LM Entréesdeligne GN Entréeappelnégatifd étage A1 Entréeappelpositifd étage G...

Страница 5: ...ado de los niveles fónicos Sidurantelaconversaciónseoyeunaudio excesivamente intermitente o si durante una llamada el altavoz tiende a torcer se aconseja retocar ligeramente la sensibili daddelmicrófonoactuandosobreeltrimmer SENSpuestoenelreversodelvideoportero Encasodedificultadatomarlalíneaenuna de las dos direcciones aumentar ligera mente el nivel del canal en dificultad y disminuirligeramentel...

Страница 6: ...lsegnale videoprovenientedallamontanteequindicon sentireuncorrettofunzionamentodegliapparati ad esso collegati Selección impedancia de cierre Atrás del videoportero es posicionado el puentecillo J2 que permite de adaptar la señal video procedente del montante y por lo tanto permitir un correcto funcionamiento de los aparatos a ello conectado Selecting the closing impedance The jumper J2 provided o...

Страница 7: ... empotrable de la placa de calle a una altura del piso hasta la parte superior de unos 1 65 m aproximadamente manteniendo los bordes frontales a plomo del enlucido Posicionaratelecâmarademaneiraaqueosraiossolaresou outras fontes luminosas directas ou reflectidas de forte intensi dade não atinjam a objectiva da telecâmara Muraracaixadeencaixedabotoneiraaumaalturadeaproximadamente 1 65mdopavimentodo...

Страница 8: ...uleurs Numéro de pixel 291 000 Objectif 3 6mm Mise au point réglable 0 6m Balayagehorizontal vertical 10 Températuredefonctionnement 0 40 C Humidité max admissible 90 RH Dados técnicos Alimentação 13Vca 1 Absorção 0 8A Standard sinal video PAL Iluminaçãomínima 2 5Lux Led 4 brancos 2 vermelhos Sensor CCD 1 3 a cores Número de pixel 291 000 Optica 3 6mm Foco 0 6m Ajustamentohorizontal vertical 10 Te...

Страница 9: ...e S1 S2 contattiaperturaserratura LP LP fonia dati video da e verso gli interni Bornes Entrada alimentación alterna 13Vca V Entradaseñaldevídeoparatelecámara suplementaria cable coaxial M Masavídeoparatelecámarasuplemen taria pantalla coaxial S1 S2 Contactos de abertura cerradura LP LP Fonía datos vídeo desde o a los inter nos Bornes Entrée alimentation alternatif 13Vca V Entréesignaldevidéopourca...

Страница 10: ...atur 0 bis 40 C Max zulässigeFeuchtigkeit 90 RH Befestigung auf DIN Schiene oder an der Mauermittels2Spreizdübeln TRANSFORMADOR Datos técnicos Tensióndered 127Vó220 230Vca Frecuencia 50 60 Hz Potencia 22VA Tensióndesalida 13Vca 1 Corrientemáxima 1A Protección en salida PTC Seguridad conformeEN60065 Contenedor DIN 3 módulos A Temperaturadefuncionamiento 0 40 C Máximahumedadadmisible 90 RH Fijación ...

Страница 11: ...iebstemperatur 0 bis 40 C Max zulässigeFeuchtigkeit 90 RH BefestigungaufDIN SchieneoderanderMauer mittels2Spreizdübeln Klemmen LP LP VerbindungzurBusleitung ALIMENTADOR DE LÍNEA Datostécnicos Tensióndered 0 127 127Vca 0 230 220 230Vca Frecuencia 50 60 Hz Potencia 60VA Corriente máxima en salida 0 5A Protección en salida PTC Seguridad conformeEN60065 Contenedor DIN 8 módulos A Temperaturadefunciona...

Страница 12: ...ance avec le poste interne plus éloigné La longueur totale des câbles du dérivateur aux postes internes ne doit pas dépasser 300 mètres somme de tous les tronçons E Câble Farfisa art 2302 Câble à 2 conducteurs torsadé recommandé pour la réalisation desystèmesDUOSystem L utili sation de câbles différents peut influencer le fonctionnement cor rectdusystème Données techniques Nombre de conducteurs 2 ...

Страница 13: ...rminais da fechadura eléctrica um supressor de perturbações transil paraaumentaraeficáciadainstalação Serratura elettrica Il segnale video può essere disturbato durante l azionamentodellaserraturaelettrica Perevi tarequestoinconvenienteoperazionareserra tureconcaratteristichedifferentidaquellacon sigliata 12Vca 1A max si suggerisce di utiliz zare un alimentatore supplementare come ri portatonellos...

Страница 14: ...ker bei 1 2 belassen Perrealizzareunimpiantomonofamiliarecon2videocitofoni schema a pagina 15 occorre aggiungere al videokit un ulteriore videocitofono ML2002C ed un altrascatoladaincassoML2083 spostareilponticelloJ12delvideocitofonoVC1dallaposizione1 2 alla 3 4 lasciarlo su 1 2 nel VC2 cambiareilnumerodistanzadiunodeiduevideocitofonida 0 a 1 procedere come indicato nel paragrafo Indirizzo stanza ...

Страница 15: ...nummer bei einem der beiden Videohaustelefone von 0 auf 1 einstellen siehe Abschnitt Nummer des Zimmer auf Seite 57 Es wird darauf hingewiesen dass das Haupt Videohaustelefon mit dem Code 0 gekennzeichnetistundsichbeieinemAnrufvonderTürstation automatisch einschaltet das Videohaustelefon mit dem Code 1 kann bei Drücken der Taste die Kamera einschalten und den Anruf beantworten Pourréaliseruneinsta...

Страница 16: ...ulsante P1 Lapressionedelpulsante P1 èconfermatadauntonosull altoparlante Thepush buttonofVD2121CAG orVD2121CAGL externaldoorstation is programmed with the same calling code as the internal station 100 and therefore needs no programming The encoder module must be programmed as illustrated below only if you want to change some functions or add additional devices to the videokit Factorysetting Exter...

Страница 17: ...ente modo entrare nella modalità di programmazione seguendo le indicazioni descritte nel capitolo Entrare in programmazione inserire il codice 112 e premere Pn si udirà un tono di conferma ed i led rossi inizieranno a lampeggiare comporre il numero dell interno che si vuol attribuire al pulsante Pn Gli interni devono essere codificati con numeri compresi tra 001 e 200 Entering codes or addresses C...

Страница 18: ... perusciredallaprogrammazione di sistema si udirà un tono di conferma ed i led rossi torneranno ad accendersi in modo continuo Nota La programmazione non sarà memorizzata se non saranno confermati tutti i modi di funzionamento proseguireinserendoilcodicediunanuovaprogrammazioneoduscire spostando il ponticello J1 nella posizione 1 2 withoutflashing continue by entering the code of a new programming...

Страница 19: ... reset the camera activation function during the call for the buttons for which this function was deactivated with the previous programming operation code 210 you must enter the programming mode following the instructions described in Enteringtheprogrammingmode enter code 211 and press Pn you hear a confirmation tone and the red LEDs start flashing press one at a time the buttons for which you wan...

Страница 20: ...n A dissuasion tone while pressing a button means the function is not available because the service has not been enabled or the intercom line is busy Videocitofono a riposo schermo spento ok Inizio e fine conversa zione Serratura apriporta Muting esclusione inclusionemicrofono Impostazionivideocitofoniche selezioneingressoeregolazioniaudio video Videocitofono acceso e connesso alla linea videocito...

Страница 21: ...uce scale ecc attivabilidirettamentedalvideocitofono indirizzi da 211 a 220 Attenzione gliindirizzimemorizzatinelvideocitofonodevonocoincidere conquelliprogrammatineivaridispositividachiamareoabilitare Introduction Atthefirststart up thevideointercommustbesuitablyprogrammed to define its operating mode A wrong programming can affect negatively the operating of the whole system The possible program...

Страница 22: ...i possono inserire 30 nomi ed indirizzi di dispositivi intercomunicanti postiesternieattuatoriperservizi es cucina 1 Rossi Mario 104 Ingresso via Marconi 231 apertura cancello 211 Ogni categoria è evidenziata dalla diversa colorazionedellescritte Posizionare il cursore su Contatti epremereOK si accedeallefunzioni Nuovo elenco di nominativi se inseriti in precedenza Ordinamento Enter system program...

Страница 23: ...f a user Select new and press OK thefollowingfunctions will be displayed Label Address Room Ringtone Delete Label select Label to enter the name max 16 characters upper and lower cases numbers or symbols you want to give to the device example Living Room Robert Brown Oxford Street entrance car gate Insert the name using the buttons to searchthecharacters keep them pressed for fast searching andpre...

Страница 24: ...rsonal ringingmelody tomakethis programming it is necessary move the cursorto RingingMelody press OK the list of availableringingmelodies aredisplayed ingreenthe present assigned ringing melody Usebuttons toscrollthelistandhearthemelody pressOKtoselectthedesired one To insert other user names repeat all the above operations If in the contacts list it is necessary to store 2 users with the same add...

Страница 25: ...ill be displayed and the present level will be heard With buttons select the desired level of volume and press OK to confirm and go back to the previous page Tone level it allows to increase or decrease the volume ofallthetonesofthevideointercoms Select Tonelevel andpress OK on the right side of the screen a vertical graphic bar will be displayed and the present level will be heard With buttons se...

Страница 26: ...te selezionarelaprimaliberae premere OK selezionare indirizzo e premere OK tenere premuto il tasto o per scegliere l indirizzo aggiuntivo desiderato indirizzi da 1 a 200 premereOK siaccedeallapaginadi conferma Selezionare annulla per ritornare alla videata dell indirizzo selezionare salva per uscire confermando il nuovo indirizzo selezionare non salvare per usciresenzavariarlo selezionare stanza p...

Страница 27: ...K per effettuare la cancellazionedelleprogrammazionieripristinareilvideocitofonoalla configurazionedifabbrica Premere perusciredallamodalitàdiprogrammazione MENU PROGRAMMAZIONE tenere premuto per oltre 4 secondi keep pressed for about4 seconds CONTATTI CONTACTS NUOVO o nome esistente NEW or existing name CAMPANELLO DOOR BELL INDIRIZZO ADDRESS INDIRIZZO ADDRESS ELENCO LINGUE LANGUAGE LIST ETICHETTA...

Страница 28: ...contacts volume levels of ringing melodies and tones ringing melodies language character size on the screen WhilethevideointercomisOFF pressshortlythe menu button less than 4 seconds user menu is displayed Contacts Audio Language Fontsize Contacts In contacts if programmed during the installation of the videointercom are listed the name of users door stations and actuators whose sorting ringing me...

Страница 29: ...N MOVE WITH ANNULLA CANCEL AUDIO AUDIO ORDINAMENTO SORTING SUONERIA RING TONE DURATA SUONERIA RING TONE PERIOD SUONO TASTI KEY TONE VOLUME SUONERIA RING TONE LEVEL VOLUME TONI TONE LEVEL ABILITATO ENABLED GRANDE LARGE SALVA SAVE NON SALVARE DON T SAVE LINGUA LANGUAGE CARATTERE FONT SIZE ANNULLA CANCEL SALVA SAVE NON SALVARE DON T SAVE MENU IMPOSTAZIONE SETUP MENU Regolazioni audio video Peracceder...

Страница 30: ...ion for around 90 seconds press the button If it is desired to disable the audio to the door station but continuing hearing the audio from the door station press shortly the button while audio is disabled on the screen it is shown symbol To restore theaudiotothedoorstation pressagainthebutton thesymbol disappears from the screen In case of a call to a user with more than one videointercom in paral...

Страница 31: ...Unachiamatadapostoesternoadunqualunqueutentedell impianto concluderàforzatamentelaconversazioneinternaincorso Telecamera Ingresso Apertura cancello Apertura cancello Impostazioni Iftheinstallationincludesmoreexternaldoorstationstomonitorthem selectively it is necessary to press the button menu from the list selecttherequestedentranceandpressbuttonOK Payattentionto pressthebuttononlyoncebecauseasec...

Страница 32: ... P1 estconfirméeparunetonalitéémise parlehaut parleur El pulsador de llamada de la placa de calle VD2121CAG o VD2121GAGL es programado con el mismo código del puesto interior 100 por tanto no necesita de ninguna programación Sólo en los casos en que se quiera variar algunas funciones o añadir ulteriores aparatos al videokit se tiene que proceder a la programación del codificador Programacionespord...

Страница 33: ...er comme suit entrer en mode de programmation en suivant les indications dé taillées dans le chapitre Entrer en mode de programmation saisir le code 112 et appuyer sur Pn on entend une tonalité de confirmation et les leds rouges commencent à clignoter Insercióncódigosodirecciones Los códigos y o las direcciones para guardar deben estar siempre formadosportrescifras centenares decenasyunidades losc...

Страница 34: ...ue continuerensaisissantlecoded unenouvelleprogrammationouquitter en déplaçant le pontet J1 sur la position 1 2 Note La programmation ne sera pas mémorisée si l on ne confirme pas tous les modes de fonctionnement insertar el código 112 y presionar Pn se escucha un tono de confirma ción y los LED rojos empiezan a parpadear marcar el número de la extensión que se quiere asignar al pulsador Pn Las ex...

Страница 35: ...l puente J1 a la posición 1 2 Restauración de los pulsadores con desactivación de la cámara código211 Para restaurar la función de activación de la cámara a los pulsadores excluidos de esta función con la programación anterior código 210 se necesita entrar en el modo de programación siguiendo las indicaciones ilustradas en el capítulo Entrar en programación insertar el código 211 y presionar Pn se...

Страница 36: ...funciónnoestádisponibleyaqueelservicionoestá activo o la línea del videoportero está ocupada por otro usuario Vidéophone au repos écran éteint Début et fin de la conversation Serrure ouvre porte Muting exclusion inclusiondumicrophone Paramètresvidéophonique sélectionentréeetréglagesaudio vidéo Vidéophone allumé et connecté à la ligne vidéophonique Page précédente ou sortie Page suivante ouconfirma...

Страница 37: ... coïncideraveccellesprogramméesdanslesdifférentsdispositifsà appelerouactiver Introducción Alencenderseporprimeravez elvideoporterodebeserprogramado convenientemente por el instalador para definir el modo de funcionamiento Una programación errónea puede comprometer el correcto funcionamientodetodalainstalacióndelvideoportero Los modos posibles de programación son dos remota permiteprogramarvelozme...

Страница 38: ...municants postes externesetactionneurspour des services ex cuisine 1 Dupont Marc 104 Entrée rue Hugo 231 ouvertureduportail 211 Chaquecatégorieestmise enévidenceparlacoloration différentedesinscriptions Positionnerlecurseursur Contacts etappuyersurOK onaccède aux fonctions Nouveau liste de noms si saisis précédemment Ordre Entrar en la programación de sistema Atención Paraaccederalasprogramaciones...

Страница 39: ...iqueta seleccionar Etiqueta para introducir el nombre máximo16caracteres mayúscula minúscula númerososímbolos que se desee dar al dispositivo ej Cocina Pérez Pablo entrada calleDalí aperturacancela Escribirelnombreutilizandolasteclas para la búsqueda del carácter mantenerlas apretadasparalabúsqueda veloz yapretarOK elcursor se posiciona automática menteenlasiguientecasilla Buscar el 2 carácter y c...

Страница 40: ...précédente Sonería acadausuario de la lista se le puede asignar una melodía diferente pararealizaresta programación es nece sario colocarelcursoren sonería apretar OK se visualiza la lista de las melodías disponibles en verde la melodía anteriormente programada Utilizar las teclas para desplazarse por la lista yescucharlasdiferentesmelodíaspresentes apretarOKparala confirmación Para introducir otr...

Страница 41: ...as activadas en el videoportero Seleccionar Volumensonería yapretarOK enelladoderecho de la pantalla aparece una barra vertical y se escuchará el nivel actual del sonido Con las teclas elegir el nivel preferido y apretar OK para confirmar y volver a la página anterior Volumen tonos permite aumentar o disminuir el volumen de los tonos activados en el videoportero Seleccionar Volumen tonos y apretar...

Страница 42: ...o seleccionar RelanzarA1 yapretarOK seleccionar deshabilitado paranopermitirlareactivacióndelallamadadeltimbrealosotros videoporteroso habilitado parapermitirla Apretar OK para confirmar y después para salir Idioma Colocarelcursoren Idioma y apretar OK con lasteclas seleccionarel idiomapreferidoyapretarOK para confirmar apretar para volver a la página anterior Pourprogrammerlafonction adressesuppl...

Страница 43: ...R CONFIRMA CONFIRMA CONFIRMER SYSTÈME SISTEMA LANGUE IDIOMA CARACTÈRE TAMAÑO FUENTE PAR DÉFAUT DE FABRICA Carácter Permiteaumentaroreducireltamañodelostextosvisualizables enlapantalla Seleccionar Tamañofuente yapretarOK elegir eltamañodelcarácter normalogrande yapretarOK apretar para volver a la página anterior De fábrica Regreso a la programación de fabricación El mando elimina todos los datos y ...

Страница 44: ...ntalla Cuando el videoportero está apagado y en el sistema no hay encursootrasconversacioneso encendidos de control apretar brevemente la tecla menú menos de 4 segundos se accede a la página Contactos Audio Idioma Tamañofuente Contactos Dentrodelalista si se introducen durante la programacióndelvideoportero hay nombres de usuarios y o de funciones cuyo orden tipo de melodía o nombre pueden servari...

Страница 45: ...anterior Audio procedimiento descrito en la página 40 Idioma procedimientodescritoenlapágina42 Tamaño fuente procedimiento descrito en la página 43 Caméra Entrée principal Entrée principal Ouverture porte Ouverture porte Réglages Volume Vidéo R é g l a g e s Ouverture porte Ouverture porte Réglages Volume R é g l a g e s Telecamara Entrada Abertura portal Abertura portal Configuración Volumen Vide...

Страница 46: ...el pulsador Si se desea disactivar la fonía de la placa de calle micrófono aunque continuando con el audio proveniente de la misma hay que presionar brevementeelpulsador durantetodoelperiododeladeshabilitación aparece en la pantalla el símbolo Para retomar el audio de la placa de calle presionar de nuevo el símbolo desaparece Encasodellamadaaunusuarioquetienemásdeunmonitorenparalelo en su apartame...

Страница 47: ...orcément interrompue par n importe quel appel en provenance du poste de rue et adressé à n importequelusager Caméra Entrée principal Entrée principal Ouverture porte Ouverture porte Réglages la entrada deseada y apretar la tecla OK Prestar atención para no apretar 2 veces la tecla OK porque se accionaría la apertura de la cerradura Elencendidodecontroltieneunaduracióndeunos30segundos pero seinterr...

Страница 48: ...ltire il dispositivo secondo quanto prescritto dalle norme per la tutela dell ambiente Dispose of the device in accordance with environmental regulations Écouler le dispositif selon tout ce qu a été prescrit par les règles pour la tutelle du milieu Eliminar el aparato según cuánto prescrito por las normas por la tutela del entorno Disponha do dispositivo conforme regulamentos ambientais Werden Sie...

Отзывы: