background image

NetPA Ultra Series • DSP Configurator Software

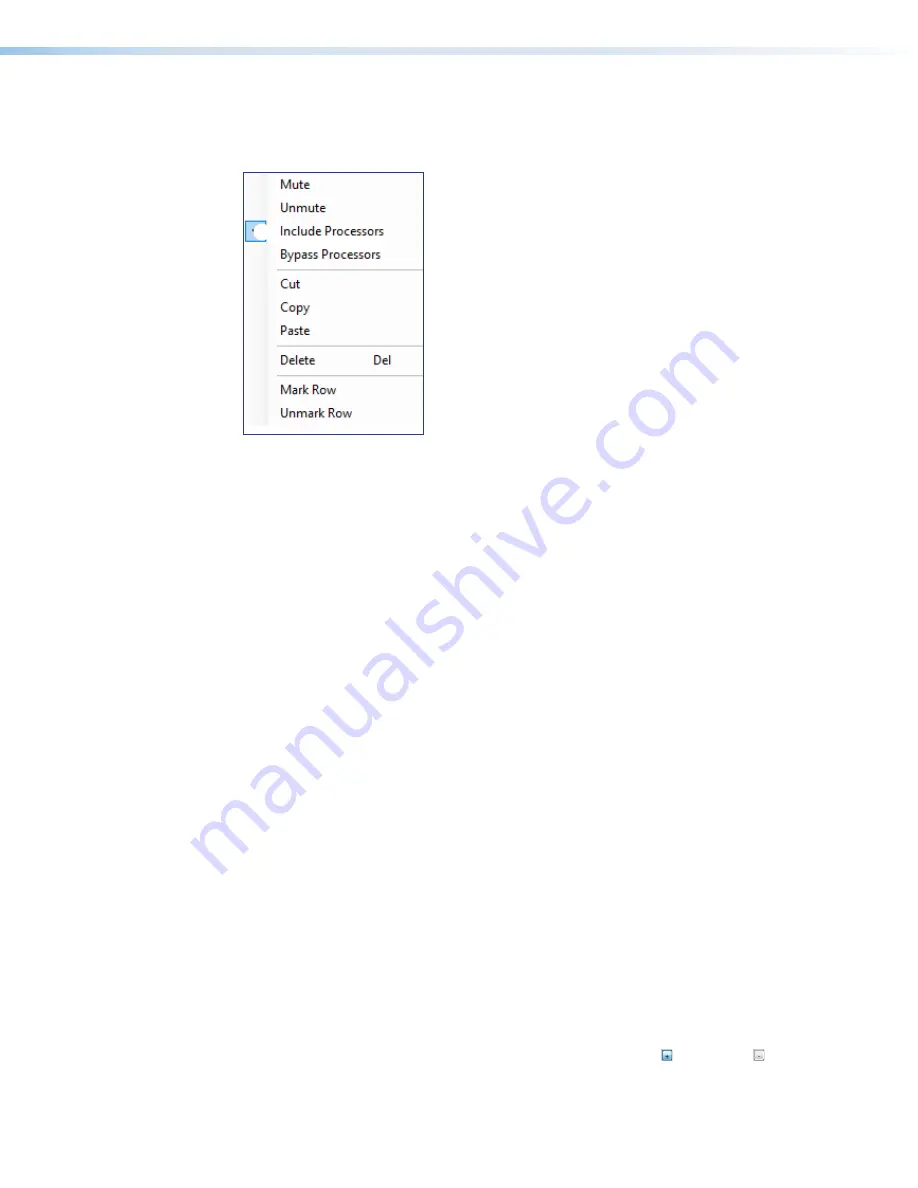
Mix-Point Context Menu

Right-click a mix-point to open the mix-point context menu. This menu provides quick 
options to operate mix-points.

1
2
3
4

5

6
7
8

9
¢

Figure 69. 

Mix-Point Context Menu

1


Mute

 — Mutes the mix-point.

2


Unmute

 — Unmutes the mix-point and creates an audio path between an input and 

output.

3


Include Processors

 — Includes signal processing at the mix-point and marks the 

mix-dot teal to signify this.

4


Bypass Processors

 — Bypasses signal processing at the mix-point and marks the 

mix-dot green to signify signal processing is bypassed.

5


Cut

 — Cuts the mix-point parameter configuration, preparing it to be pasted to another 

mix-point. The parameter configuration information is not removed until it is pasted to 
another mix-point.

6


Copy

 — Copies the mix-point parameter configuration, leaving the mix-point intact and 

preparing it to be pasted to another mix-point.

7


Paste

 — Pastes a previously cut or copied mix-point parameter configuration to the 

selected mix-point.

8


Delete

 — Deletes the mix-point parameter configuration and mutes the mix-point.

9


Mark Row

 — Marks the entire row containing the selected mix-point, highlighting all of 

the elements.

¢


Unmark Row

 — Unmarks the entire row containing the selected mix-point.

DSP Configurator Outputs

The outputs run along the top right of the main workspace in DSP Configurator. There are 
two types of outputs available:

• 

Line/AT Amplifier Outputs

• 

Amplifier Outputs

These outputs receive signal when mix-point connections are made between an input and 
an output in the mix-matrices.
Each output panel can be expanded or collapsed by clicking the   (expand) or   (collapse) 
buttons.

figure 31.  

Mix-point Drop Down Menu

DSP Configurator 
Outputs

49

Содержание NetPA U 1002

Страница 1: ...User Guide NetPA Ultra Series Amplifiers NetPA Ultra Series 2 channel and 4 channel DSP and Dante enabled power amplifiers 68 3165 01 Rev A 09 20...

Страница 2: ...encia 68 290 01 en el sitio Web de Extron www extron com Instructions de s curit Fran ais AVERTISSEMENT Ce pictogramme lorsqu il est utilis sur le produit signale l utilisateur la pr sence l int rieur...

Страница 3: ...Key Minder LinkLicense LockIt MediaLink MediaPort NAV NetPA PlenumVault PoleVault PowerCage PURE3 Quantum ShareLink Show Me SoundField SpeedMount SpeedSwitch StudioStation System INTEGRATOR TeamWork T...

Страница 4: ...reception which can be determined by turning the equipment off and on you are encouraged to try to correct the interference by one or more of the following measures Reorient or relocate the receiving...

Страница 5: ...or device responses used in this guide the character 0 is used for the number zero and O is the capital letter o Computer responses and directory paths that do not have variables are written in the f...

Страница 6: ...Inputs 33 Mic Line Inputs Processing 35 AT Inputs 45 AT Inputs Processing 45 Mix Points 47 DSP Configurator Outputs 49 Line AT Outputs NetPA U 1004 50 Line AT Outputs NetPA U 1002 50 Line AT Output Pr...

Страница 7: ...e Command and Response Tables 87 Symbol Definitions 87 Error Responses 88 SIS Commands 88 Hardware Reset Modes 89 Command and Response Table 91 Generic Hardware Setup and Access 91 Standby 93 Naming 9...

Страница 8: ...er amplifiers About the NetPA Ultra Series The Extron NetPA Ultra Series NetPA U 1002 and NetPA U 1004 are Dante enabled ENERGY STAR qualified power amplifiers that deliver two to four 100 watt channe...

Страница 9: ...ented CDRS Class D Ripple Suppression CDRS is an Extron Patented technology that provides a smooth clean audio waveform and an improvement in signal fidelity over conventional Class D amplifier design...

Страница 10: ...prevent saturation of speaker transformers 5 mm screw lock captive screw speaker connectors Enable simple secure connections with 22 to 12 AWG speaker cables Front and rear mounted signal and protecti...

Страница 11: ...ation of the equipment in a rack Elevated operating ambient temperature If the equipment is installed in a closed or multi unit rack assembly the operating ambient temperature of the rack environment...

Страница 12: ...ottom of the amplifier if previously installed 2 Attach the included rack ears one long and one short to the sides of the amplifier with the four provided 6 machine screws 1 Figure 1 Installing Rack E...

Страница 13: ...e four provided 6 machine screws 2 Figure 3 Installing NetPA Ultra Series Bridge Plate 5 Insert the amplifiers into the rack and align the holes in the rack ears with the holes in the rack 6 Secure th...

Страница 14: ...e corners ATTENTION Using screws longer than 3 16 damages the unit and voids the warranty L utilisation de vis plus longues que 3 16 endommagera l unit et annulera la garantie 2 4 40 x 3 16 Screws RSU...

Страница 15: ...with all local codes Cet appareil doit tre install conform ment au National Electrical Code et tous les codes locaux An ALL POLE MAINS SWITCH with a contact separation of at least 3 mm in each pole sh...

Страница 16: ...llowing parts One conduit adapter plate pre attached for PS 124 and XPA 1002 2001 amplifiers One conduit adapter plate for XPA Ultra Series and NetPA Ultra Series amplifiers not attached One 6 foot lo...

Страница 17: ...olding the blue hot line and the brown neutral wires from the terminal block on the PCB Put the screws to the side to be used later see figure 8 4 Remove the ground wire nut from the grounding stud lo...

Страница 18: ...d zip tie wrap to secure the two wires together close to the terminals WARNING Ensure that you observe correct wire polarity The following illustration shows the location of the hot line and neutral t...

Страница 19: ...etPA Ultra Series function identically 1 Power Standby LED A single LED that lights green when the unit is on and active and lights amber when The unit is powering up and booting The unit is in standb...

Страница 20: ...7 8 9 A B D E F G I 1 2 NetPA U 1002 MIC LINE INPUTS 1 2 STANDBY LIMITER PROTECT SIGNAL LINK R 2 1 Tx Rx RS 232 G G 3 4 1 2 100 240V 1 0A 50 60Hz LINE OUTPUTS REMOTE 8 4 OUTPUTS NetPA U 1002 1 2 3 4 5...

Страница 21: ...ctor Wiring 5 Remote Ports see figure 13 on page 13 Connect a 3 5 mm 3 pole captive screw connector to the RS 232 port to remotely monitor and control the unit Connect a 3 5mm 2 pole captive screw con...

Страница 22: ...s until the reset LED blinks three times once at 3 seconds again at 6 seconds again at 9 seconds then release and press Reset momentarily 1 second Mode 5 resets the device settings while preserving Da...

Страница 23: ...shown below WARNING AVERTISSEMENT Do not tie channel output pins to each other or to ground Doing so will short out the outputs damage the amplifier or both Ne pas lier les sorties 1 et 2 des canaux e...

Страница 24: ...T Inputs are routed to their respective amp and line outputs ex AT Input 1 routed to amp output 1 and line output 1 NOTE The attenuation blocks of the amplifier outputs are set to 24 dB in order to pr...

Страница 25: ...it is being used as both an amplifier and off on ramp to the Dante network the auto standby timer must be disabled and the amp must not be forced into Standby mode On NetPA U 1004 models selecting 88...

Страница 26: ...in this state until the contact is opened Once opened the amplifier returns to its last known standby state This function overrides all other standby conditions NOTE In Standby mode the line and Dant...

Страница 27: ...attenuator block for the odd channel Figure 21 Acessing Amplifier Output Block Panel 2 Copy and paste the configuration of the odd channel to the even channel 3 Open the attenuator block of the even c...

Страница 28: ...uts make the ties in Dante Controller now connection 3 Unplug the IEC power cord from the amplifier 4 Wire the outputs as shown in figure 24 below ATTENUATION 1 2 Input To Speaker Load 5 mm Captive Sc...

Страница 29: ...See the Status section in the SIS portion of the guide for the commands to query 2 Each status command is capable of being queried 3 Query commands can be used when polling with a control system 4 All...

Страница 30: ...eeded to facilitate communication between the amplifier and control system Amplifier must be in verbose 3 Connection to DMP XMP must be in verbose 3 The connection must be maintained The following com...

Страница 31: ...the DSP Configurator Software product page click the blue Download button 4 Select Run to run the DSP Configurator installer Select Save to save the install file to run at a later time 5 To run DSP C...

Страница 32: ...one is opened Click Yes to save the current configuration or No to delete it and open a new configuration Click Cancel to return to the current configuration 2 Open Opens an existing configuration or...

Страница 33: ...elements 2 Copy Copies the configuration of selected elements in the workspace to be pasted to other elements 3 Paste Applies the cut or copied configuration of elements to the selected elements in th...

Страница 34: ...ialog box to edit date and time IP address DHCP status and other settings see Device Settings on page 72 Options see Tools on page 26 Opens the Options dialog box to configure DSP Configurator appeara...

Страница 35: ...tion Figure 28 Preset and Action Selection DSP Configurator Status Panel This panel displays the current status of DSP Configurator and shows when data is being pushed to or pulled from the device Whe...

Страница 36: ...on the device When entering Live mode the user is prompted with the Connect to device dialog box Connect to a NetPA Ultra Series Amplifier in Live Mode 1 Click the Live button in the menu bar of DSP C...

Страница 37: ...nnect via Dante Click the Dante tab in the dialog box Select the device from the list then click OK Figure 34 Connect to device Dante Dialog Box 3 When a connection with a device is established the Sy...

Страница 38: ...lected presets the preset selection dialog box opens after clicking OK allowing you to select which preset to push to the device If only pushing selected presets mark them from the dialog box shown in...

Страница 39: ...g an Input Channel 1 Click the input name field Figure 40 Input Name Field 2 Highlight or delete the text and enter a new name Figure 41 New Input Name 3 Press Enter or navigate away from the field to...

Страница 40: ...seful starting point for devices in the same product category as the name of the building block such as handheld microphones line level sources and so on 3 Add a Building Block Button Creates a custom...

Страница 41: ...dialog box The Input Gain dialog box provides controls to configure the input gain stage of the input processing path 1 Input Name This name changes to match the default or user defined input name 2...

Страница 42: ...r Help file for further assistance in configuring input gain Input Filter Block Double click the Filter block to open the filter drop down list Select one of the four available filters to insert into...

Страница 43: ...s for all 5 available filter slots Frequency Slope Boost Cut Q and Bypass controls are also available in this list Available filters include High Pass Butterworth High Pass Linkwitz Riley Parametric L...

Страница 44: ...cs processor type to insert it into the Dynamics block There is one Dynamics block available per mic line input channel Each block can be configured with any of the processor types The two types of dy...

Страница 45: ...lect the Soft Knee checkbox to provide a more natural implementation of compression when the signal reaches the threshold 4 Bypass Button Bypasses the compressor When the button is red bypass is enabl...

Страница 46: ...plementation of limiting when the signal reaches the threshold 4 Bypass Button Bypasses the limiter When the button is red bypass is enabled 5 Set Defaults Button Resets all limiter parameters to thei...

Страница 47: ...Duck block to open the drop down list where the Ducker and Adaptive Gain processors can be selected Figure 57 Duck Block and Drop Down Menu Select Ducker to insert a ducking processor into the duck b...

Страница 48: ...ngs Contains controls for setting Threshold Attack Time Hold Time and Release Click the Ducking Operation Help button 4 to open the Ducking Operation topic in the DSP Configurator Help File 3 Duck Pri...

Страница 49: ...o that channel when signal exceeds the threshold on the adaptive gain trigger channel NOTE For every 1 dB of signal beyond the level set in the Threshold field 1 dB of gain is added to the channels se...

Страница 50: ...own Arrow keys to adjust the fader up or down in 1 dB steps 3 Pre mixer Gain Text Box Enter a gain or attenuation value in 0 1 dB steps 4 Mute Button Mutes signal at the pre mixer stage preventing it...

Страница 51: ...AT input name field Figure 62 AT Input Name Field 2 Delete or highlight the text and type the desired name Figure 63 New AT Input Name 3 Press the Enter key or navigate away from the field to confirm...

Страница 52: ...AT Input Meter dialog AT Input Filter Block The AT input filter block functions the same as the mic line input filter block see Input Filter Block on page 36 for information on configuring the virtua...

Страница 53: ...rices that connect all inputs and outputs The mix matrices set post processing mix levels Each input is connected to a mix point for the signal to be routed to an output In general mix levels are set...

Страница 54: ...the mix point is muted 5 Mix Dot Selection Two radio buttons allow selection of the type of input processing applied to the mix point Include Processors includes signal processing at the mix point and...

Страница 55: ...t removed until it is pasted to another mix point 6 Copy Copies the mix point parameter configuration leaving the mix point intact and preparing it to be pasted to another mix point 7 Paste Pastes a p...

Страница 56: ...tPA U 1002 The NetPA U 1002 has two separate channels for the line outputs and two separate channels for the AT outputs Each output has to be routed to individually Figure 71 Outputs Panel Naming an O...

Страница 57: ...saving the currently applied gain and processor settings on the selected channel Click the icon to open the Add a Building Block dialog box This allows users to name the new custom building block and...

Страница 58: ...for the selected output 1 2 3 4 5 1 2 3 4 5 Figure 80 Post mixer Trim Dialog Box 1 Output Name This name changes to match the default or user defined output name 2 Post mixer Trim Fader Click and drag...

Страница 59: ...e fader once and use the Up Arrow or Down Arrow to adjust delay in 1 sample steps or the 1 sample equilvalent in milliseconds feet or meters Use the text box below the fader to input a delay value 4 T...

Страница 60: ...utput Name This name changes to match the default or user defined output name 2 Output Attenuation Fader Click and drag the trim fader to provide up to 100 dB of attenuation Click the trim fader and u...

Страница 61: ...le the NetPA U 1002 features two processing paths to the amplifier outputs All audio inputs can be routed to an amplifier output via discrete amplifier output mix points Figure 85 Amplifier Output Pan...

Страница 62: ...The delay block functions the same as the line AT output delay block see Line AT Output Delay Block on page 53 for information on configuring output filters Amplifier Output Filter Block One filter bl...

Страница 63: ...t dynamics block see Input Dynamics Blocks on page 38 for information on configuring the output dynamics block Amplifier Output Attenuation Block One attenuation block is available for each amplifier...

Страница 64: ...a particular location Power Save State Indicates the standby state that the amplifier is currently in Active Auto Timer Disabled The Auto Standby Timer is disabled and the amplifier does NOT automatic...

Страница 65: ...el Hardware failure Disconnect power then reconnect power to the unit to determine if the unit immediately goes into standby upon power up The amplifier may need to be serviced Loss of AC If a 2 is re...

Страница 66: ...he output has been shorted Recheck the amplifier gain structure For low impedance loads Verify that total impedance at the amplifier is 4 ohms For 70V 100V speaker loads Recheck speaker taps Check for...

Страница 67: ...audio signal must be present at the output channel The output attenuation meters should be bouncing above TBD dB FS If at any point an open circuit is detected yellow or red status the system should b...

Страница 68: ...en Save Preset is clicked the following dialog box opens saying that only the elements marked with a green outline are saved to the preset see figure 94 This option is only available if items are mark...

Страница 69: ...Save a Preset dialog box enter the preset number 1 through 8 in the Preset Number field see figure 96 1 Preset slots that do not already have a preset assigned read unassigned Enter a name into the Pr...

Страница 70: ...tputs From the Select Control Type panel select the type of control from the Gain or Mute lists 3 Available Group Members This section populates according to the selected control type and lists all in...

Страница 71: ...7 Confirm the group number and name from the Confirm Group Details dialog box see figure 99 5 8 Click OK to confirm all details and create the group 6 5 6 Figure 99 Confirm Group Details Dialog Box To...

Страница 72: ...evice Manager Device Manager is used to configure and switch between multiple devices in Live or Emulate mode within DSP Configurator see Live and Emulate Panel on page 29 Devices can be placed and or...

Страница 73: ...e into 6 Device List Panel see figure 101 on page 66 Lists the devices and folders in Live and Emulate mode From this panel devices can be clicked and dragged into folders placed in custom order and f...

Страница 74: ...Connect to Device and opens the Connect to device dialog box when selected When DSP Configurator is in Live mode and connected to a device this selection reads Disconnect from Device and disconnects D...

Страница 75: ...wnloaded from the same page as the firmware 5 Submit the required information and follow the on screen instructions to start the download Note where the fie is saved 6 From the save location open the...

Страница 76: ...th each intended application or specific device The Organize Building Blocks dialog box allows users to organize building blocks to their preference import new building blocks export existing building...

Страница 77: ...ick the button to create a new folder that building blocks can be dragged into Upon creation a default folder name is highlighted and a custom name can be entered Click a folder name twice to edit the...

Страница 78: ...NetPA Ultra Series Configuration Tools Figure 107 Unit Info Tab Serial Settings The Serial Settings tab display the baud rate of the rear panel RS 232 port Figure 108 Serial Settings Tab ox 72...

Страница 79: ...ox 4 Enter a device name for the Dante interface 5 Click Apply A confirmation dialog box opens 6 Click Yes to confirm removing existing connections after the name is changed Dante Device Network Setti...

Страница 80: ...A Ultra Series amplifiers processed and routed to the Line AT Outputs and transmitted onto the Dante network Audinate recommends the Dante audio network be kept separate from other networks However th...

Страница 81: ...ultiple devices on the same Dante network can present difficulty in identifying individual devices To avoid confusion and difficulty ensure the following steps are taken Connect devices to the Dante n...

Страница 82: ...1 and analog out 1 are recognized as the same name Unicode and non roman characters are not supported Tx and Rx channel labels can use any character except equals period or Tx and Rx channel labels mu...

Страница 83: ...112 Populated Device View Dialog Box 6 Click the Device Config tab see figure 113 1 to open the Device Config page 7 In the Rename Device panel enter the new name of the device in the text field No sp...

Страница 84: ...iver The default names shown in the Dante Receivers column are extracted from the Dante interface of the connected device see figure 116 1 on the next page The NetPA Ultra Series receivers are labelle...

Страница 85: ...ame up to 31 characters using any combination of letters numbers and special characters except for and period 6 Press Enter on the keyboard to confirm the name or click another channel text box 7 Repe...

Страница 86: ...ignal from the Dante network that can then be routed and mixed into a mix matrix The NetPA U 1004 has four Dante inputs while the NetPA U 1002 has two Dante inputs Dante Routing Operation Dante Contro...

Страница 87: ...rol computer and NetPA Ultra amplifier are connected to the same network 2 From the start menu select All Programs Audinate Dante Controller Dante Controller The Dante Controller Network View screen o...

Страница 88: ...oubleshooting shut down Dante Controller and reseat the Ethernet cable connecting the PC to the Dante network and restart Dante Controller This can be enough for the software to reacquire the Dante ne...

Страница 89: ...ll software on the computer 4 Enable DHCP on the remaining network connection This forces the computer to acquire an IP address from the Dante interface NOTE A DHCP server must be on the network for D...

Страница 90: ...g port The NetPA Ultra Series amplifiers can be set up and controlled using SIS commands or DSP Configurator software see Rear Panel Features on page 13 for details on the configuration and control po...

Страница 91: ...ght through cable or a crossover cable and must be properly terminated for your application Crossover cable Direct connection between the computer and the NetPA Ultra Series amplifier Straight through...

Страница 92: ...he NetPA Ultra Series initiates messages under specific conditions No response is required for the host The NetPA Ultra Series initiated messages are listed below Copyright Message The NetPA Ultra Ser...

Страница 93: ...nversion Table The Command and Response tables list valid ASCII commands the NetPA Ultra Series responses to the host and descriptions of the command functions with the results of executing the comman...

Страница 94: ...stem command timed out E12 Invalid port number E25 Busy E13 Invalid parameter E25 Device not present E14 Not valid for this configuration E30 Hardware Failure followed by colon and descriptor E17 Inva...

Страница 95: ...device name and channel names to default MODE 4 MODE 5 With power on press and hold the reset button for about 9 sec until the Power LED blinks three times once at 3 sec again at 6 sec again at 9 sec...

Страница 96: ...e return or pipe symbol no line feed hex 0D Carriage return with no line feed no line feed hex 0D for URL encoded commands use the pipe character instead E Escape key or hex 1B use W instead of E for...

Страница 97: ...00 watt 4 Channel low impedance amplifier with DSP and Dante 1004 Inf02 100 watt 4 Channel low impedance amplifier with DSP and Dante 1004 100 watt 4 Channel 70 volt amplifier with DSP and Dante 1004...

Страница 98: ...PD ExpdIX X X Using this command automatically turns DHCP off Dante device must be rebooted for new IP configuration to take effect see the Reboot Dante device command in the previous page View IP sub...

Страница 99: ...ld be set to 0 if this amplifier is to be used as an off ramp Standby Priority The standby contact closure port has the highest priority and supersedes SIS and the timer SIS is the next highest priori...

Страница 100: ...X KEY X Input output number Input Output 1 Analog Line Input 1 1 Amplifier Output 1 5 Analog Line Output 1 2 Analog Line Input 2 2 Amplifier Output 2 6 Analog Line Output 2 3 Analog Line Input 3 3 Am...

Страница 101: ...0 1 dB increments Post mixer trim cannot be muted The output attenuation gain range is 100 dB to 0 dB in 0 1 dB increments All responses are shown in Verbose Mode 2 or 3 Set gain level EGX7 X7 AU DsG...

Страница 102: ...or maximum upper lower range of the group For mutes E13 error invalid parameter X1 X1 X1 and X2 values can be sent without leading zeroes Set Group Set Soft Limits ELX1 X1 X1 GRPM GrpmLX1 X1 X1 View S...

Страница 103: ...and line output 3 AT input 4 is routed to amp output 4 and line output 4 All inputs gain blocks and line output attenuators are unmuted and set to unity gain Trim blocks are set to unity gain all amp...

Страница 104: ...tes an internal temperature in the amplifier View fault statuses of system E32STAT X9 32StatX9 NOTE X9 gives an overview of the current status of the amplifier system and channels Rather than ping eve...

Страница 105: ...there is insufficient signal to take a measurement no changes are made to the status Each channel is represented in the response as part of the string n represents the output channel number Loss of A...

Страница 106: ...ertemp 54 STAT DC protect 60 STAT Loss of AC 61 STAT Power Supply Fault PSAV Standby Status 62STAT Signal Presence 57STAT Overload 55STAT Output thermal limiting 58STAT Output Open Circuit 64STAT Digi...

Страница 107: ...rted Unsolicited response TrgrS Schedule is refreshed Clear active alarms ECALRM Alrm C Clear all active alarms View active alarms 39I name alarm_name level alarm_level If no active alarms None active...

Страница 108: ...but has gone over the temperature threshold in the past 2 System temperature was over the normal operating temperature range at the time the command checked the status The Over Temp LED is on X9 0 and...

Страница 109: ...ted in the past 2 A fault on the main power supply was detected at the time the command checked the status X10 0 and 1 Signal presence status The left most X10 represents output channel 1 and the righ...

Страница 110: ...dicated output channel did not detect digital clipping at the time the command checked the status and has not been detected in the past 1 The indicated output channel did not detect digital clipping a...

Страница 111: ...e Input 4 40003 Mic Line Input 4 40103 AT Input MTR Block OID Mic Line Pre mixer Gain Block OID AT Input 1 50000 AT Input 1 50100 AT Input 2 50001 AT Input 2 50101 AT Input 3 50002 AT Input 3 50102 AT...

Страница 112: ...ne Output 1 60004 Line Output 2 60105 Line Output 2 60005 Line Output 3 60106 Line Output 3 60006 Line Output 4 60107 Line Output 4 60007 Output Path OIDs NetPA U 1002 Amplifier Output Trim Block OID...

Страница 113: ...In 4 20300 20301 20302 20303 20304 20305 20306 20307 Digital AT In 5 20400 20401 20402 20403 20404 20405 20406 20407 Digital AT In 6 20500 20501 20502 20503 20504 20505 20506 20507 Digital AT In 7 206...

Страница 114: ...timer Amber Lit No output signal Amplifier has been placed in standby mode and the output has been turned off Check remote port and SIS DC Fault may have been detected Amber Lit DC Fault is detected...

Страница 115: ...Amplifier has exceeded the recommended operating temperature The LED turns off after the amplifier cools down Verify that the placement of the amplifier allows for suitable ventilation and airflow see...

Страница 116: ...urrent is being drawn due to overdriving the output An improper speaker load has been attached for example attaching a low impedance speaker to a high impedance output The output has been shorted Rech...

Страница 117: ...3STAT Over Temp on page 109 If none of the above work power cycle the amplifier If that does not work the amplifier may need to be serviced 62STAT Signal presence A signal has been detected N A N A 64...

Страница 118: ...outh Tower 160 Jan Smuts Avenue Rosebank 2196 South Africa This Limited Warranty does not apply if the fault has been caused by misuse improper handling care electrical or mechanical abuse abnormal op...

Отзывы: