


Adjusting the Interactive Pen
67
e
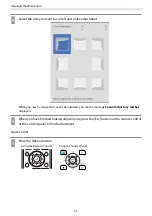
Repeat step 4 until all of the dots disappear
The dot appears at the top left first and then moves towards the bottom right.
When all of the dots disappear, Manual Calibration is complete.
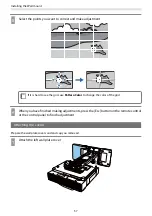
c
Check that there are no obstacles between the interactive pen and the Interactive pen
receiver (shown below).
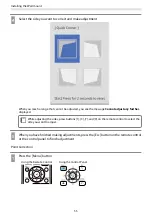
If you touch the wrong position, press the [Esc] button on the remote control to return to the
previous dot.
To cancel calibration, hold down the [Esc] button for two seconds.
Auto Calibration
a
Turn on the projector, and then press the [Menu] button
Using the Remote Control
Using the Control Panel
Содержание EB-1480Fi
Страница 1: ...Installation Guide ...
Страница 53: ...Installing the Wall mount 52 b Select Geometry Correction from the Installation menu c Select Arc Correction ...
Страница 55: ...Installing the Wall mount 54 b Select Geometry Correction from the Installation menu c Select Quick Corner ...
Страница 65: ...Installing the pen stand 64 b Attach the cover c Store the interactive pens ...
Страница 75: ...Installing the Touch Unit 74 Wavelength 932 to 952 nm ...
Страница 78: ...Installing the Touch Unit 77 Adjustment range 79 5 140 5 15 76 ...


