


Installing the Wall mount
32
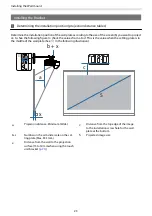
a
b
c1
c2
90"
2101 × 900
347
321
395
254
91"
2125 × 911
354
328
398
256
92"
2148 × 921
361
335
401
257
93"
2171 × 931
367
341
405
260
94"
2195 × 941
374
348
408
261
95"
2218 × 951
381
355
411
262
96"
2241 × 961
388
362
415
265
97"
2265 × 971
394
368
418
266
98"
2288 × 981
401
375
421
268
99"
2311 × 991
408
382
424
269
100"
2335 × 1001
414
388
428
272
S
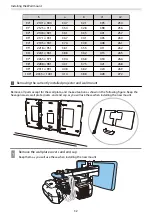
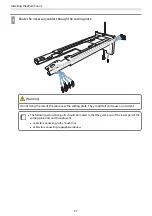
Removing the currently installed projector and wall mount
Remove all parts except for the wall plate, and make situation as shown in the following figure. Keep the
hexagonal axis, wall plate covers, and end cap as you will use these when installing the new mount.
a
Remove the wall plate covers and end cap
Keep them as you will use these when installing the new mount.
Содержание EB-1480Fi
Страница 1: ...Installation Guide ...
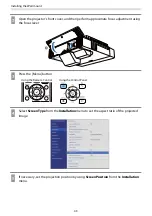
Страница 53: ...Installing the Wall mount 52 b Select Geometry Correction from the Installation menu c Select Arc Correction ...
Страница 55: ...Installing the Wall mount 54 b Select Geometry Correction from the Installation menu c Select Quick Corner ...
Страница 65: ...Installing the pen stand 64 b Attach the cover c Store the interactive pens ...
Страница 75: ...Installing the Touch Unit 74 Wavelength 932 to 952 nm ...
Страница 78: ...Installing the Touch Unit 77 Adjustment range 79 5 140 5 15 76 ...


