


33
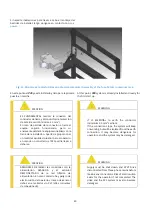
3.3. Instalación
Si usted ha adquirido el equipo con el complemento del
“Soporte de cargador y ondulador”, no deberá realizar
los pasos indicados con dos asteriscos (**)
Estos son los pasos que se deben seguir:
1.
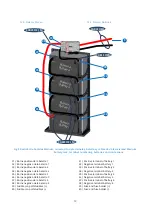
Elija una superficie vertical para fijar los componentes
en la que los elementos del P2S no puedan recibir
salpicaduras de líquidos, estén al margen de flujos
importantes de polvo y asegúrese que sea un área seca,
sin condensación. Asimismo, para minimizar la longitud
de los cables, es recomendable que el sistema esté
próximo al variador de frecuencia.
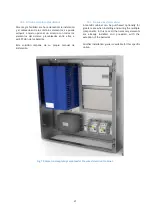
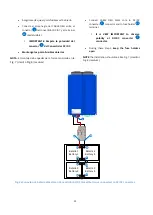
i)
El Convertidor DC/DC (EPCLL) del sistema P2S
siempre debe instalarse sobre una superficie
vertical con los ventiladores de la parte superior
apuntado hacia arriba y con espacio suficiente en la
rejilla de ventilación. De no hacerlo así es posible
que el Convertidor DC/DC no se refrigere bien y
podría llegar a dañarse.
•
Si se ha adquirido el accesorio del soporte del
cargador y ondulador, este se debe colocar
orientado tal y como aparece en la imagen de la
anterior.
ii)
** El Inversor monofásico debe estar ubicado en
posición horizontal, de manera que la ventilación
forzada del mismo sea en este mismo sentido. El
interruptor
deberá estar en posición OFF.
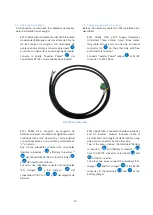
iii)
No coloque el Inversor monofásico lejos del
Convertidor DC/DC, ya que sino el cable
suministrado no será suficientemente largo.
iv)
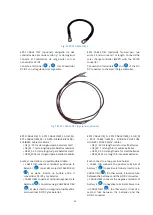
** El cargador podrá estar colocado en cualquier
posición.
•
No coloque el Cargador demasiado lejos
del Convertidor DC/DC, de lo contrario el
cable
suministrado
no
será
suficientemente largo.
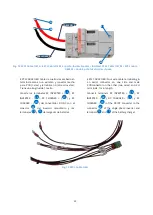
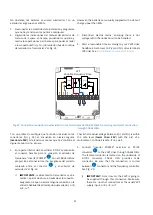
v)
Las baterías y su bastidor deberán estar colocados
y fijados en la posición que aparece en esta imagen.
No coloque las baterías a más de 3 metros
del Convertidor DC/DC, ya que este caso los
cables
suministrados
no
serán
suficientemente largos.
3.3. Installation
If you have previously acquired the holding tray as an
extra accessory, you may skip the steps marked with
two asterisks (**).
These are the steps you must follow to install:
1.
In order to prevent P2S system from water splashes or
dust, choose a vertical surface to hang the
components. Be sure that the installation area is dry
and condensation free. Likewise, a surface close to the
VVVF Drive should be chosen, with the purpose of
minimizing cable length.
i)
P2S DC/DC converter should always be attached
to a vertical surface, with the fans pointing
upwards. Make room in front of the ventilation
grill. Otherwise, cooling system may not operate
properly and the converter may be damaged.
•
If the holder tray has been acquired, it should
be placed as shown in the previous picture.
ii)
** Single-phase inverter should be placed in a
horizontal position; thereafter its cooling system
remains horizontal too. The switch of this inverter
should be OFF.
iii)
Do not place the single-phase inverter far from the
DC/DC converter. Provided wire may not be long
enough.
iv)
** Battery Charger may be placed in any position.
•
Do not place battery charger far from the
DC/DC converter. Provided wire may not be
long enough.
v)
Batteries and battery rack must be placed and
attached as shown in the picture.
Do not place batteries more than 3
metres away from the DC/DC converter.
Provided wires may not be long enough.
25
2
5
d
e
b
e
r
a
e
s
t
a
r
25
de
be
ra
est
ar
Содержание P2S Series
Страница 1: ...1 Manual de instalaci n Installation guide P2S Series plug single phase P2S powered by...
Страница 2: ...2 Versi n 4 6 June 2018 Epic Power Converters S L...
Страница 9: ...9 Fig 3 Convertidor DC DC 5k5 5k5 DC DC Converter 0 1 2 3 4 6 10 9 7 8 5...
Страница 55: ...55 Dimensiones EPCL 5K5 EPCL 5k5 dimensions...
Страница 56: ...56 6 6 Dimensiones del cargador de bater as 6 6 Battery charger dimensions...
Страница 57: ...57 6 7 Dimensiones del inversor monof sico 6 7 Single phase inverter dimensions Inversor TS 400 TS 400 Inverter...
Страница 58: ...58 Inversor TS 700 TS 700 Inverter...
Страница 59: ...59 6 8 Dimensiones del Controlador de carga solar 6 8 Solar charge controller dimensions...
Страница 61: ...61 6 9 2 Bastidor bater as Small 4x1 6 9 2 Small batteries rack 4x1...
Страница 62: ...62 6 9 3 Bastidor bater as Medium 6 9 3 Medium batteries rack...


