


eCopy ShareScan
®
Installation and Setup Guide
|
129
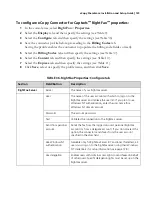
To configure eCopy Connector for Captaris
™
RightFax
™
properties:
1
In the console tree, select
RightFax
>
Properties
.
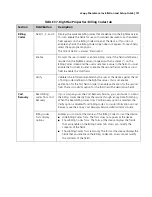
2
Select the
Display
tab and then specify the settings (see Table 9).
3
Select the
Configure
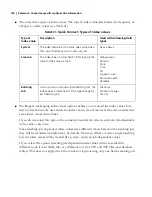
tab and then specify the settings (see Table 36).
4
Save the connector profile before proceeding to the
Billing Codes
tab.
Saving the profile enables the connector to populate the billing code fields correctly.
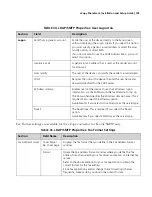
5
Select the
Billing Codes
tab and then specify the settings (see Table 37).
6
Select the
Content
tab and then specify the settings (see Table 10).
7
Select the
Express
tab and then specify the settings (see Table 11).
8
Click
Save
, select or specify the profile name, and then click
Save
.
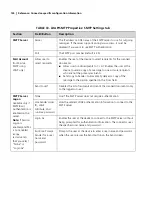
TABLE 36. RightFax Properties: Configure tab
Section
Field/Button
Description
RightFax Server
Server
The name of your RightFax server.
User
The name of the user account with which to log on to the
RightFax server and retrieve the user list. If you plan to use
Windows NT authentication, enter the user name for a
Windows NT domain account.
Password
The account password.
Test
Validates the connection to the RightFax server.
Send from personal
account
Sends the fax from the logged on user’s personal RightFax
account (or from a delegate account). If you do not select this
option, the connector sends faxes from the user account
specified in the User field.
Use Windows NT
authentication
Available only for RightFax Server 8.7 and later. If selected, all
users must log on to the RightFax server using their Windows
NT credentials (for setup information, see page 128.)
Use delegation
Enables users with Admin access rights to send faxes on behalf
of other users. Specific delegation rights must be set up on the
RightFax server.


