background image


D

IGITAL 

C

ONTROL 

I

NCORPORATED


DigiTrak

®

 F5

®

 SST

®


Operator’s Manual 

36


LWD Software Instructions  

Starting LWD Program and Opening Files 

The LWD (Log-While-Drilling) software, which is preinstalled on the SST laptop computer, is used with the 
F5 SST guidance system. The SST transmitter is referred to as the “steering tool” in the LWD software.  

There are three ways to start the DigiTrak LWD program:  

  Double-click on the LWD icon  

  on the desktop. 

  Use the Start button and select 

Start | All Programs | Digital Control, Inc | DigiTrakLWD | 


DigiTrakLWD

  From  Windows  Explorer,  double-click  on  the  DigiTrakLWD.exe


file  in  the  C:\Program 

Files\DCI\DigiTrakLWD folder, or the folder you have designated for the storage location.  

After you start up the program, use the 

File | New 

command on the menu bar or click on the new file icon 

 on the tool bar then select the 

“Steering” option to open a new steering file. You will be prompted to 

enter values for the rod length and reference heading before continuing. The rod length may be any value 
other  than  zero;  the  reference  heading  may  be  any  value  from  0  to  360.  If  no  reference  heading  is 
entered, the reference heading used in the file will be that recorded at the first data point (Rod 0). Click on 
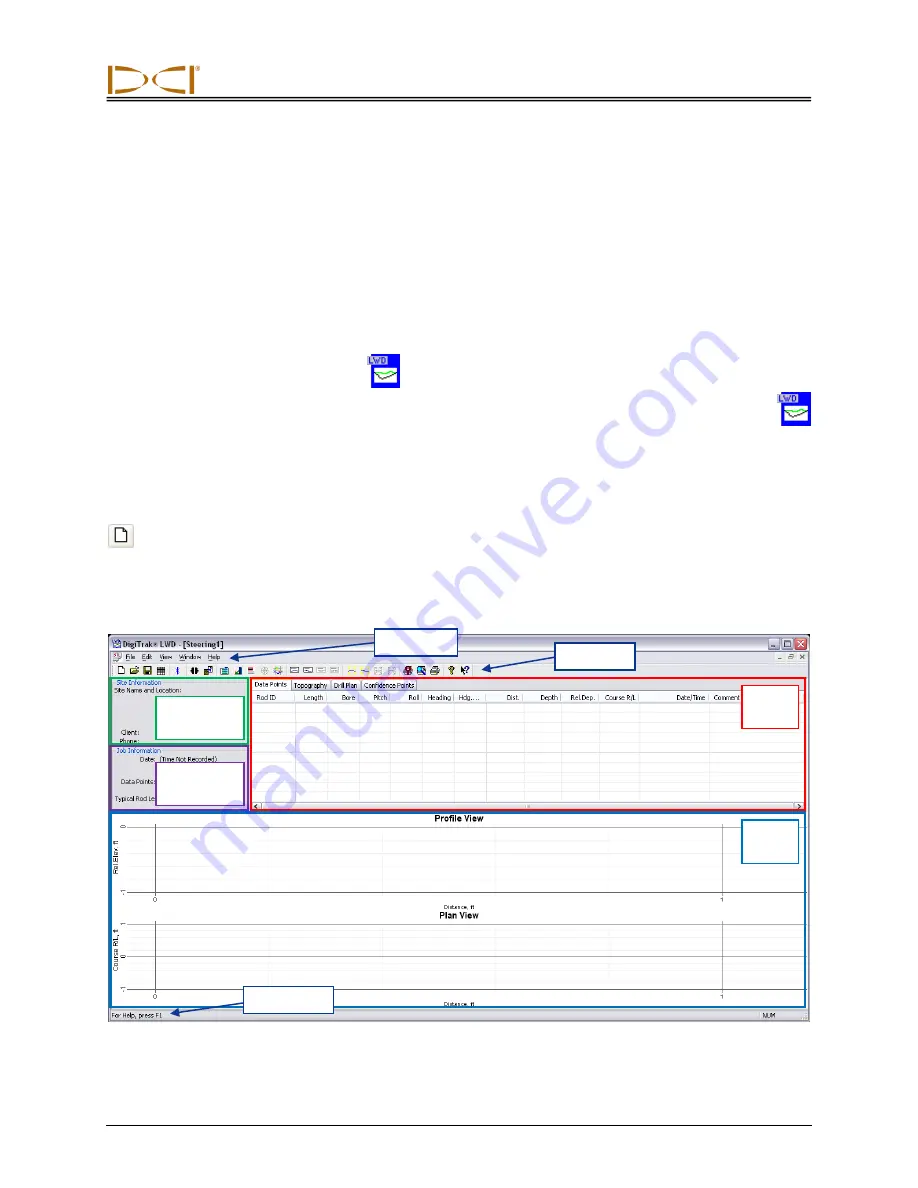
OK to open a blank steering tool file, as shown below.  


LWD Steering Tool Application Window (without data) 

Job 

information 

Data 

tables 

Chart 

area 

Tool bar 


Site  

information 

Status bar 


Menu bar 

Содержание F5 SST

Страница 1: ...DIGITAL CONTROL INCORPORATED dci digital control com www DigiTrak com Guidance System Operator s Manual ...

Страница 2: ...ein shall constitute any warranty by DCI nor will anything herein be deemed to modify the terms of DCI s existing Limited Warranty applicable to all DCI products The most recent version of this manual is available on DCI s website Compliance Statement This equipment complies with Part 15 of the Rules of the FCC and with Industry Canada license exempt RSS standards and with Australia Class License ...

Страница 3: ... China 368 Xingle Road Huacao Town Minhang District Shanghai 201107 P R C 86 21 6432 5186 86 21 6432 5187 fax dci china digital control com Europe Brueckenstraße 2 97828 Marktheidenfeld Germany 49 9391 810 6100 49 9391 810 6109 fax dci europe digital control com India DTJ 1023 10th Floor DLF Tower A DA District Center Jasola New Delhi 110044 91 11 4507 0444 91 11 4507 0440 fax dci india digital co...

Страница 4: ...t 253 395 2800 or complete and submit the form online at our website www digitrak com We will put you on the Digital Control mailing list and send you product upgrade information and our FasTrak newsletter Feel free to contact us if you have any problems or questions Our Customer Service department is available 24 hours a day 7 days a week International contact information is available on our webs...

Страница 5: ...m Operation 27 Logging Drill Run 31 Summary of Basic Operating Procedure 35 LWD SOFTWARE INSTRUCTIONS 36 Starting LWD Program and Opening Files 36 Menu and Tool Bars 38 Information Fields 40 Editing and Annotating Charts 45 Printing and Previewing Project Files 47 Saving Project Files 47 E mailing Report to Customer Who Does Not Have DigiTrak LWD software 48 INPUTTING AND EDITING DRILL DATA 49 Top...

Страница 6: ...erators do not use the drilling or locating equipment correctly to obtain proper performance DCI equipment is not explosion proof and should never be used near flammable or explosive substances In the event of electrostatic shock the display screen may go blank No data loss will occur Click the trigger to reset the receiver or toggle down to reset the remote display Hot surfaces can occur on cable...

Страница 7: ...environment For more information about where you can drop off your waste equipment for recycling please contact your local city office your household waste disposal service or the shop where you purchased the equipment The battery charger provided with your DigiTrak locating system is designed with adequate safeguards to protect you from shock and other hazards when used as specified within this d...

Страница 8: ...y such as car rental agencies using their remote check in modules or other directional drilling locating equipment Background noise must be minimal and signal strength must be at least 150 points above the background noise during all locating operations Because this equipment may generate use and radiate radio frequency energy there is no guarantee that interference will not occur at a particular ...

Страница 9: ...transmitter is not in use and a special non magnetic housing is required during drilling Steering data is shown in real time on both the remote display at the drill rig and on the laptop computer which can be placed up to 50 ft 15 m away from the remote The remote and computer are connected through the cable box which is also connected to the SST transmitter and the power source The F5 receiver is...

Страница 10: ...ed on remote and recorded on computer Heading deviation in tenths of a degree Amount of deviation SST transmitter is exhibiting from the reference heading displayed on remote and recorded on computer Depth in feet or meters pitch in tenths of a percent or tenths of a degree and roll in degrees from 0 360 Displayed on receiver and remote when receiver is used for walkover locating calculated depth ...

Страница 11: ...nd techniques used in this manual are considered basic to the F5 locating system If you have never used the F5 system then you are required to read the operator s manual for the system DigiTrak F5 Directional Drilling Locating System Operator s Manual before using the SST system NOTE You must know how to operate the F5 locating system prior to operating the F5 SST guidance system You also must rea...

Страница 12: ...ield The SST transmitter is similar to the standard cable transmitter except that it also provides heading information and requires special non magnetic shielding and a non magnetic housing The heading information in addition to the pitch and roll data enables the drill operator to determine the SST transmitter s position and orientation and thus allows steering of the tool The SST transmitter pro...

Страница 13: ...t least three slots equally spaced around the circumference of the housing Each slot must be at least 1 16 or 0 0625 in 1 6 mm wide For accuracy slot measurements must be taken from the inside of the housing The SST transmitter which is 24 in 60 96 cm long requires slots in the housing that are at least 9 in 22 9 cm long and begin at least 8 5 in 21 6 cm from the front end of the transmitter as sh...

Страница 14: ... and displays real time information including heading pitch roll temperature and battery status Any DigiTrak F Series Display FSD or DigiTrak Multi Function Display MFD can be upgraded to have the SST capability An SST remote operates much like a standard remote display with the function buttons on the keypad direction buttons and execute button and the main menus operating in the same manner The ...

Страница 15: ...x The white wire from the SST transmitter connects to the power post on the cable box The laptop computer is connected to the serial port on the cable box When connected real time data can be viewed at the computer and data points can be logged by the computer operator The SST software allows for viewing logging editing graphing saving and printing of the drill data See the LWD Software Instructio...

Страница 16: ...wever only the information that is pertinent to running the SST guidance system is included in this manual Instructions for the other LWD applications are given in the DigiTrak LWD DataLog System Operator s Manual The steering application in the LWD software is used with the SST system A typical steering job screen as it appears in the LWD application window is shown below See the LWD Software Ins...

Страница 17: ...between the non magnetic housing and the first drill rod a second monel may be required if you are using a mud motor Fish tape or device to fish wire through rod 10 gauge wire Approximately 20 ft 6 m for use as a ground connection when establishing the reference heading 10 gauge wire Enough for bore length and additional for pullback of rods Butt splices for 10 12 gauge wire Heat shrinks Crimper H...

Страница 18: ...System Operation Logging Drill Run A summary of the procedure is provided at the end of the section Setting Up SST Laptop 1 Plot Topography Drill Plan and Planned Deviation Any topographic and or planned bore information that you want in your SST job file can be input into the SST software before drilling or during the drilling logging process DCI recommends that you input this information before ...

Страница 19: ...on mag Tooling Assembly onto Marked Bore Path With the transit still in position but rotated 180 place the tooling assembly at least 30 ft 9 m in front of the drill onto the marked bore path so that it is pointing in the direction of drilling with the tool or bent sub oriented to 0 12 o clock as shown in the photo on the right and the SST Job Site Setup diagram below Sight the transit onto the str...

Страница 20: ...lay if using a panel mounted MFD remove it from the drill rig console contact your dealer for assistance if necessary Multi function cable box MFCB Power source such as a generator or 12 28V battery Amp meter NOTE Keep the remote display with its magnetic mounting bracket at least 5 ft 1 5 m from the SST transmitter or damage to the SST transmitter could occur At least 30 ft 9 m from tool to drill...

Страница 21: ... cable box You must ground the transmitter by connecting the negative terminal on the power source to the metal end cap on the SST transmitter Press the execute button on the SST remote to power it up From the main menu select the cable mode option and press the execute button to enter cable mode Verify that you see data on the remote display and the receiver If you do not then recheck your connec...

Страница 22: ...g key When the transmitter is properly keyed it will not rotate NOTE Always use the extraction insertion tool to install or remove the cable transmitter Do not ever try to remove the transmitter from the housing by pulling on the transmitter wire Disconnect the amp meter and reconnect the SST transmitter s wire to the power post on the cable box Be sure to ground the housing this is commonly done ...

Страница 23: ...ely SST Remote Steering Screen Showing New Reference Heading NOTE If possible take a heading reading at several locations along the bore path This will allow you to determine an average reference heading to use over the bore path and possibly identify variations in the heading that could result in inaccurate readings When the SST transmitter s heading does not match the reference heading the tool ...

Страница 24: ... the right arrow button from the steering screen A popup menu will display to set a new roll offset with the option to set the displayed value or exit SST Remote Popup Menu for Setting New Roll Offset Push the right arrow button to highlight the set option and press the execute button The roll position and roll value on the remote will change to read 0 and the roll offset value 194 in this example...

Страница 25: ...the value of the roll shown on the remote display will be that of the SST transmitter If the set option is selected the roll offset function will be enabled with the roll offset value shown 12 Set Roll Offset on Receiver if needed If you have set the roll offset function on the remote then you must next set and enable the function on the receiver First select the roll offset option from the settin...

Страница 26: ...by the roll value being 0 0 and the letters RO appearing to the lower left of the roll indicator SST Receiver Locate Mode Screen Showing New Roll Offset To disable and stop the roll offset function select the roll offset option from the settings menu then toggle right to highlight the option to disable the roll offset and click the trigger The roll offset function will be disabled and the value of...

Страница 27: ...oint calibration and follow the prompts to complete the calibration Do not move the receiver while it is calibrating When calibration is complete the confirmation signal will sound and a checkmark will display on the screen indicating a successful calibration The screen will then return to the locate mode display Take depth readings at several locations using a tape measure to verify that the dept...

Страница 28: ...he negative terminal on the drill rig s battery or a metal contact point on the drill rig or drill stem Connecting SST System Components The compression fitting shown in the diagram is a non DCI part required to seal the transmitter from the drilling fluid Contact a drill or tooling manufacturer for information on compression fittings With the SST transmitter properly grounded through the drill ho...

Страница 29: ... Information or clicking the edit job information icon Click on OK to open the new steering tool job file in the LWD application Select File Upload Control or click on the upload control icon on the toolbar to open the Steering Tool Data Upload Control dialog box shown below Steering Tool Data Upload Control Dialog Box not connected Reference heading entered on remote Select to use heading recorde...

Страница 30: ...y again Steering Tool Data Upload Control Dialog Box connected See the Inputting and Editing Drill Data section later in this manual for complete information on using the job information and data upload control dialog boxes Select to input and record a different heading value than displayed here Rod length to be recorded at next logged point Log button select to log a data point with the data show...

Страница 31: ... Information dialog box 19 Locate if possible Override Data if necessary and Continue to Log As the tool moves away from the drill to maintain a straight drill path the heading readings should match the reference heading Based on your steering commands and the tool s located position using the receiver you can determine if the heading and pitch are correct or if compensation in the LWD log is requ...

Страница 32: ...y these values place your mouse on the row of data to be edited in the data points table in the main application window and double click to open the Edit Steering Tool Data Point dialog box see figure below Note that if you make a change to the data the rod number for that row will show a gray rod as opposed to black for an unmodified data point and it will be highlighted on the data chart Edit St...

Страница 33: ...plots and also from the data points table see LWD Software Instructions section If you decide to not pull back after you have retreated rods you can press the Restore button until you are back to the original position or where you want to start resteering and the original data will reappear Once a rod is pulled back it will remain visible on the screen until a new rod that changes the previous bor...

Страница 34: ...sure 6 ft 1 8 m from the make up break out clamps to the top of the rod then you would subtract 6 ft 1 8 m from the rod length If the rod length is 10 ft 3 0 m then the last rod measurement will be 4 ft 1 2 m NOTE If the depth of the last rod is less than 24 in 61 cm and you are tracking the SST transmitter with the receiver you must set the height above ground HAG measurement and log the last dat...

Страница 35: ...nto aligned non mag tooling assembly Setting Reference Heading and Roll Offset 10 Set reference heading and shoot the probe 11 Set roll offset on remote display if needed 12 Set roll offset on receiver if needed Calibrating SST Transmitter and Confirming Proper System Operation 13 Calibrate SST transmitter to receiver 14 Measure SST transmitter current draw in housing 15 Verify pitch readings usin...

Страница 36: ... C Program Files DCI DigiTrakLWD folder or the folder you have designated for the storage location After you start up the program use the File New command on the menu bar or click on the new file icon on the tool bar then select the Steering option to open a new steering file You will be prompted to enter values for the rod length and reference heading before continuing The rod length may be any v...

Страница 37: ...with data The LWD application menus and tool bar icons are described in the following subsection and the different information fields site information job information data tables and profile and plan view charts are described afterward We recommend that you review the help files in the LWD software for more information The tool tip helper can also be used to understand different parts of the appli...

Страница 38: ... box to save the open job to a specified file name and folder When a new file has not yet been saved selecting the save icon on the tool bar will open the same screen as the Save As menu command NOTE DCI recommends saving SST data often and with different names Print Opens the Print dialog box where you can select printing options and print the job Print Preview Displays the project on the screen ...

Страница 39: ...ed Utilities Opens the Utility Flags dialog box where you can add change or delete flags and data regarding utilities Profile Chart Annotations Opens the Steering DataLog Profile Annotations dialog box where you can make comments and insert drawings to appear on the profile chart This dialog box can also be opened by holding the shift key down and using the mouse button to draw a box in the profil...

Страница 40: ...on Window shown at the start of this section Detailed information on reading and editing the data fields are provided in the software s help files Use the tool tip helper or view help topics for more information Site Information The site information section displays the job location and client information Visible on the screen are Site Name and Location Job name and physical location of site Clien...

Страница 41: ... box where you can edit the typical rod length reference heading reference elevation and relative position at entry select the Job Information command in the Edit menu click on the job information icon on the toolbar or double click anywhere in the job information field of the application window The job information dialog box also automatically launches after a new job is created Data Tables Four ...

Страница 42: ... table include Topo Pt Number of the topography point as it appears left to right on the profile chart Dist Distance from where the tool enters the ground Rod 0 to the specified topography point Units are those displayed in the job information field for depth Rel Elev Vertical distance from the origin or the chart to the specified topography point Units are those displayed in the job information f...

Страница 43: ...d for depth Confidence points can be edited inserted deleted or imported into the confidence points table A confidence point can be edited in the Steering Confidence Point dialog box by right clicking on the confidence point in the table and selecting Edit or by double clicking on the confidence point in the table or on the chart See the Inputting and Editing Drill Data section for more informatio...

Страница 44: ...ative depth and relative elevation from the chart s origin Cursor coordinate details appear when you hover the mouse over the profile view chart and data point details appear when you hover the mouse over a data point in the chart Plan View Chart The plan view chart is at the same horizontal position as the profile chart but it is from a bird s eye view Plan View Chart Area The Y axis of the chart...

Страница 45: ... chart editing functions Drawing Shapes and Adding Captions There are four ways you can access the chart annotations dialog boxes where you can draw shapes and enter information to be included on the chart graph and printed report Select the profile or plan chart annotations command from the Edit menu Click on the edit profile or plan chart annotations icon on the tool bar Place the mouse on an ex...

Страница 46: ...w Caption in the Draw Shape section of the chart annotations dialog box must be checked to activate the Caption section of the dialog box With the Caption section active type the words you would like to appear on the graph in the text box in this section You do not have to draw a shape to add a caption If a shape is drawn the caption will appear centered in the shape by default To change the locat...

Страница 47: ...ent and contractor information if entered will appear on the first page along with the statistical data about the job and any job comments The profile and plan view charts will appear on the second page The third page and more if needed will list the drill data Data for data points that have been removed will not display The topography survey data and drill data if entered will display Saving Proj...

Страница 48: ...alled xps It is a standard Windows component and will probably appear in your printer list Only Microsoft Internet Explorer can present this document type without a translator If IE is not your default web browser then you or your customer may not be able to view this file type Please refer to http windows microsoft com en US windows vista Print to the Microsoft XPS Document Writer for instruction...

Страница 49: ...table and then select Insert A new topo point will display in the data table and on the chart with default values for distance and relative elevation 2 Edit the topography data values if necessary To add a topography point to the middle of the list 1 Select the topo point prior to where the new point is to be inserted you can click on the topo point in the data list or on the terrain graph 2 Right...

Страница 50: ...mns of data Column A List the horizontal distance that each topo data point is from the drill rig in order from the closest to the farthest Column B List the associated relative elevation vertical distance from the surface of the ground at the drill rig for each topo data point listed in column A If no elevation data is entered for a data point there will be a gap in the terrain graph for that dis...

Страница 51: ...d below The drill plan graph which is the planned bore with the measured terrain appears as shown below Drill Plan with Terrain Inserting Drill Plan Data Points To insert the first or next sequential drill plan point on the table 1 Right click in any blank cell in the drill plan data table and select Insert A new plan point will display in the data table and on the chart with default depth relativ...

Страница 52: ...ed click on the plan point in the data list or on the drill plan graph 2 Right click on the highlighted point in the data list and select Edit or double click on the plan point in the list or on the drill plan graph to open the Edit Drill Plan Data dialog box Edit Drill Plan Data Dialog Box 3 Modify the data as desired in the dialog box 4 Click on OK to save your changes or Cancel to close without...

Страница 53: ...he reference heading line for each plan point listed in column A If no depth data is entered for a plan point there will be a gap in the drill plan view graph for that distance 4 Save the spreadsheet file in its standard format so that it can be found later 5 Save the spreadsheet file again in the same location using the File Save As command to save it as a CSV csv file type which is available as ...

Страница 54: ...dence point will appear on the graph as a highlighted point and display in the confidence points data table The confidence point data will override the calculated drill path and force it to pass through the measured point To edit an existing confidence point 1 Right click on the confidence point in the data table and select Edit or double click on the confidence point in the graph to open the Stee...

Страница 55: ...ading area enter the same reference heading value unit in degrees that you have set in the remote display it can be 0 To use the heading recorded at Rod 0 as the reference heading check the box next to Use Rod 0 Ref Hdg In the Survey Point Elevation Change area of the dialog box the elevation units may be feet ft or meters m and can be changed and can be changed in the Edit Display Units menu Chec...

Страница 56: ...o open the Steering Tool Data Upload Control dialog box Select the Upload Control command in the File menu Click on the upload control icon on the toolbar Steering Tool Data Upload Control Dialog Box Once the upload control dialog box is opened you can hide it so that you can more easily access these controls on the main application screen by clicking on the upload control icon on the toolbar Clic...

Страница 57: ... the next data point will show 3 for this value to finish the 7 ft typical rod length Click on the check box next to Heading to enter a heading value in degrees for the next recorded data point and to override the measured heading NOTE This manual override of the heading value is used when the magnetometer does not provide a valid heading due to metallic objects around the transmitter Under the He...

Страница 58: ...ations Editing Steering Tool Data Points To edit the pitch heading and rod length information recorded at a data point 1 Open the Edit Steering Tool Data Point dialog box by double clicking on the data point to be edited in the data point table or on the graph or right clicking on the data point in the table and selecting Edit Edit Steering Tool Data Point Dialog Box 2 Modify the data as required ...

Страница 59: ...point to be restored 2 Select the checkmark next to Remove to uncheck the remove option and restore the data point Hiding Steering Tool Data Points To hide a steering data point from appearing on the graph 1 Right click on the data point to be hidden 2 Select Hide The data point will be removed from the graph but its data will still be used for calculating the drill path The point will show as hid...

Страница 60: ...ational Current DigiTrak SST Transmitter SST 9 28 V 6 A max DigiTrak F5 SST Receiver F5R 14 4 V 350 mA max DigiTrak F Series Remote Display FSD 12 28 V 3 2 W max DigiTrak MFD Remote Display MFD 12 28 V 3 2 W max DigiTrak Multi Function Cable Box MFCB 12 28 V 6 A max Environmental Requirements Device Relative Humidity Operating Temperature System Working Altitude DigiTrak SST Transmitter 100 4 to 1...

Страница 61: ...ust be kept at least 5 ft 1 5 m away from all magnets including the remote display which has a magnetic mount that will damage the transmitter A protective magnetic shield is provided with the SST transmitter and is available through any authorized DigiTrak dealer The magnetic shield should be placed on the end of the SST transmitter at all times when the transmitter is not in use Placing tape aro...

Страница 62: ...sing a damp soft cloth without chemicals or cleaning agents Clean the receiver remote and battery charger case using only a soft moist cloth and mild detergent Do not use chemicals to clean the transmitter Inspect the equipment daily and contact DCI if you see any damage or problems Do not disassemble or attempt to repair the equipment Do not store or ship this equipment with batteries inside Alwa...

Страница 63: ... end cap from the transmitter base 3 Identify the deepest set screw depression in the base Using the 1 8 Allen wrench or a standard screw driver remove the white nylon set screw There will be a brass set screw behind the nylon screw that holds the cable in place NOTE Do not tamper with the brass set screw and O ring located on the opposite side of the base in the shallow depression 4 Using the 3 3...

Страница 64: ...ith a thin layer of Noalox to prevent electrical corrosion do not substitute with standard grease 11 Replace end cap and line up the screw holes on the base with the nonthreaded holes on the cap 12 Install two new lock washers and Torx screws and tighten the screws in place using the T15 Torx wrench NOTE Use care when threading the Torx screws into the base to avoid cross threading ...

Страница 65: ...T IS NOT COVERED This Limited Warranty excludes all damage including damage to any DCI Product due to failure to follow DCI s operator s manual and other DCI instructions abuse misuse neglect accident fire flood Acts of God improper applications connection to incorrect line voltages and improper power sources use of incorrect fuses overheating contact with high voltages or injurious substances use...

Страница 66: ...nt available together with a list of all DCI Product serial numbers It is important that field troubleshooting be conducted because many problems do not result from a defective DCI Product but instead are due to either operational errors or adverse conditions occurring in the User s drilling environment 3 If a DCI Product problem is confirmed as a result of field troubleshooting discussions with a...

Отзывы: