ALL ABOUT IMAGE RECOGNITION & PROCESSING
ALL ABOUT IMAGE RECOGNITION & PROCESSING
5. Operation
5. Operation
4. System Setup
4. System Setup
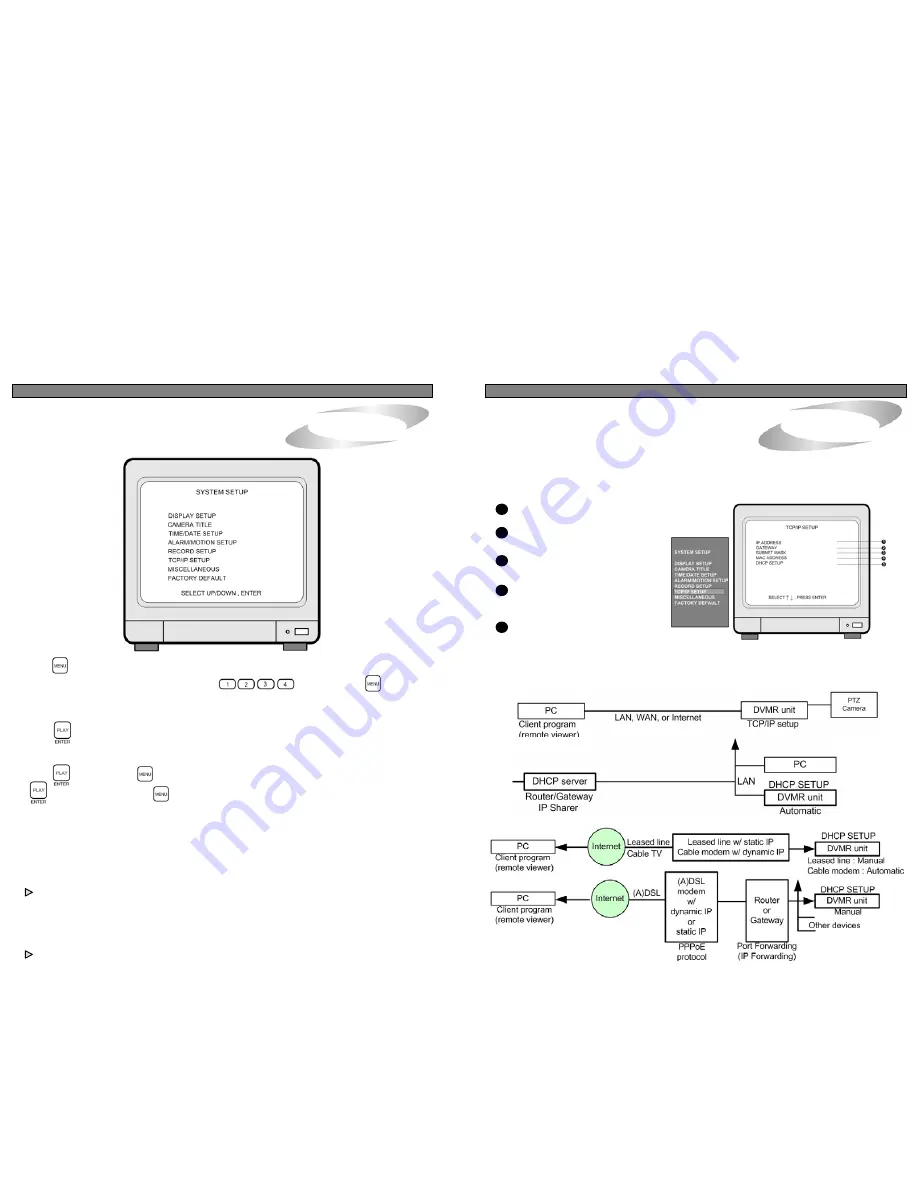
7. TCP/IP SETUP
TCP/IP function of this DVMR system enables user to see live pictures and recorded pictures via internet
line, far apart from DVMR unit. To see live pictures or recorded pictures of DVMR, users must input IP
address, Gateway, and Subnet mask in TCP/IP SETUP in DVMR first, and then input IP, PORT number
and PASSWOR(ADMIN password in DVMR unit) in Remote Viewer Program installed on client PC.
For detail procedure for installing Remote Viewer Program and setting up, refer to manual for Remote
Viewer program included in the package.
1
IP ADDRESS : Enter numbers using direction buttons and
press [MENU] button.
2
GATEWAY : Enter numbers using
direction buttons and press [MENU]
button.
3
SUBNET MASK : Enter numbers using
direction buttons and press [MENU]
button.
4
MAC ADDRESS : It is unique ID number
provided by the manufacturer, and the
user should not change under any
condition.
5
DHCP SETUP : In case you connect
DVMR unit to LAN network under router/Gateway/IP sharer
which has DHCP server function, set DHCP SETUP at DHCP, and
DVMR unit automatically gets IP data automatically during the process of booting.
In case you connect DVMR unit to leased line with static IP or Router/Gateway connected (A)DSL line
(with static IP or dynamic IP), you are requested to set DHCP at MANUAL and input IP data manually.
For details, refer to Remote Viewer manual.
TCP/IP SETUP
1) Concept of accessing to DVMR unit via IP network
2) DHCP SETUP according to condition of IP network
a) Accessing to DVMR unit in the same Intranet(LAN)
b) Accessing to DVMR unit via Internet line
For details of TCP/IP SETUP in DVMR unit and PC, refer to “Remote Viewer manual” included in the package.
1. Basic Operation
Display of SYSTEM SETUP
1) Press button.
2) Log into the system by entering the password with
button and press button
to enter SETUP MENU.
3) Use [UP]/[DOWN] button to select setup item.
4) Press button to enter sub-menu of selected SETUP
5) Press sub-menu item with [UP]/[DOWN] button,
and change the value with [LEFT]/[RIGHT] button.
6) Press button to forward button to go backward.
button enables to enter and button to go back.
7) To go back to the very first SETUP condition recommended by manufacturer, set at FACTORY DEFAULT.
You can set at FACTORY DEFAULT all in one (as a whole) or group by group. When cursor is at
ALL SETUP, you can set at ON or OFF by pressing [ENTER] button. If you set ALL SETUP at ON, all
groups of settings are SET as per FACTORY DEFAULT recommended by manufacturer. If you set
ALL SETUP at OFF, then you are requested to set each group of settings separately one by one, ON or
OFF, and groups of settings set at ON shall be reset whenever you set at FACTORY DEFAULT.
To reset, you have to select ALL SET or each group of settings (ON or OFF), and then move to
RESET NOW and press [ENTER].
Items remain unchanged when FACTORY DEFAULT is selected.
1. value of TIME/DATE SETUP
2. Date stored on HDD
3. Marked image (Internal backup)
4. ADMIN password
5. ALARM LIST SETUP
We recommend users to set at FACTORY DEFAULT in the first operation, and when you replaced
EEPROM for updating DVMR program or replaced HDD.
15
24


