


6-10
Chapter 6
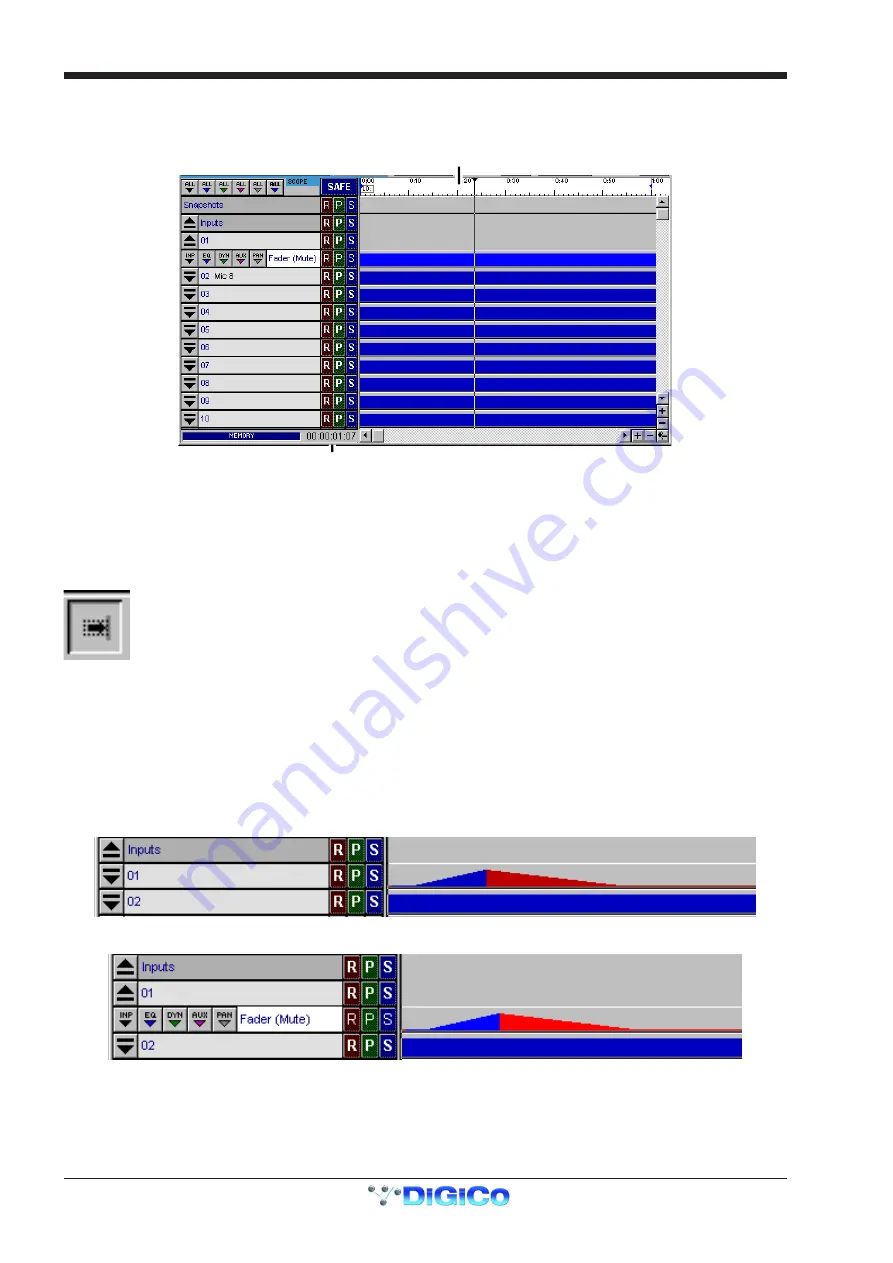
6.2.3 The Time-Line ......................................................................
The Time-Line indicates the current time, as displayed on the timecode display. The timecode position of the trackball pointer is shown at
the bottom left of the Automation Editor screen.
Trackball Position
Time-Line
When timecode is running, you can choose to make the time-line move with it, so that the line travels from left to right: see
Following the
Timecode
overleaf.
When timecode is not running, you can select a particular timecode point in the mix by positioning the time-line using the trackball. To
position the time-line, click on the timecode
display area (white background) at the top of the section. The
Trackball Position Indicator
provides a continuous read-out of the
position of the trackball pointer, so you can use it to position the trackball precisely to the nearest frame before clicking to move the time-
line. This will issue a locate instruction to connected machines if they are following the console's timecode.
Following the Timecode: the Follow Button
This button, at the top right of the Automation section, allows you to prevent the timeline from moving as timecode runs. Stopping the
timeline also prevents the automation data from "scrolling" out of the visible area: this is useful if you want to look closely at a particular
section of the automation data without stopping the timecode.
6.2.4 Event Display ........................................................................
The Automation Editor primarily shows the Fader and Mute status for each channel, along a timeline running from left to right. As we have
seen the display can be changed to show the subset of information you need. If you record changes (using the on-line Record mode - see
6.1), these changes are displayed in the Automation Editor as "Events", and you can change or move these Events using the off-line editor
tools.
NOTE:
If the channel display is in its "collapsed" state (None of the lines of individual types of event are showing as seen below) editing
will affect all the events on the selected channel.
To edit individual types of event the view must be expanded to show the relevant events by touching the down arrow next to the channel
number.
In the above example the fader and mute events are shown and can therefore be edited in isolation. When the view is expanded the blue
and red colours appear in a brighter shade.
Содержание D5T
Страница 1: ...Operation Manual Issue A September 2004 Software Versions 2 4...
Страница 2: ......
Страница 10: ......
Страница 11: ...Chapter 1 1 1 Chapter 1 Getting Started...
Страница 12: ...Chapter 1 1 2...
Страница 32: ...Chapter 2 2 1 Chapter 2 Inputs and Console Channels...
Страница 33: ...Chapter 2 2 2...
Страница 58: ...Chapter 3 3 1 Chapter 3 Busses and Outputs...
Страница 59: ...3 2 Chapter 3...
Страница 68: ...4 1 Chapter 4 Chapter 4 Master Section...
Страница 69: ...Chapter 4 4 2...
Страница 91: ...5 1 Chapter 5 Chapter 5 The Cue List...
Страница 92: ...Chapter 5 5 2...
Страница 111: ...Chapter 6 6 1 Chapter 6 Automation...
Страница 127: ...7 1 Chapter 7 Chapter 7 Effects...
Страница 128: ...7 2 Chapter 7...
Страница 135: ...8 1 Chapter 8 Chapter 8 Troubleshooting...
Страница 136: ...Chapter 8 8 2...
Страница 139: ...A 1 AppendixA Appendix A D5TC Theatre Masters Controller...
Страница 140: ...A 2 Appendix A...
Страница 147: ...B 1 Appendix B Appendix B Multiple Console Setups Inc Redundant Engines...
Страница 148: ...B 2 Appendix B...
Страница 162: ...B 16 Appendix B Standalone PC Screen Appearance...


