


5-19
Chapter 5
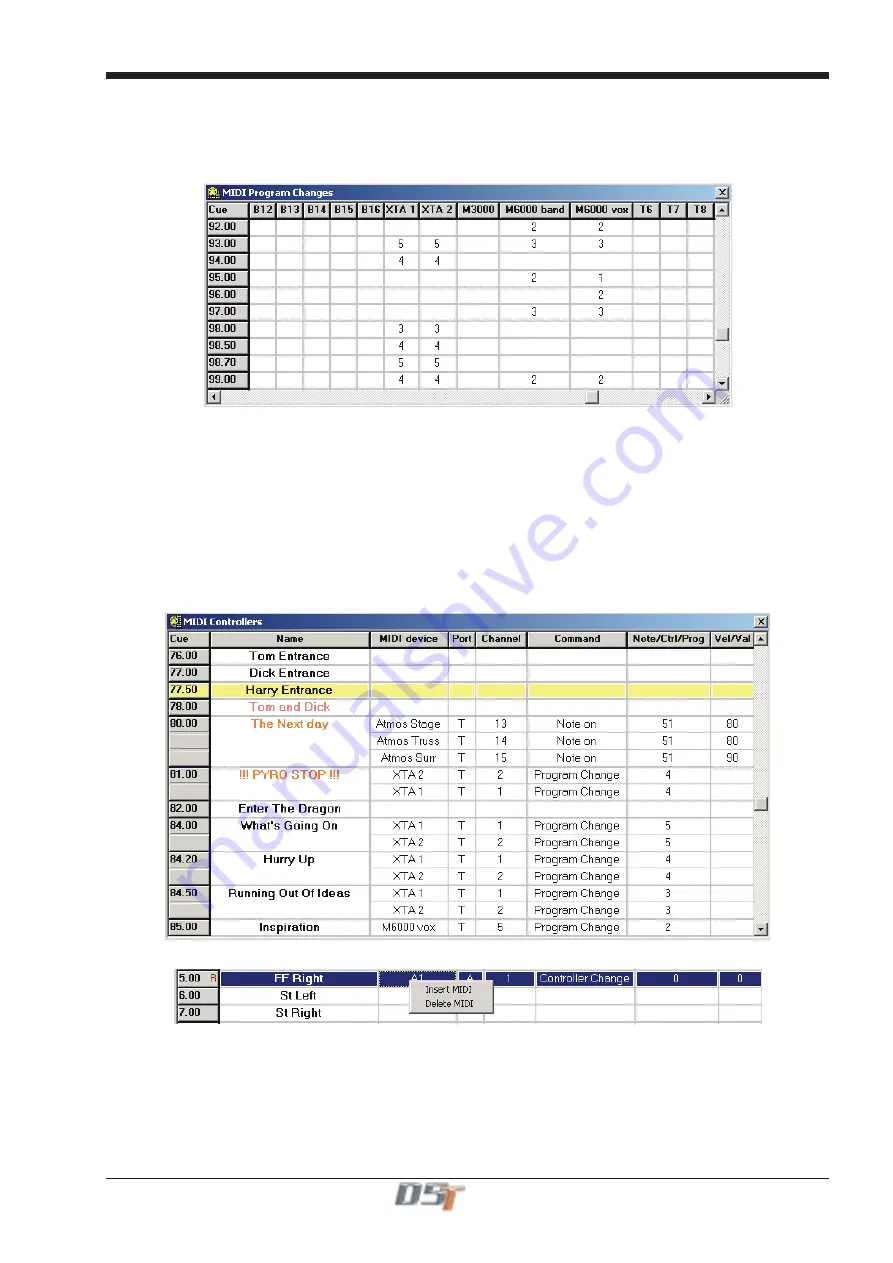
5.3.9 MIDI Program Changes ........................................................
The icon showing a MIDI socket and a small horizontal grid represents MIDI Program Changes.
If the MIDI Channel names have been set up as described above then scrolling the window horizontally will show column names for each
MIDI device in the system. To send a Program Change message from a given cue, simply click in the box relating to the required cue in
the correct column for the device and type a MIDI Program Change number.
To send other MIDI messages, see the next section on MIDI controllers.
5.3.10 MIDI Controllers .................................................................
The icon showing a MIDI socket and a small vertical grid represents MIDI Controller Messages.
To send a controller message from a cue, go to the row fro the required cue, click repeatedly in the
Port
column and select port A, B or T.
Then select a MIDI Channel in the
Channel
column in a similar way. If you have already defined the Channel Names (as previously
discussed), then the defined device(s) should automatically appear in the
MIDI Device
column.
Now select a type of MIDI command from the
Command
column and then complete the message by selecting one or two values accord-
ing to the type of message.
If you wish to send more than one MIDI message from a cue then right click anywhere in the cue's row and select Insert MIDI from the
drop down menu. This will insert an extra row for that cue and the above process can be repeated for a new message.
To remove a row, right click and select delete from the drop down menu.
Right clicking in the relevant cue row will show a menu allowing the insertion or deletion of a MIDI Controller message
Содержание D5T
Страница 1: ...Operation Manual Issue A September 2004 Software Versions 2 4...
Страница 2: ......
Страница 10: ......
Страница 11: ...Chapter 1 1 1 Chapter 1 Getting Started...
Страница 12: ...Chapter 1 1 2...
Страница 32: ...Chapter 2 2 1 Chapter 2 Inputs and Console Channels...
Страница 33: ...Chapter 2 2 2...
Страница 58: ...Chapter 3 3 1 Chapter 3 Busses and Outputs...
Страница 59: ...3 2 Chapter 3...
Страница 68: ...4 1 Chapter 4 Chapter 4 Master Section...
Страница 69: ...Chapter 4 4 2...
Страница 91: ...5 1 Chapter 5 Chapter 5 The Cue List...
Страница 92: ...Chapter 5 5 2...
Страница 111: ...Chapter 6 6 1 Chapter 6 Automation...
Страница 127: ...7 1 Chapter 7 Chapter 7 Effects...
Страница 128: ...7 2 Chapter 7...
Страница 135: ...8 1 Chapter 8 Chapter 8 Troubleshooting...
Страница 136: ...Chapter 8 8 2...
Страница 139: ...A 1 AppendixA Appendix A D5TC Theatre Masters Controller...
Страница 140: ...A 2 Appendix A...
Страница 147: ...B 1 Appendix B Appendix B Multiple Console Setups Inc Redundant Engines...
Страница 148: ...B 2 Appendix B...
Страница 162: ...B 16 Appendix B Standalone PC Screen Appearance...


