


6-8
Chapter 6
Remember that automation modes can be set on a channel and on an individual parameter basis, as described in the third example above.
For example, it is possible to set all a channel's controls except faders to Update, and then control the channel fader by firing a cue. Even
a single band of a particular EQ section could be taken out of dynamic automation and put under cue control. The only restriction is that
controls are not automatically switched from dynamic to cue automation, so its best to decide at the beginning of the mix which controls
will be automated by which technique. Then if you need to add a cue to an EQ which is basically dynamically automated this is still
possible using the
Channel Controls in Record, Cues isolated
combination described above.
6.1.11 MIDI Patches .......................................................................
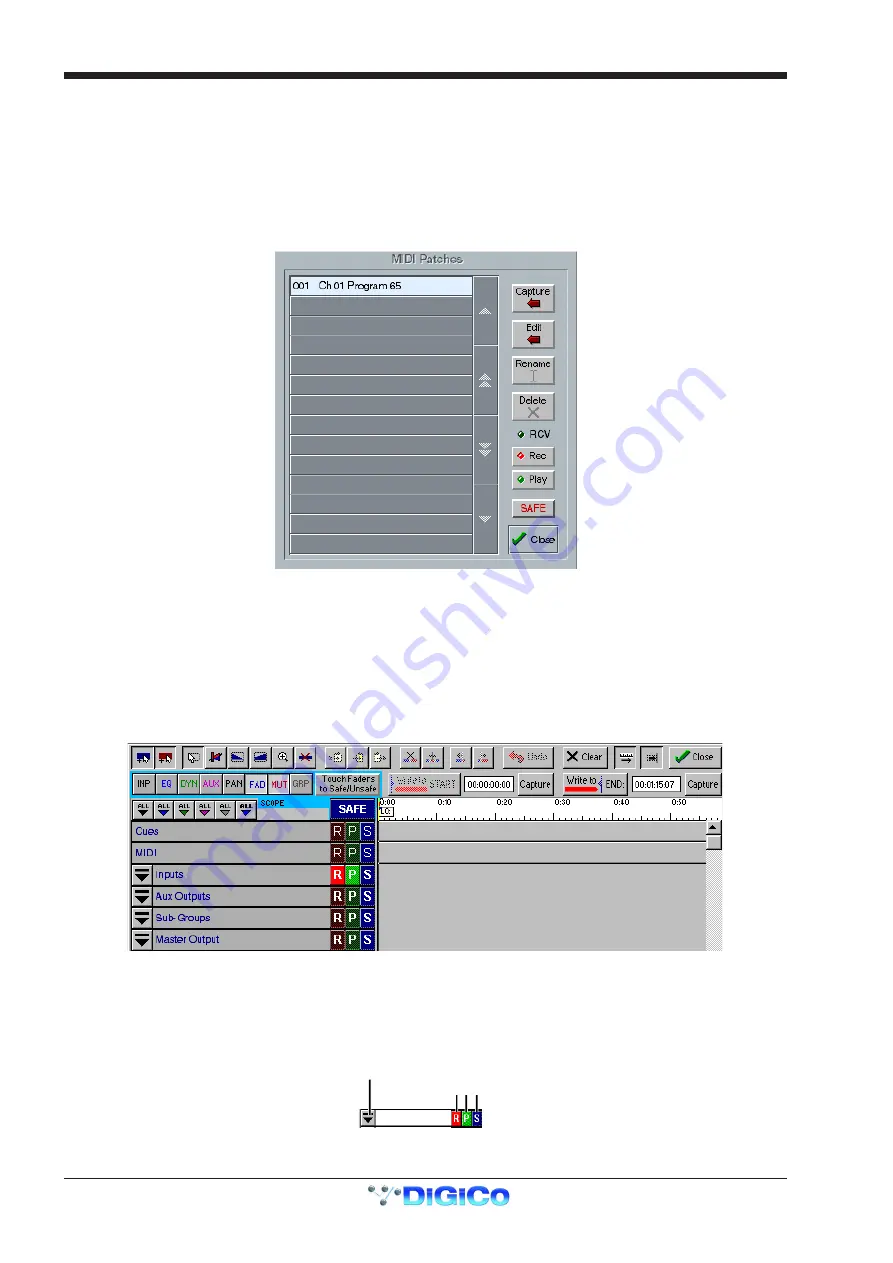
Touching the
MIDI Patches
button in the
Setup
menu opens the MIDI Patches panel which allows any MIDI program change, controller
change, note on or note off message to be recorded and played back manually or against timecode.
To record a MIDI Patch into dynamic automation press the
Record
button and touch the relevant Patch on the list. Touching the
Play
button (if not already lit) will enable the playback of the Patches.
In the
Automation Editor
the strip beneath Cues will display recorded MIDI Patch events.
The MIDI text editor may also be accessed by right-clicking on an automated MIDI Patch in this strip.
MIDI Patches and their automation events are stored in session files. The
New Session
panel has a Clear option for MIDI: if selected the
MIDI Automation strip will disappear until the MIDI panel is next opened in the new session.
6.2 The Automation Mix Editor
Once you have recorded some automation "events" using the on-line automation modes, you can view and edit these events using the
Automation Mix Editor. This is displayed on the Master screen when you press the
Automation / Mix Editor
button.
The Automation Editor initially shows a line for each section of the console's automation.
Around the edge of the automation screen are a number of buttons for controlling the display, and for editing the recorded events.
6.2.1 Channel Display ...................................................................
The channels themselves are listed according to their type at the left side of the screen - initially there are entries for the Cues, Inputs,
Auxiliary, SubGroup and Master outputs. To see an individual channel from any of these sections, click the drop-down button to the left of
the section name.
Status Indicators
Drop-Down button
Inputs
Содержание D5T
Страница 1: ...Operation Manual Issue A September 2004 Software Versions 2 4...
Страница 2: ......
Страница 10: ......
Страница 11: ...Chapter 1 1 1 Chapter 1 Getting Started...
Страница 12: ...Chapter 1 1 2...
Страница 32: ...Chapter 2 2 1 Chapter 2 Inputs and Console Channels...
Страница 33: ...Chapter 2 2 2...
Страница 58: ...Chapter 3 3 1 Chapter 3 Busses and Outputs...
Страница 59: ...3 2 Chapter 3...
Страница 68: ...4 1 Chapter 4 Chapter 4 Master Section...
Страница 69: ...Chapter 4 4 2...
Страница 91: ...5 1 Chapter 5 Chapter 5 The Cue List...
Страница 92: ...Chapter 5 5 2...
Страница 111: ...Chapter 6 6 1 Chapter 6 Automation...
Страница 127: ...7 1 Chapter 7 Chapter 7 Effects...
Страница 128: ...7 2 Chapter 7...
Страница 135: ...8 1 Chapter 8 Chapter 8 Troubleshooting...
Страница 136: ...Chapter 8 8 2...
Страница 139: ...A 1 AppendixA Appendix A D5TC Theatre Masters Controller...
Страница 140: ...A 2 Appendix A...
Страница 147: ...B 1 Appendix B Appendix B Multiple Console Setups Inc Redundant Engines...
Страница 148: ...B 2 Appendix B...
Страница 162: ...B 16 Appendix B Standalone PC Screen Appearance...


