Saturn User Manual V1
Page 35
10 GETTING STARTED
This section describes the steps needed to get Saturn SBC up and running and assumes that user also has a
Saturn Development Kit or Saturn Cable Kit. The Cable Kit includes all cables needed for the I/O, except the LCD
and backlight. The Development Kit includes the Cable Kit, an AC adapter to power the board, M.2 SATA and the
hard drive programmer board.
10.1 Quick Setup
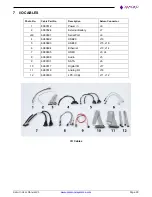
1. Attach HDMI cable 6980605 and USB cables
6980602
as needed.
2. Attach display, keyboard, and mouse (if needed) to the cables.
3. Connect power (5V) to power input connector J8 using external power supply with power cable 6980512.
The input connector and cable keyed to prevent incorrect connection.
WARNING: Attaching the power connector incorrectly will destroy the Saturn SBC!
4. For a quick verification that the system is set up and working properly, if no boot device is attached, the
system will boot to BIOS mode.
10.2 Boot Device Options
Saturn can boot from SATA or any of the available USB ports or PXE (10/100 Ethernet Port only). Either a M.2
SATA DOM or an externally powered SATA HDD can be connected to the SATA port. DSC will provide a M.2 SATA
with pre-loaded OS.
WARNING: It is possible to destroy the Saturn SBC by connecting a SATA cable incorrectly (reverse
orientation or offset from correct position). Always use keyed cables to avoid connection errors.
The Boot device selection and priority are configured in the BIOS
Boot
menu. Only devices which are connected
to the SBC will appear in the list of options. Therefore if user wants to select a hard drive or USB device as the boot
device, the SBC should be connected first, then boot up and enter the BIOS, then select it as a boot device.
The following are a few example boot scenarios.
Install an externally powered SATA hard drive directly on the SATA connector (J7).
Attach a M.2 2242 SATA device on the M.2 socket (J19)
Attach a bootable USB device to one of the USB ports (J10,J15,J16).
PXE boot over Ethernet (J13, J14)

