background image

270

271

Assembly Guide

270

271

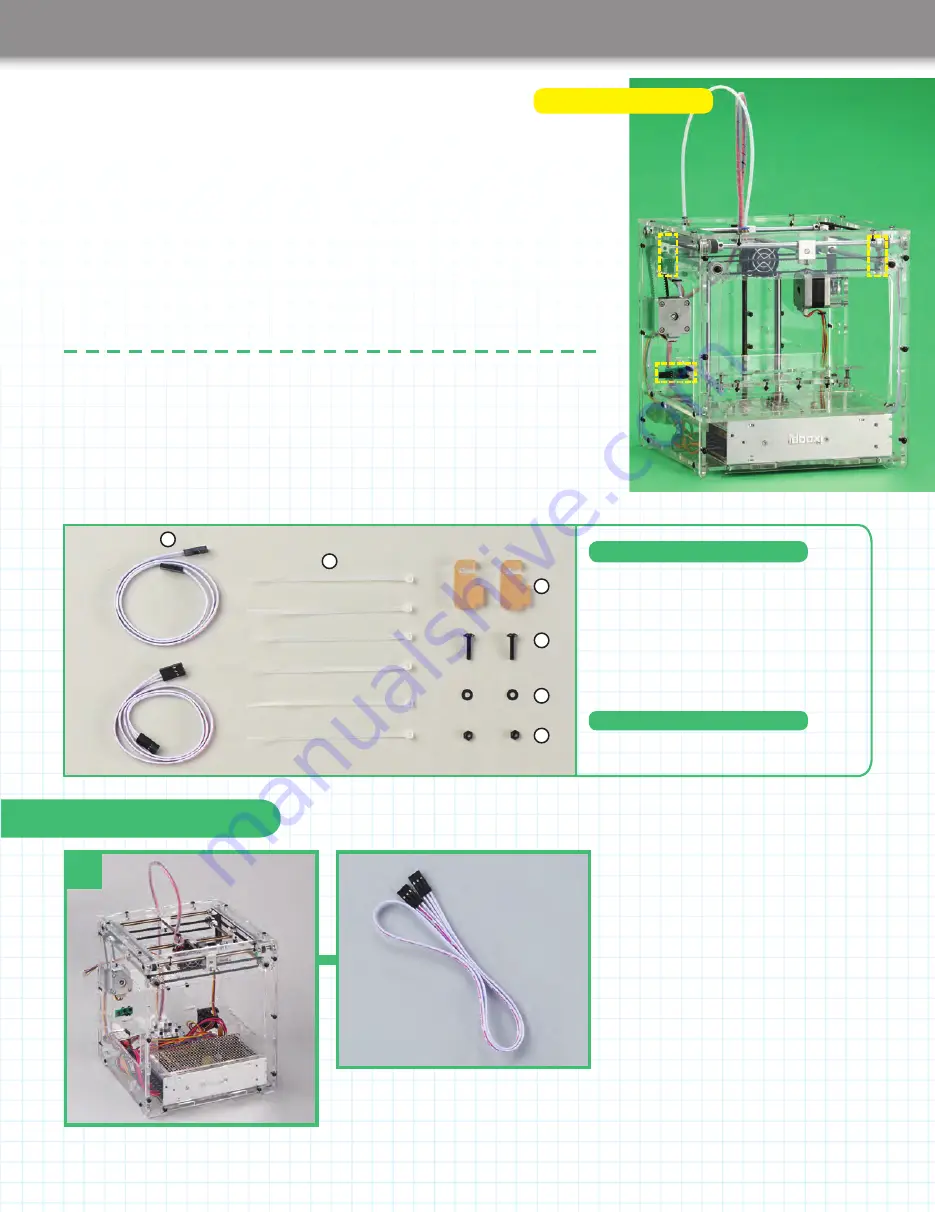
Stage 43: Connect the 

X-, Y- and Z-axis limit 

switches to the driver board

When you insert the pins on the limit 

switches into the connectors on the 

ends of the cables, be sure to do this 

carefully and not bend the pins. Make 

sure you get the connectors in the 

correct positions on the driver board. 

Secure the limit switch cables using 

ties supplied with this stage and others 

attached to the housing in Stage 39. After 

you have plugged the thermistor cable into 

the driver board, tidy up the cables in the 

bottom of the housing. 

1:

 Limit switch cables x 2

2:

 Cable ties x 6

3:

 Brackets x 2

4:

 M3 truss head screws (14mm) x 2

5:

 M3 washers x 2

6:

 M3 nuts x 2

Stage 43 Components

In this stage, you connect up the three limit switches to the driver board using the two 

cables supplied with this stage and the one supplied with Stage 3. You will also plug in 

the thermistor cable to the driver board and tidy up the cables. 

Tools you will need

Scissors

Parts to have ready

1

Get ready the printer housing and the limit 

switch cable that was supplied with Stage 3.

Stage 43 Assembly Area 

1

2

3

4

5

6

Содержание Model Space Idbox pack 10

Страница 1: ...Pack 10 Compatible with Windows 7 8 Mac OS X Anything you can imagine you can make 3D PRINTER BUILD YOUR OWN 3D technology is now available for you at home...

Страница 2: ...he table WARNING Not suitable for children under the age of 14 This product is not a toy and is not designed or intended for use in play Items may vary from those shown The next five detailed and easy...

Страница 3: ...click on the FREE DOWNLOAD link There is lots of useful information including pages of Documentation a Troubleshooting section Tutorial pages and a Forum on the Repetier website Preparing to download...

Страница 4: ...alog On the Ready To Install dialog above click on Install Files will then be installed on your computer 8 On the Completing the Repetier Host Setup Wizard dialog click on Finish 9 The program will la...

Страница 5: ...a driver software that connects a PC to external devices such as printers like the idbox Mac computers come with the driver pre installed If connecting a Windows PC to the idbox download Arduino IDE v...

Страница 6: ...an be left at the default value SETTINGS Connector Serial Connection Port Auto If this does not work test each of the other options in sequence Baud Rate 115200 Transfer Protocol Autodetect Reset on E...

Страница 7: ...ow The values available may not contain the one shown in the image on the left depending on the Mac being used SETTINGS Port usbmodem will change depending on the Mac being used Baud rate 115200 Stop...

Страница 8: ...ows but is similar on the Mac If you can t see any message click on Toggle Log Windows or Load G Code Mac These are close by the Connect button at the top left of the screen See above 3 There could be...

Страница 9: ...Quality determine the height of each layer when printing 3 Click the Filament tab to enter the details of the filament Details here are for PLA Note the setting by Temperature will change depending o...

Страница 10: ...em in the three fields outlined in red in the image on the left The names of the fields are Print Settings Printer Settings Extruder 1 6 Click Extruder 1 in the panel on the left sidebar Enter the val...

Страница 11: ...e 1 Motor drivers x 2 2 Feeder motor cable 650mm x 1 3 Cable ties x 4 4 USB cable x 1 Stage 41 Components In this stage you add the Z axis motor driver to the driver board then add the feeder motor dr...

Страница 12: ...the left when viewed with the front of the housing facing you Be careful not to touch this element Make absolutely certain that the motor drivers are correctly plugged in with their pins in the correc...

Страница 13: ...able has been plugged into the driver board There are two different connectors on the USB cable supplied this time The smaller squarer one is the B type and is plugged into the idbox The wider flatter...

Страница 14: ...rts to have ready Set the input voltage to 230V for UK 1 The printer housing 1 Power supply x 1 2 Power lines x 2 3 Earth wire x 1 4 Power supply wires for the fans x 2 5 M3 truss head screws x 4 Stag...

Страница 15: ...e into the seventh terminal which has V above it Tighten the screws 5 6 7 Black wire Pink wire Earth symbol 3 There are nine screw terminals on the end of the power supply Use a size 2 Phillips screwd...

Страница 16: ...using and plug it into the rightmost terminal of the power supply which has V above it and tighten the screw Pass the second thick pink cable from the driver board through the hole in the front panel...

Страница 17: ...orrect locations Tighten all four of the screws with a size 1 Phillips screwdriver When tidying the thick power cables to the bottom of the housing unplug the motor cables one at a time and plug them...

Страница 18: ...d to either branch The fan power connectors are designed to be put together so the ribs on one side of the smaller connectors fit into the slots on the larger connectors 20 21 Plug the connector for t...

Страница 19: ...ged the thermistor cable into the driver board tidy up the cables in the bottom of the housing 1 Limit switch cables x 2 2 Cable ties x 6 3 Brackets x 2 4 M3 truss head screws 14mm x 2 5 M3 washers x...

Страница 20: ...or the printer will not operate properly Take care 6 Turn the printer housing so the front panel is facing you and find the location of the pins for the limit switch cables outlined in yellow above an...

Страница 21: ...ctor into the third column of pins from the right The side of the connector where the metal parts are visible should be facing to the left 9 Untwist the cable from the Z axis limit switch if necessary...

Страница 22: ...witch cable to the bundle of the X axis limit switch and motor cables at the lower cable tie Stage 39 and do it up Trim off the excess from the straps of the ties and turn the housing so the front is...

Страница 23: ...motor the power supply and the cartridge heater cables are not held together Gather together the cables at the bottom of the housing Keep the brackets washers nuts and truss head screws supplied but n...

Страница 24: ...ed on in Stage 11 Also the two truss head screws washers nuts and brackets from Stage 43 Peel the protective coverings off both sides of the brackets Put an M3 flat washer on each of the 14mm M3 truss...

Страница 25: ...an M3 flat washer then an M3 spring washer over the shafts of each of the bolts and then screw an M3 nut onto each bolt with your fingers 6 With the dog protective metal plate at the top left locate...

Страница 26: ...2 5mm Allen key supplied with Stage 44 Lastly check and adjust the alignment of the metal dog which is next to the newly added linear bush Parts to have ready 1 Get ready the table you worked on in S...

Страница 27: ...of the bush through the hole and put a 15mm M3 cap bolt through each of the screw holes ringed in red in the bush Hold the bolts in position and turn the table over Put an M3 flat washer and then an...

Страница 28: ...280 User Guide TM www model space com 3D PRINTER BUILD YOUR OWN...

Отзывы: