


18 • dap4 User Manual
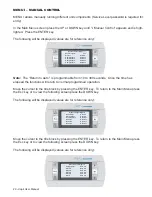
The cursor will return to the title block. Repeat the same step for each day to be copied or select
ALL.
▼ Press the ENTER key. The cursor will flash on the “NO or YES” setting. Pressing the UP or
DOWN key will change from YES to NO or NO to YES. Leave in the NO setting until selections
have been made.
▼ Press the ENTER key. The cursor will flash on the first time setting. All time is on a 24 hour
clock (i.e. 6:00 PM = 18:00 hours). The start time (line # 1) is selected by pressing the UP or
DOWN key.
▼ Press the ENTER key to change the hour. By pressing the UP or DOWN key, the hour will
change. Once the correct hour is selected, press the Enter key.
The cursor will flash on the minutes. By pressing the UP or DOWN key, the minutes will change.
Once the correct minutes are selected, press the Enter key.
The cursor will be positioned on the settings input. Press the DOWN key to view the available
selections:
Set-Back;
Normal SP (setpoint)
Turn Off
▼ Press the ENTER key. The cursor will flash on the second time setting.
Repeat the steps to set the second time setting (and third and fourth if used).
Once the settings are complete, with the cursor in the title block, press the DOWN key to advance
to the next screen or press Esc to return to the Main Menu or press the Esc key to return to nor-
mal operation.
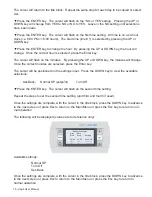
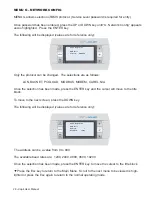
The following will be displayed (values are for reference only):
Available settings:
Normal SP
Turn Off
Set-Back
Once the settings are complete, with the cursor in the title block, press the DOWN key to advance
to the next screen or press Esc to return to the Main Menu or press the Esc key to return to
normal operation.
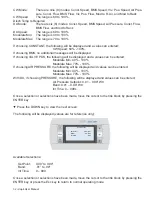
Holiday Scheduler
Date Date
Start Stop Setting
07/04 07/05
Turn Off
--/-- --/-- ----------
--/-- --/-- ----------
Содержание dap4 touch
Страница 4: ......
Страница 101: ...101 dap4 User Manual...
Страница 111: ...111 dap4 User Manual...


