background image

Copyright © 2008 

 2019 DARE!! International 

Page 26 


4


Using the Radi

Sense

®


4.1


Manual Control 

Once the Radi

C

entre

® 

is switched on, the Radi

S

ense

® 

can be activated from the ‘main’ screen on 

the Radi

C

entre

®

 touchscreen. 

4.1.1


Starting the LASER powered sensor 

The  LASER  of  the  Radi

S

ense

®


field  sensor  can  be  started  from  the  ‘main’  window  of  the 

Radi

C

entre

®

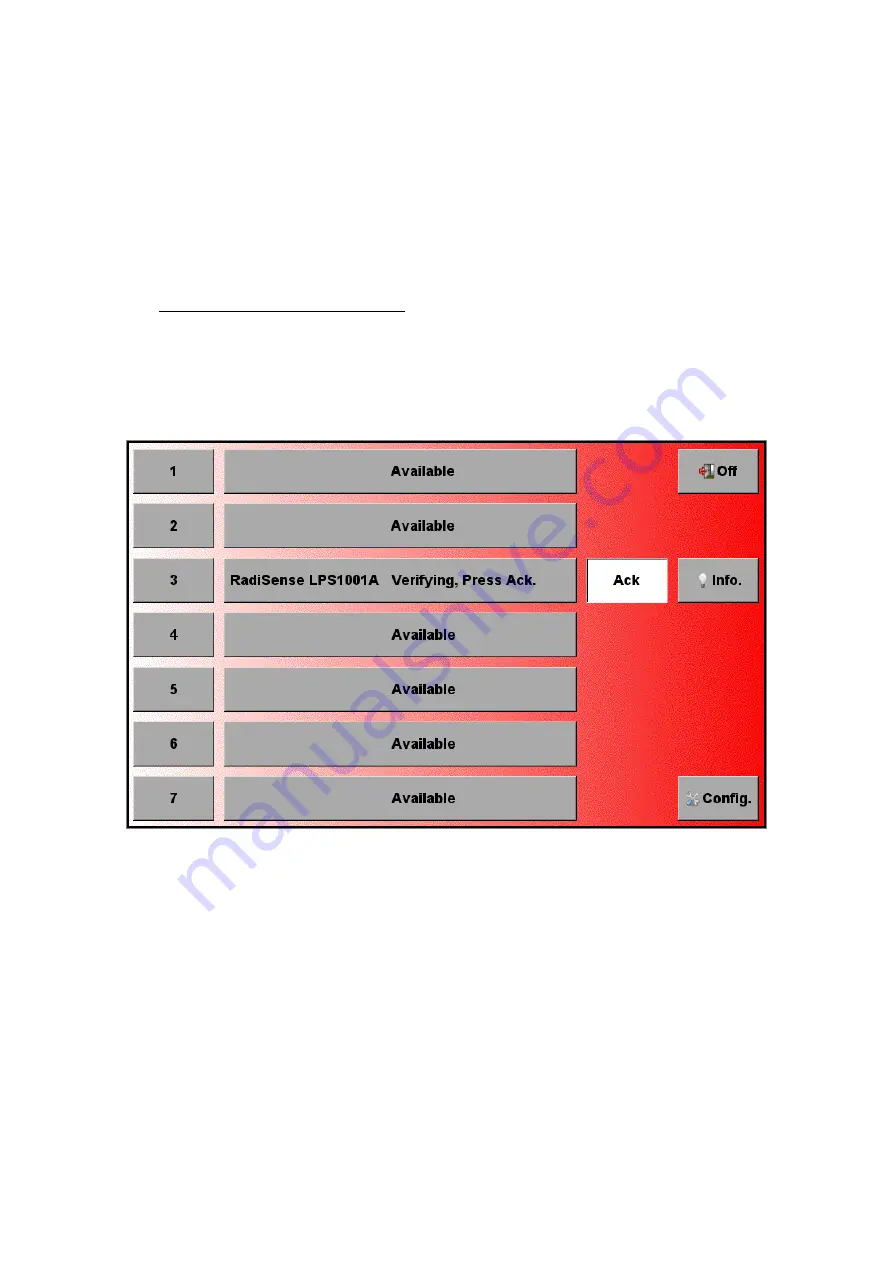
. To activate the sensor, press the ‘Start’ button for the required sensor and, within 4 

seconds,  the  ‘ACK’  button.  A  short  sound  will  be  audible  until  the  safe

ty  loop  is  closed 

successfully. 


Figure 14

: Laser ‘acknowledge’ button in the main screen


As  long  as  the  LASER  is  activated,  the  front  and  rear  ‘LASER  ON’

-

LED’s  will 

light  up  to  indicate 

LASER operation. 

Содержание RadiSense RSS1004

Страница 1: ...struments dare eu DARE Products B V CoC number 30138672 VAT number NL8056 13 390 B01 Eori number NL805613390 Rabobank Utrechtse Waarden e o IBAN NL31RABO0158313585 SWIFT code RABONL2U RadiSense Product Manual Electric Field Sensors With RadiSupply Plug In Card for the RadiCentre Sensor Model Card Model RSS1004 RSS1006 RSS1018 LPS1001A ...

Страница 2: ...uick Start Guide has been added to this product for your convenience This double printed A4 sheet contains the basic start up steps and the safety warnings for the RadiSense Please keep the Quick Start Guide and this regular manual close at hand when you operate your new RadiSense Please contact DARE Instruments or your local reseller if you have any questions Supplier Information DARE Products B ...

Страница 3: ...ic Cables 10 2 5 RadiSupply Plug In Card Rear Panel 10 2 6 Beam Shutter 11 2 7 LASER Safety Measures 13 2 8 Fiber Handling and Maintenance 18 3 Installation 20 3 1 Hardware Configuration 20 3 2 Software Configuration 22 4 Using the RadiSense 26 4 1 Manual Control 26 4 2 Remote Control 28 5 RadiSense Command Set 29 5 1 General 29 5 2 Commands 30 5 3 Error Codes 33 6 RadiSense Specifications 34 WARR...

Страница 4: ...adjustments maintenance or repairs on the equipment This equipment is designed to be used as a plug in card for the RadiCentre Do not use this card in combination with any other main frame The RadiSense contains materials that can be recycled and reused to minimize material waste At the end of life specialized companies can dismantle the discarded system to collect the reusable and recyclable mate...

Страница 5: ... LASER can only be turned on by pressing the START button of the RadiCentre system for several seconds An auditory warning will sound during this activation period In combination with the RadiCentre CTR1001S Make sure that the fiber cables and beam shutter are installed correctly before activating the system The field sensor calibration data of the RadiSense probes is stored in flash memory within...

Страница 6: ...rs calibration Field homogeneity measurements RF broadcast and welding radiation hazard monitoring Long term field monitoring 1 2 Related Products RadiCentre system The RadiCentre is a modular EMC test system that serves as the user and computer interface for all the RadiCentre plug in cards and modules such as the RadiField system RadiMation software RadiMation is the EMC software package from DA...

Страница 7: ...d to the wavelength of the measured signal There are two reasons for this First because large sensor dimensions cause the sensor to resonate at lower frequencies and therefore causes measurement inaccuracies Secondly to maintain field uniformity in an anechoic chamber The smaller the sensor the better the obtainable resolution for field homogeneity measurements In TEM and G TEM cells sensor dimens...

Страница 8: ... card Model LPS1001A An electric field sensor plug in card to be used in the RadiCentre system Fiber extension cable Model CBL1000 10 meter fiber extension cable with inline couplings Cleaning wipes Lint free alcohol wipes to clean the fiber optic cable connectors Supporting documentation in the form of USB stick containing The digital User Manual and Quick Start Guide Optional The calibration cer...

Страница 9: ...The difference between these models is the frequency range that they cover The sensors are enclosed in a rugged housing to minimize the risk of damage Labels indicate the field directions for the three axis RadiSense RSS1004 Frequency range 9 kHz 4 GHz RadiSense RSS1006 Frequency range 10 MHz 6 GHz RadiSense RSS1018 Frequency range 30 MHz 18 GHz ...

Страница 10: ...d by DARE Instruments Fiber extension cables are available on request Contact your local reseller for more detailed information 2 5 RadiSupply Plug In Card Rear Panel The following connections and indicators are found at the back panel of the RadiSupply plug in card POWER ON This green LED lights up when the power is on and the interlock is closed LASER APERTURE Connect to the E field sensor throu...

Страница 11: ...lug in card and prevents accidental LASER light to be emitted if there is an unconnected LASER aperture The beam shutter operates a reed contact in the module and needs to be in place to enable the laser If the optical connector of the laser is not mounted the black slide will shut the laser beam Figure 2 Beam shutter red on the RadiSupply plug in card in the RadiCentre system ...

Страница 12: ...onnector with the notch facing right right When the FC connector is inserted in the laser aperture plug in the FSMA connector in the optical data input Do not use any tools or excessive force to tighten the optical connectors If both connectors are properly connected the RadiCentre can be switched on and the LASER can be activated to start measurements Be sure that the FC connector is lined correc...

Страница 13: ...ever we ask that you comply with the following precautions for your own safety NEVER look into any of the fibre optic connectors The LASER emits an infrared beam that is invisible to the naked eye This will cause permanent eye damage Avoid eye or skin exposure to direct or scattered radiation Assign a LASER safety officer in your company The LASER safety officer is responsible for reviewing the sa...

Страница 14: ...7 slot specific A LASER Code is required to activate the RadiCentre 2 slot and 7 slot systems This LASER code enables the power supply to all installed LASER modules To prevent accidental activation of the LASER an Acknowledge button will appear directly after the LASER Start button is pressed The LASER will only be activated if this button is pressed within the 4 seconds timeframe RadiCentre sing...

Страница 15: ...nted differently in the RadiCentre Single see chapter 2 7 2 To meet the LASER safety precaution enter the LASER Code in the LASER Code screen and press OK for confirmation see Figure 8 The default LASER code is 3447 This code can be changed by the customer in the main configuration screen see Figure 9 To change the laser code the user will be asked to enter the current code ones and the new code t...

Страница 16: ...Copyright 2008 2019 DARE International Page 16 Figure 9 Change the laser protection code in the main configuration screen Figure 10 Enter new code notification ...

Страница 17: ...tre and hold it 2 Five loud beeps can be heard four short followed by one long 3 On the fifth beep the LASER link is activated and the red LASER ON LED on the RadiSupply card lights up 4 Release the Start button This means that If you want to interrupt the activation process all you have to do is release the Start button before the fifth beep The LASER will not be activated If you are interrupted ...

Страница 18: ...he plastic end caps on the fiber connectors when they are not in use Only use the supplied end caps Never touch the tip of the fiber connector core surface Never drop the fiber connectors as this may damage the core surface Never bend the fibers exceed the minimum bend radius 5 cm as this will break the fiber core Never pull the fiber connector out of a coupling by its orange jacket always use the...

Страница 19: ...lint free alcohol wipes Do not use other solvents or wipes Fibers are clean and polished on delivery and do not need to be cleaned when installed for the first time 2 8 3 Fiber conditions Use the examples and instructions in the following figure as a guideline for further fiber maintenance Figure 11 Examples of fiber conditions and maintenance ...

Страница 20: ...two on top and two at the bottom See Figure 12 3 Gently insert the plug in card into the slot of the RadiCentre and reinsert the four screws See Figure 12 Figure 12 Example of a RadiSupply LPS1001A plug in card installation 4 Switch on the RadiCentre system The new plug in card will automatically be detected and initialized by the RadiCentre Steps 5 to 7 of the hardware configuration are visible o...

Страница 21: ...rectly into the slot to connect the FC connectors 6 Connect the RadiCentre system to your PC using any of the available interfaces of the RadiCentre system USB RS232 Ethernet or IEEE 488 optional 7 Place the interlock plug of the plug in card into the interlock connector of the RadiCentre The hardware installation for the plug in card is now complete The user can control the plug in card either th...

Страница 22: ...pped If RadiMation software is used select the required device driver for the RadiSense 3 2 1 RadiMation Freeware driver 1 After the RadiMation software is installed and started select Devices in the menu screen and Add Field Sensor to select the driver for the RadiSense RadiCentre 2 A new screen is shown where the applicable product code of the RadiSense RadiCentre can be selected In this example...

Страница 23: ...nication tab and choose the control interface In this example we use USB 4 To enable the USB communication make sure the RadiSense probe is connected to the PC USB port and press the Detect button After pressing Detect the Device Identifier ID will be updated with the unique ID number see typical example below Make sure that there are no other DARE products connected to the same PC using USB ...

Страница 24: ...CTR1004B CTR1009B select under the tab RadiCentre the RadiCentre Multi slot and define the corresponding slot number in which the RadiSense probe is installed In this example the probe is installed in slot number 5 7 Upon completion of the correct settings of the communication interface click on OK 8 After clicking OK you will go back into de device driver settings window The communication can now...

Страница 25: ...are configuration steps 1 to 9 RadiMation is now ready for use with the RadiSense RadiCentre field sensor The RadiMation software package verifies the field sensor at the beginning of each test if a field sensor is selected If you are using the RadiSense RadiCentre field sensor system with any other EMC test software package we refer you to chapter 5 RadiSense Command Set ...

Страница 26: ...sor The LASER of the RadiSense field sensor can be started from the main window of the RadiCentre To activate the sensor press the Start button for the required sensor and within 4 seconds the ACK button A short sound will be audible until the safety loop is closed successfully Figure 14 Laser acknowledge button in the main screen As long as the LASER is activated the front and rear LASER ON LED s...

Страница 27: ... will return optical data to the RadiCentre system As long as the probe returns optical data the LASER will continue to power the sensor If the loop is interrupted the LASER will switch off immediately 4 1 3 Reading probe data Readings from the probe can be taken directly from the TFT screen with the RadiMation EMC software or any other custom made software package 4 1 4 Band selection RadiSense R...

Страница 28: ... strength in a large font together with the field strength data of each separate axis LASER temperature LASER current and probe temperature are also displayed in the Module data window To determine which axis will be used to calculate the isotropic field strength simply press the axis buttons Only the axes that are marked as ON will be used to calculate the isotropic field strength value This is d...

Страница 29: ... in this chapter Example RadiCentre ports To get a reading from the RadiSense card in slot 1 using the RadiCentre serial port or the GPIB port the following command can be sent 1 D2 To get a reading from the RadiSense card in slot 2 using the RadiCentre serial port or the GPIB port the following command can be sent 2 D2 Example Holaday compatible port To get a reading from the RadiSense card in sl...

Страница 30: ...hort notation Dxx xxuuu Dxx xxuuurrrobxyz Dxx xx yy yy zz zzuuu Where xx xx or y or z is the reading uuu is the unit _V_ for V m mW2 for mW cm _V2 for V m rrr is the recorder out value from 0 to 255 o is over range indicator N is Ok O is over range b is battery status N is Ok W is warning F is fail xyz is the axis on off status D for Disable E for Enable This table continues on the next page 3 Thi...

Страница 31: ...tting DYN dynamic 2 to 8 times depending on value 1 no average 2 2 times average 3 4 times average 4 8 times average 5 16 times average 6 20 times average OK Or N A with Holaday compatible port Read battery Voltage B r Bxx xx Where xx xx is the battery voltage Set baud rate 4 Ca r Where a is setting 1 2400 Odd Data7 Stop1 2 9600 Odd Data7 Stop1 C Zero sensor Z r for serial interface or ZERO r for ...

Страница 32: ...re xxx is the temperature Sleep 5 Sx r Where x is the sleeptime in seconds S Identity IDN r Identity string of the RadiSense IEEE commands for Interface Clear or Clear are not supported IEEE Status flags in either serial or parallel poll or as a service request are not supported When IEEE communication is used the first command request should be the IDN r command 5 This command is discarded by the...

Страница 33: ...bandwidth OK Or N A with Holaday compatible port 5 3 Error Codes The following table shows the error codes for the Holaday compatible port Error code Description E1 Internal buffer overflow too long command E2 Command too long E3 Invalid command E4 Command too short illegal character or invalid parameter E5 Hardware error E6 Parity error E9 Sensor is not connected LASER is off Please refer to the ...

Страница 34: ...o 18 GHz Accuracy 10kHz to 10MHz 10MHz to 30MHz 30MHz to 1GHz 1GHz to 4GHz 4GHz to 6GHz 6GHz to 18GHz 1 5dB 3 0dB 3 0dB 3 0dB 1 5dB 1 5dB 3 3dB 3 3dB 1 5dB8 1 5dB 1 5dB 1 5dB 4 0dB Isotropy 1 GHz 0 25 dB 0 5 dB 1 5 dB Linearity 0 5 dB 0 5 V m Shape Cubical Spherical Stalk Electrical measuring volume 74 cm3 42 42 42 mm 52 cm3 25mm Ø 1 cm3 Length 280mm Measuring speed sensor 5 samples sec 60 samples...

Страница 35: ...xed to sensor 10m extension with couplings Safety LASER product classification Class IIIb Safety measures Key switch RadiCentre Remote interlock system RadiCentre LED indications for LASER ON Audible warning signals Redundant closed loop safety system Beam shutter with integrated interlock LASER switch on time approx 70 ms LASER switch off time 5 ms Environmental conditions Temperature range 15 to...

Страница 36: ...nty term The customer will need to cover the costs for returning the product to DARE such as shipping and or any applicable duties and taxes DARE Instruments will arrange the courier and cover the costs for the return shipment These warranty terms are not applicable to Fiber optic cables Products that have been improperly used Products that have been used outside their specified range Products tha...

Страница 37: ... EN 61326 1 2013 Class A1 Electrical equipment for measurement control and laboratory use Immunity EN 61326 1 2013 Industrial level performance criteria A Electrical equipment for measurement control and laboratory use Safety EN 61010 1 2010 Safety requirements for electrical equipment for measurement control and laboratory use The Technical Construction Files are maintained at DARE Instruments B ...

Отзывы: