background image

23

Playing of MP3s, JPEG and MPEG files

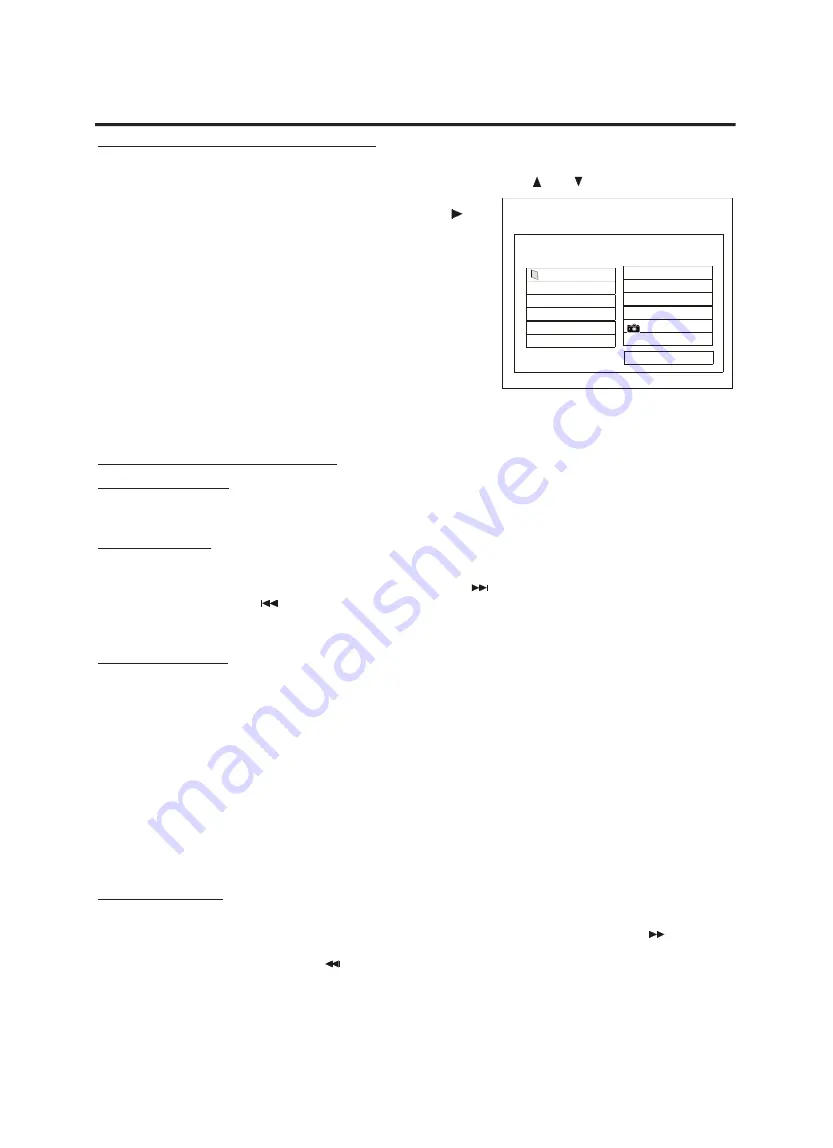
When inserting an Audio disc with MP3s, JPEG or MPEG files (or mixed), a menu will automatically be displayed on
the screen. Select the folder that you want to play by pressing the direction keys 

and 

and press the button

“ENTER”. The subdirectories will now be shown on the screen on the left
side. Select the required subdirectory and press the direction key 

and

select the track (MP3), JPEG or MPEG file that you want to play by pres-
sing the up and down direction keys and press “ENTER” to start playing.
To stop playing of a MP3 or MPEG file, please press the button “STOP”
on your remote control. To stop playing of a JPEG file, please press the
button “MENU” on your remote control.

There are different play modes available:

Normal,

plays the tracks, JPEG or MPEG files of the selected folder

Single, 

plays only the selected track, JPEG or MPEG file

Repeat One,

repeats the selected track, JPEG or MPEG file

Repeat Folder,

repeats the selected folder

The play mode can be changed by pressing the button “REPEAT 1/ALL” on your remote control until the required play
mode is shown in the play mode window on the screen. The tracks, JPEG or MPEG files (or mixed) will be played
according to the selected play mode.

Additional features for JPEG files

1. Rotation of a picture

To rotate the picture, press the direction buttons on your remote control after you have selected a JPEG file. In this
way, the picture can be rotated in each direction.

2. Making a preview

To make a preview of all pictures, press the button “STOP” on your remote control after you have selected a JPEG file.
All pictures will now be shown on the screen. Please press the button

to preview more pictures if available. To

return please press the button

. You can select a picture by pressing the direction keys. Select a picture and press

the button “ENTER” or “PLAY” on your remote control to start playing. You can also select a menu indicating the remo-
te key functions.

3. Making a slide show

To make a slide show, press the button “STOP” on your remote control after you have selected a JPEG file. Please
select “Slide Show” by pressing the direction keys and press “ENTER”. The slide show may be effected in different
modes by pressing the button “PROG” on your remote control until the required mode appears in the top left corner of
the screen. The following modes can be selected for your slide show:

- Wipe top

- Extend from center vertical

- Wipe bottom

- Compress to center horizontal

- Wipe left

- Compress to center vertical

- Wipe right

- Window horizontal

- Diagonal wipe left top

- Window vertical

- Diagonal wipe right top

- Wipe from edge to center

- Diagonal wipe left bottom

- Random

- Diagonal wipe right bottom

- None

- Extend from center horizontal

4. Zooming in and out

Zooming in and out can be carried out on a JPEG picture by pressing the button “ZOOM” on your remote control.
“ZOOM 100%” will be displayed in the top left corner of the screen. To zoom in please press the button

. You can

zoom in the picture 125%, 150% and 200%. When you are zoomed in move around the screen using the direction but-
tons. To zoom out please press the button

until the required size is reached (possible are 200%, 150%, 125%,

100%, 75% and 50%). To zoom completely out, please press the button “ZOOM” again. In this way you will reach the
normal picture size.

SPECIAL FEATURES FOR MP3, JPEG AND MPEG FILES

FOLDER: 001/002               FILE: 000/005

MIX HITS

PLAY MODE

MP3 

SONG_A

1

VCD 

ABCD

2

MP3 

WXYZ

3

MP3 

HIJK

4

NOPQ

5

REPEAT ONE

Содержание CH-DVD 402

Страница 1: ..._________________________ Bedienungsanleitung____________________________ Mode d emploi__________________________________ Istruzioni per l uso______________________________ Manual de instrucciones____...

Страница 2: ...forward backward search Playing a disc frame by frame Still the Picture frame Zooming in and out of an image Using the Intro feature Using position markers Bookmark Using the sound effects Changing th...

Страница 3: ...2 You can find the region code on the back side of the DVD cover SPECIFICATIONS Audio Features Frequency Response 20 Hz 20 KHz Audio Format 96 KHz 24 bit Audio D A Converter Optical Output Level SPDIF...

Страница 4: ...eriously damaged Non use periods When the unit is not used turn the power off When the unit is unused for a long period of time the unit should be unplugged from the household AC outlet Do not touch i...

Страница 5: ...not open covers and do no repairs yourself Refer to qualified personnel for servicing 3 RISK OF ELECTRIC SHOCK DO NOT OPEN CAUTION The lightning flash with arrowhead symbol within an equilateral trian...

Страница 6: ...MP3 8 cm Single Single 12 cm Single Single Suitable discs their marks PREPARATION KNOWLEDGE This device supports the following disc formats 4 DVD and VCD Audio and Video discs CD DA and MP3 Only Audi...

Страница 7: ...ntion on the discs Cleaning of Player The control panel and the case of the player only require wiping with a soft cloth Areas with stub born stains can be cleaned with a soft cloth dipped in a neutra...

Страница 8: ...D light will be off Opens or closes the disc tray Loading the disc starts playing This is used to pause a disc Stops the disc playing HOLD and enters Stop mode after pressing the button two times STOP...

Страница 9: ...atus of the front right and front left speakers output 10 Indicates that the microphone is on or off in Karaoke mode 11 12 Indicates the title number the current chapter or track of the disc playing T...

Страница 10: ...ates when you get closer to the device it means that the batteries have been used up Please replace the two batteries simultaneously with two new batteries Size AAA R03 1 5V Please note the polarity N...

Страница 11: ...ist Used for direct selection of a numbered item in the menu or number input for the function GOTO Repeats the current title or all titles Repeats the sequence stipulated by two selected playback poin...

Страница 12: ...practical use For other connec ting methods please refer to the instructions of the amplifier purchased Possible Connections Audio Video Connection of the DVD Player with the TV over SCART If your TV...

Страница 13: ...puts on your TV by means of the Cinch cable Audio Video Connection of the DVD Player with the TV with the Cinch cable and S Video cable Please connect the Cinch outputs and the S Video output with the...

Страница 14: ...with the corresponding input on the amplifier by means of a coaxial cable Please note that this connection is only possible if your amplifier contains a DTS Dolby Digital Decoder In this case the dig...

Страница 15: ...n the centre of the tray Press the OPEN CLOSE button again after closing the tray there will be displayed CLOSE on the display panel If the disc supports the FIRST PLAY function the title of the disc...

Страница 16: ...device should be idle before the screen saver is enabled and before the device goes into Standby mode Highlight Screen Saver in the general setup menu Please press the direction button to enter the m...

Страница 17: ...stored as discrete multi channel surround sound using Dolby Digital or DTS audio compression similar to the digital surround sound formats used in theatres Please press ENTER to finalize your selecti...

Страница 18: ...Dual Mono in the audio setup menu Please press the direction button to enter the menu Move the highlight bar by pressing the buttons or to select one of the following options STEREO Sets the stereo s...

Страница 19: ...ck bars on top and on bottom This setting is recommended if you are using a television with 16 9 format Please press ENTER to finalize your selection You can leave this menu by pressing the button on...

Страница 20: ...set the video output to RGB or S Video RGB over Scart Electrical transmission possibility for video pictu res i e it is a picture signal which is splintered according to the pri mary colours of the T...

Страница 21: ...rol until either the option Select Track for Audio Discs and Video CDs or Title and Chapter for DVDs is displayed on the screen The total number of tracks or titles and chapters are displayed Use the...

Страница 22: ...W on your remote control to slow down the current speed of play Whenever the SLOW button is pressed once the speed of play will slow down by one step from 1 2 1 4 1 8 1 16 Another pressing of the key...

Страница 23: ...Soft for DVDs Concert Living Room Hall Bathroom Cave Arena Church for Audio discs and Video CDs If you want to disable the sound effects please press the button EFFECT until Off is displayed on the sc...

Страница 24: ...selected To change the language press AUDIO again until the required language is displayed Changing the angle of view Some DVDs offer the facility to change the angle of view Selecting the angle to vi...

Страница 25: ...e shown on the screen Please press the button to preview more pictures if available To return please press the button You can select a picture by pressing the direction keys Select a picture and press...

Страница 26: ...e button to return back to the first 10 Creating a playlist of VCDs or CDs Press the button PROG on your remote control to display the program menu as shown on the right side Please enter a number by...

Страница 27: ...n Press the PLAY key to return to nor changed mal play The Audio terminal has not been Properly connect the cables properly connected Mute condition Reset to mute off No Picture The device has not pro...

Страница 28: ...zakh 7576 Greenlandic 7577 Cambodian 7578 Kannada 7579 Korean 7583 Kashmiri 7585 Kurdish 7589 Kirghiz 7665 Latin 7678 Lingala 7679 Laothian 7684 Lithuanian 7686 Latvian Lettish 7771 Malagasy 7773 Maor...

Страница 29: ...decoder DTS Digital Theatre Systems Digital surround sound system which works with 5 1 channels and corresponds to AC 3 on the first view It differs regarding the data reduction The DTS system works...

Страница 30: ...analogue two channel signal In the setup of the most DVD Players you must not enter anything for the sound format as the digital output is not used If the setup offers it the settings described for t...

Отзывы: