background image

V

I D E O

 B

L A S T E R

 D

I G I T A L

 VCR U

S E R

S

 G

U I D E

Setup Wizard Options:

33

6

+ 2 5 7 & 8 7


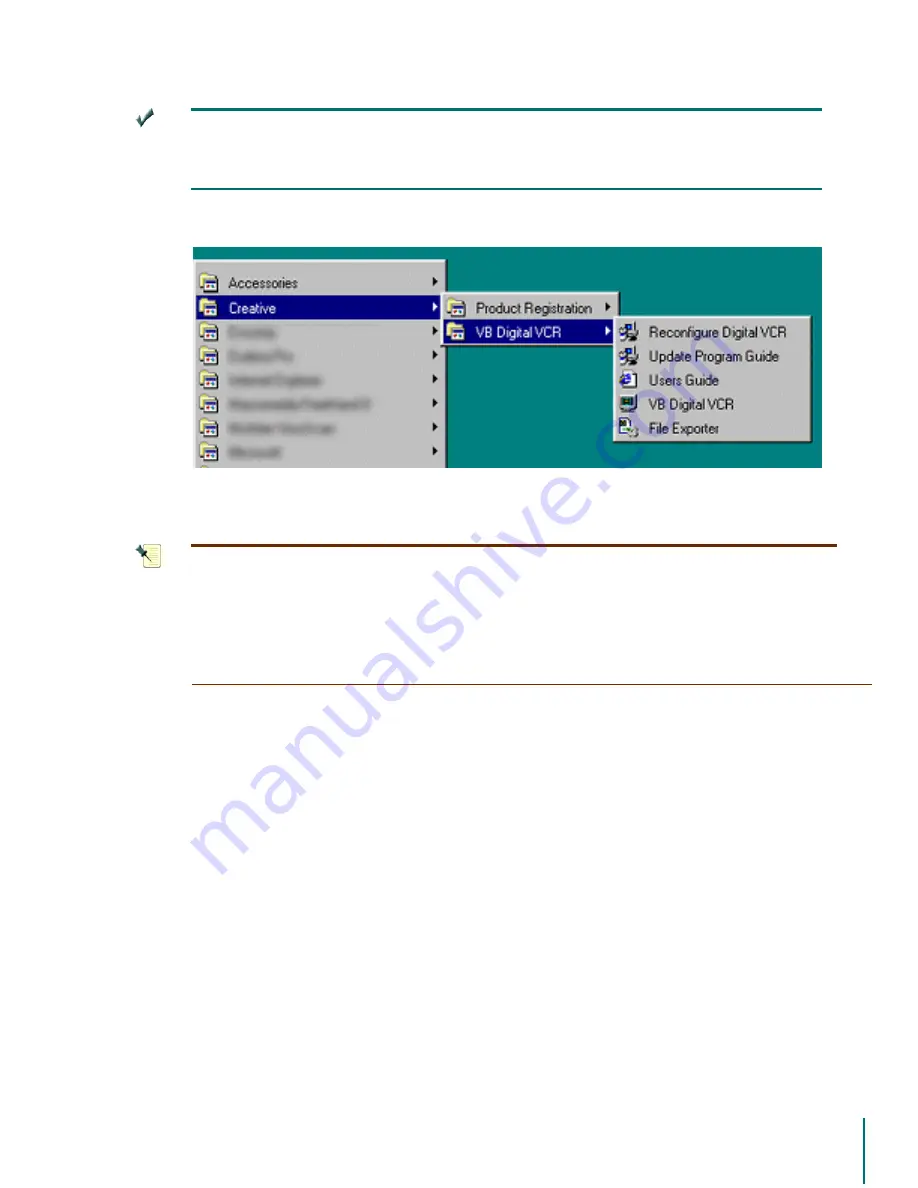
<RXFDQDOVRVWDUWWKH6HWXS:L]DUGE\VHOHFWLQJLWIURP\RXU6WDUW

0HQX$VKRUWFXWZDVSODFHGWKHUHGXULQJWKHLQVWDOODWLRQSURFHVV7KHGHIDXOWORFD
WLRQLV3URJUDPV!&UHDWLYH!9%'LJLWDO9&5!5HFRQILJXUH'LJLWDO9&5

1

27(

,I\RXSUHIHUWKHVHTXHQWLDOSDJHIRUPDWRIWKHRULJLQDOYHUVLRQRIWKH:L]

DUG\RXFDQVZLWFKWRLWE\SUHVVLQJWKH:L]DUGEXWWRQORFDWHGWRWKHOHIWRIWKH6DYH
6HWWLQJVEXWWRQ<RXZLOOWKHQEHSUHVHQWHGZLWKWKHRULJLQDO:L]DUGIRUPDW8VHWKH
%DFNDQG1H[WEXWWRQVWRPRYHWKURXJKWKHYDULRXVZLQGRZVRIWKH:L]DUG<RXFDQ
RQO\DFFHVVWKLVRSWLRQDIWHUUXQQLQJWKH6HWXS:L]DUGFRPSOHWHO\DQGVDYLQJ\RXU
SUHIHUHQFHVDWOHDVWRQFH

Exiting the Setup Wizard

You can exit the Wizard at any time by pressing the 

([LW

 button. If you are running the Setup 

Wizard for the first time, you will not save any settings by exiting at this point. 

Exiting the Wiz-

ard when installing for the first time is not recommended.

 A prompt will be displayed that reads 

([LWZLWKRXWVDYLQJ"

”. Click 

<HV

 to exit without saving the changes or 

1R

 to return to the 

Wizard to continue with the setup.

Содержание Video Blaster Digital VCR

Страница 1: ...User s Guide Copyright 2001 Creative Technology Ltd Document Version 01 612 ...

Страница 2: ...Input 13 Stereo Audio Input 13 Connect Your TV Signal to the Card s RF Tuner Input 13 TV Signal Types 14 Antenna 14 Cable 15 Cable Box or Digital Cable Box 15 Cable Box with separate audio and video connections 16 Satellite 17 Satellite Box with separate audio and video connections 18 SOFTWARE INSTALLATION Overview 19 About the CD ROM 19 Performance Settings 19 DMA 19 Driver Installation 20 Instal...

Страница 3: ...tup Wizard 33 THE REMOTE CONTROL Using the Remote Control 34 Battery Installation 34 The Software Remote Control 34 Open the Software Remote 34 Reposition the Software Remote 35 Minimize 35 The Remote Control Buttons 36 Power On Menu 36 Guide 36 Live TV 36 Back 36 Favorites Favs 37 Adding a Channel to the Favorites List 37 Deleting a Channel from the Favorites List 37 Menu 38 Enter 38 Up Down Arro...

Страница 4: ...ive TV 49 Rewind Live TV 49 Rewind Direct Entry 50 The Fast Forward FF Function Live TV 50 Jump Forward Direct Entry 50 Start From the Beginning 50 Slow Motion Play 51 Pausing Live TV 51 Watching a Prerecorded Show During Commercials 52 Program Thumbnails 52 Bookmarks 52 Adding a Bookmark 53 Navigating with Bookmarks 53 Renaming a Bookmark 53 Deleting a Bookmark 54 RECORDING A PROGRAM Overview 55 ...

Страница 5: ...ecycled Folder 68 Manually Deleting a Program 68 THE MAIN MENU Overview 69 The Main Menu Features 69 Recorded Shows 69 Selecting a Show 70 Show Information 71 Editing Show Information 71 Deleting a Recorded Show 71 Deleting Shows in the Recycle Folder 72 Removing Shows from the Recycle Folder 72 Watch Live TV 72 Scheduler 73 The Options Menu 73 Storage Configuration 74 Changing Storage Settings 75...

Страница 6: ...ging Files 93 To Restore an Archived File 93 To Delete a Restored File 93 REMOVING THE SOFTWARE Uninstalling the Digital VCR Software 94 Windows 2000 Specific Settings 94 Common Settings 94 Using the Modify Option 95 Using the Repair Option 97 Using the Remove Option 97 KEY COMMANDS Keyboard Shortcuts and Key Commands 99 Remote Control Shortcuts 101 TROUBLESHOOTING Overview 102 Windows does not re...

Страница 7: ... recording space size to be edited after the initial installation 104 The Setup Wizard will not allow the Time Shift Buffer size to be edited after the initial installation 105 The PC was placed in Standby mode A scheduled recording was not completed 105 Keyboard commands are not working 105 Poor picture quality 105 No picture video card not working 105 When trying to put the PC into Standby mode ...

Страница 8: ...emory 4GB or larger hard disk drive 20GB or larger strongly recommended Graphics card capable of displaying at least 65 000 colors One available PCI 2 1 compliant slot Sound Blaster or other audio card with speakers or headphones CD ROM drive for software installation DirectX 7 0 or higher Microsoft Windows 98 Windows Me Windows 2000 Drivers are certified For Windows XP use Windows 2000 Drivers An...

Страница 9: ...ms In each case descriptive text formatting will be used to indicate the specific type of action to be taken Standard Text ROG 7H W is used to indicate a button that can be pressed in a software dialog box For example Press the DQFHO button to exit A menu item or other software page also appears in ROG 7H W For example Click the Start Menu and go to 6HWWLQJV RQWURO 3DQHO Buttons on the remote cont...

Страница 10: ...ument Each of these references will act as a link Click on the reference itself to jump to the page containing the new information For example in the text To review the software installation procedure see page 22 try click ing on the reference to the page number The text will move forward to display that page in the PDF window In this example To review the process for setting up a recording see Re...

Страница 11: ...e steps to install the Digital VCR card 1 Turn off the power to your computer and any connected devices 2 Disconnect the power cord from the electrical source 3 Touch a metal surface on the computer to ground yourself and discharge any static elec tricity 4 Remove the cover from the computer 5 Locate a free PCI expansion slot for the Digital VCR card 6 Remove the screw and metal cover plate from t...

Страница 12: ...the Infrared Receiver The Digital VCR card has a dedicated jack for the Infrared Receiver see the diagram below Installation is simple 1 Plug the Infrared Receiver connector into the jack on the Digital VCR card marked QIUD UHG 5HFHLYHU QSXW 2 Position the LED receiver of the Infrared Receiver near your PC monitor so that signals transmitted from the Remote Control are not blocked by any other com...

Страница 13: ...ch the audio output here Connect Your TV Signal to the Card s RF Tuner Input The Digital VCR needs to have your television signal connected to its video input jack to enable viewing and recording of live TV signals Depending on the type of equipment you have you will need to connect one or more cables from the equipment s video and or audio outputs to the Digital VCR card The Digital VCR card has ...

Страница 14: ...t would not need to connect anything to the coaxial input 127 KLOH PDNLQJ FRQQHFWLRQV EHWZHHQ WKH LJLWDO 9 5 FDUG DQG RXU WHOHYL VLRQ HTXLSPHQW DOO HTXLSPHQW VKRXOG EH WXUQHG RII TV Signal Types Follow the instructions in this section that pertain to your specific type of television signal See Diagram 1 above for a close up of the Digital VCR connectors Antenna If you use a rooftop antenna or rabb...

Страница 15: ...e Diagram 2 above Cable Box or Digital Cable Box If your cable TV connection terminates in a cable TV box it may have more than one set of output connectors available a single coaxial signal and or separate audio and video output If your cable box has a single cable output connect a standard coaxial cable from the cable box output to the QWHQQD DEOH QSXW on the Digital VCR card See Diagram 3 below...

Страница 16: ... output on the cable box is not necessary To use the S Video output use a standard S Video cable available separately to connect the S Video output of the cable box to the Digital VCR card s video input When using the standard composite video output from a cable box most devices make this connection with an RCA jack This requires the use of the S Video Composite video adapter cable supplied with y...

Страница 17: ...an one set of output connectors available a single coaxial signal and or separate audio and video output If your satellite box has a single cable output connect a standard coaxial cable from the satel lite box output to the QWHQQD DEOH QSXW on the Digital VCR card No other connections are necessary See Diagram 5 below Diagram 5 ...

Страница 18: ... the satellite box is not necessary To use the S Video output use a standard S Video cable available separately to connect the S Video output of the satellite box to the Digital VCR card s video input When using the standard composite video output from a satellite box most devices make this connection with an RCA jack This requires the use of the S Video Composite video adapter cable supplied with...

Страница 19: ...e DMA option checked To check this setting if your PC is using Windows 98 and Windows ME 1 From the desktop right click on 0 RPSXWHU 2 Select 3URSHUWLHV to open the System Properties window 3 Select the HYLFH 0DQDJHr tab 4 In the Device Manager make sure that the 9LHZ GHYLFHV E W SH radio button is selected 5 Locate the LVN ULYHV item in the Device Manager list 6 Click the plus sign next to the LV...

Страница 20: ...e plus sign next to the Disk Drives item to expand it and show the contents 9 Locate the entry for the hard drive that will be used for recording 10 Double click the drive s name to display its Properties window If there is no specific list ing for your drive you can use Generic IDE Disk Type 00 the default setting 11 Select the 6HWWLQJV tab 12 In the Options section confirm that 0 is checked 13 C...

Страница 21: ...lling the Digital VCR Software on page 22 To manually install the device driver or to update the driver with a new version continue on to the next section The sequence of steps is slightly different depending on the version of the Windows operating system installed on your computer Instructions for each version appear below If you are using Windows 98 or Windows 2000 follow these steps When prompt...

Страница 22: ...ents presented by the installer 6 Click the HV button to agree and continue or click 1R to exit the installer 7 On the next page select a destination folder The installer will place all of the program files in this location A default location is already selected Click the 1H W button to accept the default location or click the URZVH button to select a different folder 8 On the next page select a p...

Страница 23: ...in choosing record playback options and setting user preferences Before You Run the Setup Wizard Before starting the Setup Wizard you need to install the Video Blaster Digital VCR card con nect the Infrared Receiver and connect your television source satellite cable antenna etc to the card Refer to the sections on Hardware Installation page 11 and Software Installation page 19 if you have not yet ...

Страница 24: ...zard has been run at least one time successfully you will see a prompt showing the location of your MPG directory This holds your recorded files To continue using the same folder for future recordings click the 8VH LVWLQJ button 127 1HZ XVHUV ZLOO QRW VHH WKLV SDJH XQWLO WKH 6HWXS L DUG KDV EHHQ UXQ FRP SOHWHO RQH WLPH ...

Страница 25: ...SURFHHG ZLWK WKH VHWXS Tuner Input Selection If you selected Video Input on the previous page this page will be skipped These options tell the Video Blaster Digital VCR software what type of live TV signal is con nected to the RF Antenna Cable input jack on the card See diagram Select the one that describes your situation from the pop up menu 127 2QO RQH LQSXW VRXUFH FDQ EH VHOHFWHG I RX VHOHFW RQ...

Страница 26: ...al Cable TV box This option also requires that you select a channel to be used to receive TV signals from your cable box Select the channel from the pop up menu Usually channel 3 or channel 4 6DWHOOLWH R If you receive TV signals via a satellite service choose this option You need to specify the channel that your satellite box uses to trans mit TV signals to your television Select the channel from...

Страница 27: ...ove choices such as a DVD player VCR digital camera or video camcorder 127 RX PD QHHG WR XVH WKH VXSSOLHG 6 9LGHR RPSRVLWH DGDSWHU WR FRQQHFW WKH 5 FRQQHFWRU RXWSXW IRXQG RQ VRPH GHYLFHV WR WKLV MDFN Video Format Selection The video input jack on the Video Blaster Digital VCR card looks like a standard S Video jack It is actually a multipurpose connector the software sets the signal type present a...

Страница 28: ...on on recording and quality settings appears later in this document See Recording Quality Settings on page 55 Storage Requirements When a video quality setting is chosen the storage requirements for that setting will be dis played next to the pop up box This read only text will show the approximate number of mega bytes required to store a minute of recorded program Program Options This page contai...

Страница 29: ...OI 6L H Window mode medium size 320 x 240 pixels 4XDUWHU 6L H Window mode smallest size 160 x 120 pixels The Location X Y boxes allow you to position the windowed display at a specific location on your screen Enter a coordinate for each as needed The X parameter refers to the left right screen location while the Y parameter refers to the up down screen location Storage Options The Video Blaster Di...

Страница 30: ... shift files unless you specify an alternate location by running the Wizard again The largest hard drive in your system is selected by default The Directory Path is preset to the directory named MPG created by the Video Blaster Digital VCR installer To change the drive selection simply highlight the selection and retype the name For exam ple the default recording location will be C MPG Drive C is ...

Страница 31: ... this free space now during the installation pro cess to guarantee that the space you need for recording is always available No other applica tions can claim this space once Digital VCR has allocated it Be sure to leave some free hard disk space available for the installation of new applications and for the data files created by other applications in your system To set the recording space amount d...

Страница 32: ...p your Video Blaster Digital VCR system initially you can reconfigure the user settings and preferences by running the Setup Wizard again In addition many of the preferences can be changed from the Main Menu After the initial installation the Wizard runs with a tabbed layout This Advanced Setup mode allows easy access to the different parameter settings without the need to proceed through each pag...

Страница 33: ...WKHQ EH SUHVHQWHG ZLWK WKH RULJLQDO L DUG IRUPDW 8VH WKH DFN DQG 1H W EXWWRQV WR PRYH WKURXJK WKH YDULRXV ZLQGRZV RI WKH L DUG RX FDQ RQO DFFHVV WKLV RSWLRQ DIWHU UXQQLQJ WKH 6HWXS L DUG FRPSOHWHO DQG VDYLQJ RXU SUHIHUHQFHV DW OHDVW RQFH Exiting the Setup Wizard You can exit the Wizard at any time by pressing the LW button If you are running the Setup Wizard for the first time you will not save an...

Страница 34: ... by sliding it into position until it clicks Battery Polarity Your remote control is now ready to use The Software Remote Control In addition to the hardware remote control there is an on screen software version of the remote control All functions described below for the hardware remote control apply to the soft ware version Using the mouse to press any of the virtual buttons is equal to pressing ...

Страница 35: ...ith the left mouse button in any of the solid areas of the remote While still holding the mouse button down drag the remote to the desired location and then release the mouse button Minimize To minimize the software remote click the box in the upper right corner It will be minimized and available from the Task Bar 127 6RPH LJLWDO 9 5 FRPPDQGV FDQ DOVR EH SHUIRUPHG E SUHVVLQJ VSHFLILF NH V RQ RXU 3...

Страница 36: ...e event scheduler is running The applica tion will wake up automatically to perform a scheduled recording However the recording will take place in the background without displaying any video 127 KHQ XVLQJ WKH RQ VFUHHQ UHPRWH RX FDQ DOVR FOLFN WKH µPLQLPL H ER WR KLGH WKH UHPRWH FRQWURO W FDQ EH UHFDOOHG E FOLFNLQJ WKH LJLWDO 9 5 5HPRWH RQ WURO EXWWRQ WKDW ZDV SODFHG LQ WKH 7DVN DU ZKHQ WKH UHPRWH...

Страница 37: ... Channel to the Favorites List To add a channel to the Favorites list 1 Start in Live TV mode press the 9 79 button on the remote 2 Select the channel to be added to the list with the up down arrows or by direct entry on the remote s keypad 3 Press the 925 7 6 96 button on the remote control 4 The Favorites screen appears listing the current channels assigned as Favorites 5 Press the button Your n...

Страница 38: ... the up down arrows can be used to select a Thumbnail Channel Up Down Arrows Pressing a Channel Up Down arrow while viewing live TV will select the next channel in your list of available channels Pressing a Channel Up Down arrow while a prerecorded program is playing will pause the recorded show and switch to the live TV signal Left Right Arrows as cursors When viewing the Main Menu pages or other...

Страница 39: ...to rewind ten seconds playback continues automatically from this point This function works for both recorded pro grams and live TV broadcasts You ll never miss another important line in a movie or a great play in a sporting event again To jump additional ten second intervals press the 5 3 button repeatedly Each press will move backward an additional ten seconds Skip The 6 3 button has multiple use...

Страница 40: ...n screen You can use the numeric keys to advance a program you are watching by a specific amount For example typing followed by a press of the button will move playback of the current program to the point fifteen minutes ahead of the current location Playback will automatically continue from this point For larger numbers you can enter them in exact minutes up to 99 minutes or hours and minutes e g...

Страница 41: ...ned in the program since it was paused Pressing the B button will display thumbnails Pressing the 3 button will restart playback Frame Advance Pressing the 3 86 button once stops playback Pressing the 3 86 button a second time will advance the picture by single frames You can press the 3 86 button repeatedly to advance a frame at a time or hold it down to advance multiple frames Stop Press 6723 to...

Страница 42: ...Q RI D SURJUDP RX DUH UHFRUGLQJ Bookmark Bookmarks are a set of custom markers that can be used to store locations within a recorded file Pressing the 22 0 5 button will open a window where you can select add name and delete Bookmarks Each Bookmark is shown with a picture from the show a time reference and its text description See Bookmarks on page 52 Find Press to find broadcast channels in Setup...

Страница 43: ...ng that the Digital VCR is in Standby mode and its icon appears in the Task Bar Double click a shortcut to Digital VCR placed on the desktop For new installations if you have not yet selected any TV channels the software will open the Channel Setup page by default the first time you launch Digital VCR Here you can have Digital VCR automatically scan for occupied channels or manually select and nam...

Страница 44: ...H KDQQHO 6HWXS ZLQGRZ See Channel Setup on page 80 Favorite Channels The 925 7 6 button 96 gives you access a customizable subset of all the channels avail able on your TV service In Favorites mode you can use the up down arrows to move through the list of selected Favorite channels skipping over other channels This is especially useful if you have a large selection of available channels as with c...

Страница 45: ... program you were watching Volume Control To adjust the playback volume use the left right arrows in the cursor section of the remote control Pressing these buttons will increase or decrease the volume in 5 increments The screen will display the current volume setting as soon as you press one of the volume arrow buttons The range is 0 to 100 Volume settings are saved when you quit the Digital VCR ...

Страница 46: ... To Change the Screen Size Selecting an alternate screen size is easy Follow these steps to choose a different screen size 1 Open the Main Menu by pressing the 0 18 button on the remote control or by right clicking the live TV picture 2 In the Main Menu select 2SWLRQV 3 Press 17 5 to open the Options page 4 In the Options page scroll and select LVSOD 6L e 5 Press 17 5 6 The Display Size list opens...

Страница 47: ... menu has an underlined letter that is used to select the shortcut Once the menu is open simply type the underlined letter to choose the option The Options menu contains 6WDQGE Select this to place the application into Standby mode When you exit Standby mode to watch TV again the picture size will be the same as when you were last viewing live TV OZD V 2Q 7RS Use this when using other applications...

Страница 48: ...OW Version Information The version number of the Digital VCR software may be useful when you need customer ser vice assistance or when a new version of the application is released To get the version number of the Digital VCR application running on your computer click the ERXW item in the Help menu When clicked a new window will open on top of the existing Digital VCR window In this new window you ...

Страница 49: ...ed it may take multiple presses of the 6 3 button to return to real time Rewind Live TV At any time while watching a live TV program you can also rewind the current show to replay a section The exact amount of time available for rewinding is determined by these factors The size of the Time Shift buffer How long your Digital VCR system has been on Even with a thirty minute Time Shift buffer if your...

Страница 50: ...peatedly will cycle through the available fast forward rates When you get to a section of the program that you want to watch simply hit the 3 button on the remote to start playback While using the fast forward function the current rate and time location with the current pro gram will be shown on screen To jump back to current time in the live program just press the 9 79 button Jump Forward Direct ...

Страница 51: ... your favorite show No not with Time Shifting Just pause the program and return to it when you are ready Time Shifting caches live TV to your hard drive When Time Shifting is enabled live TV is always recorded allowing you to pause Live TV and then continue without missing your program When Time Shifting is disabled Live TV will be paused but broadcast content will be lost during the pause When yo...

Страница 52: ...egular intervals as markers similar to a bookmark in a browser They are created automatically when you pause a live TV broadcast They show you what has been happening since you paused the program that you were watching Thumbnails are also available for programs recorded to disk They serve as an easy naviga tional aid To view the Thumbnails for a recorded program simply press the 3 86 button The sc...

Страница 53: ... on one screen scroll bars will appear at the top and or bottom of the Bookmarks page Bookmarks can be added to a live broadcast that is being recorded if desired Navigating with Bookmarks Once you have created some Bookmarks in a recorded file they can be used to navigate the file To navigate using Bookmarks 1 Press the 22 0 5 6 button on the remote to open the Bookmarks window 2 Any Bookmarks sa...

Страница 54: ...gram that you want to remove Bookmarks from 2 Press the 22 0 5 button 3 The Bookmarks window will open 4 Select the Bookmark to be removed by navigating with the arrow buttons to select it 5 Press the button 6 A confirmation dialog box will appear 7 Hit 17 5 to select Yes and delete the Bookmark 8 To exit the delete dialog without removing the Bookmark scroll with the arrow keys to 1R and then pre...

Страница 55: ...ing Or you can select a different preset recording quality setting to be used as the default This can be done on the Recording Options page found in the Options menu See Recording Settings on page 76 In addition to the four preset quality settings there is a user defined Custom recording quality setting This allows you set up video and audio recording parameters to suit your needs For additional i...

Страница 56: ...ed can be cancelled if desired Programming a Show to be Recorded When you install Digital VCR space is pre allocated on your hard drive for recording You can think of this space as a virtual tape The disk space is set aside for use by Digital VCR When a show is added to the schedule to be recorded two things happen Your hard drive free space allocated to Digital VCR is checked to determine that th...

Страница 57: ...l Day and Date URP the program start time when recording will begin 7R the point at which recording will end 4XDOLW the recording quality to be used 5 To make a change with the remote control use the up down arrows to scroll to the item you want to alter 6 Use the left right arrows to change the current value Using the PC mouse click on the left right arrows next to any parameter to change it The ...

Страница 58: ...press an for AM or a for PM To exit the record dialog without scheduling the record operation press the button You will return to the previous page Optionally you can scroll down to DQFHO UHFRUGLQJ and then press 17 5 Scheduled Recordings Using Standby Mode Once a show is scheduled to be recorded you have the option of placing the Digital VCR into Standby mode The live TV picture does not have to ...

Страница 59: ...d time is reached it will cycle back to the original end time Pressing the Stop button while the record screen is visible will terminate the recording The record screen will revert to the live TV image after 5 seconds Thumbnails in a Recorded Program You can use the Thumbnails as a navigator in the same manner as used for a paused live TV program The Thumbnails are displayed any time you pause pla...

Страница 60: ...he purpose of this simplified illustration assume that there is two hours of recording time available on the sys tem s hard disk allocated to Digital VCR your virtual tape By setting up a two hour Group recording up to four episodes of the program would be available The programs in your Group would be constantly refreshed as other episodes are broadcast Here s a simple Group example see the diagra...

Страница 61: ...hree hours To save eight half hour shows set the total size to four hours etc When setting up multiple Groups this setting can help manage the Group recording process by choosing the relative sizes for each Group When reclaiming space Digital VCR tries to preserve shows in a Group that you have not had time to watch by eliminating the oldest shows first When multiple Groups exist each Group is ana...

Страница 62: ...S 5 Press 17 5 to create the recording Group Group Recording Settings Each setting in the Group recording dialog box is explained in this section All settings can be changed with the left right arrow keys the PC arrow keys or the mouse Record This setting lets you select different options relating to the content of your Group You can make your Group more or less specific by changing this setting R...

Страница 63: ...5HFRUGLQJ URXS 13 Press the 17 5 button Quality The Quality setting allows you to select any of the four preset recording quality settings for your Group recording All shows in the Group are recorded with the same settings You can also use the Custom record setting Size Each Group can be set to a user defined size The size you select determines the approximate number of shows that will be availabl...

Страница 64: ...he record dialog box opens 5 Select the 7R field navigating with the up down arrows This indicates the scheduled recording end time 6 Use the left right arrows to change the end time to the new desired time 7 Scroll down to KDQJH 5HFRUG QG 7LPH 8 Press 17 5 Stopping a Recording in Progress While a program is being recorded you can cancel the recording process The portion of the show that has alrea...

Страница 65: ...e To do this 1 Press the 0 18 button on the remote control 2 Select 6FKHGXOHU by scrolling with the up down arrows 3 Press 17 5 4 The Scheduler dialog box opens 5 Select the recording Group you want to cancel by scrolling with the up down arrows 6 Press the button on the remote control 7 An Are you sure dialog box will open giving you the opportunity to confirm your choice or cancel 8 Press 17 5 a...

Страница 66: ...he list of all shows in the category is displayed in the window Scroll with the up down arrows to select the show to be changed 6 Press the 17 5 button 7 The Modify Settings window opens 8 Scroll with the up down arrows to select a parameter to edit 9 Use the left right arrows to modify the current settings 10 When you are finished changing the current settings scroll to FFHSW PRGLILHG VHW WLQJV 1...

Страница 67: ... these steps to delete a recorded program from your library 1 On the remote control press the 0 18 button to access the Main Menu 2 Use the up down arrows to select Recorded Shows 3 Hit the 17 5 button to view the recorded program category list 4 Scroll with the up down arrows to select the category containing the show you want to delete 5 Hit the 17 5 button to display the contents of that catego...

Страница 68: ...ecycled folder from the list 5 Press the 17 5 button the Recycled folder opens 6 Scroll with the up down arrows to select a show to be restored 7 Press the button 8 Confirm the operation in the dialog box Press 17 5 to answer Yes and complete the file restoration To cancel select 1R and press 17 5 Manually Deleting a Program To permanently delete a program from the Recycled folder manually 1 Press...

Страница 69: ...utton again The Main Menu Features This section describes the pages features and options available from the Main Menu screen To move around the items in the list use the up down arrows The currently selected item will be highlighted To make a selection press the 17 5 button Recorded Shows This page shows an overview of all program recordings stored on your system sorted by cate gory Each category ...

Страница 70: ...er double click it or select it with the remote control arrow buttons and then hit 17 5 Every show selection in a category has a still frame picture from the show used as an icon and assorted recording information such as recording date time channel etc Also included is information about the show s total time and the last time at which play back was stopped You ll see something like this 17min 30m...

Страница 71: ...t 3 minutes Wow Editing Show Information If a show has been recorded without a description or if you need to change the description entered previously text can be added from your PC keyboard while on this page To change or add text 1 Open the Recorded Shows window 2 Select and open the category window that contains the show to be edited 3 Select the show for which you want to add or change the des...

Страница 72: ...older immediately you can do so at any time To manually delete the contents of the recycle folder follow these steps 1 From the Main Menu select the 5HFRUGHG 6KRZV entry 2 Press the 17 5 button 3 The Recorded Shows page opens 4 Select the 5HF FOHG folder from the list 5 Hit 17 5 6 The Recycled folder opens 7 Press the button 8 You will be prompted with a confirmation dialog box 9 Select HV to conf...

Страница 73: ...tton on the remote control can be used to cancel a recording and remove it from the schedule Scroll with the up down arrows to choose a program name to be canceled For Group recordings the cancel operation actually just disables the recording function When cancelling a Group recording notice that after pressing the button to cancel the Group recording the on screen text for the button will change ...

Страница 74: ...figuration The Storage Configuration page provides an overview of all current system disk use settings Fields on this page can be edited to change your system setup in real time without running the Setup Wizard The storage readouts will update in real time to reflect any changes being made ...

Страница 75: ...ds display both hard disk space amounts in GB and recording time in minutes The recording time displays are shown for each of the preset recording quality settings Total Storage Amount To change the Total Storage amount from the remote control 1 From the Main Menu select 6WRUDJH 2 Press 17 5 to open the Storage Configuration page 3 Use the up down arrows to select the 7RWDO 6WRUDJH parameter 4 Use...

Страница 76: ...ving changes Recording Settings This page shows you the current quality setting that will be used for recording When the page opens your default recording setting is highlighted To change the current recording quality setting 1 From the Options menu click the 5HFRUGLQJ button to open the Recording Options menu 2 Scroll with the up down arrows to choose a new record quality setting 3 Press the 17 5...

Страница 77: ... at full bandwidth This requires the most computing power To change a setting 1 Scroll with the up down arrows to select a field 2 Use the left right arrows to change the selected parameter 3 Press the 17 5 button to confirm your changes 4 Or press the button to exit without saving changes Changes can be made from the remote control or the PC keyboard As a reference the following table lists the s...

Страница 78: ...when running other tasks on your PC HVW Use with the fastest processors for the best picture quality Display Controls The Controls setting is a simple on off switch for the three variables below it The settings in this section allow you to adjust the Digital VCR picture to accommodate differ ent monitors and video cards Since the single switch controls three parameters you can tog gle the Controls...

Страница 79: ...the list of options No title bars etc are available Window 640 x 480 This selection displays the Digital VCR picture in a standard desktop window This is the larg est windowed picture available This gives you access to the rest of your Windows desktop fea tures while watching video playback Half Size Window 320 x 240 The desktop window video display is shown at half of its normal size Quarter Size...

Страница 80: ...Active Hidden or selected as a Favorite To scan for occupied channels 1 Press the Menu button 2 Select Options 3 Select Channel Setup from the Options menu 4 The Channel Setup page opens 5 If you have no channels defined Digital VCR will offer to add the current channel Press Enter to accept or Back to delete 6 When the channel list is displayed press Find to scan for occupied channels 7 When the ...

Страница 81: ...DQQHO W 9LG WR LGGHQ ZKHQ LW LV QRW LQ XVH GRLQJ WKLV RXU FKDQQHO OLVW ZLOO QRW LQFOXGH WKH FDPHUD LQSXW H FHSW ZKHQ QHHGHG Time Shifting Digital VCR has a tuner only playback mode available that disables some features This may be useful in situations where you do not need the ability to pause replay or rewind live TV pro gramming such as when viewing recorded programs in your video library Time S...

Страница 82: ... DUH QRW GLVDEOHG LI RX DUH ZDWFKLQJ D SUHUHFRUGHG SURJUDP VLQFH WKH GR QRW UHTXLUH WKH 7LPH 6KLIW EXIIHU Enable Time Shifting Once you have disabled the Time Shifting feature it can be enabled again by returning to the Options page available from the Main Menu The menu text will now read QDEOH 7LPH 6KLIW LQJ instead of LVDEOH 7LPH 6KLIWLQJ Using the arrow buttons scroll down to select QDEOH 7LPH ...

Страница 83: ...the 32 5 21 0 18 button down for about four seconds The application will close placing an icon in the Task Bar on the desktop To wake up from Standby mode press the 32 5 21 button on the remote control You can also enter exit Standby mode from the Task Bar by clicking on the Digital VCR icon found there A menu will pop out with selections for Standby Wake Up and Quit Quit Choosing 4XLW will exit t...

Страница 84: ...cting an S Video Device Connecting an external device requires two steps connecting the hardware and choosing soft ware settings Connect the Hardware To connect a video device that has an S Video output follow these steps 1 Connect an S Video cable from the video output of your device to the video input on your Digital VCR card You do not need the supplied adapter cable for this setup 2 Connect th...

Страница 85: ...ograms Creative VB Digital VCR Reconfigure Digital VCR 3 Select the 9LGHR QSXW page 4 Click the 6 9LGHR radio button 5 Click the 6DYH 6HWWLQJV button 6 Click the LW button The new settings will be available the next time the Digital VCR software is launched To watch the external video device select channel zero on the remote control Do this by pressing the number zero button followed by the 17 5 b...

Страница 86: ...CR card in the step above 3 Connect the audio outputs from your device to the audio inputs on the Digital VCR card You may need an adapter cable to connect the RCA audio outputs found on most consumer electronics devices to the Digital VCR card To select the Video input signal type 1 Quit the Digital VCR application 2 Select Start Programs Creative VB Digital VCR Reconfigure Digital VCR 3 Select t...

Страница 87: ...gital VCR directory during the installation process The default location is C Program Files Creative VB Digital VCR File Exporter 127 KHQ H SRUWLQJ ILOHV UHPHPEHU WKDW WKH H SRUWHG ILOHV ZLOO WDNH XS WKH VDPH DPRXQW RI GLVN VSDFH DV WKH VRXUFH ILOHV H VXUH WKDW WKHUH LV VXIILFLHQW VSDFH RQ WKH GLVN ZKHUH H SRUWHG ILOHV ZLOO EH VWRUHG EHIRUH VWDUWLQJ WKH H SRUW SURFHVV File Types There are two type...

Страница 88: ...porter The File Exporter application can be launched by selecting it from the Start Menu or by double clicking the application icon dvrexport exe in the Digital VCR directory As mentioned above the default location is C Program Files Creative VB Digital VCR File Exporter Exporting can be broken down into three simple steps adding files to the export list selecting an output folder converting the f...

Страница 89: ...the Add button To add files to the export list using the Add button 1 Click on the GG button in the File Exporter window 2 A standard Windows navigation dialog box will open 3 Navigate to your MPG folder 4 Select a show to be added to the export list 5 Click the 2SHQ button 6 The file is added to the export Source list 7 Repeat this procedure to add additional shows the list Removing Shows from th...

Страница 90: ...conversion process click the RQYHUW button A progress bar is displayed for each file to be converted in your Source list To abort the conversion click the DQFHO button Preferences This page allows you to set a default output file size and a default output directory The default files size is useful when making multiple backups to the same size media such as CD R To set an output file size simply se...

Страница 91: ... to locate files to be imported Importing a show does not copy it to your hard drive Instead Digital VCR plays the file directly from the archive disk You can however make a permanent copy on a local disk Steps for saving a local copy of an imported file are given below To import a show saved as an MPEG 2 file 1 Press the 0 18 button to open the Main Menu 2 Select 5HFRUGHG 6KRZV 3 Press 17 5 to op...

Страница 92: ... press 17 5 Saving a Local Copy of an Imported File If you prefer to make a copy of an archived file rather that play it from its archive media you can do this from the Imported Shows folder A show must be imported first before it can be pro moted To make a local copy 1 Open the Recorded Shows page from the Main Menu 2 Select the PSRUWHG 6KRZV folder 3 Press 17 5 to open it and display its content...

Страница 93: ...n play it Digital VCR always looks in the MPG folder for shows to be added to the list you see when you open the Recorded Shows window from the Main Menu To restore a file 1 Copy the archived folder containing the show s bth files to the MPG folder 2 Copy the bti file associated with the archived file also to the MPG folder 3 Quit the Digital VCR application 4 Launch the Digital VCR application ag...

Страница 94: ...g the left side while the right side displays the data for the function selected on the left side Each function on the left side of the page is selectable by clicking it Be sure to select the Change or Remove Programs button to begin the software removal pro cess In addition when using Windows 2000 the text on the button that starts the software uninstall process is labeled KDQJH 5HPRYH In Windows...

Страница 95: ...on are not changed in the process To use the Modify option 1 Exit the Digital VCR application before proceeding 2 Click the Start Menu and go to 6HWWLQJV RQWURO 3DQHO 3 Choose the GG 5HPRYH Programs utility 4 Scroll down in the Add Remove window until Video Blaster LJLWDO 9 5 is visible in the program list 5 Highlight Video Blaster Digital VCR and click the GG 5HPRYH button KDQJH 5HPRYH for Window...

Страница 96: ... selected click the 1H W button to continue 12 The update utility replaces the selected components 13 Depending upon which components of the software were selected you may want to make changes to the MPG folder as well During the Modify operation you will be prompted to choose an option for saving or deleting the MPG folder contents 14 Select the option that best suits your needs by clicking its r...

Страница 97: ...ete the MPG folder that contains your recorded programs If you want to preserve your recorded programs choose the option to not remove the MPG folder Also when removing the software you are given the option of deleting the Digital VCR applica tion folder and its contents If you want to preserve the settings from the Setup Wizard and any other files that may have been saved in the application folde...

Страница 98: ...t again you will find that the Video Blaster Digital VCR application is no longer present 127 1RWH 7KH FRQWHQWV RI RXU 03 IROGHU WKH IROGHU ZKHUH DOO UHFRUGHG SUR JUDPV DUH VWRUHG ZLOO QRW EH UHPRYHG XQOHVV RX GHOHWH LW DV SDUW RI WKH XQLQVWDOO SURFHVV KHQ XSGDWLQJ WKH VRIWZDUH LW LV QRW QHFHVVDU WR GHOHWH SUHYLRXVO UHFRUGHG VKRZV ...

Страница 99: ...t 28 Double click the Live TV window to toggle from full screen to windowed 1 0 18 Typing the first letter of a menu item selects that item Live TV 63 5 Start Playback 6 Stop Playback Rewind Fast Forward 200 Replay pressing the Shift key is not required 3 5 2 Skip pressing the Shift key is not required 3 Pause Playback 63 6 Back 5 Record 0 Main Menu 8 Mute audio Info Selects an on screen option sa...

Страница 100: ...Q RU ZLQ GRZ RQ RXU GHVNWRS OLFN WKH WLWOH EDU RI D ZLQGRZ WR EULQJ LW WR WKH IURQW RQ WKH GHVNWRS 180 5 6 Numeric entry channel select same as remote 7 7 Cycles through the open windows to access the software remote control 7 2 In windowed video mode opens the Options menu 7 6 In windowed video mode opens the Shortcuts menu 7 In windowed video mode opens the Help menu 7 Quit the Digital VCR appli...

Страница 101: ... number 6 3 amounts are in minutes Toggle on screen display options Press 1 2 repeatedly Exit pause Press 3 Frame advance Press 3 86 repeatedly Change rewind speed Press 5 repeatedly Rewind by an exact amount number 5 amounts are in minutes Change fast forward speed Press repeatedly Fast Forward by an exact amount number amounts are in minutes Play a recording from the beginning Press zero 3 Start...

Страница 102: ... wrong source is selected there may be no live TV picture Click 6 7 5 7 3 5 2 5 0 6 5 7 9 9 7 9 5 5 2 1 8 5 9 7 9 5 Click the Wizard button to return to the original format Check the settings that were chosen for the Input Connector Selection and Tuner Input Selection pages The Input Connector Selection should be set to Tuner Input and the Tuner Input Selection should be set to 1 7 1 1 for standar...

Страница 103: ...you need to select the source of your TV signals If the wrong source is selected there may be no live TV picture Click 6 7 5 7 3 5 2 5 0 6 5 7 9 9 7 9 5 5 2 1 8 5 9 7 9 5 Click the Wizard button to return to the original format Check the settings that were chosen for the Input Connector Selection and Tuner Input Selection pages The Input Connector Selection should be set to Tuner Input if your are...

Страница 104: ...eck box to enable the feature Then select a default window size from the Screen Size pop up box You can also specify a location on the desktop where the window should be placed by typing in coordinates in the X Y boxes When the Digital VCR application is running display size settings can be changed from the Main Menu These settings will be remembered when to put the Digital VCR in Standby mode and...

Страница 105: ...t to the inactive color usually gray To make the Digital VCR window the front window on the desktop click anywhere in the Digital VCR window Use the Alt Tab key combination to cycle through the open applications Select Digital VCR to make it the front application on the desktop Poor picture quality Check that the settings for DMA are turned on for your hard drive This is done from the Device Manag...

Отзывы: