


•
SyslogServerAddress
: Select the Hostname or IP address from the dropdown menu, or type this in manually.
•
IncludeSystemID
: This option will include the router’s “System ID” at the beginning of every log message. This is often useful when a
single remote Syslog server is handling logs for several routers.
•
IncludeUTF8ByteOrderMark
: The log message is sent using UTF-8 encoding. By default the router will attach the Unicode Byte Order
Mark (BOM) to the Syslog message in compliance with the Syslog protocol, RFC5424. Some Syslog servers may not fully support RFC5424
and will treat the BOM as ASCII text, which will appear as garbled characters in the log. If this occurs, disable this option.
LogtoattachedUSB stick
: Only enable this option if instructed by a Cradlepoint support agent. This will write a very verbose log file to the root
level of an attached USB stick. Please disable the feature before removing the USB stick, or you may lose some logging data.
Verbosemodemlogging
: Only enable this option if instructed by a Cradlepoint support agent.
Createsupportlog
: This functionality allows for a quick collection of system logging. Create this log file when instructed by a Cradlepoint support
agent.
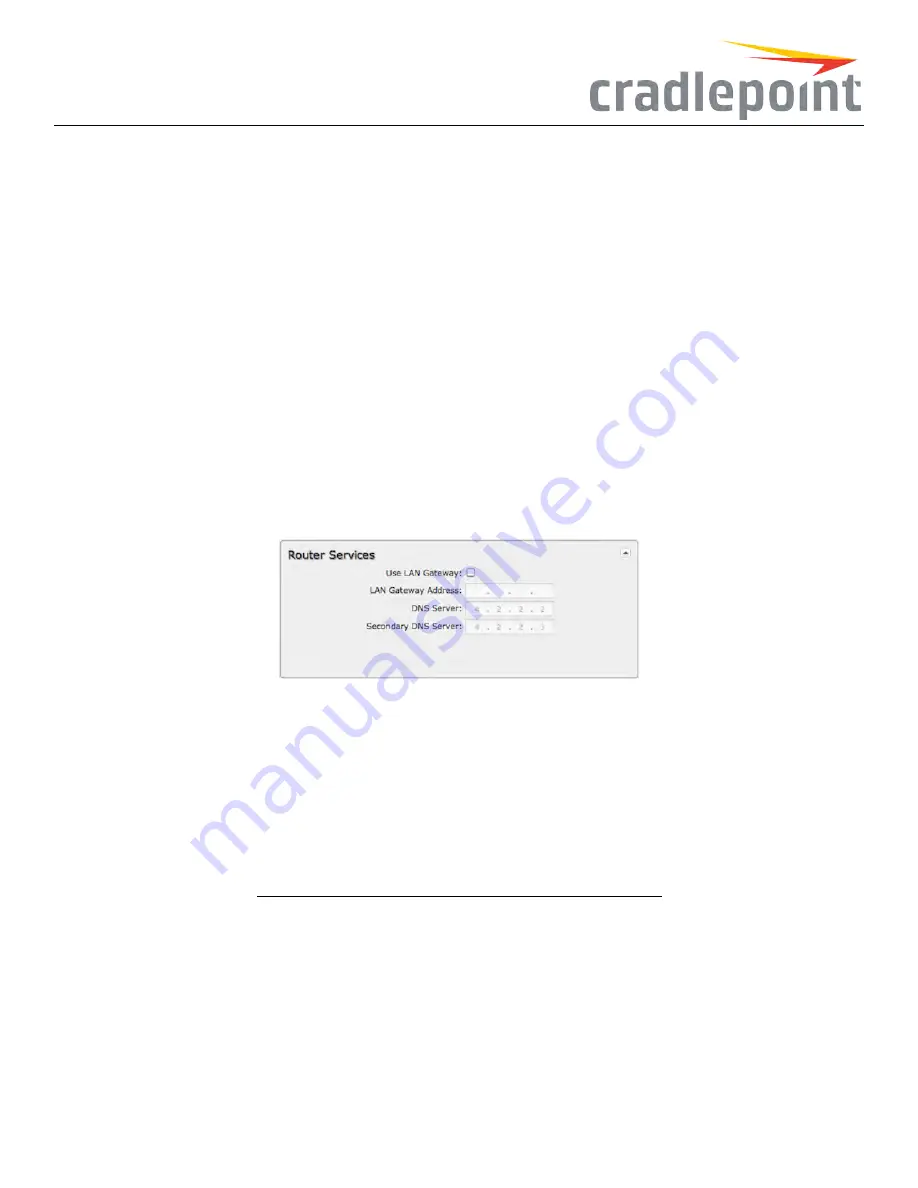
RouterServices
By default, router services (Enterprise Cloud Manager, NTP, etc.) connect to the router via the WAN. In some setups it makes sense to use the LAN
instead. For example, if your router is used strictly for 3G/4G failover behind another router, you may not want to use 3G/4G data unnecessarily.
Select
UseLAN Gateway
to set your router services to connect via the LAN.
Figure 159: Router Service Connection Settings
LAN GatewayAddress
: Input the IP address of the LAN side connection. If this is a 3G/4G failover router operating behind another router, the
LAN Gateway Address is the IP address of that other router.
DNS Server
and
SecondaryDNS Server
: The primary and secondary DNS server numbers match the static DNS values (set at
NetworkSettings
>DNS
). You can leave the default values or set them manually here. (Changing these values also changes the static DNS values.)
CertificateManagement
Through the Cradlepoint administration pages you now have the ability to create, manage, sign, and import/export
X.509 certificates
– frequently
referred to as
SSL certificates
– under
NetworkSettings>CertificateManagement
. Our implementation integrates an
OpenSSL
toolkit solution.
It includes the abiility to create your own
CA
certificates and
self-signed certificates
.
For background information on digital certificates, see the following Wikipedia articles:
•
Public key certificate
•
Public key infrastructure
•
X.509
(ITU-T standard)
133
Содержание COR IBR350
Страница 7: ...Figure 3 COR IBR350 Lights Ports Figure 4 COR IBR350 SIM Door USB Antenna Connectors 7 ...
Страница 12: ...Figure 9 Enterprise Cloud Manager Login Page Figure 10 Enterprise Cloud Manager Registration Page 12 ...
Страница 14: ...Figure 12 Router UI Figure 13 Cradlepoint logo Figure 14 Quick links 14 ...
Страница 18: ...Figure 19 Enterprise Cloud Manager Login Page 18 ...
Страница 25: ...Figure 27 COR IBR350 Status Dashboard Figure 28 Cradlepoint Logo 25 ...
Страница 29: ...Figure 32 Internet Connection Status Figure 33 Modem Status Figure 34 QoS Status 29 ...
Страница 32: ...Figure 39 Failover Failback Load Banlance Statistics Figure 40 System Log 32 ...
Страница 34: ...Figure 41 VPN Tunnel Status 34 ...
Страница 43: ...Figure 57 Zone Firewall Settings Figure 58 Port Forwarding Rules 43 ...
Страница 46: ...Figure 62 Remote Admin Access Figure 63 Add Edit Remote Admin Access 46 ...
Страница 52: ...Figure 70 Add Network Filter Policy 52 ...
Страница 53: ...Figure 71 Filter Rule Editer 53 ...
Страница 56: ...Figure 74 Local IP Networks 56 ...
Страница 58: ...Figure 76 IPv4 Settings Editor 58 ...
Страница 60: ...Figure 77 IPv6 Settings Editor 60 ...
Страница 61: ...Figure 78 Network Interface Editor 61 ...
Страница 62: ...Figure 79 Local Network Access Editor 62 ...
Страница 63: ...Figure 80 IPv4 DHCP Editor 63 ...
Страница 65: ...Figure 82 IPv6 Network Adressing Editor 65 ...
Страница 66: ...Figure 83 Multicast Proxy Editor Figure 84 Add Multicast Proxy 66 ...
Страница 76: ...Figure 99 Static Routes Figure 100 Static Route Editor 76 ...
Страница 86: ...Figure 111 Modem Settings 86 ...
Страница 90: ...Figure 115 Modem Update Activation Figure 116 Modem Update Error 90 ...
Страница 92: ...Figure 118 WAN Configuration Rules 92 ...
Страница 96: ...Figure 122 Data Usage Rules Figure 123 Data Usage Rule Editor Page 1 96 ...
Страница 99: ...Figure 127 Historical Data Usage Figure 128 Add Historical Data Usage 99 ...
Страница 101: ...Figure 130 GRE Tunnel Editor 101 ...
Страница 103: ...Figure 131 GRE Tunnel Toute Editor Figure 132 Keep Alive GRE TUnnel 103 ...
Страница 106: ...Figure 135 Add VPN Tunnel 106 ...
Страница 109: ...Figure 138 Add Edit VPN Tunnel Remote Gateway Figure 139 Add Edit VPN Tunnel Remote Netowrk 109 ...
Страница 112: ...Figure 141 Add Edit VPN Tunnel IKE Phase 2 112 ...
Страница 117: ...Figure 145 Local User Settings Figure 146 TACACS Settings 117 ...
Страница 121: ...Figure 151 GPS Settings 121 ...
Страница 126: ...Figure 156 GPS Client Settings 126 ...
Страница 135: ...Figure 161 Create PKCS12 Format Certificates 135 ...
Страница 138: ...Figure 163 Local Certificates Figure 164 Import PEM CA Certificate 138 ...
Страница 141: ...Figure 168 Device Alert Configuration Figure 169 SMTP Mail Server Configuration 141 ...
Страница 146: ...Figure 175 Device Control Figure 176 System Ping 146 ...
Страница 148: ...Figure 179 Firmware System Config Restore Page 148 ...


