


User Manual: WaveLinx Lite (1.5)
22
www.cooperlighting.com
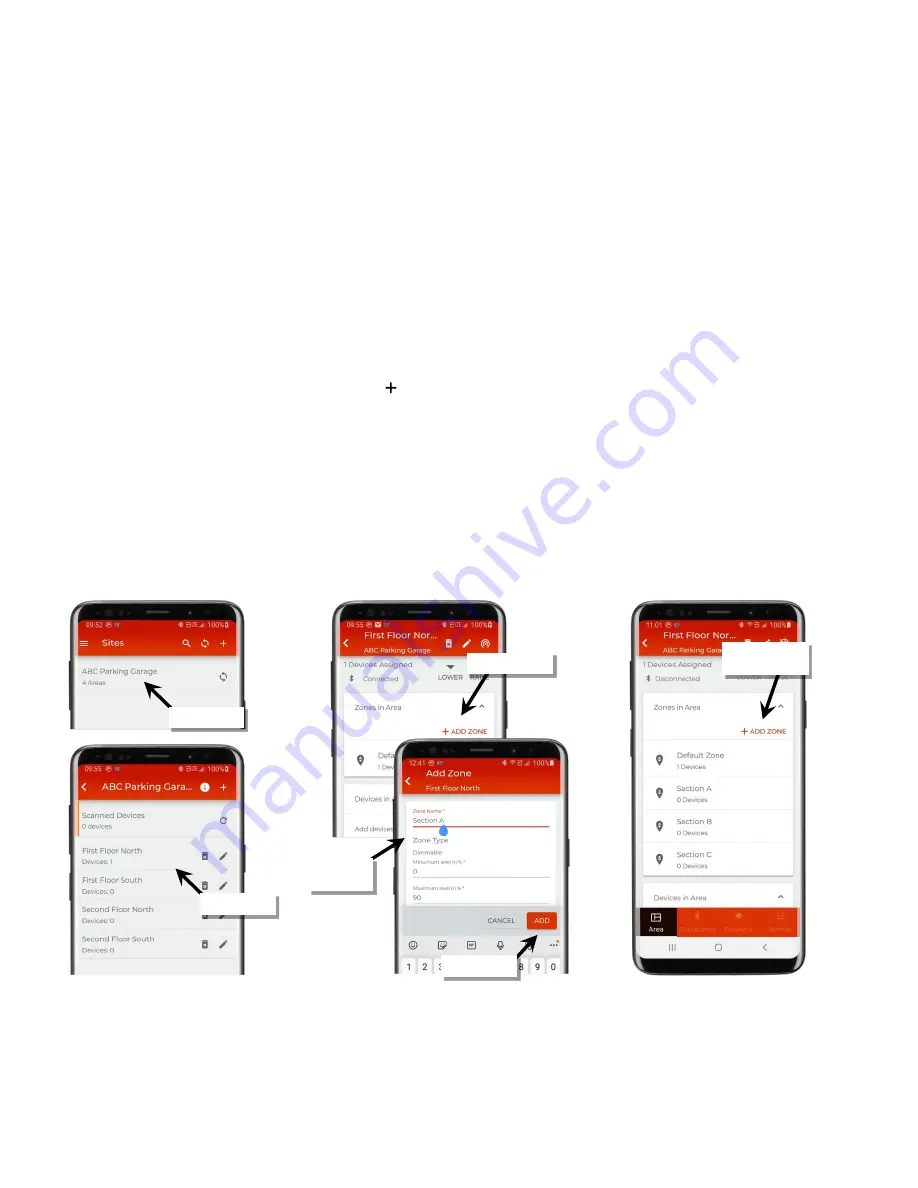
Step 4: Manage the Area Zones
In WaveLinx Lite, controlled devices (light fixtures, for example) are organized into zones. A
zone
is a group of controlled devices that will be
controlled together in the same way. If all controlled devices are going to operate together as one large group, no additional zones need to be
created (skip to “Step 5: Manage the Area Occupancy Sets” on page 23). The default zone will be used for the controlled devices in the area.
If the area needs to have smaller control groups, or lights in the same area need to be at different light levels for scene-based control, add
zones as needed. One area can have up to 16 zones.
Internet connection is not required to create zones. A connection to a WaveLinx Lite device/network is not needed for zone creation after the
first device has been provisioned.
Note
: Modification of a previously created zone’s parameters will require a connection to the WaveLinx Lite network.
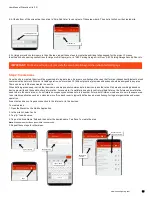
To create a zone:
1: Open the WaveLinx Lite Mobile Application.
2: In the site list, select a site.
3: In the area list, select the desired area.
4: Locate the ‘Zones in Area’ section and tap the option to ‘ Add Zone’.
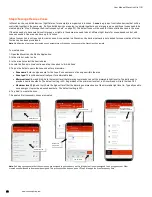
5: Tap on the fields to name the zone and enter parameters:
•
Zone name
: Enter a unique name for the zone. Zone names must be unique within the area.
•
Zone type
: This will be automatically set for a dimmable load.
•
Minimum level
(low end trim): Sets the lowest level that dimming commands can set the dimmable light level to. Typically used to
provide a desired aesthetic. The default setting is 0%. Regardless of the minimum level set, a 0% command will turn the load OFF.
•
Maximum level
(high end trim): Sets the highest level that the dimming command can set the dimmable light level to. Typically used to
save energy or to provide a desired aesthetic. The default setting is 90%.
6: Tap ‘Add’ to create the zone.
7: Repeat until all necessary zones are created.
Note
: If adding zones, ensure that the new zones are assigned to an occupancy set. Only the default zone is assigned to an occupancy set. Other
created zones will need to be manually assigned. This process will be done as part of “Step 5: Manage the Area Occupancy Sets”.
Select the site
Select the area
Tap ‘+ Add Zone’
Define zone
parameters
Tap on ‘’Add’
Repeat until all
zones are created


