


51
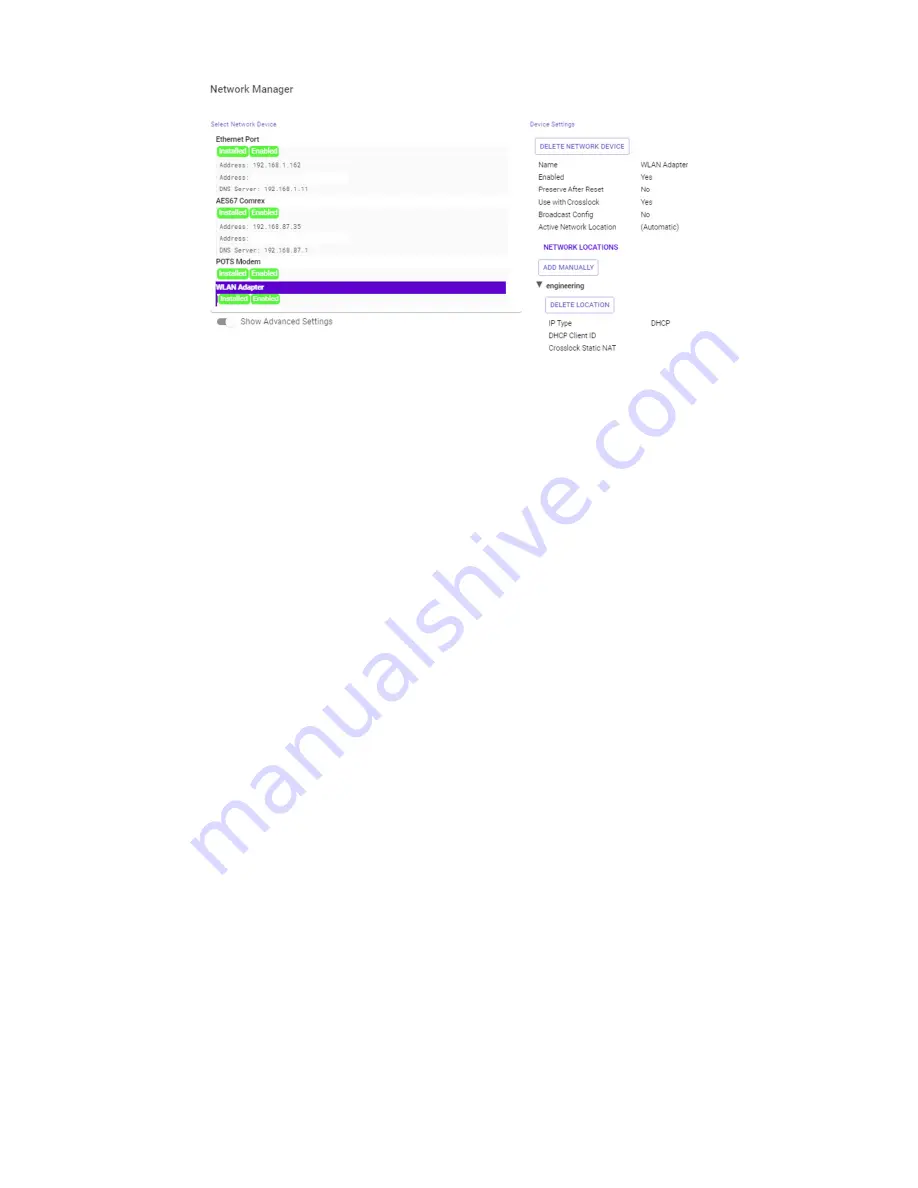
FIgure 30
wlAn AdApter settIngs
When setting up a WiFi connection, users will require the use of a USB WiFi adapter to begin making connections.
Once this has been installed, the adapter will populate in the Select Network Device section of the Network Manager
Tab as the
WLAN Adapter
(
Figure 30
). This adapter must be Enabled prior to using or scanning it. The WLAN Adapter
can be enabled by selecting it in the list and selecting “Enabled” under the Device Manager Settings and setting it to
“Yes”.
To select a new WiFi, select
Scan
to populate a list of local available networks. Choose the desired WiFi network and
select
ADD AS LOCATION
to store the network. The selected network will then appear under the Network Locations
section of the
WLAN Adapter
settings. For password-protected networks, select the
Key
field to enter the network
password and select
APPLY CHANGES
.
FInally, set this new WiFi network by navigating to the Active Network Location. This will open a dialogue box to the
right of the screen, where stored WLAN Network locations can be selected. Click APPLY CHANGES to complete setting
up the WLAN Adapter.
3G/4G CONNECTIONS
4G Cellular connections can be made with MultiRack by attaching a cellular modem with SIM over USB connection.
Cellular-based modems will appear as their model name. 4G connections generally populate automatically, as Cellular
connections are SIM-specific. Successful 4G connectivity will display like
Figure 31
.
It is possible to modify the APN setting if the default is not correct by selecting the SIM option under Carrier Networks
and selecting APN. New values can be inputted into the field manually. Additionally, some pre-programmed APNs
may be selected based on the list of carriers programmed into MultiRack. By setting the Region, Country, and Carrier
option, the list will suggest the proper APN by carrier.
Содержание ACCESS MultiRack
Страница 1: ...Product Manual ...
Страница 27: ...27 Figure 11 network recovery mode ...
Страница 111: ...Figure 81 Hotswap CC indicator 111 ...


