Clare Controls 16-Channel NVR with PoE Скачать руководство пользователя страница 148


Chapter 11: HDD Management  

Network Video Recorder User Manual  

137 

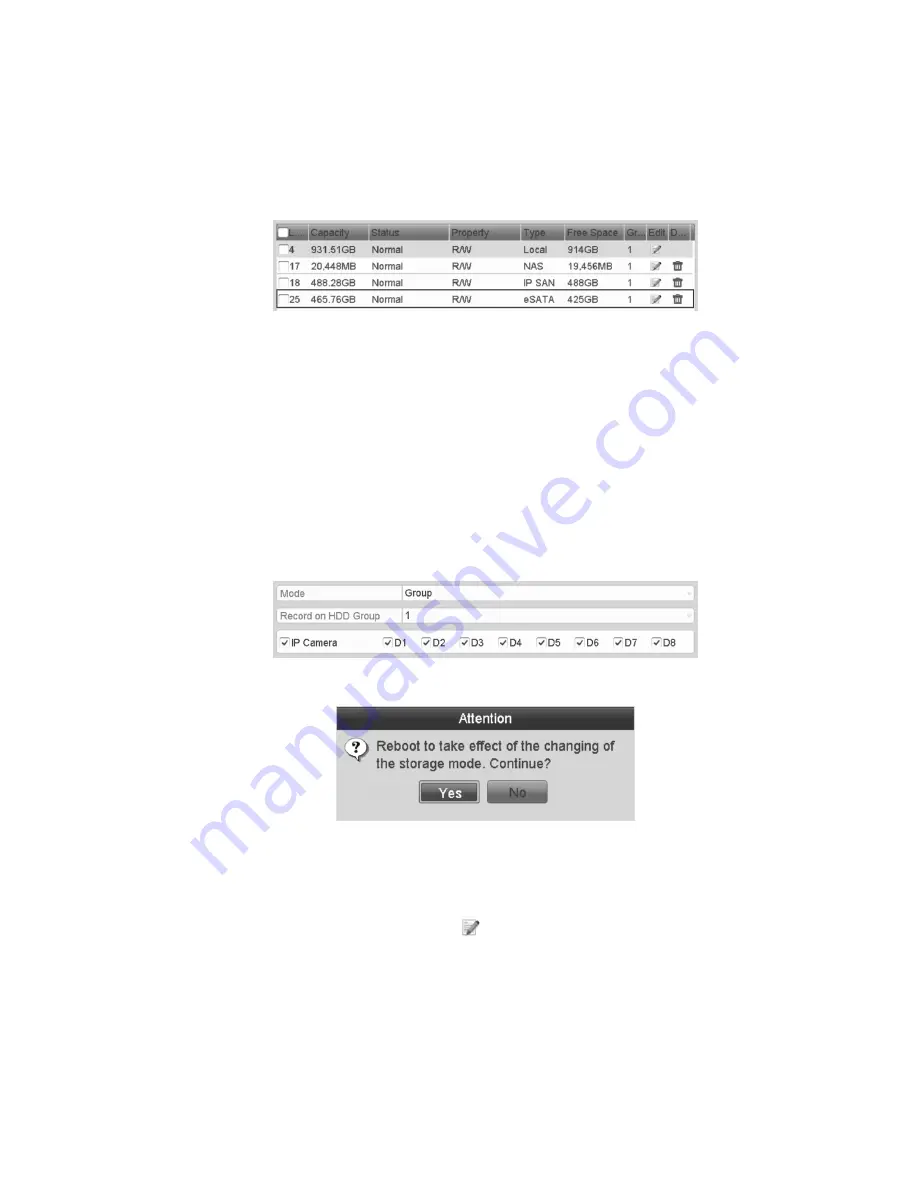
2.  Edit the property of the selected eSATA, or initialization is required. 

Note: 

When used for Record/Capture, two storage modes is configured for the 

eSATA. Refer to “Managing the HDD group” on page 137 and “Configuring 

Quota mode” on page 139 for details. 


Managing the HDD group 

Setting HDD groups 

Multiple HDDs is managed in groups. Video from specified channels is recorded 

to a particular HDD group through HDD settings. 

To manage HDD groups: 

1.  Enter the Storage Mode interface (Menu > HDD > Advanced). 
2.  Set the Mode to Group. 


3.  Click Apply

The Attention dialog displays. 


4.  Click Yes to reboot the device and activate the changes. 
5.  After the reboot completes, enter the HDD Information interface  

(Menu > HDD > General). 

6.  Select HDD from the list and click   to enter the Local HDD Settings 

interface. 

Содержание 16-Channel NVR with PoE

Страница 1: ...nel NVR with PoE 64 Channel NVR with PoE Last Modified 06 June 2015 Note The Network Video Recorder User Manual will no longer be updated For up to date NVR information see our Knowledge Base https kn...

Страница 2: ...trols Network Video Recorder User Manual name and logo are trademarks of Clare Controls Inc Other trade names used in this document may be trademarks or registered trademarks of the manufacturers or v...

Страница 3: ......

Страница 4: ...NVR 18 Using the wizard for basic configuration 19 Adding and connecting the IP cameras 24 Adding the online IP cameras 24 Editing the connected IP cameras and configuring customized protocols 26 Con...

Страница 5: ...ure 56 Configuring HDD group for recording and capture 57 Files protection 58 Playing back record files 61 Playing back by channel 61 Playing back by time 63 Playing back by event search 65 Playing ba...

Страница 6: ...Configuring Advanced 110 Configuring email 112 Configuring high speed downloads 113 Checking network traffic 114 Configuring network detection 115 Testing network delay and packet loss 115 Exporting n...

Страница 7: ...m information 147 Searching and export log files 149 Importing and exporting configuration files 151 Upgrading the system 152 Restoring default settings 154 Chapter 14 Other Settings 155 Understanding...

Страница 8: ...foregoing limitation will apply to the maximum extent permitted by applicable law regardless of whether Clare Controls Inc has been advised of the possibility of such damages and regardless of whethe...

Страница 9: ...vi Network Video Recorder User Manual...

Страница 10: ...vice Turns red when controlled by a keyboard and purple when the IR remote and keyboard are used at the same time HDD Blinks red when data is being read from or written to HDD MODEM Reserved for futur...

Страница 11: ...View mode REC SHOT Enter the Manual Record setting menu In the PTZ control settings press REC SHOT and then press a Numeric button to call a PTZ preset Turn audio on and off in Playback mod PLAY AUTO...

Страница 12: ...of the PTZ camera 8 Control Buttons DIRECTION The DIRECTION buttons are used to navigate between different fields and items in menus In the Playback mode use the Up and Down button to speed up and sl...

Страница 13: ...n is functioning normally 2 DVD R W Slot for DVD R W 3 Control Buttons DIRECTIONS In menu mode use the direction buttons to navigate between different fields items and select setting parameters In pla...

Страница 14: ...ox and select the ON OFF switch Start stop record clipping in playback 6 MNO PLAY Playback for direct access to playback interface 7 PQRS REC Open the manual record interface 8 TUV PTZ Access PTZ cont...

Страница 15: ...ol is enabled 2 The light is red when the function of the composite keys SHIFT is used 3 The light is out when none of the above condition is met ALARM The light is red when there is an alarm occurrin...

Страница 16: ...LAY AUTO button on front panel 8 INFO button Reserved 9 VOIP MON button Same as the MAIN SPOT ZOOM button on front panel 10 MENU button Same as the MENU WIPER button on front panel 11 PREV button Same...

Страница 17: ...remember the NVR ID The default ID number is 255 This ID number is valid for all the IR remote controls 3 Press the DEV button on the remote control 4 Enter the NVR ID number from step 2 5 Press ENTE...

Страница 18: ...rovider The mouse operation Table 5 Mouse control Name Action Description Left click Single click Live view Select channel and show the quick set menu Menu Select and enter Double click Live view Swit...

Страница 19: ...thod description Use the soft keyboard to enter text Click to view the numeric keyboard Figure 5 Soft alpha numeric keyboard Figure 6 Soft numeric keyboard Table 6 Soft keyboard icons Icons Descriptio...

Страница 20: ...tional Connects external SATA HDD CD DVD RM 2 eSATA interfaces 8 LAN Interface 2 network interfaces 9 Termination Switch RS 485 termination switch Up position is not terminated Down position is termin...

Страница 21: ...the Tb pin of the controller For cascading devices the first NVR s D D pin should be connected with the D D pin of the next NVR ALARM IN Connector for alarm input ALARM OUT Connector for alarm output...

Страница 22: ...A HDD CD DVD RM 2 eSATA interfaces 8 LAN Interface 1 network interface provided 9 Termination Switch RS 485 termination switch Up position is not terminated Down position is terminated with 120 resist...

Страница 23: ...VGA DB9 connector for VGA output Display local video output and menu 5 AUDIO IN BNC connector for audio input Also for two way audio AUDIO OUT BNC connector for audio output 6 LAN Interface 1 network...

Страница 24: ...ector for alarm inputs and outputs 5 VGA DB9 connector for VGA output Display local video output and menu 6 AUDIO IN BNC connector for audio input also for two way audio AUDIO OUT BNC connector for au...

Страница 25: ...ont panel is red indicating the device is getting power 2 Press the power button on the front panel The power indicator LED turns blue indicating start up 3 After startup the Power indicator LED will...

Страница 26: ...Video Recorder User Manual 17 Figure 12 Right click menu Figure 13 Top menu Shutting down the NVR There are two ways to shut down the NVR To shut down the NVR Option 1 1 Click Menu Shutdown See Figur...

Страница 27: ...button on the front panel for three seconds 2 Enter the administrator s username and password in the dialog box for authentication 3 Click Yes Note Do not press the power button again when the system...

Страница 28: ...portant settings of the NVR If you do not want to use the Wizard click the Cancel button You can choose to use the Wizard the next time you use the NVR by checking the Start wizard when the device sta...

Страница 29: ...deo Recorder User Manual 5 Click the Next button to enter the date and time settings window 6 After configuring the time settings click Next This returns you to the Network Setup Wizard window Figure...

Страница 30: ...C is only available in the 64 Channel NVR device For the 4 Channel NVR 8 Channel NVR 16 Channel NVR and 32 Channel NVR configure the internal NIC IPv4 address for the cameras connecting to the PoE net...

Страница 31: ...ers and then click Next The HDD Management window displays 9 To initialize the HDD click Init Note Initialization removes all the data saved in the HDD 10 Click Next to enter the Adding IP Camera inte...

Страница 32: ...etting Started Network Video Recorder User Manual 23 12 Click Next Configure the recording for the IP cameras 13 Click Copy to copy the settings to other channels 14 Click OK to complete the startup S...

Страница 33: ...d record of the video Before you start ensure that the network connection is correct For detailed instructions about checking and configuring the network see Checking network traffic and Configuring n...

Страница 34: ...ce as shown below You can edit the IP camera s IP address protocol management port and other information 2 Click Add to add the camera To add IP cameras using the Camera Management interface 1 Click M...

Страница 35: ...ection window and then click OK to finish adding Editing the connected IP cameras and configuring customized protocols After adding the IP cameras the basic settings are listed on the page Configure t...

Страница 36: ...side and then click to display the Advance Set window 2 Edit the network information and password for the camera 3 Click Apply to save the settings and then click OK to exit the window Configuring th...

Страница 37: ...ustomized protocols provided in the system You can edit the protocol name and choose whether to enable the sub stream 2 Choose the protocol type and then choose the transfer protocols Note The network...

Страница 38: ...work camera The PoE interface supports the Plug and Play function Example When using 4 Channel 8 Channel 16 Channel or 32 Channel NVRs to connect two online cameras and six network cameras via PoE int...

Страница 39: ...erface You cannot edit the camera parameters when choosing this option The camera s IP address can only be edited in the Network Configuration interface See Configuring general settings on page 103 fo...

Страница 40: ......

Страница 41: ...e View Dwell Time Start Recording This starts recording continuous record and motion detection record are supported Output Mode Select the output mode Standard Bright Gentle or Vivid Playback Playback...

Страница 42: ...Some basic operations is performed in the Live View mode for the Aux output Note For the 4 Channel and the 8 Channel there is only one audio output the VGA output has a higher priority over CVBS outp...

Страница 43: ...ately Output Mode Four modes of output supported including Standard Bright Gentle and Vivid Aux Monitor Switch to the auxiliary output mode and the operation for the main output is disabled Notes Scre...

Страница 44: ...auxiliary monitor Some features of Live View are also available while on an Aux monitor These features include Single Screen Switch to a full screen display of the selected camera The camera is selec...

Страница 45: ...toolbar Figure 20 Quick Settings toolbar Table 15 Quick Settings toolbar icons Enable Disable Instant Record Instant Playback 1 Mute Audio on Capture PTZ Control Digital Zoom 2 Image Settings 3 Live...

Страница 46: ...oom Figure 22 Image settings preset Figure 23 Live View Strategy Adjusting Live View settings You can customize the Live View settings according to your different needs You can configure the output in...

Страница 47: ...VBS out for the 4 Channel and 8 Channel NVR Live View Mode Designates the display mode used for Live View Dwell Time The time in seconds to dwell between switching channels when auto switch is enabled...

Страница 48: ...igure channel zero encoding 1 Enter the Live View Settings interface Menu Configuration Live View 2 Select the Channel Zero Encoding tab 3 Check the check box after Enable Channel Zero Encoding 4 Conf...

Страница 49: ...before you control the PTZ camera To configure PTZ settings 1 Enter the PTZ Settings interface Menu Camera PTZ 2 Select the camera for PTZ use in the Camera drop down list 3 Enter the parameters of th...

Страница 50: ...akes place To set the preset location 1 Enter the PTZ Control interface Menu Camera PTZ More Settings 2 Use the directional buttons to wheel the camera to the location you want to preset 3 Click Save...

Страница 51: ...bar to enter the PTZ setting menu in Live View mode 2 Choose Camera in the list on the menu 3 Double click the preset in the list to call it Customizing patrols You can set patrols to move the PTZ to...

Страница 52: ...ough the patrol The Duration refers to the time span the PTZ stays at the corresponding key point The Speed defines the speed at which the PTZ moves from one key point to the next 5 Click OK to save t...

Страница 53: ...t calling patrol in Live View mode 1 Press PTZ control on the front panel or on the remote or Click the PTZ Control icon on the quick setting toolbar to show the PTZ control toolbar 2 Choose Patrol on...

Страница 54: ...PTZ camera according to the predefined patterns To set a calling pattern in the PTZ setting interface 1 Enter the PTZ Control interface Menu Camera PTZ More Settings 2 Select the pattern number 3 Clic...

Страница 55: ...te control or choose the PTZ Control icon to enter the PTZ panel Figure 25 PZT panel Table 17 PZT panel icons Direction and auto cycle buttons Zoom Focus Iris Zoom Focus Iris The speed of the PTZ move...

Страница 56: ...resolution and so on 1 Make sure that the HDD is installed If not install and initialize it now Menu HDD General 2 Check the storage mode of the HDD a Click Advanced to check the storage mode of the...

Страница 57: ...rding ends at 11 00 and you set the post record time as 5 seconds it records till 11 00 05 Expired Time The expired time days is the longest time for the NVR to keep a recorded file in the HDD When it...

Страница 58: ...igure all the parameters on this menu Configuring record capture schedule Set the record schedule to automatically start and stop the recording based on the configured schedule In this chapter we use...

Страница 59: ...d draw the schedule line on the panel To edit the schedule 1 In the dialog you can choose the day when you want to set a schedule 2 Click the clock button to set the time of the schedule 3 To schedule...

Страница 60: ...k To apply the schedule to other days click Copy 6 Click OK to save the setting and return to the previous menu 7 Click Apply in the Record Schedule interface to save the settings in the Record menu T...

Страница 61: ...ecord and capture Follow the steps to set the motion detection parameters In the Live View mode once a motion detection event takes place the NVR can analyze it and respond Enabling the motion detecti...

Страница 62: ...figure 3 Check the check box after Enable Motion Detection 4 Using your mouse drag and draw the area for motion detection If you want to set the motion detection for the entire area viewed by the came...

Страница 63: ...dit the Motion Detection Record Schedule Configuring alarm triggered record and capture To configure alarm triggered recording or capture 1 Enter the Alarm setting interface Menu Configuration Alarm 2...

Страница 64: ...select a channel 9 Click Apply to save settings 10 Click OK to return to the previous menu 11 Repeat the above steps to configure other alarm input parameters 12 If you want to apply the settings to...

Страница 65: ...3 Click the status button before the desired camera number to change OFF to ON To disable manual record 1 Click the status button to change ON to OFF Note The green ON icon indicates that the channel...

Страница 66: ...s for recording and capture on holidays To configure holiday record and capture 1 Enter the Record setting interface Menu Record Holiday 2 To enable the Edit Holiday schedule click to enter the Edit i...

Страница 67: ...redundant HDD if available This will enhance the data safety and reliability To configure redundant recording and capture 1 Enter HDD Information interface Menu HDD 2 Select the HDD and click to ente...

Страница 68: ...re other channels Configuring HDD group for recording and capture You can group the HDDs and save the record files and captured pictures in various HDD groups To configure the HDD group 1 Enter HDD se...

Страница 69: ...Click Apply to save settings Note After configuring the HDD groups you can configure the Recording and Capture settings Follow Configuring parameters on page 45 Files protection You can lock the reco...

Страница 70: ...lick to edit the HDD you want to protect Note To edit HDD property you must set the storage mode of the HDD to Group See Managing the HDD group on page 137 3 Set the HDD property to Read only 4 Click...

Страница 71: ......

Страница 72: ...in the quick setting toolbar to choose a channel in Live View mode Note In instant playback mode only record files recorded during the last five minutes on this channel are played back Option 2 1 Ent...

Страница 73: ...e below 6 Click the channel s to execute simultaneous playback of multiple channels Note The indicates the start end time of the record Table 18 Playback icons Icons Description Audio on Mute Start St...

Страница 74: ...s bar to locate special frames Playing back by time Play back video files recorded in a specified time duration Multi channel simultaneous playback and channel switch are supported To play back by tim...

Страница 75: ...Figure 26 Figure 26 Playback by time toolbar Note The indicates the start end time of the record Table 19 Playback by time icons Icons Description Audio on Mute Start Stop clipping 30s forward 30s rev...

Страница 76: ...ayback progress bar or drag the bar to locate specific frames Playing back by event search Play back record files on one or several channels searched out by restricting event type e g alarm input and...

Страница 77: ...Chapter 6 Playback 66 Network Video Recorder User Manual Figure 27 Alarm input search interface Figure 28 Motion search interface...

Страница 78: ...Click button to play back the file Note Pre play and post play is configured If the event is set to trigger recording for multiple channels clicking displays the Synch Playback interface You can selec...

Страница 79: ...ure frame Lock video Add default tag Add customized tag Tag management Speed down Pause reverse play Reverse play Single frame reverse play Pause play Play Single frame play Scaling up down the time l...

Страница 80: ...in playback Use video tags to search for record files and position time points To play back by tag 1 Enter the Playback interface Menu Playback 2 Search and play back the record files 3 Click to add d...

Страница 81: ...oose channels edit start time and end time and then click Search to enter the Search Result interface Note You can enter a keyword in the Keyword textbox to search the tag on your command 4 Click to p...

Страница 82: ...pported Capture frame Lock video Add customized tag not supported Tag management Speed down Pause reverse play Reverse play Single frame reverse play Pause play Play Single frame play Scaling up down...

Страница 83: ...ck by system logs 1 Enter the Log Information interface Menu Maintenance Log Information 2 Click the Log Search tab to enter Playback by System Logs 3 Set search time and type and click Search button...

Страница 84: ...playing process Playing back external file Follow the steps to search for and play files in an external device To play back external files 1 Enter the Tag Search interface Menu Playback 2 On the top...

Страница 85: ...peed changes to a single frame One click on the Playback screen represents reverse playback of one frame You can also use the button in the toolbar To play back frame by frame using the front panel 1...

Страница 86: ...ted and up to 1 channel with 2560x1920 resolution reverse playback is supported To reverse playback of multiple channels 1 Enter the Playback interface Menu Playback 2 Select more than one check box t...

Страница 87: ...anual 3 Choose channels edit start time and end time and then click Search 4 Choose the file you want to view and click Click the Back button to return to the search interface 5 Use the toolbar in the...

Страница 88: ...Chapter 6 Playback Network Video Recorder User Manual 77 Figure 31 Picture playback toolbar Table 22 Picture playback toolbar icons Button Description Play reverse Play Previous picture Next picture...

Страница 89: ...flash drives USB HDDs USB writer SATA writer and e SATA HDD To backup using USB flash drives and USB HDDs 1 Enter Export interface Menu Export Normal 2 Set search condition and click Search to enter t...

Страница 90: ...is not recognized do the following Click the Refresh button Reconnect device Check the vendor s compatibility You can format USB flash drives or USB HDDs via the device 5 Stay in the Exporting interf...

Страница 91: ...and then click To backup using USB and SATA writers 1 Enter Export interface Menu Export Normal 2 Set search condition and click the Search button 3 Choose the recorded file in the Export interface a...

Страница 92: ...do the following Click the Refresh button Reconnect device Check the vendor s compatibility 5 Select the file type by clicking the corresponding option icon and then click OK to start backup 6 Stay i...

Страница 93: ...and set the usage to Export 3 Click Yes when prompted Note The usages of eSATA HDD contain Record Capture and Export Changes in usage will take effect after your reboot the device 4 Access the Export...

Страница 94: ...c Check the vendor s compatibility You can also format the eSATA HDD via the device 8 Select the file type by clicking its corresponding option icon and then click OK to start the backup 9 Stay in the...

Страница 95: ...he Export interface Menu Export Event 2 Choose Motion from the Event Type list Note Event types contain Alarm Input and Motion The following example shows backing up by motion 3 Select the alarm input...

Страница 96: ...zed a Click Refresh b Reconnect the device c Check the vendor s compatibility You can also format USB flash drives or USB HDDs via the device 8 Stay in the Exporting interface until all record files a...

Страница 97: ...ck toolbar to start or stop clipping record files 3 Use the Quit Playback interface when finishing clipping You are prompted to save the clips Note You can select a maximum of thirty clips for each ch...

Страница 98: ...6 Choose the record file in Export interface and click button to check it Backing up pictures Back up pictures using USB devices USB flash drives USB HDDs USB writer SATA writer or eSATA HDD To backup...

Страница 99: ...ch picture you want to back up and then click Export Note The following example shows backing up to a USB flash drive 4 Click Export to start the backup 5 Stay in the Exporting interface until all rec...

Страница 100: ...u must select at least one camera 3 Select the record files you want to back up and then click Export to enter the Export interface Note You must select at least one record 4 Click New Folder to creat...

Страница 101: ...s compatibility To manage USB writers 1 Enter Search Result interface of record files Menu Export Normal 2 Set search condition and then click Search to enter Search Result interface Note You must se...

Страница 102: ...Chapter 7 Backup Network Video Recorder User Manual 91...

Страница 103: ...detection Menu Camera Motion 2 Set up the detection area and sensitivity by selecting Enable Motion Detection 3 Using the mouse draw a detection area and then drag the sensitivity bar to set sensitiv...

Страница 104: ...f the week and up to eight times for each day 9 Click Apply to save the settings Note Do not repeat or overlap times 10 Click the Linkage Action tab to set up the alarm response actions of motion alar...

Страница 105: ...Configuration Alarm 2 Select the Alarm Input tab to enter the Alarm Input Settings interface 3 Check the Enable check box and then click Settings to set its alarm response actions 4 Click the Trigger...

Страница 106: ...up alarm response actions of alarm input 10 If necessary select the PTZ Linking tab and set PTZ linking parameters and then click OK Note Ensure the PTZ or speed dome supports PTZ linkage One alarm i...

Страница 107: ...Video Loss interface of Camera Management and select a channel you want to detect Menu Camera Video Loss 2 Check the Enable Video Loss Alarm check box and then click to set up the handling action for...

Страница 108: ...alarm Alarms trigger when the lens is covered and takes alarm response actions To detect video tampering 1 Enter the Video Tampering interface and then select a channel Menu Camera Video Tampering De...

Страница 109: ...le for handling actions 7 Choose a day of a week and up to eight periods for each day 8 Click Apply to save the settings Note Do not repeat or overlap times 9 Click the Linkage Action tab to set up al...

Страница 110: ...ord Capture Exception No space for saving recorded files or captured images Array Exception Abnormal virtual disks exist under array Note Array Exception is only supported by the 64 Channel NVR To set...

Страница 111: ...een Audible warning This triggers an audible beep when an alarm is detected Notify surveillance center This sends an exception or alarm signal to the remote alarm host when an event occurs The alarm h...

Страница 112: ...output You can also copy the above settings to another channel Triggering or clearing alarm output manually Sensor alarm is triggered or cleared manually When you select Manually Clear from the Dwell...

Страница 113: ...Chapter 8 Alarm Settings 102 Network Video Recorder User Manual...

Страница 114: ...eneral settings You must properly configure network settings before you can operate an NVR over the network To configure general settings 1 Enter the Network Settings interface Menu Configuration Netw...

Страница 115: ...1000M NIC cards provided by the 9600NI ST RT XT series device The cards allow the device to work in the Multi address Load Balance and Net fault Tolerance modes Multi address mode You can configure th...

Страница 116: ...system prompts you to reboot the device to enable the new settings After the reboot the PPPoE dial up is automatically connected You can go to Menu Maintenance System Info Network interface to view th...

Страница 117: ...ClareVision website IPServer Enter Server Address for IPServer PeanutHull Enter the User Name and Password obtained from the PeanutHull website NO IP 1 Enter the account information in the correspond...

Страница 118: ...address of NTP server NTP Port Port of NTP server 5 Click Apply to save and exit the interface Note The time synchronization interval is set from1 to 10080 minutes The default value is 60 minutes If t...

Страница 119: ...iguring a remote alarm host With a remote alarm host configured the NVR will send the alarm event or exception message to the host when an alarm is triggered The remote alarm host must have the Networ...

Страница 120: ...tion Network 2 Click the More Settings tab 3 Set multicast IP as shown below When adding a device to the Network Video Surveillance Software the multicast address must match the NVR s multicast IP 4 C...

Страница 121: ...text fields 4 The default server port is 8000 Note The server port is set in the range of 2000 to 65535 Use it for remote client software access The HTTP port is used for remote IE access The default...

Страница 122: ...ser Manual 111 3 Click Save To configure the IP camera 1 Enter the IP Camera menu Menu Configuration Remote Configuration Camera Management IP Camera 2 Select a camera and then click Add Modify Delete...

Страница 123: ...figure email 1 Enter the Network Settings interface Menu Configuration Network 2 Set the IPv4 address IPv4 subnet mask IPv4 gateway and the preferred DNS server in the Network Settings menu 3 Click Ap...

Страница 124: ...fy that the SMTP server is reached 6 Click Apply to save the email settings 7 Click Test to verify your email setting are working properly The Attention dialog displays the results Configuring high sp...

Страница 125: ...the interface Checking network traffic You can check the network traffic to obtain real time information of the NVR such as linking status MTU sending receiving rate etc To configure network traffic 1...

Страница 126: ...ck Test to start testing network delay and packet loss The testing result display in the window If the test fails the error message displays Exporting network packets By connecting the NVR to network...

Страница 127: ...h the packet export Note Up to 1M data is exported each time Checking the network status You can also check the network status and quickly set the network parameters in this interface To check the net...

Страница 128: ...ork parameters Checking network statistics You can check the network statistics to obtain the real time information of NVR To check network statistics 1 Enter the Network Detection interface Menu Main...

Страница 129: ...red The 64 Channel NVR is capable of realizing Redundant Array of Independent Disk supporting RAID0 RAID1 RAID5 and RAID10 Before you start Install the HDD s using the same enterprise level HDDs inclu...

Страница 130: ...19 Figure 36 RAID workflow One touch configuration Through one touch configuration you can quickly create the disk array and virtual disk By default the array type is RAID 5 Steps 1 Enter the Physical...

Страница 131: ...or more HDDs for one touch configuration a hot spare disk will is set by default We recommend that you set the hot spare disk to automatically rebuild the array when the array is abnormal 4 When the...

Страница 132: ...DD Information interface Menu HDD General Manually creating array and virtual disk You can manually create the array of RAID 0 RAID 1 RAID 5 and RAID 10 Note In this section we use RAID 5 as an exampl...

Страница 133: ...1 If you choose RAID 5 at least three HDDs are installed If you choose RAID 10 four six or eight HDDs are configured for RAID 10 4 Click OK to create an array Note If the number of HDDs you select is...

Страница 134: ...tion is quick only initializes part of the data of the virtual disk and cannot detect bad sectors o Foreground Recommended By using foreground initialization the virtual disk is completely initialized...

Страница 135: ...initialization the virtual disk displays in the HDD Information interface after the initialization is complete After initializing the virtual disk the status will change from Uninitialized to Normal 1...

Страница 136: ...status of array changes to Functional When the number of lost disks has exceeded the limit the working status of array changes to Offline In other conditions the working status is Degraded If the virt...

Страница 137: ...in Firmware Settings interface Menu HDD RAID Firmware or if the hot spare disk was not been configured then you can rebuild the array manually to restore the array when the virtual disk is in Degrade...

Страница 138: ...restores to Functional Note We recommend enabling the Auto rebuild function and setting the hot spare disk for automatically rebuilding the array Repairing a virtual disk If the disk cannot display i...

Страница 139: ...al disk will delete all data saved on the disk Deleting the virtual disk To delete the virtual disk 1 Enter the Virtual Disk interface Menu HDD RAID Virtual Disk 2 Select a virtual disk and then click...

Страница 140: ...is needed use array migration and extend it to enlarge the capacity of the virtual disk Before you start At least one available physical disk should exist for the array migration To migrate and exten...

Страница 141: ...nitialization the array migration is not done 4 Select the available physical disks and then click OK to confirm the settings 5 When prompted click OK to start migration Enter the Array Settings inter...

Страница 142: ...ed by the following formula Expanded VD capacity Original VD Capacity Original Array Capacity Newly Added Capacity of Hard Disk Example The capacity of the original array is 2 TB and two virtual disks...

Страница 143: ...e to check the information of the firmware including the version maximum physical disk quantity maximum array quantity auto rebuild status etc 2 Click Upgrade to upgrade the firmware Local and FTP upg...

Страница 144: ...dialog displays if any uninitialized HDD exists Initializing the HDD will erase all existing data on it Figure 39 Dialog of uninitialized HDD Click Yes to initialize it immediately or you can perform...

Страница 145: ...has initialized the status is changed from Uninitialized to Normal Managing Network HDD You can add the allocated NAS or disk of the IP SAN to NVR and use it as a network HDD To manage the HDD network...

Страница 146: ...e NAS disks 3 Select the NAS disk from the list shown below or Manually enter the directory in the NetHDD Directory field 4 Click OK to add the configured NAS disk Note Up to eight NAS disks is added...

Страница 147: ...ce connected to NVR you can configure eSATA t Record Capture or Export and you can manage the eSATA in the NVR To manage eSATA 1 Enter the Advanced Record Settings interface Menu Record Advanced 2 Sel...

Страница 148: ...g the HDD group Setting HDD groups Multiple HDDs is managed in groups Video from specified channels is recorded to a particular HDD group through HDD settings To manage HDD groups 1 Enter the Storage...

Страница 149: ...e R W Before setting the HDD property set the storage mode to Group An HDD is set to read only to prevent important recorded files from being overwritten when the HDD becomes full in overwrite recordi...

Страница 150: ...ur NVR in order to set the HDD to Redundancy and one HDD with the R W property Configuring Quota mode Each camera is configured with an allocated quota for the storage of recorded files or captured pi...

Страница 151: ...as 7 Click OK to finish the Copy settings and return to the Storage Mode interface 8 Click Apply to apply the settings Note If the quota capacity is set to 0 then all cameras will use the total capaci...

Страница 152: ...HDD tab to view the status of each HDD displayed on the list HDD detection Note The 64 Channel NVR does not support this function The device provides the HDD detection function such as adopting S M A...

Страница 153: ...T HDD self evaluation Note If you want to use the HDD even when S M A R T checking failed you can click the Continue to use the disk when self evaluation is failed check box Bad sector detection To de...

Страница 154: ...the HDD status is Uninitialized or Abnormal To configure HDD error alarms 1 Enter the Exception interface Menu Configuration Exceptions 2 From the Exception Type list select HDD Error 3 Click the che...

Страница 155: ...ion interface Menu Camera OSD 2 Select the camera to configure OSD settings 3 Enter the camera s name in the Camera Name field 4 Click the Display Name Display Date and Display Week check boxes to sel...

Страница 156: ...ly four configurable privacy mask To configure a privacy mask 1 Enter the Privacy Mask Settings interface Menu Camera Privacy Mask 2 Select the camera to set privacy mask 3 Click the Enable Privacy Ma...

Страница 157: ...al Configuring video parameters To configure video parameters 1 Enter the Image Settings interface Menu Camera Image 2 Select the camera to set its image parameters 3 You can click the arrow to change...

Страница 158: ...information To view device information 1 Enter the System Information interface Menu Maintenance System Info 2 Click the Device Info tab to view the device name model serial number firmware version an...

Страница 159: ...ord tab to view the recording status encoding parameters of each camera To view alarm information 1 Enter the System Information interface Menu Maintenance System Info 2 Click the Alarm tab to enter t...

Страница 160: ...ty Searching and export log files The operation alarm exception and information of the NVR is stored in log files which you is view and export at any time To search and export log files 1 Enter the Lo...

Страница 161: ...is displayed each time 4 You can click of each log or double click it to view its detailed information And you can also click to view the related video files if available 5 To export the log files cli...

Страница 162: ...es exported to the backup device are named by exporting time for example 20110514124841logBack txt To export all the log files 1 Enter the Log Information interface Menu Maintenance Log Information Lo...

Страница 163: ...nfiguration file select the file from the selected backup device and click Import After the import process is completed reboot the NVR Note When the import finishes the device reboots automatically Up...

Страница 164: ...onfigure the PC running FTP server and NVR on the same LAN Run the third party TFTP software on the PC and copy the firmware into the root directory of the TFTP To upgrade via FTP 1 Enter the Upgrade...

Страница 165: ...default settings 1 Enter the Default interface Menu Maintenance Default 2 Click OK to restore the default settings Note Except for the network parameters including IP address subnet mask gateway MTU N...

Страница 166: ...apacity 4 channel 20 Mb 8 channel 40 Mb 16 channel 80 Mb 32 channel 160 Mb 64 channel 160 Mb To fully understand NVR capacity it is necessary to understand the concepts of streaming video resolution q...

Страница 167: ...Mbps for best quality A 4 channel NVR is currently limited to 16 Mbps Adjusting settings Know NVR s capacity and make adjustments if necessary Adjust the bit rate by lowering the resolution frame rate...

Страница 168: ...output resolution mouse pointer speed through the Menu Configuration General interface To configure general settings 1 Enter the General Settings interface Menu Configuration General 2 Select the Gene...

Страница 169: ...to save the settings Configuring DST settings To configure DTS settings 1 Enter the General Settings interface Menu Configuration General 2 Choose DST Settings tab 3 Check the Auto DST Adjustment che...

Страница 170: ...me is set to five Minutes the system will exit from the current operation menu to the Live View screen after 5 minutes of menu inactivity Menu Output Mode You can choose the menu display on different...

Страница 171: ...name to log into the NVR Password Password to log into the NVR Confirm Password confirmation Adding Method The method used to add the IP Camera 3 Click OK to add the camera Managing user accounts The...

Страница 172: ...d all operating permission in Camera Configuration by default Guest The Guest user does not have permission to use Two way Audio in Remote Configuration and only has the local remote playback in the C...

Страница 173: ...ion Operating HDD management initializing HDD setting HDD property upgrading system firmware clearing I O alarm output Local Shutdown Reboot Shutting down or rebooting the NVR Remote configuration Rem...

Страница 174: ...selected cameras Local Playback Locally playing back recorded files of the selected cameras Remote Playback Remotely playing back recorded files of the selected cameras Local PTZ Control Locally cont...

Страница 175: ...ing user name password permission level and MAC address Check the Change Password check box when you want to change the password and then enter the new one in the Password and Confirm fields Admin You...

Страница 176: ...tion cable is good If there is still no image display on the monitor after rebooting check the connection cable to ensure that it is good and change a cable to connect again 3 Verify that the Input mo...

Страница 177: ...D General If the status of the HDD is Uninitialized check the check box of corresponding HDD and then click the Init button 3 Verify the HDD is detected or is in good condition Select Menu HDD General...

Страница 178: ...that there is enough bandwidth Select Menu Maintenance Net Detect Network Stat Check if the access bandwidth has reached its limit 4 Check steps 1 to 3 for resolution If it is solved finish the proces...

Страница 179: ...solved finish the process If not contact the engineer to do the further process Using the IPC to connect a device remotely with no NVR monitor connection is successful Using a monitor VGA or HDMI to c...

Страница 180: ...the command ping 192 168 0 0 l 1472 f the IP address may change according to the real condition and verify if there is packet loss Note Press Ctrl C to exit the ping command 2 Verify the frame rate is...

Страница 181: ...C is connected Open the cmd window in the Start menu or you can press windows R shortcut key to open it Use the ping command to send large packets to the NVR enter the command ping 192 168 0 0 l 1472...

Страница 182: ...parameters are correct Select Menu Record Parameters Record and set the Stream Type as Audio Video 3 Verify the audio encoding standard of the IPC is supported by the NVR NVR supports G722 1 and G711...

Страница 183: ...uce the channel number of playback Select Menu Record Encoding Record and then set the resolution and bitrate to a lower level 4 Reduce the number of local playback channels Select Menu Playback and c...

Страница 184: ...the HDD status is normal Select Menu HDD General to view the HDD status and verify the HDD is detected and is read and written normally 4 Check if the fault is resolved If it is resolved finish the pr...

Страница 185: ...method protocol or network service that provides the capability for a networked device such as a router or computer system using the Internet Protocol Suite to notify a domain name server to change in...

Страница 186: ......

Страница 187: ......

Страница 188: ......

Отзывы: