9-4
Cisco 7500 Series Installation and Configuration Guide
OL-5008-03 B0
Chapter 9 Replacing DRAM on the Route Switch Processor
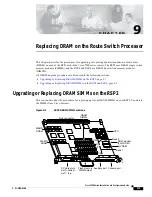
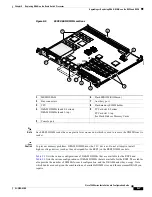
Upgrading or Replacing DRAM SIMMs on the RSP2
Step 6
Place the SIMM in an antistatic bag to protect it from ESD damage. You can use the SIMMs that you
remove in compatible equipment.
Step 7
Repeat
Step 4
through
Step 6
for the remaining SIMMs, as required for your upgrade.
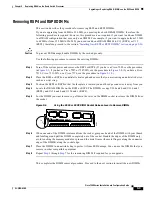
This completes the SIMM removal procedure.
Proceed to the next section to install the new SIMMs.
Installing New RSP2 SIMMs
This section describes the procedure for installing new RSP2 SIMMs.
Caution
SIMMs are sensitive components that can be shorted by mishandling, and they are susceptible to ESD
damage. Handle SIMMs by the edges only; avoid touching the memory modules, pins, or traces.
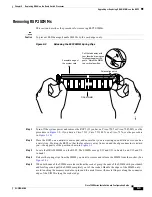
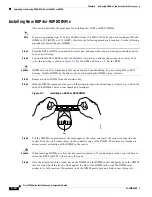
Figure 9-3
Handling an RSP2 SIMM
Use the following procedure to install the new SIMMs:
Step 1
Ensure that the RSP2 is in the same orientation as the preceding procedure (with the handle away from
you and the edge connector toward you).
Step 2
Remove a new SIMM from the antistatic bag.
Step 3
Hold the SIMM component-side up, with the connector edge (the metal fingers) closest to you. Hold the
sides of the SIMM between your thumb and middle finger, with your forefinger against the far edge,
opposite the connector edge.
Step 4
Tilt the SIMM to approximately the same angle as the socket and insert the entire the connector edge
into the socket. (Install the first SIMM in the slot farthest away from you. Install the last SIMM in the
slot closest to you.)
Caution
When inserting SIMMs, use firm but not excessive pressure. If you damage a socket, you will have to
return the RSP2 to the factory for repair.
Step 5
Gently push the SIMM into the socket until the spring clips snap over the ends of the SIMM. If necessary,
rock the SIMM gently back and forth to seat it properly.
Step 6
Repeat
Step 2
through
Step 5
for the remaining SIMMs.
H2326


