R E V I E W D R A F T — C I S C O C O N F I D E N T I A L
3-2
Cisco 7500 Series Installation and Configuration Guide
OL-5008-03 B0
Chapter 3 Installing a Cisco 7500 Series Router
Providing a Ground Connection for the Chassis
•
A temperature-controlled, air-conditioned area is ideal for the chassis.
•
Avoid crossing high-power cables with interface cables, which can cause interference in some
interface types. It will not always be possible to avoid this, but try to prevent it.
•
Check the power cable and power supply for compatibility with your power service; check the labels
on the equipment and ensure that the power service at your site is suitable for the chassis. Do not
mix AC- and DC-input power supplies in one chassis.
•
Do not place the router on the floor. Floors accumulate dust, which can be drawn into the chassis
interior by the fans. Excessive dust inside the chassis interior can cause overtemperature conditions
and component failures. A raised platform, rack, or sturdy table provides a cleaner environment than
the floor. (See the
“Equipment Rack-Mounting Guidelines” section on page 2-15
.
•
Allow approximately 19 inches (48.26 cm) of clearance behind the chassis for installing or replacing
processor modules, the fan or blower, power supplies, or attaching network connection cables or
equipment.
•
Provide an adequate chassis ground (earth) connection for your router chassis.
Note
We strongly recommend that you see the next section, “
Providing a Ground Connection for the Chassis
,”
and follow the procedure to provide a chassis ground connection.
Providing a Ground Connection for the Chassis
Before you connect power or turn on power to your router, we strongly recommend that you provide an
adequate chassis ground (earth) connection for your router chassis. Chassis grounding receptacles are
provided on each Cisco 7500 series router chassis.
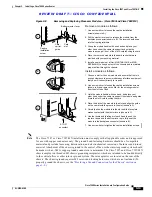
To ensure the chassis grounding connection that you provide is adequate, you will require the following
parts and tools:
•
One grounding lug—Must have two number-10 screw holes that have a 0.63-inch (16.002-mm)
spacing between them, and a wire receptacle large enough to accept a 6-AWG multistrand, copper
wire. (See
Figure 3-1
.) This lug is not available from Cisco; electrical-connector vendors provide
this type of grounding lug.
•
Two Phillips-head machine screws with locking washers—M5 (metric), 0.031-inch (0.8-mm) pitch,
0.315-inch (8-mm) length. These screws are not available from Cisco; they are available from a
commercial hardware vendor.
•
One grounding wire—6-AWG, 0.162-inch (4.115-mm) diameter, with (approximately) 0.108-inch
(2.743-mm) insulation, for a total wire diameter of (approximately) 0.27 inches (6.858 mm). The
wire length is dependent on your router location and site environment. This wire is not available
from Cisco; it is available from any commercial cable vendor.
•
Number 2 Phillips screwdriver.
•
Crimping tool large enough to accommodate the diameter of the wire receptacle on your grounding
lug.
•
Wire stripping tool large enough to accommodate 6-AWG wire.


