background image

44

Plus 42 - 45 - 50 - 55 - 55S - 55E

11-2000

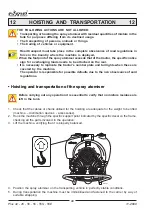
13.7 - REMOVING OR REPLACING THE TANK

This operation has to be carried out by a C.I.M.A. service point

It  must  in  any  case  be  performed  without  liquid  residues  in  the  hydraulic  circuit..

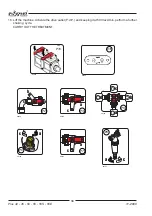
1. Free the tank of its hydraulic and pneumatic connections.
2. Dismantle the mobile protection cover of the coupling.
3. Remove  the  tank  securing  bracket,  undoing  the  2  screws.
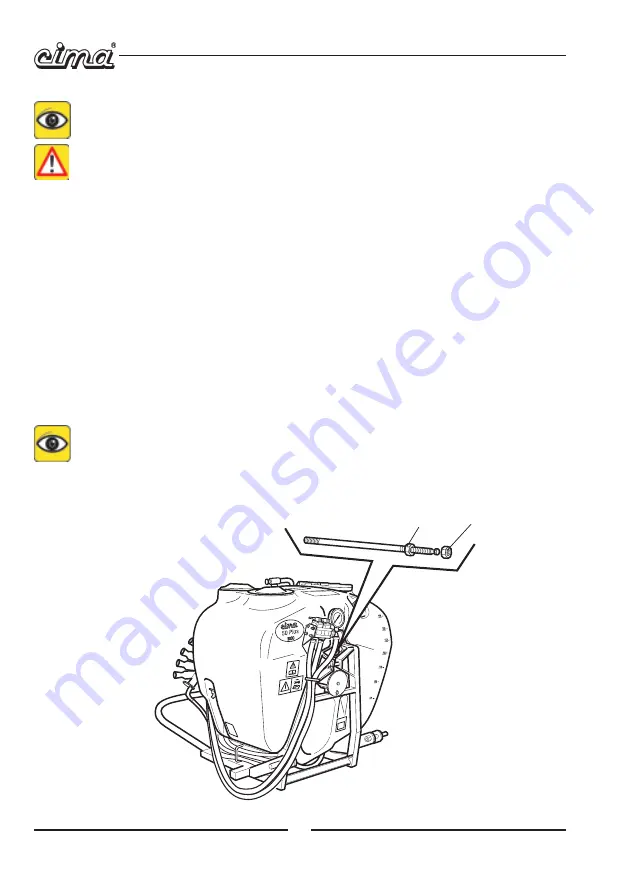
4. Undo the external nut (1) of the tie rod.
5. Tighten the internal nut of the tie rod, utilising the spanner provided, moving it away from the plate.
6. Undo the tie rod from its securing point, located in the rear part of the frame. Remove it through

the large hole on the frame’s plate.

7. Replace or reassemble the tank.
8. Re-position the tie-rod in its seat, in other words the smaller one, first inserting it through the big

hole.

9. Tightly screw in and secure the tie rod to the rear plate of the frame.

N.B. Lock tightly and with utmost care.

10. Unscrew the internal nut of the tie rod, slightly tightening it against the plate.
11. Securely tighten the external nut (1) of the tie rod against the plate.
12. Reassemble the tank’s securing bracket, fastening it with the 2 screws.

Before every intervention, check the proper tightening of the 2 securing screws of the
tank’s  mounting  bracket..

13. Reassemble the mobile protection lid of the disengaging device, by securing it with the relevant

screw.

14. Reinstate the hydraulic and pneumatic connections.

00141

1

2

Содержание Plus 42

Страница 1: ...ratori Babsb fhngkd lkdm skh gfhdgdddgdg sfdmkhkygulhdgdgdgdgdgdddj tfykfygvjyl j ffgddddgdgdgt Babsb fhngkd lkdm sk sfdmkhkygulhj tfykfygvjyl j ffgdddt Babsb fhngkd lkdm sk sfdmkhkygulhj tfykfygvjyl...

Страница 2: ...sfied at the right price Our continuous engagement in R D and in testing our machines allows us to realize products able to offer the best performances a high reliability and a great easiness of use a...

Страница 3: ...ATOMISER CARRIED 27040 Mont Beccaria Loc Molino Quaroni PV ITALIA Tel 39 0385 246636 r a Fax 39 0385 246637 http www cimaitalia com S p A OPERATING AND MAINTENANCE INSTRUCTIONS Plus42 45 Plus50 55 55...

Страница 4: ......

Страница 5: ...lication consists of 59 pages subdivided as follows N OF PAGE REVISION BASE from I to VI 01 November 2000 from 1 to 53 01 November 2000 ADDITIONAL RECORDS AND VARIANTS REVISION DESCRIPTION 00 First Ed...

Страница 6: ...4 SAFETY SYSTEMS 8 3 5 MANAGING AGRO CHEMICALS 9 3 5 1 STORAGE 9 3 5 2 SPECIFIC TOOLS 9 3 5 3 DISPOSAL OF EMPTY CONTAINERS AND AGRO CHEMICAL RESIDUES 9 3 5 4 PERSONAL MEANS OF PROTECTION 10 4 MACHINE...

Страница 7: ...elease 30 8 1 b Fan engagement to start the treatment 31 8 2 FILLING THROUGH POURING FROM THE TOP 31 8 3 FILLING THROUGH THE SPECIFIC PIPE 32 9 SHAKING OF MIXTURE 35 10 HYDRAULIC CIRCUIT DISCHARGING 3...

Страница 8: ...INTENANCE OPERATIONS 45 14 FAULT FINDING 46 15 REPAIRS ALLOWED 48 15 1 ASSEMBLING OF PUMP CONTROL BELT 48 15 2 REPLACEMENT OF ELECTRICAL PANEL FUSES 49 16 INTEGRATIVE DIAGRAMS 50 16 1 HYDRO PNEUMATIC...

Страница 9: ...ATION All indications contained in this manual are aimed at the user of the spray atomiser The duration of the machine and its operation the operator s safety and the respect for the environment are d...

Страница 10: ...incomprehensible they should be promptly replaced For every type of distribution device Head delivered with the spray atomiser a specific user and maintenance manual is attached All the head manuals...

Страница 11: ...re Mesh N of meshes per linear inch Micron 1 1000 of millimetre PTO power take off s seconds 2 3 DECALS The decals relative to the safety and the use maintenance of the machine are applied to the mach...

Страница 12: ...f the tank Utilisation and maintenance 10 95059 HOOKINGPOINTFORTHELIFTINGOFTHEMACHINE Positioned on the frame above the fan s casing 11 95052 GREASEEVERY20HOURS FANSHAFTBEARINGS Positioned on the rear...

Страница 13: ...5 Plus 42 45 50 55 55S 55E 11 2000 Operation and maintenance decals 00129 17 8 00184 3 6 00128 00011 350 300 250 200 150 100 50 6 15 12 10 2 6 19 10 14 11 13 16 5 13 7 1 4 00130 18 OPTONAL...

Страница 14: ...5059 00062 00063 00064 00065 00068 00069 00067 00127 2 50 atm 3 30 atm A POSIZIONE LAVORO WORK POSITION POSITION DU TRAVAIL POSICION DE TRABAJO MANUTENZIONE FILTRO FILTER MAINTENANCE COMPLAINTE DU FIL...

Страница 15: ...CEITWASMANUFACTUREDONLYFORDUSTINGAGRICULTURAL CROPS WITH ANTI PARASITIC PRODUCTS It is necessary to scrupulously abide by the following general norms always stop the tractor s engine before carrying o...

Страница 16: ...hemicalsare not permitted It is forbidden to enter the tank 3 4 SAFETY SYSTEMS All machine moving parts are suitably protected by guards and highlighted through the use of warning decals It is forbidd...

Страница 17: ...erworks system have the use of fire extinguishers should flammable products and substances be stored All packages whether whole or partially utilised must be stored in their original packing and with...

Страница 18: ...ro chemical dusting and spraying adjusting of the spray atomiser emptying and cleaning of the tank replacement of the agro chemical maintenance interventions it is necessary to wear personal protectio...

Страница 19: ...URAL ANALYSIS 4 The pictures indicate the position of the main components of the spray atomiser CENTRIFUGAL FAN TANK DISTRIBUTION DEVICE HEAD JOINING ELBOW ROTATING DISC REGULATOR MAIN FILLER BP FRAME...

Страница 20: ...tank This operation is carried out from the front below the 3rd point connection by means of a spanner supplied with the machine In the forward part below the 3rd point connection the removable protec...

Страница 21: ...g that of the fan The fan housing can rotate by 360 degrees This permits the positioning of the outlet spout at the point necessary for the assembling of the different distribution devices An air inta...

Страница 22: ...am For versions in which this is envisaged DELIVERY TANK HYDRAULIC SHAKER SUCTION FILLER PIPING ACCESSORY TO THE DISTRIBUTION HEAD MIXER 00134 LEGEND P E elements of the circuit T piping LOADING d b a...

Страница 23: ...255mmdiameterscrewlid transparent level indicator external pipe with graduated scale hydraulic mixture shaker connected to the return piping T2 pneumatic mixture shaker connected to the piston tap fou...

Страница 24: ...be closed in order that the filling of the tank be carried out through the filler piping see paragraph 8 3 AND ON COMPLETION OF THE OPERATION IT MUST BE RE OPENED back to position a 00020 P4 CENTRIFU...

Страница 25: ...ration before disconnecting the filling up piping NEVER OPERATE THE SPRAY ATOMISER WITH TAP P5 IN THIS POSITION d Pointing horizontally to the left The flow to piping T2 is open The capacity flow towa...

Страница 26: ...It connects tap P7 to tank P1 for the filling P8 SELF CLEANING IN LINE DELIVERY FILTER It is mounted on tap P5 and connected to the distributor P10 E10 through the feed piping T6 A ring nut locks the...

Страница 27: ...electric distributor E11 P10 MANUAL DISTRIBUTOR WITH 2 LEVER OPERATED TAPS 00025 It is connected to the feeding pipes T6 distribu tion piping T7 It remote controls the closing and opening of the pulve...

Страница 28: ...unit E10 mounted on the tractor The solenoid valves open and close following the command of the electrical control unit switches T7 DISTRIBUTION PIPING It connects the distributor P10 E10 to the rotat...

Страница 29: ...2 6 0 5 m m h t d i w l a t o T 0 6 9 0 2 1 1 0 5 4 1 m m t h g i e h l a t o T 0 6 1 1 0 8 1 1 0 3 2 1 m m h t g n e L 0 5 4 1 0 5 4 1 0 5 4 1 g k y t p m e t h g i e W 5 2 2 0 3 2 4 4 2 g k d a o l...

Страница 30: ...V 3 0 0 5 V 3 0 3 5 V 3 0 3 5 V 3 r e t e m a i d y e l l u p p m u P 8 7 5 2 8 5 2 8 5 2 8 8 8 5 2 8 UMAPT04aGB Centrifugal pump CD32 Model C I M A CD32 Pressed in nylon Turning open Stainless steel...

Страница 31: ...gs locking them with the clip pins 5 Remove the 3rd point rod of the tractor and mount it on the machine securing it with the peg and the clip pin 6 Hook the rod to the tractor again securing it with...

Страница 32: ...the same axis and measure the distance D between their grooves Length L of the transmission shaft refer to the Picture to be deployed measured between the 2 stopping pawls and with joint closed must...

Страница 33: ...uctions of the specific use and mainte nance booklet which is supplied with it Position the electrical cables W1 and W2 in such a way as to avoid risking their being wrenched off during treat ments If...

Страница 34: ...R I G T 1 0 P 0 5 2 M R I G T d n a m m o c t u o p s n o n n a c o c c a b o t r o f v e d g n i w s l a c i r t c e l E P 5 7 1 E R I G T P 5 7 1 E R I G T P 5 7 1 E R I G T 1 0 P 0 5 2 E R I G T s...

Страница 35: ...the outlet in the position necessary for assembling indications contained in the use and maintenance booklet of the distribution device 4 After this has been done fasten the collar again 6 3 ELBOW FI...

Страница 36: ...nd the proper sealing of the bottom drawing valve by pouring water into the pipe P3 P5 P7 7 2 PAIR OF WHEELS The wheels thread can be adapted to that of the tractor MOUNT THE WHEELS AFTER HAVING HITCH...

Страница 37: ...NOVELLA For its application a 45 elbow is necessary It is an accessory utilised to modify the direction of the pulverising It can be deployed only with some types of distribution devices All indicatio...

Страница 38: ...ctor remove the key from the control panel and check that the fan has stopped 3 Undo the mobile protection cap s fixing screw and rotate it so as to access the disengagement tunnel 4 Fullypressthespri...

Страница 39: ...BS located in the upper right hand side of the tank towards the front of the spray atomiser opposite the filler of the hand washing tank THEINLETOFTHEFILLERPIPINGMUSTNEVERCOMEINTOCONTACTWITHTHEANTI P...

Страница 40: ...Disengage the drive outlet PTO and rest the spray atomiser on the ground Stop the tractor and remove the key from the control panel 8 Ensure that the fan is stopped Engage the fan to the servo amplifi...

Страница 41: ...ose the tap P5 setting the lever in position c 10a5 Close the tap P7 setting the lever in position c 10a6 Disconnect the filler piping and replace the stopper on the pump 10a7 Open the tap P3 of the p...

Страница 42: ...Lift the machine Activate the drive outlet P d P and keeping it at 500 revs min perform a further shaking cycle CARRYOUTTHETREATMENT 00033 00093 P10 00094 b c a P2 E10 a c 00107 a c 00140 c a 00105 d...

Страница 43: ...unger tap above the tank must also be open if the treatments involved don t use agro chemicals generating excessive foam This operation is of essential importance in obtaining a uniform distribution o...

Страница 44: ...he necessary information from the products sales representative e Carefully calculate the exact quantity of the product necessary for the treatment and establish the volume of water to be used for the...

Страница 45: ...correct volume dosage of agro chemicals and fertiliser mixtures the fertiliser must be first diluted h Wash and rinse the just emptied product containers with clean water collect the washing water and...

Страница 46: ...ove the polluted garments and interrupt the work if these cannot be immediately replaced g keep to the preliminary operations already indicated 11 1 c in case of wind conditions prevailing h stop the...

Страница 47: ...o product residues are left in any part of the circuit b Apply suitable lubrication to all greasing points then operate the spray atomiser for a few minutes c Empty the hydraulic circuit completely wi...

Страница 48: ...and tail lights when these are covered by the machine The operator is responsible for possible defaults due to the non observance of said regulations Hoisting and transportation of the spray atomiser...

Страница 49: ...i t c A l a i r e t a m n o i t p m u s n o C y t i c i d o i r e P t r o p p u s g n i r a e b t f a h s n a F g n i s a e r G 2 I G L N e s s a l C P E e p y t e s a e r G s r u o h 0 2 t r o p p u...

Страница 50: ...r within the tank through the piping T4 thus partially cleaning the filtering cartridge Close the tap when the operation is completed When the machine is in operation check that the drain tap is close...

Страница 51: ...ONER Check length L of the spring refer to Picture it should be in tension between 9 and 12 cm 13 6 PUMP BELT TENSIONER Check length L of the spring refer to Picture it should be in tension between 4...

Страница 52: ...Remove it through the large hole on the frame s plate 7 Replace or reassemble the tank 8 Re position the tie rod in its seat in other words the smaller one first inserting it through the big hole 9 Ti...

Страница 53: ...s n a F S E Y S E Y t r o p p u s r e n o i s n e t t l e b n a F G N I S A E R G S E Y G N I L I O g n i r a e b p m u P S E Y G N I S A E R G l e e h w e e r F S E Y K C E H C g n i p i p d n a s g...

Страница 54: ...ripping from the pump 1 CAUSE Non sealing of the fittings and clamps connecting the piping to the pump REMEDY Check for proper tightening of ring nuts and clamps Check the efficiency of the sealers Re...

Страница 55: ...the distribution point involved REMEDY As per point F 1 H FAULT No pulverising action delivered totally or only on the one side of the distribution device 1 CAUSE Manual distributor P10 taps dirty or...

Страница 56: ...ews 2 Undo the spring adjustment screw of the belt tensioner the pump support plate will be free to rotate 3 Open the coupling tunnel below the 3rd connection point rotating the mobile protection cove...

Страница 57: ...engine and remove the ignition key from the tractor s control panel 1 Undo the fuse carrier cover 2 Replace the faulty fuse and screw back the cover Fuse 1 25 A delayed ALL OTHER INTERVENTIONS MUST BE...

Страница 58: ...FLOW DELIVERY DELIVERY FAN PNEUMATIC MIXER PIPING PLUNGER TAP MAIN TANK DRAIN DISTRIBUTION DEVICE FEED PIPING RETURNPIPING PRESSURE REGULATOR FILLER PIPING CONNECTION PUMP 3 WAY TAP DELIVERY FILTER MA...

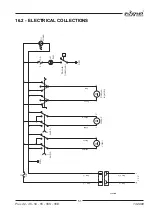
Страница 59: ...ECTRICAL COLLECTIONS Marrone F1 Valve 1 Valve 2 12 V GRN Black 1 5 Red 1 5 10A 1 Switch 2 Switch DL1 1 1 2 2 M M Bianco Giallo Arancio Nero 1 5 Red 1 5 Pressure regulator 1 2 M Nero Rosso F2 10A P GRN...

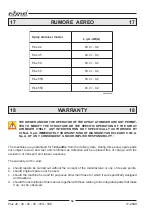
Страница 60: ...ARS C I M A S p A OF ANY CONSEQUENT AND OR IMPLIED RESPONSIBILITY The machines are guaranteed for 12 months from the delivery date During this period spare parts not subject to wear and tear and confi...

Страница 61: ...53 Plus 42 45 50 55 55S 55E 11 2000 00102 F F F F F A A A A A C S I M I L E C S I M I L E C S I M I L E C S I M I L E C S I M I L E 19ATTACHMENT DECLARATION OF COMPLIANCE19...

Страница 62: ......

Страница 63: ...want to congratulate with you for having chosen a sprayer Your choice shows the wisdom of the well informed Purchaser aware of the fact that the required features of quality technique and reliability...

Страница 64: ...BLITZ atomizzatori e impolveratori R S p A 27040 Mont Beccaria Loc Molino Quaroni PV ITALIA Tel 39 0385 246636 r a Fax 39 0385 246637 http www cimaitalia com Blitz 50T basso volume Blitz50T bassovolu...

Отзывы: