


Power Supply Operation
3-3
Remote Operation:
CURRent {<current> |MIN|MAX}
This command sets the current.
VOLTage {<voltage> |MIN|MAX}
This command sets the voltage.
OUTPut ON
This command enables the output.
3.2
Constant Current Operation
Constant current (CC) operation, using the front panel or through remote control, is reviewed
below. The relative operation buttons are the same as the ones at
section 3.1
Front Panel Operation:
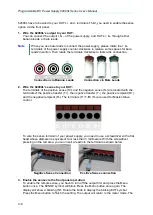
1. Connect a load to the output terminals:
Before turning on the power, connect a load to
the + and – output terminals.
2. Initial turn on of the power supply:
When the power supply is first turned on, it disables
the output.
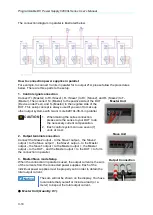
3. Set the limit mode:
When the
Limit
flashes on the display, the limit mode is entered. You
can see the voltage and current limit values on the display.
Note
Under the constant current mode, the current values between the meter and the
limit mode are identical. In addition, if the display is under the meter mode, are
not able to see the change in the voltage limit value when adjusting the knob.
Therefore, to see the change in the voltage limit value in the constant current
mode, enter the limit mode.
4. Use the knob to set the desired current limit:
Press the
Limit
button on the front panel
and set the knob to current control by pressing the
V/A
button. The cursor under the first
digit of the ammeter flashes. You can change the flashing cursor using the
or
buttons, and adjust the value to the desired current limit by turning the knob. The limit
setting is disabled and the Limit on the display extinguishes in 5 seconds without any
operations.
5. Use the knob to set the desired voltage limit:
Press the
Limit
button on the front panel
and set the knob to current control by pressing the
V/A
button. The cursor under the
second digit of the voltmeter flashes. You can change the flashing digit using the
or
buttons, and adjust the value to a desired output voltage. The limit setting is disabled, and
the Limit on the display extinguishes in 5 seconds without any operations.
6. Get back to the meter mode:
Press the
Limi
t button or let the display time-out after
several seconds to get back to meter mode. Then the Limit on the display turns off, and
the display shows “OUTPUT OFF.”
7. Enable the output:
The
OFF
on the display is turned off. Then OVP, OCP, and CC are lit.
The display goes into the meter mode. Under this mode, the display shows the actual
output voltage and current.
8. To make sure that the power supply is under the constant current mode:
If you
operate the power supply under the constant current (CC) mode, make sure that the CC
on the display is lit. If the CV on the display is lit, choose a higher voltage limit.
Note
1. To use the knob to set a desired voltage and current limit, you can use the
or
buttons to move the flashing cursor to the right or left.
2. If a load change during actual CC operation causes the voltage limit to be


