2
Preparation before use
2.1 Preparation before Operation
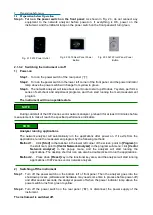
Fig. 2.4 Coaxial Alignment of Interconnected Connectors
Step 2.
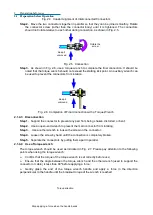
Move the two connectors together in parallel so that they can be joined smoothly. Rotate
the connector screw (rather than the connector body) until it is tightened. The connectors
should not rotate relative to each other during connection. as shown in Fig. 2.5.
Fig. 2.5 Connection
Step 3.
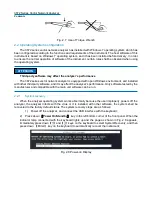
As shown in Fig. 2.6, use a torque wrench to complete the final connection. It should be
noted that the torque wrench should not exceed the starting kick point. An auxiliary wrench can
be used to prevent the connectors from rotation.
Fig. 2.6 Completion of Final Connection with a Torque Wrench
2.1.4.3 Disconnection
Step 1.
Support the connector to prevent any part from being shaken, distorted, or bent;
Step 2.
Use an open-end wrench to prevent the main connector from rotating;
Step 3.
Use another wrench to loosen the screw on the connector.
Step 4.
Loosen the screw by hand until the connection is completely broken.
Step 5.
Separate the connectors by pulling them apart in parallel.
2.1.4.4 Use of torque wrench
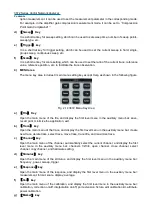
The torque wrench should be used as indicated in Fig. 2.7. Please pay attention to the following
points when using the torque wrench:
Confirm that the torque of the torque wrench is set correctly before use;
Ensure that the angle between the torque wrench and the other wrench (used to support the
connector or cable) is less than 90
o
before applying a force;
Gently grasp the end of the torque wrench handle and apply a force in the direction
perpendicular to the handle until the breakout torque of the wrench is reached.
Torque direction
Stop applying a force when the handle bends
Keep it
unmoved
Rotate the
screw
Keep it
unmoved
Содержание 3672 Series
Страница 1: ...3672 Series Vector Network Analyzer Quick Start Guide ...
Страница 2: ......
Страница 7: ......


