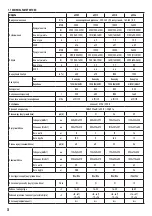


45
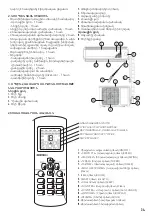
13. MODE Button
Each time the button is pressed the operating mode of the AC will
change in the following order: Automatic / Cooling / Drying / Heating
/ Ventilation.
The respective mode is shown on the display: AUTO (Automatic), COOL
(Cooling), DRY (Drying), HEAT (Heating), FAN (Ventilation).
In the automatic mode the AC, regardless of the indoor air
temperature, will automatically select the cooling or heating mode to
provide comfortable conditions for the user. The target temperature is
not displayed on the RC unit display and it cannot be changed.
In the ventilation mode only the indoor unit fan will operate. In this
mode the temperature in the room is not maintained. The target
temperature is not displayed on the RC unit display and it cannot be
changed.
Attention! The AC does not provide an intake of fresh air!
14. Target Temperature Increase Button
Each time the button is pressed the target value will increase by 1 °С
within the range of +16...+32 °С. The set target temperature value is
displayed on both RC unit and indoor unit front panel displays.
15. Target Temperature Decrease Button
Each time the button is pressed the target value will decrease by 1 °С
within the range of +16...+32 °С. The set target temperature value is
displayed on both RC unit and indoor unit front panel displays.
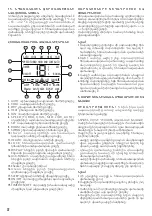
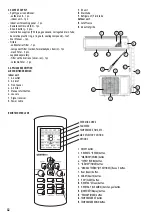
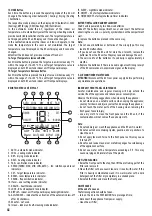
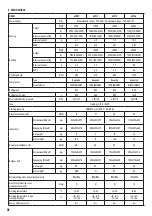
REMOTE CONTROL UNIT DISPLAY
COOL DRY HEAT
AUTO
FAN
SPEED TURBO HIGH MID LOW
TIMER
ON/OFF
SWING
SWING
OFF
ON
HEALTH iFAVOR
SLEEP iCLEAN
DISPLAY LOCK
Eheater Anti-FUNGUS
AUTO
SET
˚C
˚F
h
ROOM
6
19
7
8
9
17
15
14
13
12
16
11
18
18
10
1
2
3
4
5
1. AUTO – automatic mode indicator.
2. COOL – cooling mode indicator.
3. DRY – drying mode indicator.
4. HEAT – heating mode indicator.
5. FAN – ventilation mode indicator.
6. SPEED (TURBO, HIGH, MID, LOW, AUTO) – fan rotation speed level
indicators.
7. SET – target temperature indicator.
8. ROOM – room temperature indicator.
9. SWING – flap oscillation indicator.
10. Ifavor – user settings mode indicator.
11. HEALTH – health mode indicator.
12. LOCK
–
RC unit keyboard lock indicator.
13. DISPLAY – indoor unit front panel display backlight indicator.
14. Anti-FUNGUS – indicates the activation of the automatic blow-off
after AC shutdown.
15. Eheater – not used.
16. Iclean – indoor unit self-cleaning mode indicator.
17. SLEEP – nighttime mode indicator.
18. ON/OFF
–
AC startup/shutdown indicators.
19. TIMER ON/OFF- startup/shutdown timer indicators.
BATTERY INSTALLATION AND REPLACEMENT
The RC unit is powered by two AAA size batteries.
Slide off the battery compartment cover and insert the batteries
observing the «+» and «-» polarity symbol shown on the compartment
wall.
To replace the batteries proceed in the same way.
Note:
1. Do not use old batteries or batteries of the wrong type. This may
lead to RC malfunctions.
2. If you do not use the RC unit for more than 1 month, remove the
batteries from the RC unit as they may leak and damage the unit.
3. The service life of the batteries if used daily is approximately 6
months.
4. Replace the batteries if there is no audio signal confirming receipt
of the RC commands or no command signal on the display.
5. AIR CONDITIONER MAINTENANCE
ATTENTION!
Disconnect the AC from power supply before performing
any maintenance operations.
INDOOR UNIT FRONT PANEL MAINTENANCE
Careful maintenance and regular cleaning will help extend the
service life of the appliance and reduce power consumption.
Observe the following suggestions when cleaning the appliance:
–
do not stand on an unstable surface when wiping the appliance;
you may fall down and injure yourself and damage the appliance;
–
do not touch the metal parts of the housing when removing the
front panel to avoid injury;
–
use a dry cloth to clean the front panel and the RC unit, if the
contamination will not come off use a damp cloth.
Note:
1. Do not submerge or wash the appliance and the RC unit in water!
2. Do not use alcohol-containing liquids, gasoline, oils or polishers to
clean the unit.
3. Do not apply too much force to the front panel as this may cause
it to fall off.
4. Do not use abrasive cleaners or metallic sponges to avoid damage
of the appliance’s surface.
5. Do not use water with a temperature exceeding 45
0
С. This may
cause warping and discoloration of the plastic.
AIR FILTER CLEANING
1. Raise the front panel to the stop, then lift the protruding part of the
filter and remove it.
2. Clean the filter with a vacuum cleaner or rinse it with water. If the
filter is heavily contaminated wash it in warm water with a mild
detergent. Let the filter dry completely in a shaded place.
3. Reinstall the filter and close the front panel.
MAINTENANCE
At the end of a season
The following action should be taken:
–
turn on the AC in the VENTILATION for a prolonged time;
–
disconnect the appliance from power supply;
–
clean the air filter;


