


Cattron™ MP96/48 Series Portable Remote Control Systems
User Manual
63
68C-MP96/48-RD-EN
Version 006
PASSWORD
: This is needed to execute most functions within the program. The default password is set to
‘master’ (all lower case letters). The system administrator will use the master password, giving him/her access to
all of the program’s functions. The administrator should create operator passwords for any operators who may
use the program. Note that operators are limited in the functions they may execute. To change the master
password, click on ‘SETUP’, then ‘PASSWORD MANAGER’ and follow the instructions.
COM PORT
: The user must select the com port of his/her computer that will be used for downloading the
information.
Click on ‘SETUP’, then ‘COM SERIAL PORT’, and set accordingly.
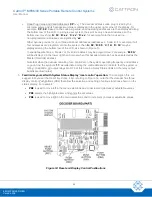
CRANE/SYSTEM INFORMATION
:
Specific information relating to the user’s equipment must be entered. The
following information must be entered in the order specified.
Click on ‘FILE’, then ‘NEW MPLog INFO FILE’. A
screen will appear on which the user must input his/her specific system information.
Use the ‘TAB’ (not the
ENTER or mouse button) to move throughout the screen. Enter the following:
•
UNIT DESCRIPTION
: Enter a brief description of the system (for example, Crane 123 Bay 12)
•
LOG FILENAME
: Enter the filename under which to save the datalog. A good choice is the system
serial number (for example, 5500011)
•
DATALOG RECEIVE FREQUENCY
: This is used only with the optional PDDCTB unit. If this unit was
not ordered, enter 448.1000. Refer to the help screens for instructions concerning the operation of the
PDDCTB
•
COMMAND TRANSMIT FREQUENCY
: This is the similar to the previous item. If the PDDCTB was not
ordered, enter 448.1000
•
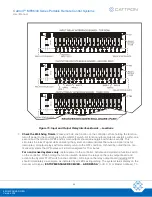
DECODER ADDRESS
: This must be the address of the system decoder which can be found in the
drawing package supplied with the system or on the serial tag applied to the Gold Box (for example, 01)
•
COMMENT
: This is an optional item for any pertinent comments the user deems necessary
Note:
All of the above information must be completed accurately (except for the comment field); otherwise,
the program will post an error when saved.
Aft
er all information is entered, click on ‘SAVE’ or depress ‘ENTER’. Next, the user will be prompted to enter the
new unit information filename (MPL file).
This is a directory that will contain this system’s information (and any
other systems if multiple systems were ordered). This filename must have a
.
mpl
extension (for example,
Bay12.mpl).
Click on ‘OK’ when
complete.
Lastly, click on ‘UNIT’, then ‘EDIT UNIT’ and click on ‘RESET
FILENAME EXTENSION’ and ‘SAVE’.
The Datalog Analysis and Utility Program has been designed to assist the user in analyzing the datalogs of
multiple systems. It is recommended that the MPL files are used as descriptive headings for a group of systems
(units). For example, the user may have MPL files called Building1.mpl, Building2.mpl, Building3.mpl, etc. Within
each MPL file there can be multiple units, such as Crane 123, Crane 124, Crane 125, etc. This would allow the
user to quickly access a particular system based upon its location. If the user has few systems, a single MPL file
should be sufficient. Refer to the help screens for further information about MPL files. To change MPL files, click
on ‘FILE’, then ‘LIST MPLog INFO FILES’ and make a selection. Then click on ‘UNIT’, then ‘ADD UNIT’ and enter
and save each system’s information. Lastly, click on ‘UNIT’, then ‘EDIT UNIT’ and ‘RESET FILENAME
EXTENSION’ and ‘SAVE’. Once all systems have been entered, the setup is complete.


