background image

4 Nomenclature 


9


4 Nomenclature 

4.1 Scale Overview 


1)  Pictured below are important scale components and parts that you should be familiar with. 


#  Description 

#  Description 

#  Description 

1  Advertisement Insert, rear 

8  Fuse Cap 

15  Power Switch 

2  Connector, COM1 

9  Gauge, Leveling 

16  Printer 

3  Connector, COM2 

10  Keyboard, Numeric 

17  Serial Number Plate 

4  Connectors, network 

11  Keyboard, Speed Keys 

18  Side Access Door, Com port 

5  Display Column 

12  Leveling Feet 

19  Side Access Door, printer 

6  Display Window, customer 

13  Platform 

20  Template Sheet, Numeric 

7  Display Window, user 

14  Platter 

21  Template Sheet, PLU 


22  Connector, Cash Drawer 


Содержание LP-2G

Страница 1: ...2001 CAS USA CORPORATION EAST RUTHERFORD NEW JERSEY 07073 LP 2G Electronic Price Computing Label Receipt Printing Scale REV 2 00 Jan 2002 ...

Страница 2: ......

Страница 3: ...laims any warranties of merchantability or fitness for any particular purpose Any software describes in this manual is sold or licensed as is Should the programs prove defective following their purchase the buyer and not this company its distributors or its dealers assumes the entire cost of all necessary servicing repair and any incidental or consequential damages resulting from any defect in the...

Страница 4: ...g CalibrationMode 20 6 2 Entering Calibration Mode NON USA 20 7 Calibration the Scale 21 7 1 Calibration Menu 21 8 System Options 25 8 1 Weight Options 25 8 1 1 Capacity Units 25 8 1 2 Tare Options 26 8 1 3 Zero Range 26 8 1 4 Captions Headings 27 8 2 Non Weight Options 29 8 2 2 Auto Print Threshold 29 8 3 Report Settings 29 8 4 Decimal Place Setting 30 8 5 Keypad Options 30 8 6 Clear Memory 31 8 ...

Страница 5: ...14 6 1 Rewind Motor Assembly Replacement 49 14 6 1 Stepper Motor Assembly Replacement 50 14 6 2 Thermal Print Head Replacement 50 14 6 3 Gap Sensor Assembly Replacement 51 14 6 4 Peel Sensor Assembly Replacement 51 14 6 5 Label Roll Spool Replacement 51 14 6 6 Width Adjuster Replacement 52 14 7 Display Replacement 52 14 8 Keyboard Replacement 52 14 9 Keyboard Servicing 53 15 Installing Options 54 ...

Страница 6: ...4 ETHERNET OPTION BOARD ASS Y 72 19 1 5 ANALOG MODULE ASS Y 72 19 1 6 ANALOG PCB ASS Y 73 19 1 7 BODY ASS Y 73 19 1 8 MAIN PCB ASS Y 74 19 1 9 CAL PCB ASS Y 75 19 1 10 DISPLAY PCB ASS Y 75 19 1 11 GAP SENSOR PCB ASS Y 76 19 1 12 KEY PCB ASS Y 76 19 2 MECHANICAL 76 19 2 1 SET 76 19 2 2 MECHANISM 78 19 2 3 C T BOX ASS Y 79 Appendix A Country Codes 81 Appendix B Label Formats 83 Appendix C Datasheet ...

Страница 7: ...for warranty service should the CAS label or logo or the rating label or serial number be removed or tampered with or should the product fail to be properly maintained or fail to function properly as a result of misuse abuse improper installation neglect improper shipping damage caused by disasters such as fire flood and lightning improper electrical current software problems interaction with non ...

Страница 8: ......

Страница 9: ...ontinuous strip labels or even thermal paper You also can print logos templates Nutri Facts panels ingredient messages advertisement lines and more Remember for proper installation and maintenance please refer to the LP 2 Service Manual A wide variety of supplies accessories and expansion options are available through CAS USA Corporation for whatever your new and increasing demands may require Bef...

Страница 10: ...mmodity Name 114 Char Label Format 1 999 Sales Message 1 32 Unit lb kg Group Code 0 99 Tax Rates 0 3 Country Code 0 999 Sell By Date 0 999 days Cook By Date 0 999 days Tare Weight 0 Capacity Price 0 00 999 99 Sale Weight 0 Capacity Sale Price 0 00 999 99 Net Weight 0 9999 Count 1 99 Sale Count 0 99 UPC 0 999999 Ingredients 2000 Char Barcode Type Format Nutritional Information PLATTER SIZE Length 4...

Страница 11: ...1 General 3 Note Specifications are subject to change without notice ...

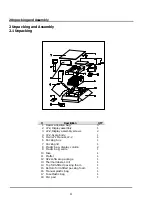
Страница 12: ...sembly screws 2 4 LP 2 Scale body 1 5 Owner s Manual LP 2 1 6 Packing box 1 7 Packing lid 1 8 Plastic bag display column 2 9 Plastic bag scale 1 10 Fuse 1 11 Platter 1 12 SP 2 software package 1 13 Thermal labels 1 roll 1 14 Top form fitted packing foam 1 15 Bottom form fitted packing foam 1 16 Manual plastic bag 1 17 Fuse Plastic bag 1 18 PLU pad 1 ...

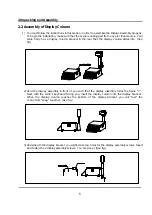
Страница 13: ...that the display column slides into See fig 2 Hold the display assembly in front of you such that the display assembly forms the figure 7 Next with the scale s keyboard facing you insert the display column into the display bracket When the display column reaches the bottom of the display bracket you will feel the connectors snap together See fig 3 Underneath the display bracket you will find 2 scr...

Страница 14: ...nt Wherever possible we have tried to place warning labels and other indicators at the actual location on the equipment where the danger is most likely to occur However it is not always possible to foresee all dangerous situations Warnings and cautions that are necessary for the safe operation of the scale are contained in this manual Please make sure to carefully read ALL warnings and cautions be...

Страница 15: ...ghing platform and may cause incorrect weight readings 2 Leveling If the scale is not properly leveled please adjust the 4 adjustable legs at the bottom of the scale Turn the legs clockwise or counterclockwise so as to center the bubble of the leveling gauge inside the indicated circle Turning the adjustable legs counter clockwise viewed from top of scale will lower that part of the scale Turning ...

Страница 16: ...lectrical socket is correct If yo u are uncertain as to the state of your business electrical lines please contact a certified electrician 2 Once you are sure as to the safety of the electrical line make sure to ONLY plug the scale into a 3 prong outlet The third prong is a safety ground and an electrician should properly wire this if it is not correct or if you are unsure Failure to this CAN resu...

Страница 17: ... Fuse Cap 15 Power Switch 2 Connector COM1 9 Gauge Leveling 16 Printer 3 Connector COM2 10 Keyboard Numeric 17 Serial Number Plate 4 Connectors network 11 Keyboard Speed Keys 18 Side Access Door Com port 5 Display Column 12 Leveling Feet 19 Side Access Door printer 6 Display Window customer 13 Platform 20 Template Sheet Numeric 7 Display Window user 14 Platter 21 Template Sheet PLU 22 Connector Ca...

Страница 18: ...LU commodity 8 Total price heading TOTAL PRICE and money symbol 9 Total price indicator 7 digits USA 0 00 9999 99 10 Unit price heading UNIT money and weigh symbols 11 Unit price indicator 6 digits USA 0 00 999 99 12 Weight indicator 5 digits 13 Weight heading WEIGHT and weigh symbol 14 Negative weight indicator Blank 15 Net Weight indicator Blank 16 Stable weight indicator Blank 17 Zero weight in...

Страница 19: ...ter 5 Peel Off Bar 11 Roller return 17 Thermal Print Head 6 Pick Up Spool Assembly 12 Brush 18 Paper Guide Plate To clean the Thermal Print Head turn the scale OFF Open the printer s side access door and release the print head using the release lever Using the Thermal Head Cleaner Pen rub it gently from left to right working your way from the front to the back of the print head See diagrams below ...

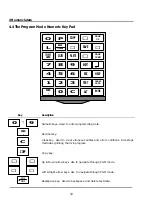
Страница 20: ...ions Also stops multi label printing that is in progress Copy key Up Down arrow keys Use to navigate through PGM mode Left Right arrow keys Use to navigate through PGM mode Backspace key Used to backspace and delete text data 0 9 C COPY BACK SPACE O P COPY PAGE UP L BACK SPACE SAVE PAGE DOWN INSERT OVER DELETE PASTE 7 8 9 4 5 6 1 00 2 3 0 C TEST ESC SHIFT HELP LABEL FEED ALT ENTER 00 ...

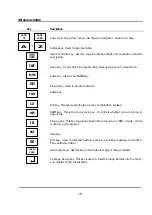
Страница 21: ... for special key combination presses SHIFT key This is the Caps Lock key It controls whether you are typing in uppercase Escape key This key toggles between Main menu and REG mode It also is used to exit programs Help key Test key Used to print test pattern preview a scrolling message and print a PLU verification label Label Feed key Use this key to feed labels or paper through printer Carriage Re...

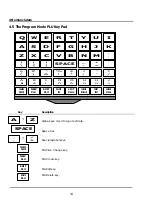
Страница 22: ... Special Symbol keys PLU Price Change key PLU Create key PLU Edit key PLU Delete key À à È è A S Q W E R T Y U I D F G H J K Z X C V B N M _ SPACE Ì ì Ñ ñ Ò ò Ù ù Ü ü CHANGE PRICE NEW PLU EDIT PLU DELETE PLU LIST PLUs PROGRAM SPEED KEYS PRINT TEST ASSIGN SCROLL A Z SPACE CHANGE PRICE NEW PLU EDIT PLU DELETE PLU ...

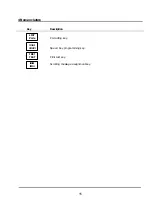
Страница 23: ...4 Nomenclature 15 Key Description PLU Listing key Speed Key programming key Print test key Scrolling message assignment key LIST PLUs PROGRAM SPEED KEYS PRINT TEST ASSIGN SCROLL ...

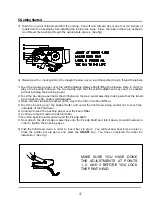
Страница 24: ...nce on how to properly install the label roll See fig 2 Find and remove the Pick Up Spool assembly and the label roll Pin Also find the Print Head Release Lever and push it in the direction indicated The print head will be in the UP position If there were any labels previously installed please remove all the collected backing paper from the Pick Up Spool assembly The Pick Up Spool assembly automat...

Страница 25: ...sor assembly making sure that the labels travel under the Secondary width adjuster ƒ Make sure that labels are pushed all the way to the left on the Peel Off bar Feed the backing over the Rubber Roller and under the Print Head being careful not to touch the underside of the Print Head Continue to feed the backing paper over the Peel off Bar Continue to feed it under the Return Roller Feed the back...

Страница 26: ...ns have fields that contain data that you can modify This data is always contained in brackets 123456 or ABCDEDG To select a field simply use the or keys to move the cursor to that field A field s name followed by a colon will usually appear on the left side of the bracketed data In the Sample Entry Screen above the word Unit appears to the left of the brackets containing the value 1 To the right ...

Страница 27: ...nsor Print speed Printer odometer Label type Adjust feed length Gap peel calibrate Fine GAP adjust Fine PEEL adjust Display Loadcell Keyboard Printer Peel off Memory size NV memory Serial port Calibration MENU C1 C2 C3 C4 C6 C11 C12 C13 C211 C212 C213 C21 C22 C23 C241 C242 C243 C344 C24 C41 C42 C43 C44 C45 C411 C412 C413 C61 C62 C63 C64 C65 C66 C67 C68 STEP1 STEP2 STEP3 Network Options C5 Captions...

Страница 28: ... appear as follows Pressing ESC from this menu will take you out of CAL mode and effect all of the changes that you may have made NOTE Only CAS trained personnel should attempt to make changes in CAL mode If you are not trained to work on this equipment please contact the CAS USA Service Department for assistance Non qualified personnel attempting service the CAS LP 2 risk voiding the scale s warr...

Страница 29: ...full capacity If kilo weights are required the scale will display 30 kg Span Fine Adjust Does not require weights but they are recommended for checking the Fine Adjustment Gravity Constant This is a value that causes automatic compensation for different altitudes If the scale is calibrated in NY and shipped to CA you can simply enter the Gravity Constant for CA and the scale will be calibrated for...

Страница 30: ...onscreen directions v If problems persist you may have a damaged A D Converter 90 v If problems persist you may have a damaged Load Cell 5 v Contact the CAS Service Department Other 5 NOTE Any changes made here will affect the NTEP Audit Trail counters CAL counter only IZR Initial Zero Range allows 10 of Capacity from Calibrated Zero point 7 3 Span Zero Fine Adjust Once at the CAL Main Menu screen...

Страница 31: ...ensation takes place If these are different this implies that the scale was calibrated at some other location than the Using Place value In this case compensation takes place The purpose of this function is to allow you to calibrate the scale in one location say New York and then ship it to another location say Panama where you change the Using Place value from 9 8024 to 9 7814 This will compensat...

Страница 32: ... 9 7844 Boston 9 8039 Hungary Budapest 9 8069 Chicago 9 8024 Indonesia Djakarta 9 7814 Dallas 9 7949 Iraq Baghdad 9 7964 Detroit 9 8039 Japan Mishima 9 7979 Los Angeles 9 7979 Korea Seoul 9 7994 New York 9 8024 Kuwait Kuwait 9 7919 Philadelphia 9 8024 Lebanon Beirut 9 7964 USA San Francisco 9 7994 Mauritius Port Louis 9 7859 Venezuela Caracas 9 7829 NOTE The G Constant is the acceleration of gravi...

Страница 33: ...is value without re calibrating the scale you will get a Calibrated Mass Error every time you power ON the scale Capacity This determines the capacity for the scale The LP 2 VER 1 03 USA is available in 60 lb 30 kg only however the scale is programmable for 30 lb 60 lb 15 kg or 30 kg Weigh Range This determines the range for the scale thus determines the minimum displayed divisions See chart below...

Страница 34: ...y the maximum tare value Tare Mode This determines how the Tare operates The screen will change as follows when the cursor is on the Tare Mode field One time tare allows you to enter a tare once manual or platter tare and then you must clear that tare before you can enter a new one Successive tare allows you to combine platter tares For example you can place 5 lb on the scale and press TARE put an...

Страница 35: ... affect the NTEP Audit Trail counters OPT counter only 8 1 4 Captions Headings For changes to Captions or Headings please consult your Authorized CAS Dealer These changes are only possible through Service Programming The Label Captions options allow you to specify some of the Captions that get printed An example of a Caption is TOTAL PRICE which usually appears above the Total Price box on some fo...

Страница 36: ...lay Headings Currency 2 Currency 1 screen 1 of 2 Currency 1 screen 2 of 2 INS CAPS 1 2 SET LABEL CAPTIONS Total Price TOTAL PRICE By Count Price QTY By Weight lb Price PRICE lb By Weight kg Price PRICE kg Discount Price YOU SAVE INS CAPS 2 2 SET LABEL CAPTIONS Regular Price REG PRICE Tax Price TAX INS CAPS 1 2 SET DISPLAY HEADINGS Currency Symbol Total Price Box TOTAL PRICE By Weight lb Unit Price...

Страница 37: ...ght Options Menu screen press the 3 key for Auto Print Threshold The Auto Print Threshold screen will then appear as follows Min Weight This determines how much the weight must deviate in order for PRE PACK to automatically print a label This value is in divisions so on a 60 lb x 0 02lb Single range LP 2 a value of 2 will cause an auto print if the weight deviates by 2 X 0 02 lb 0 04 lb Remember i...

Страница 38: ...tive 8 4 Decimal Place Setting You can determine decimal place setting 8 5 Keypad Options Once at the CAL Main menu screen press the 2 key The System Options Menu screen will appear as follows At the System Options Menu screen press the 3 key for Keypad Options the Keypad Options screen will appear The Keypad Options screen will appear as follows This screen has 2 pages as you can see from the 1 2...

Страница 39: ... be allowed Numeric Tare If this is set to Y then the TARE key will allow manual tares If this option is set to N then the TARE key will not allow manual tares using 0 9 keys to enter tare weight 00 key If this is set to Y then the 00 key will work the same as pressing the 0 key twice If this option is set to N then the 00 key will not work at all do nothing Misc PLU keys If this is set to Y then ...

Страница 40: ...ve 3 ramifications Selecting any of the 4 options will bring you to the following screen Once you press Y there is no turning back Some memories will take longer than others to clear however the maximum time to clear ALL the memories is approximately 60 seconds Some of the clearing processes will report memory chip numbers or memory sizes during the process WARNING If you clear the memory you will...

Страница 41: ...table to Stable If there are 4 consecutive load cell readings whose difference between any pair is less than or equal to the Motion Band then the stable lamp is turned on Filter Band This value is used to filter out small vibrations from noisy environments It can be from 0 to 50 but should not be less than 10 The filter will also affect stability the more filtering the more stable the scale appear...

Страница 42: ... head is locked down Using continuous labels will not calibrate the Gap sensor Fine Gap Adjust This is a manual process that allows you to change the Gap sensor threshold value directly Fine Peel Adjust This is a manual process that allows you to change the Peel sensor threshold value directly This process also lets you actively test your setting Gap Sensor This is the sensor that is used to sense...

Страница 43: ...inter Sensors menu 10 2 2 Gap Sensor Fine Adjust At the Printer Sensors Menu screen press the 2 key for Fine Gap Adjust You will see the following screen Pressing the 1 key will decrease the value by 1 the 2 will decrease it by 5 Pressing the 3 key will increase the value by 1 the 4 will increase it by 5 Press the FEED key to the test alignment or press the SAVE key to save the changes 10 2 3 Peel...

Страница 44: ... keep track of TPH Thermal Print Head life and printer wear tear If you replace a TPH you can write down the odometers value at the time of replacement so that if the new TPH were to fail too soon you would be able to tell how long that TPH was actually used for To exit press the ESC key and the scale will return to the previous screen 10 5 Label Type At the Printer Hardware Settings Menu screen p...

Страница 45: ... while the cursor is on the last field in order to save the current screen contents and return to the previous menu or press the ESC key to return to the previous menu 10 6 Feed Adjust At the Printer Hardware Settings Menu screen press the 5 key for Feed Adjust The Feed Adjust screen will then appear Feed Adjustment This is a fine adjustment that controls the print position from top to bottom on a...

Страница 46: ...11 Network Options 38 11 Network Options Refer to Network manual ...

Страница 47: ...s are the same except that the Zero Adjusted starts at 0 when you enter this screen In the example above the Current Zero is 3569 the Zero Adjusted is 3569 3569 0 If the Internal Counts went up to 4000 then the Zero Adjusted would be 4000 3569 431 RAW CURRENT ZERO ZERO ADJUSTED The external weight is calculated using theses very simple values First the Calibrated Zero is calculated by reading the ...

Страница 48: ...est The Keyboard Test screen will be displayed Keyboard value This value is in hexadecimal and corresponds to a key s hardware scan code See the keyboard table next page Converted Value This value corresponds to a key s ASCII value It only applies to the QERTY keyboard and the numeric keys All ASCII values generated by other keys are ignored Key Name For most keys this should be the same as the wo...

Страница 49: ...2 2 3 33 3 D D E E 130 130 131 131 132 132 133 133 134 134 135 135 136 136 137 137 A 2E 0 30 0 B B 1D 1D C C 12 5 Printer Test At the Self Test Menu screen press the 4 key for Printer Test The scale will then print a TPH test label This label has a checker pattern that can help you find problems with the TPH Thermal Print Head You should clean the TPH before you try this procedure Follow the maint...

Страница 50: ...n Volatile This is the total size of your Flash memory and is directly related to PLU capacity The value is in kilobytes Remember that 1024 kilobytes 1 megabyte For PLU capacity see section 15 4 Used This reports the amount of memory that is in used Free This value reports the amount of free memory available for PLUs or label formats 12 8 Flash Memory Test At the Self Test Menu screen press the 7 ...

Страница 51: ...elf Test Menu If it fails you will see the RS 232 Test Failed on the screen You may press ESC to exit or any key to try again If you are having problems with this test please make sure that the loop back plug is connected properly and that it has pins 2 3 shorted If the problem persists you may have a damaged connector or serial port driver 12 10 Firmware Versions Test At the Self Test Menu screen...

Страница 52: ...ntioned screens the scale will consider it an attempt to calibrate and the counter will be incremented All of the screens that can change this counter will be noted in this manual Option Counter This counter is incremented every time you attempt to change or adjust any of the various NTEP regulated options If you use the SAVE key or ENTER key from any of the Weight Options entry screens the scale ...

Страница 53: ...g sure not to obstruct the Allen bolt 4 Adjust the Allen bolt until it touches the screw underneath it on the upper case 5 Repeat steps 3 4 for the other 3 corners of the platform 14 2 Removing the Upper Case 1 Make sure that the Main Power switch is OFF that the scale is unplugged 2 Remove the platter from the platform all labels backing paper from the printer 3 Remove the display stalk A Unscrew...

Страница 54: ...se 6 Remove the key board A Remove the 2 keyboard screws on top of the upper case B Remove the keyboard grounding screw on the Main PCB C Unplug the keyboard cable from J7 on the Main PCB 7 Open printer side door and remove 2 printer bay screws 8 Remove the 3 screws in the keyboard access area 9 Then remove the upper case by sliding it upwards ...

Страница 55: ...Memory PCB 7 After you are sure that these accessories are in working order attach them to the new main PCB 8 If the new main PCB has no EPROMs make sure to use the EPROMs from the old main PCB only after you have determined that they are in working order 9 The main PCB EPROMs are listed below in left to right order A U5 Scale System EPROM 4M bit B U6 Scale Display EPROM 4M bit C U7 Printer Fonts ...

Страница 56: ...Converter replacement a Disconnect the Load cell cable from CN1 on AD Converter PCB b Remove the 2 screws on the AD Converter PCB c Remove old AD Converter PCB and attach new one d Reassemble in reverse order B Load cell replacement a Disconnect the Load cell cable from CN1 on AD Converter PCB b Remove the Allen bolt from the top of the Load cell Main bracket c Remove the 2 Allen bolts from the si...

Страница 57: ...idual printer parts please follow the corresponding directions in respective subsectionsof 14 6 14 6 1 Rewind Motor Assembly Replacement 1 Follow all of the directions in section14 2 first 2 Unplug connector J16 on main PCB 3 Remove the Rewind Clamp 4 While holding the Rewind Support unscrew the screw inside the its center 5 Remove the Rewind Support from the Rewind Joint 6 On the Rewind Joint rem...

Страница 58: ...ls backing paper from the printer set the Print Head to its locked down position 4 Remove the 2 front screws on the TPH Bracket remove the Paper Cutter if present 5 Set the Print Head to its unlocked position and gently slide the Print Head out of the scale towards the front being careful not to damage the ribbon cable attached to the Print Head If you have not removed the Upper Case you may need ...

Страница 59: ...rst 2 Unplug the connectors at J10 J11 on the main PCB 3 Cut discard the 2 cable ties on the side Bracket Support see diagram 4 Remove the screw attached to the Peel Sensor Assembly also remove the screw on the IR LED Assembly 5 Remove the IR LED Peel Sensor Assemblies replace with new ones 6 Remember to attach new cable ties in the same place as before 7 Reassemble in reverse order 14 6 5 Label R...

Страница 60: ...ain Power switch is OFF that the scale is unplugged 2 Remove the platter from the platform all labels backing paper from the printer 3 Remove the display stalk A Unscrew the 2 screws from underneath the column base B Lift remove the display stalk from the column base 4 Insert new display stalk and reassemble in reverse order 14 8 Keyboard Replacement 1 Make sure that the Main Power switch is OFF t...

Страница 61: ...eyboard PCB 3 You can now replace any switch that is not working Remember that each switch has 4 pins soldered to the keyboard PCB 4 You may also replace any of the Keyboard Under lays being careful not to loose or misalign any of the Key Knobs 5 Once done reassemble in reverse order Be very careful not to over tighten the keyboard PCB screws ...

Страница 62: ...emble in reverse order 15 2 Installing the Memory Expansion Card 1 Follow steps 1 2 from section 15 1 Installing the NetworkMemoryCard 2 Plug the Memory Expansion Card into connector J8 on the main PCB This is the large 3x16 gray connector on the main PCB 3 Attach the grounding screw to the Memory Expansion Card Do not over tighten 4 Reassemble in reverse order 5 See memory chart on next page 15 3...

Страница 63: ...ng Messages 1 32 1 X 1 1 8173 Sales Messages 1 32 1 X 1 1 8172 Label Formats 100 thru 999 1 900 1 10 X 0 0 8172 PLUs 1 6000 1 5 X 0 0 8172 Total Free Memory Blocks 8172 Memory Chart Template Item Range Blocks Used Each QTY Blocks Used Sub Total Free Blocks Starting Memory 8178 Clerks 1 99 1 X ___ ______ Scales Assignment 1 32 2 X ___ ______ Departments 1 32 1 X ___ ______ Scrolling Messages 1 32 1...

Страница 64: ... 19 6 2 Calibrated mass error Reprogram all Weight settings Span calibrate the scale 7 1 7 4 6 1 3 Load Cell not ready Check for platter or platform obstruction Check replace ADC Wire Harness CON3 AD PCB Check replace ADC Wire Harness CON2 AD PCB Check replace AD PCB Check replace Load Cell Assembly 2 1 4 1 6 1 7 1 7 4 12 3 13 2 13 5 14 5 19 5 4 Zero Range Error For more than 45 seconds Check for ...

Страница 65: ...r 4 3 5 1 10 3 12 5 14 6 14 6 3 18 2 19 8 Scale powers ON goes to Zero cnt d 4 Printed data is faded in whole or in part Check replace Media Labels or paper Clean Thermal Print Head Lower the Printer Speed Adjust Print Head Check replace Rubber Roller Platent Check replace Wire Harness J19 M PCB Check replace Thermal Print Head 4 3 5 1 10 3 12 5 14 4 14 6 14 6 3 17 5 18 2 19 8 Label Printed OK exc...

Страница 66: ...16 Troubleshooting 58 16 2 Versioning Changes ...

Страница 67: ...Static RAM EPROM Flash Memory Real Time Clock Display CPU Printer Chip Selector Address Databus Control Non volatile Control EE PROM RS 232 Driver Key Scan Decoder Step Motor Driver TPH Interrupt Sensor Peeloff Sensor DC Motor Chip Selector EPROM Static RAM Address Databus Control system block diagram ...

Страница 68: ... J19 J20 J16 J7 J9 J5 J6 J8 J10 J11 J3 J1 J2 J23 J14 J15 J13 SERIAL CONNECTOR ETHERNET CONNECTOR CASH DRAWER CONNECTOR KEY BOARD CALSWITCH ETHERNET MODULE PEEL OFF SENSOR ANALOG MODULE GRAPHIC MODULE SMPS DC MOTOR GAP SENSOR STEP MOTOR THERMAL PRINTER HEADER connection diagram ...

Страница 69: ...17 Schematic Diagrams 61 17 3 Main PCB ...

Страница 70: ...17 Schematic Diagrams 62 17 4 Ethernet Memory Expansion PCB ...

Страница 71: ...17 Schematic Diagrams 63 17 5 Power Supply PCB ...

Страница 72: ...18 Exploded Views 64 18 Exploded Views 18 1 Scale ...

Страница 73: ...18 Exploded Views 65 18 2 Printer Assembly ...

Страница 74: ......

Страница 75: ... IS0 0245 A IC C MOS 74HC245D LP II EA 5 U1 3 14 15 8 6236 IS0 0573 A IC C MOS 74HC573D LP II EA 4 U4 5 16 17 9 6527 ID0 2200 0 CHIP RE 1 10W RR1220P 221D 220Ω EA 1 R7 10 6527 ID0 3300 0 CHIP RE 1 10W RR1220P 331D 330Ω EA 2 R2 3 11 6527 ID3 0270 0 CHIP RE 1 10W RR1220P 273D 27 EA 1 R8 12 6527 ID3 1000 0 CHIP RE 1 10W RR1220P 104D 100K EA 1 R1 13 6706 C16 0047 0 CHIP ELECTRIC CONDEN 47uF 16V Φ6 3 E...

Страница 76: ...9 1502 MPN 0306 0 MACHINE SCREW PH M3 6 NI EA 2 19 1 5 ANALOG MODULE ASS Y NO P A R T N O P A R T N A M E S P E C I F I C A T I O N U T Q T Y R E M A R K 1 1810 STC 0001 0 ANALOG PLATE CAM01 EA 1 2 6121 PMD 0100 0 ANALOG MODULE PCB 6121 PMD 0100 0 AP EA 1 3 6236 IS0 4011 0 IC D MOS GATE UPD 4011BG EA 1 4 6236 IS0 4066 0 IC ANALOG S W UPD 4066BG EA 1 5 6240 IS0 0177 0 IC OP AMP OP 177GS EA 1 6 6240...

Страница 77: ...60 PAC 0008 0 AC CORD LVD EA 1 10 7600 SOF 2103 0 ON OFF S W WZ231 LP II EA 1 11 7620 S06 3000 0 FUSE 3A 250V Φ6 UL CSA LP EA 1 12 7630 S00 0001 0 FUSE HOLDER FH 01 LOCK TYPE EA 1 13 7642 S00 0060 0 METAL CLAMP 6N EA 3 14 7720 GND 0040 0 TERMINAL Protective GND Termina EA 1 15 7810 C00 0001 0 WIRE NUT CONNECTOR 71B EA 4 16 7832 W00 3838 A D SUB ASS Y WIRE M 24P 8 10 P 380 LP II EA 1 17 7832 W00 39...

Страница 78: ...SISTOR KTC3875 SY EA 7 Q1 6 9 26 6292 IZE 4738 0 ZENER DIODE 8 2V 1W EA 1 DZ1 27 6294 ICP 0160 0 CHIP DIODE KDS 160 SMD EA 12 D1 11 12 28 6513 CJ0 0010 0 RESISTOR 1W CFR 1Ω 5 EA 2 R69 70 29 6527 ID0 0560 0 CHIP RE 1 10W RR1220P 560D 56Ω EA 1 R53 30 6527 ID0 1000 0 CHIP RE 1 10W RR1220P 101D 100Ω EA 2 R58 55 31 6527 ID0 2200 0 CHIP RE 1 10W RR1220P 221D 220Ω EA 1 R44 32 6527 ID0 5600 0 CHIP RE 1 10...

Страница 79: ...AFER 5267 06 EA 1 J14 70 7810 C00 0008 0 MODULA JACK 8P LP II ETHERNET JACK EA 1 J3 71 7810 C00 9299 0 CONNECTOR 929974 40 FEMALE EA 0 6 J5 6 72 7810 CHD 0006 0 CONNECTOR WAFER LP2 LAD1140 6 EA 1 J23 73 7812 C00 0009 B D SUB CONNECTOR RD9S EA 1 J2 74 7812 C00 0025 B D SUB CONNECTOR D25S EA 1 J1 75 7813 C00 0020 0 SOCKET CONNECTOR 5332 20P HIF 3FB 20PA EA 1 J7 76 7813 C00 0026 0 SOCKET CONNECTOR 53...

Страница 80: ... 12 1000 A00 0078 0 SEALING PLATE SUS304 57 5 29 5 1t EA 1 13 1503 A00 0412 0 MACHINE SCREW WPH M4 12 EA 7 14 1510 A00 0308 0 TAPPING SCREW PH 1 3 8 EA 5 15 1510 A00 0408 0 TAPPING SCREW PH 1 4 8 EA 1 16 1501 MSU 0408 0 MACHINE SCREW FH M4 8 EA 2 17 1532 MSU 0515 0 WRENCH BOLT ST M5 15 EA 4 18 1540 MSU 0500 0 NUT HEX M5 EA 4 19 1535 MSU 0620 0 WRENCH BOLT WA M6 20 EA 4 20 1000 A00 0205 0 BRACKET H...

Страница 81: ...210 A00 0025 0 MAIN POST A HEX 10 M8 132 EA 1 40 1210 A00 0075 0 MAIN POST B φ10 132 EA 1 41 1503 A00 0410 0 MACHINE SCREW WPH M4 10 EA 4 42 1502 A00 0408 0 MACHINE SCREW PH M4 8 EA 6 43 1502 MSU 0512 0 MACHINE SCREW PH M5 12 EA 2 44 1502 MPN 0306 0 MACHINE SCREW PH M3 6 EA 4 L C BRACKET ASS Y NO P A R T N O P A R T N A M E S P E C I F I C A T I O N U T Q TY R E M A R K 45 1100 A00 0035 0 L C BRAC...

Страница 82: ... R T N A M E S P E C I F I C A T I O N U T Q TY R E M A R K 17 1030 A00 0057 0 MAIN BRACKET 197 5 138 20 2t EA 1 18 1150 A00 0002 A HEAD FRAME 101 47 5 47 6 EA 1 19 1210 A00 0077 0 PAPER CUT SHAFT φ7 102 7 5 M3 EA 1 20 1210 A00 0031 0 REWIND GUIDE SHAFT φ6 105 M3 EA 1 21 1210 A00 0032 0 SIDE BRK SUPPORT HEX 10 101 M4 EA 1 22 1150 A00 0003 0 LOWER FRAME 101 35 7 44 7 EA 1 23 2010 A00 0003 0 SENSOR ...

Страница 83: ... PAPER GUIDE LOCKER 24 17 0 8t EA 1 65 1000 A00 0045 0 PAPER PRESSURE 24 5 61 19 8 0 8t EA 1 66 1000 A00 0046 0 SUPPORT PRESSURE 22 16 8 13 8 0 8t EA 1 67 1210 A00 0020 0 SHAFT PRESSURE φ4 28 5 EA 1 68 1590 A00 0027 0 TORSION SPRING 19 6 47 6 φ1 EA 1 69 1503 A00 0412 0 MACHINE SCREW WPH M4 0 7 12 EA 2 70 1502 MPN 0306 0 MACHINE SCREW PH M3 0 5 6 EA 2 71 1561 MSU 0300 0 E RING φ3 φ7 0 6t EA 2 72 15...

Страница 84: ... A POLY BAG SET 700 750 0 04t EA 1 6 9303 A00 0004 0 POLY BAG HEAD 350 450 0 05t EA 2 7 9002 LP2 0033 0 MANUAL LP 2 ENGLISH EA 1 8 9300 A00 0001 0 POLY BAG FUSE 50 60 0 05t EA 1 9 9300 A00 0003 0 POLY BAG MANUAL 230 330 0 05t EA 1 10 9400 A00 0046 0 SILICAGEL 10g EA 3 11 9900 A00 0002 0 SEALING WIRE 300M ROLL EA 0 001 12 9900 A00 0001 0 SEALING LEAD OVERSEAS EA 1 13 9102 LP2 0130 0 PAD 635 560 EA ...

Страница 85: ... 188 Grenada 248 Mexico 129 Belize 189 Guatemala 249 Micronesia 130 Benin 190 Guinea 250 Moldova 131 Bhutan 191 Guinea Bissau 251 Monaco 132 Bolivia 192 Guyana 252 Mongolia 133 Bosnia Herzegovina 193 253 Morocco 134 Botswana 194 254 Mozambique 135 Brazil 195 Haiti 255 136 Brunei 196 Honduras 256 137 Bulgaria 197 Hungary 257 Namibia 138 Burkina Faso 198 258 Nauru 139 Burma Myanmar 199 259 Nepal 140...

Страница 86: ...nt Lucia 316 Tajikistan 341 Venezuela 292 Saint Vincent 317 Tanzania 342 Vietnam 293 San Marino 318 Thailand 343 294 Sao Tome 319 Togo 344 295 Saudi Arabia 320 Tonga 345 Western Samoa 296 Senegal 321 Trinidad and Tobago 346 297 Seychelles 322 Tunisia 347 298 Sierra Leone 323 Turkey 348 Yemen 299 Singapore 324 Turkmenistan 349 Yugoslavia 300 Slovakia 325 Tuvalu 350 301 Slovenia 326 351 302 Solomon ...

Страница 87: ...tock numbers Dimensions are specified as Width X Length 99 50mm X 45mm Universal 50x45 Format 1 00 1 23 7 27 99 1 23 7 27 99 Misc By Weight PLU PRICE lb NET WT lb TOTAL PRICE PACKED ON SELL BY Store Name Address 123 ABC Ave Anywhere USA 98 50mm X 45mm Add Up Total Format 1 00 1 23 7 27 99 1 23 2 00 PM 5 GRAND TOTAL TOTAL NET WT lb TOTAL PIECES AVG PRICE lb PACKED ON TIME GRAND TOTAL PRICE Store Na...

Страница 88: ... 49mm UPC Ingredients Ishida LST 4160 55 67mm X 37 5mm Non UPC Kubota LST 3330 56 67mm X 47 5mm Non UPC Kubota LST 3370 57 67mm X 47 5mm UPC Kubota LST 3360 58 54mm X 52 5mm UPC Kubota LST 3610 60 57mm X Continuous UPC Safe Handling Ingredients TEC LST 5030 61 48mm X 40mm UPC TEC LST 2530 62 48mm X 69 3mm UPC 6 Line Ingredient TEC LST 2540 63 48mm X 54 8mm UPC 6 Line Ingredient TEC LST 2730 64 57m...

Страница 89: ...Appendix C 85 ...

Страница 90: ...Appendix C 86 ...

Страница 91: ...Appendix C 87 ...

Страница 92: ...Appendix C 88 ...

Страница 93: ...Appendix C 89 ...

Страница 94: ...Appendix C 90 ...

Страница 95: ...Appendix C 91 ...

Страница 96: ...Appendix C 92 ...

Страница 97: ...Appendix C 93 ...

Страница 98: ...Appendix C 94 ...

Страница 99: ...Appendix C 95 ...

Страница 100: ...Appendix C 96 ...

Страница 101: ...Appendix C 97 ...

Страница 102: ...Appendix C 98 ...

Страница 103: ...Appendix C 99 ...

Страница 104: ...Appendix C 100 ...

Отзывы: