14
| ENGLISCH – ORIGINAL INSTRUCTIONS
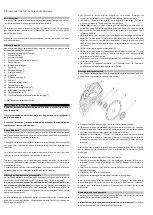
Dismounting the diamond grinding wheel
To change the diamond grinding wheel the guard and extraction hood must
be swiveled out. Place the power tool on a firm surface.
Do not touch the diamond grinding wheel before it cooled down!
The
diamond grinding wheel may become very hot while operating.
Never push the spindle lock button when the spindle is still rotating!
Otherwise the machine may damage.
Loosen the cylindrical screws which mount the cover [7] on the guard and
extraction hood [3] with the aid of a screwdriver.
Loosen the depth locking [6].
Remove the cover [7] from the guard and extraction hood.
Swivel the inner guard [5] open.
Push the spindle lock button [15] to lock the grinder spindle. Loosen the
clamping nut [8] with the aid of the two-pin spanner [19] and dismount it
from the grinder spindle [12].
Remove the diamond grinding wheel, spacer and mounting flange from the
grinder spindle.
4. OPERATING INSTRUCTIONS
Verify the switch [16] actuates properly and returns to the 0-position when
the rear of the switch lever is pressed, before plugging in the power tools.
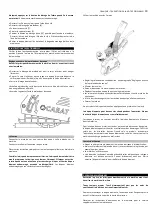
Set grinding depth in advance
Pull the mains plug of the power tool from the socket, before any work on
the machine itself!
Loosen the depth locking, so the inner guard can move in its runway.
Swivel the inner guard open until the diamond grinding wheel sticks out the
requested amount of millimeters (x) from the guard and extraction hood.
Tighten the depth locking.
The graduated scale on the cover of the guard and extraction hood is
indicative en therefore not foreseen of a calibration.
When the segments wear down this declines the grinding depth.
Usage
Connect the power tool to an power supply with the same current as stated
on the nameplate.
Connect and switch on the dust extractor.
Observe the operating instructions of the grinder for instructions to switch
the power tool ON and OFF.
Check the diamond grinding wheel before using. The diamond grinding
wheel must be mounted properly and be able to move freely. Carry out a
test run for at least one minute with no load. Do not use damaged, out-of-
centre or vibrating diamond grinding wheels.
Damaged diamond grinding
wheels can burst and cause injuries.
Operate the power tool with both hands.
Set the requested grinding depth. See section “Set grinding depth in
advance”.
Switch the power tool on.
Slowly bring the grinding unit into the material.
Move the power tool applying a moderate feed, suited to the material
being grinded.
Vertical slots can easily be grinded by pulling the power tool from top to
bottom.
At the ending of the grinding procedure swivel the grinding unit out of the
material, when the power tool is still running.
Switch the power tool off.
Do not slow down the freewheeling diamond grinding wheel applying
sideward pressure.
The diamond grinding wheel may become very hot while operating. Don’t
touch the diamond grinding wheel before it cooled down.
Curved cuts are not possible, the diamond grinding wheel will jam in the
material.
For grinding especially hard material, e.g. concrete with high pebble content,
the diamond grinding wheel can overheat and get damaged. This is clearly
indicated by circular sparking, rotating with the diamond grinding wheel.
When this occurs interrupt the grinding process and allow the diamond
grinding wheel to cool down. Run the power tool for a short time at no-load
speed.
Working advice
Do not strain the power tool so heavily that it comes to a standstill.
Firmly support the work piece, secured against sliding, e.g. with clamping
devices.
The power tool may only be used for grinding without the use of water.
Noticeable decreasing work progress and circular sparking indicates the
diamond grinding wheel has become dull. Briefly grinding a abrasive
material (e.g. lime-sand brick) can sharpen the wheel again.
Содержание Dustcatch 125
Страница 3: ...NEDERLANDS OORSPRONKELIJKE GEBRUIKSAANWIJZING 3 ...
Страница 4: ...4 NEDERLANDS OORSPRONKELIJKE GEBRUIKSAANWIJZING ...
Страница 5: ...NEDERLANDS OORSPRONKELIJKE GEBRUIKSAANWIJZING 5 ...
Страница 40: ...CARAT Nederland B V Nikkelstraat 18 4823 AB Breda The Netherlands WWW CARAT NET NMH1254 11 04 2013 ...


