background image

ENGLISCH – ORIGINAL INSTRUCTIONS | 

13 


Environment 

Do not use this power tool in a dangerous environment. Do not use  it  in an 
wet or clamp environment, such as rain. The working area must be dry. 
 
Mind (when working on floors, walls or sealing’s) concealed electric lines, gas 
and water pipes. Check your working area, e.g. with a metal detector. 
 
Failure  to  follow  these  instructions  may  result  in  electric  shock,  fire  and/or 
serious injury. 
 

Main Parts Composed Power Tool 

The  main  parts  are  numbered  identical  to  the  graphics  of  the  composed 
power tool at page 2 of this manual. 
1.


Assembly flanges (5 pair) 

2.


Screws (Assembly flanges, 2 pieces) 

3.


Guard and extraction hood 

4.


Screws (Guard and extraction hood, 4 pieces) 

5.


Inner guard 

6.


Depth locking 

7.


Cover 

8.


Clamping nut [*] 

9.


Diamond grinding wheel [*] 

10.


Spacer 

11.


Mounting flange [*] 

12.


Grinder spindle [*] 

13.


Vacuum connection 

14.


Vacuum hose 

15.


Spindle lock button [*] 

16.


ON/OFF-switch [*] 

17.


Auxiliary handle [*] 

18.


Two-pin spanner for clamping nut [*] 

 
[*] Isn’t a part of the DustCatch guard and extraction hood. 
 

3. ASSEMBLY INSTRUCTIONS 

Pull the mains plug of the power tool from the socket, before any work on 
the machine itself! 
 
It’s recommended to wear worker’s gloves while assembling or changing the 
diamond grinding wheel. 
 
Diamond grinding wheels become very hot due operating. Don’t touch them 
until they have cooled down. 


Diamond grinding wheel 

This  composed  power  tool  is  not  intended  to  be  used  in  combination  with 
other tools than diamond grinding wheels. The guard doesn’t supply suitable 
protection for tools other than diamond grinding wheels. 
 
The  arbor  of  the  diamond  grinding  wheel  must  fit  the  mounting  flange.  Do 
not increase the arbor of the diamond grinding wheel. Do not use reducers or 
adapters. 
 
The permissible speed (rpm) of the diamond grinding wheel used must be at 
least the speed stated on the nameplate of the used grinder. 
 
Always select  a  diamond  grinding  wheel  suitable  for  the  specific  material  to 
be  grinded.  We  advise  diamond  grinding  wheels  from  Carat.  Observe  the 
manual of the grinding wheel. 
Make  sure  the  diamond  grinding  wheel  is  rotating  in  the  correct  direction. 
Verify  the  direction  of  the  arrow  on  the  diamond  grinding  wheel  is 
corresponding the direction of the arrow on the power tool. 
 

Mounting the interchangeable equipment 

The  guard  and  extraction  hood  comes  with  5  pair  assembly  flanges  and  is 
suitable to be mounted on several grinders, see section “Technical Data”. 
 

Never use assembly flanges which are not suitable for the selected grinder. 

On each pair of assembly flanges is stated for which grinder they are suitable. 
At the first part the brand and a unique number are engraved, on the second 
part only the unique number is engraved. 

 
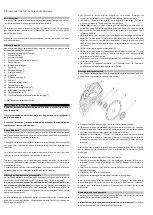
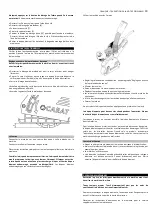
The  numbering  of  the  several  parts reflect  to  the  graphics on page  2  of this 
manual. The steps reflect to the graphics starting on page 3. 


(1)

  Remove  the  original  guard,  mounted  on  the  power  tool. 

Observe  the 

operating instructions of the grinder, where the interchangeable equipment 
will be mounted on. 


(2)

  Remove  the  clamping  nut  [8]  and  the  mounting  flange  [11]  from  the 

power tool where this interchangeable equipment will be mounted on.


(2A & 2B)

 When a grinder of the brand Makita is used in combination with 

a DustCatch 230 guard, the four bolts of the gearbox must be disassembled. 
These bolts are to be replaced with the delivered bolts FBB616.


(3  &4)

  Clamp  the  two  parts  [1]  of  one  pair  assembly  flanges  around  the 

flange  of  the  grinder.  If  necessary  (not  for  a  Metabo  grinder)  tighten  the 
two  screws  [2]. 

Mind  that  the  assembly  flanges  fit  one  way,  the  engraved 

text must point outwards. 


(5)

 Loosen the depth locking [6].


(6)

  Loosen  the  three  cylindrical  screws  which  mount  the  cover  [7]  on  the 

guard  and  extraction  hood  [3]  with  the  aid  of  a  screwdriver.


Remove  the 

cover from the guard and extraction hood.


(7)

  Mount  the  guard  and  extraction  hood  on  the  assembly  flanges  en 

tighten the four screws [4].


(8)

 Mount the auxiliary handle [17] supplied with the grinder, parallel to the 

diamond grinding wheel, as illustrated.


Mounting the diamond grinding wheel 

To  change  the  diamond grinding  wheel  the  guard and extraction hood must 
be swiveled out. Place the power tool on a firm surface. 


Clean the mounting flange, spacer and clamping nut. 


(9)

 Place the mounting flange (B) on the grinder spindle (A). The mounting 

flange must be mounted in such way the rotation-lock (two flat surfaces) is 
corresponding the flat surfaces of the grinder spindle. 


(9)

  Mount  the  spacer  (C;  5,2mm)  on  the  grinder  spindle,  make  sure  the 

bushing  is  pointing  outwards. 

If  desired,  because  the  diamond  grinding 

wheel  is  too  close  to  the  guard  and  extraction  hood,  the  spacer  of  7,2mm 
may be mounted.


Make sure, mounting the diamond grinding wheel, the direction of the arrow 
on the diamond grinding wheel is corresponding the direction of the arrow on 
the power tool. 


(9)

 Mount the diamond grinding wheel (D) on the spacer. 


Push the spindle lock button [14] to lock the grinder spindle. Screw on the 
clamping  nut  (E)  on  the  spindle  and  tighten  it  with  the  two-pin  spanner 
[18]. Make sure the bushing of the clamping nut is pointing outwards. 


(10)

  Close  the  inner  guard  [5]  and  place  the  cover  on  the  guard  and 

extraction hood. 


(10)

  Tighten  the  three  cylindrical  screws  of  the  cover  with  the  aid  of  a 

screwdriver. 


(11)

 Tighten the depth locking (at a random position). 

 
After  mounting  the  diamond  grinding  wheel  and before  switching  on,  check 
the diamond grinding wheel is correctly mounted and that it can turn freely. 
Make  sure  the  diamond  grinding  wheel  doesn’t  graze  against  the  guard and 
extraction hood or other parts. 


Содержание Dustcatch 125

Страница 1: ...NL GEBRUIKSAANWIJZING 06 ENG OPERATING INSTRUCTIONS 12 F MODE D EMPLOI 18 ES INSTRUCCIONES DE MANEJO 24 DK BRUGSANVISNINGEN FØR BRUGEN 30 D BEDIENUNGSANLEITUNG 36 DustCatch 125 DustCatch 230 ...

Страница 2: ...2 NEDERLANDS OORSPRONKELIJKE GEBRUIKSAANWIJZING DustCatch 125 DustCatch 230 HOOFDONDERDELEN MAINPARTS PARTS PRINCIPALS PARTES PRINCIPALES HOVEDDELE V100909 ...

Страница 3: ...NEDERLANDS OORSPRONKELIJKE GEBRUIKSAANWIJZING 3 ...

Страница 4: ...4 NEDERLANDS OORSPRONKELIJKE GEBRUIKSAANWIJZING ...

Страница 5: ...NEDERLANDS OORSPRONKELIJKE GEBRUIKSAANWIJZING 5 ...

Страница 6: ... mineralen vrijkomt is schadelijk voor de gezondheid Aanraking of inademing van stof kan leiden tot allergische reacties en of ziekten aan de luchtwegen van de gebruiker of personen die zich in de omgeving bevinden Om een hoge graad van stofafzuiging te bereiken gebruikt u een zuiger van stofklasse M geschikt voor mineraalstof in combinatie met dit elektrische gereedschap Zorg voor een goede venti...

Страница 7: ...chikt zijn Op het ene schaaldeel staat de merknaam en een uniek nummer op het andere schaaldeel staat alleen het unieke nummer De nummering van de diverse onderdelen is terug te vinden op pagina 2 van deze handleiding De stappen verwijzen naar de afbeeldingen vanaf pagina 3 1 Verwijder de originele beschermkap gemonteerd op het elektrische gereedschap Raadpleeg de instructies in de handleiding van...

Страница 8: ... Controleer de diamantslijpschijf vóór het gebruik De diamantslijpschijf moet juist gemonteerd zijn en vrij kunnen draaien Laat de diamantslijpschijf minstens 1 minuut onbelast proefdraaien Gebruik geen beschadigde niet ronde of trillende diamantslijpschijf Beschadigde diamantslijpschijven kunnen barsten of letsel veroorzaken Houdt het elektrische gereedschap met beide handen stevig vast Stel de g...

Страница 9: ...wachte situaties beter onder controle houden f Draag geschikte kleding Draag geen loshangende kleding of sieraden Houd haren kleding en handschoenen uit de buurt van bewegende delen Loshangende kleding lange haren en sieraden kunnen door bewegende delen worden meegenomen g Wanneer stofafzuigings of stofopvangvoorzieningen kunnen worden gemonteerd dient u zich ervan te verzekeren dat deze zijn aang...

Страница 10: ...e in het werkstuk invalt zich vastgrijpen Daardoor kan de slijpschijf uitbreken of een terugslag veroorzaken De slijpschijf beweegt zich vervolgens naar de bediener toe of van de bediener weg afhankelijk van de draairichting van de schijf op de plaats van de blokkering Hierbij kunnen slijpschijven ook breken Een terugslag is het gevolg van verkeerd gebruik of onjuiste gebruiksomstandigheden van he...

Страница 11: ...f onderhoud is gepleegd De informatie uit de handleiding niet is goed is opgevolgd De machine gebruikt is door onbevoegden De machine is gebruikt voor niet geschikte doeleinden De machine gerepareerd is met niet originele onderdelen Indien de machinecodering is aangetast of verwijderd Indien door brand vocht en of transportschade gebreken zijn ontstaan Carat Nederland B V Nikkelstraat 18 4523 AB B...

Страница 12: ... one s health Touching or breathing in the dusts can cause allergic reactions and or lead to respiratory infections of the user or bystanders To achieve a high degree of dust extraction use a dust category M vacuum cleaner for mineral dust together with this power tool Provide good ventilation of the working place It is recommended to wear a FFP2 filter class respirator Observe the relevant regula...

Страница 13: ...y the unique number is engraved The numbering of the several parts reflect to the graphics on page 2 of this manual The steps reflect to the graphics starting on page 3 1 Remove the original guard mounted on the power tool Observe the operating instructions of the grinder where the interchangeable equipment will be mounted on 2 Remove the clamping nut 8 and the mounting flange 11 from the power to...

Страница 14: ...ing instructions of the grinder for instructions to switch the power tool ON and OFF Check the diamond grinding wheel before using The diamond grinding wheel must be mounted properly and be able to move freely Carry out a test run for at least one minute with no load Do not use damaged out of centre or vibrating diamond grinding wheels Damaged diamond grinding wheels can burst and cause injuries O...

Страница 15: ...ol if the switch does not turn it on and off Any power tool that cannot be controlled with the switch is dangerous and must be repaired c Disconnect the plug from the power source and or the battery pack from the power tool before making any adjustments changing accessories or storing power tools Such preventive safety measures reduce the risk of starting the power tool accidentally d Store idle p...

Страница 16: ...ent kickback and loss of control over the power tool f Do not jam the cut off wheel or apply excessive pressure Do not attempt to make an excessive depth of cut Overstressing the wheel increases the loading and susceptibility to twisting or binding of the wheel in the cut and the possibility of kickback or wheel breakage g When wheel is binding or when interrupting a cut for any reason switch off ...

Страница 17: ...e de matériaux peut être nocive pour la santé Toucher ou respirer les poussières peut causer des réactions allergiques et ou mener a des infections respiratoires pour l opérateur ou le spectateur Pour atteindre un haut degré d extraction de poussières utiliser un aspirateur de catégorie M Bien aérer l endroit de travail Il est recommandé de porter un masque respiratoire de classe FFP2 Respectez le...

Страница 18: ...ation Chaque étape est détaillée sur les schémas de démarrage de la page 3 1 Enlever le carter original monté sur la machine Observer les instructions de la machine sur laquelle l équipement doit être monté 2 Enlever l écrou de serrage 8 et la bague d assemblage 11 de la machine sur laquelle l équipement doit être monté 2A 2B Lorsqu un abrasif de la gamme Makita est utilisé avec un guide DustCatch...

Страница 19: ...iamant endommagés peuvent éclatés et causer des dégâts Utiliser la machine avec les 2 mains Régler la profondeur de coupe désirée Voir paragraphe Réglage en avance de la profondeur de coupe Allumer la machine Amener doucement la machine dans le matériau Déplacer la machine en appliquant une légère pression Les rainures verticales peuvent facilement être faite en tirant la machine de haut en bas A ...

Страница 20: ...es risques dus aux poussières 4 Utilisation et entretien de l outil a Ne pas forcer l outil Utiliser l outil adapté à votre application L outil adapté réalisera mieux le travail et de manière plus sûre au régime pour lequel il a été construit b Ne pas utiliser l outil si l interrupteur ne permet pas de passer de l état de marche à arrêt et vice versa Tout outil qui ne peut pas être commandé par l ...

Страница 21: ...r fermement l outil électrique et placer votre corps et vos bras pour vous permettre de résister aux forces de rebond Toujours utiliser une poignée auxiliaire le cas échéant pour une maîtrise maximale du rebond ou de la réaction de couple au cours du démarrage L opérateur peut maîtriser les couples de réaction ou les forces de rebond si les précautions qui s imposent sont prises b Ne jamais placer...

Страница 22: ...e Non respect des instructions Utilisation de la machine par une personne non habilitée Utilisation de la machine sur un matériau non approprié Réparation de la machine avec des pièces détachée non originales Le code de la machine est affecté ou retiré Défaut par feu humidité et ou transport Carat Nederland B V Nikkelstraat 18 4523 AB Breda Pays Bas WWW CARAT NET 8 CERTIFICATION DE CONFORMITÉ Nous...

Страница 23: ...olvo puede causar reacciones alérgicas y o producir infecciones respiratorias del usuario o de los presentes Para alcanzar un alto grado de aspiración de polvo utilice un aspirador de clase M junto con esta herramienta Proporcione una buena ventilación al lugar de trabajo Se recomienda usar una mascarilla de la clase FFP2 Observe las prescripciones vigentes en su país sobre los materiales a trabaj...

Страница 24: ...e uso de la amoladora para montar el equipo intercambiable 2 Quite la tuerca de sujeción 8 y la arandela de montaje 11 de la máquina para montar el equipo intercambiable 2A 2B Cuando se usa una radial de la marca Makita en combinación con una carcasa DustCatch 230 los cuatro tornillos de la caja de engranajes deben ser reemplazados por los suministrados con la referencia FBB616 3 4 Fije las dos pa...

Страница 25: ...iscos en mal estado pueden causar lesiones Utilice la herramienta con ambas manos Seleccione la profundidad de corte requerida Ver sección Fije la profundidad de corte Encienda la máquina Lentamente acerque el disco al material Mueva la máquina aplicando una presión moderada adecuada al material a cortar Los cortes verticales se realizan fácilmente llevando la máquina de arriba hacia abajo Al fina...

Страница 26: ...odo momento Ello le permitirá controlar mejor la herramienta eléctrica en caso de presentarse una situación inesperada f Lleve puesta una vestimenta de trabajo adecuada No utilice vestimenta amplia ni joyas Mantenga su pelo vestimenta y guantes alejados de las piezas móviles La vestimenta suelta el pelo largo y las joyas se pueden enganchar con las piezas en movimiento g Siempre que sea posible ut...

Страница 27: ...do la rotura del útil o el rechazo del aparato Según el sentido de giro y la posición del útil en el momento de bloquearse puede que éste resulte despedido hacia o en sentido opuesto al usuario En estos casos puede suceder que el útil incluso llegue a romperse El rechazo es ocasionado por la aplicación o manejo incorrecto de la herramienta eléctrica Es posible evitarlo ateniéndose a las medidas pr...

Страница 28: ...correcto No seguir correctamente las instrucciones indicadas Uso de la máquina por personal no autorizado Utilización de la máquina para trabajos no adecuados Reparación de la máquina con repuestos no originales El código de la máquina está dañado o quitado Daños por fuego humedad y o transporte Carat Nederland B V Nikkelstraat 18 4523 AB Breda Holanda WWW CARAT NET 8 DECLARACIÓN DE CONFORMIDAD No...

Страница 29: ... og indånding af dette støv kan foresage allergiske reaktioner og eller luftvejsproblemer for bruger og personer i nærhedes af arbejdsstedet For at opnå en høj grad af støvfjernelse benyttes støvsuger kategori M beregnet til mineralsk støv når der arbejdes med maskinen Arbejdsstedet skal ventileres godt Det anbefales at benytte åndedrætsværn klasse FFP2 Overhold forskrifterne der gælder i dit land...

Страница 30: ...s til tegningerne der starter på side 3 i denne manual 1 Fjern den originale beskyttelsesskærm fra maskinen Vær opmærksom på manualen for den vinkelsliber som universalsugekåben skal monteres på 2 Afmonter spændemøtrikken 8 og montageflangen 11 fra den maskine som universalsugekåben skal monteres på 2A 2B Når en vinkelsliber af mærket Makita benyttes i forbindelse med DustCatch 230 skal de 4 bolte...

Страница 31: ...en med moderat pres passende for det materiale der skæres Der kan let skæres vertikale fuger ved at skære fra top til bund Ved afslutningen af skæringen vippes maskinen op indtil denne e rude af det der skæres i medens maskinen stadig kører Sluk maskinen Brems ikke maskinen ved at presse maskinene sideverts Diamantklingen bliver varm når der arbejdes Rør aldrig ved klingen før den er kølet af Der ...

Страница 32: ...ke et el værktøj hvis afbryder er defekt Et el værktøj der ikke kan startes og stoppes er farlig og skal repareres c Træk stikket ud af stikkontakten og eller fjern akkuen inden maskinen indstilles der skiftes tilbehørsdele eller maskinen lægges fra Disse sikkerhedsforanstaltninger forhindrer utilsigtet start af el værktøjet d Opbevar ubenyttet el værktøj uden for børns rækkevidde Lad aldrig perso...

Страница 33: ...e sig fast når det anvendes i hjørner skarpe kanter eller hvis det springer tilbage Dette medfører at man taber kontrollen eller tilbageslag e Brug ikke kædesavklinger eller tandede savklinger Sådant indsatsværktøj fører hyppigt til tilbageslag eller at man mister kontrollen over el værktøjet f Undgå at skæreskiven blokerer eller får for højt modtryk Foretag ikke meget dybe snit Overbelastes skære...

Страница 34: ...für die Gesundheit sein Direkter Hautkontakt oder das Einatmen von Staub kann allergische Reaktionen hervorrufen und oder zu Infektionen der Atemwege des Bedieners oder von umstehenden Personen führen Um einen hohen Entstaubungsgrad zu erreichen muss dieses Elektrowerkzeug in Verbindung mit einem Sauger der Staubklasse M für Mineralstaub verwendet werden Sorgen Sie für eine gute Belüftung am Arbei...

Страница 35: ... Die Nummerierung der hier genannten Teile finden Sie auf Seite2 Die Montageschritte beziehen sich auf die Abbildungen auf Seite 3 1 Entfernen Sie den originalen Schutz der an dem Winkelschleifer montiert ist Beachten Sie die Bedienungshinweise des Winkelschleifers an der die DustCatch Schutz und Absaughaube angebaut werden soll 2 Entfernen Sie die Flanschmutter 8 und den Inneren Flansch 10 von de...

Страница 36: ...n Sie keine beschädigten nicht zentrierten oder vibrierenden Diamanttrennscheiben Beschädigte Diamanttrennscheiben können brechen und Verletzungen verursachen Bedienen Sie die Elektrowerkzeuge mit beiden Händen Stellen Sie die gewünschte Schnitttiefe ein Beachten Sie den Abschnitt Einstellen der Schnitttiefe Schalten Sie den Winkelschleifer an Führen Sie die Diamanttrennscheibe langsam in das zu s...

Страница 37: ...k oder lange Haare können von sich bewegenden Teilen erfasst werden g Wenn Staubabsaug und Auffangeinrichtungen montiert werden können vergewissern Sie sich dass diese angeschlossen sind und richtig verwendet werden Verwendung einer Staubabsaugung kann Gefährdungen durch Staub verringern 4 Verwendung und Behandlung des Elektrowerkzeuges a Überlasten Sie das Gerät nicht Verwenden Sie für Ihre Arbei...

Страница 38: ... Diamant Topfscheiben von größeren Elektrowerkzeugen Diamant Topfscheiben für größere Elektrowerkzeuge sind nicht für die höheren Drehzahlen von kleineren Elektrowerkzeugen ausgelegt und können brechen RÜCKSCHLAG UND ENTSRECHENDE SICHERHEITSHINWEISE Rückschlag ist die plötzliche Reaktion infolge eines hakenden oder blockierten drehenden Einsatzwerkzeugs wie Schleifscheibe Schleifteller Drahtbürste...

Страница 39: ...angelhafte oder schlechte Wartung Wenn die Anweisungen nicht beachtet wurden Das Elektrowerkzeug wurde von unbefugten Personen benutzt Das Elektrowerkzeug wurde für andere Zwecke benutzt Das Elektrowerkzeug wurde nicht mit Original Ersatzteilen repariert Der Maschinencode wurde entfernt oder beschädigt Mängel durch Feuer Feuchtigkeit und oder Transportschäden Carat Centrale B V Nikkelstraat 18 452...

Страница 40: ...CARAT Nederland B V Nikkelstraat 18 4823 AB Breda The Netherlands WWW CARAT NET NMH1254 11 04 2013 ...

Отзывы: