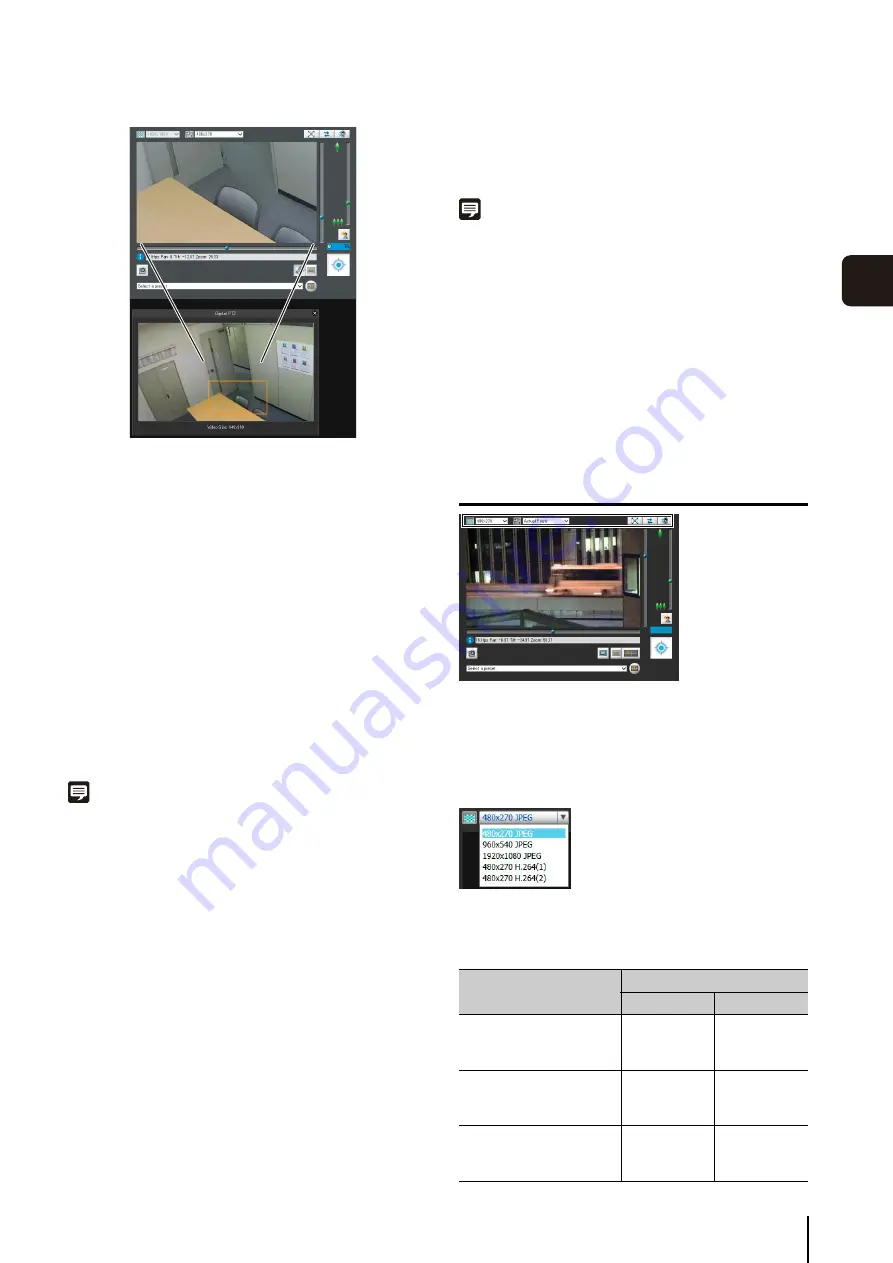
How to Operate the Viewer
137
5
A
d
min Viewer/
V
B
V
iewer
The preview frame size can be set to any of five sizes (the
changed size is displayed under [Video Size] on the
digital PTZ panel).
The sizes that can be selected depend on the [Video Size
Set] setting under [Video] > [All Videos] on the Setting
page (p. 50).
If the aspect ratio of the set [Video Size Set] is 16:9, the
five sizes are 640 x 360, 512 x 288, 384 x 216, 256 x 144,
and 128 x 72. If the aspect ratio is 4:3, the five sizes are
640 x 480, 512 x 384, 384 x 288, 256 x 192, and 128 x 96.
Changing the Position
You can move the preview frame by dragging the inside
of the frame.
If you click any position in the Digital PTZ display area, the
preview frame moves to the clicked position.
Note
The preview frame moves in stages. You cannot finely adjust the
position.
Specifying a Range with the Sliders
You can use the pan, tilt, and zoom sliders for the video
display area to specify the cropping range in the video
display area. The preview frame on the Digital PTZ panel
also moves in accordance with the operation of the pan,
tilt, and zoom sliders.
Using a Preset or the Home Position
You can use a registered preset or home position to
specify the range for Digital PTZ.
Click the preset selection box and select a preset from the
displayed list to move the preview frame on the Digital
PTZ panel to the preset position and display the video
inside the frame in the video display area.
Click the [Home Position] button to move the preview
frame on the Digital PTZ panel to the home position and
display the video inside the frame in the video display
area.
Note
Register the preset or home position beforehand using the Preset
Setting Tool (p. 98). Registered presets will appear in the preset
selection box.
Exiting Digital PTZ
Click the [Digital PTZ] button again. The Digital PTZ panel
closes and Digital PTZ ends.
Although clicking the close button of the Digital PTZ panel
closes the Digital PTZ panel, Digital PTZ will stay on.
However, when you reconnect to Viewer, the initial status
will be restored.
Setting Video and Audio
Changing the Video Size
You can set a desired video size for video received from
the camera.
The sizes that can be selected depend on the [Video Size
Set] setting under [Video] > [All Videos] on the Setting
page (p. 50).
[Video
S
ize
S
et] setting
S
electable video size
JPEG
H.264*
1
1920 x 1080 / 960 x 540 /
480 x 270*
4
480 x 270
960 x 540
1920 x 1080
*
2
*
3
1280 x 720 / 640 x 360 /
320 x 180
320 x 180
640 x 360
1280 x 720
*
2
*
3
1280 x 960 / 640 x 480 /
320 x 240
320 x 240
640 x 480
1280 x 960
*
2
*
3
Содержание VB-S30D MKII
Страница 13: ...Chapter 1 Before Use Camera Features Software Information Operating Environment and Precautions ...
Страница 22: ...22 ...
Страница 27: ...Installing the Necessary Software 27 2 Initial Settings The Camera Management Tool icon appears on the desktop ...
Страница 33: ...Access the Top Page of the Camera to Check Video 33 2 Initial Settings ...
Страница 34: ...34 ...
Страница 80: ...80 ...
Страница 124: ...124 ...
Страница 148: ...148 ...
Страница 185: ...BIE 7020 002 CANON INC 2015 ...


