background image

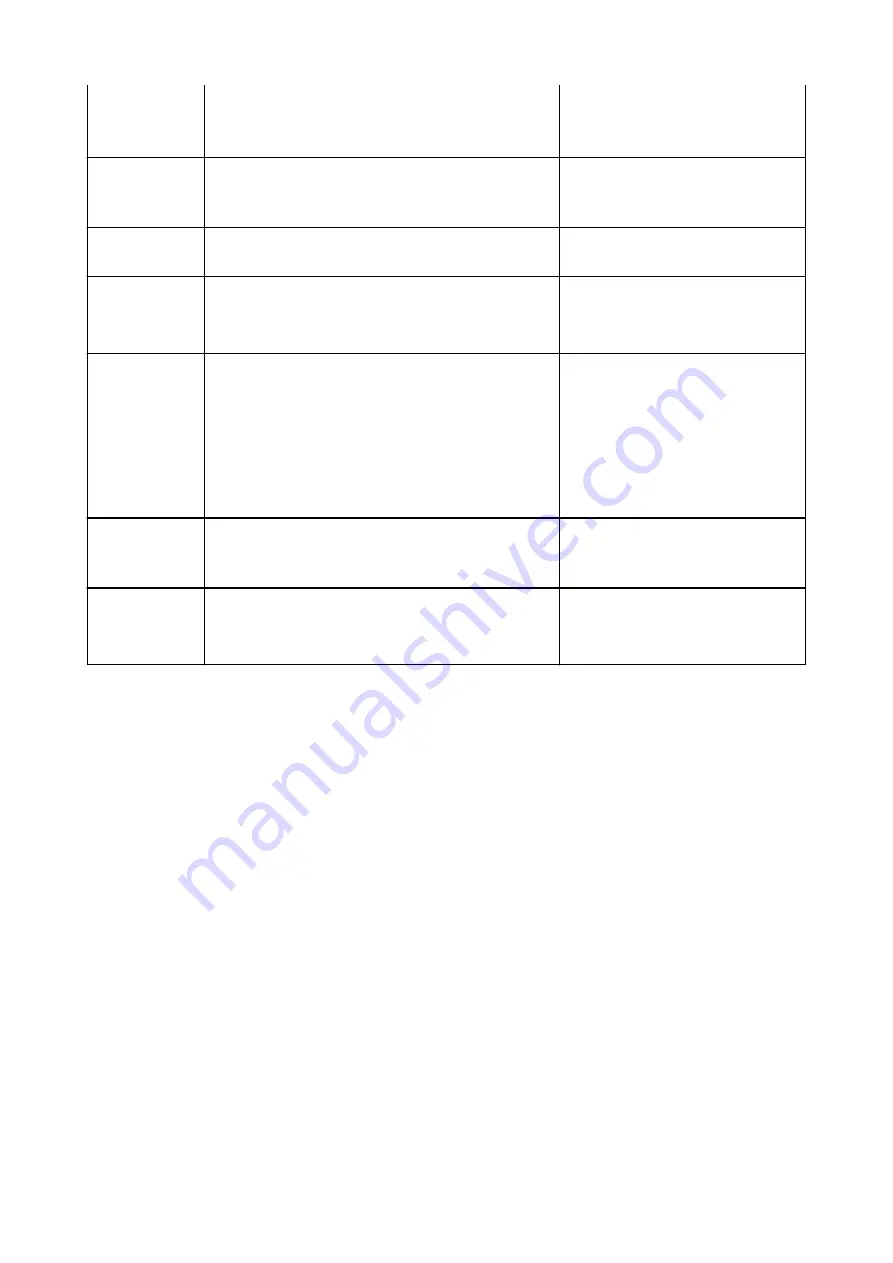
• Your application may not properly

comply with TWAIN. Scan using
another application.

203

There is not enough free disk space to complete the
scan.
Scanner driver will be closed.

• Delete unnecessary files on the

hard disk and scan again.

206

The scanner is not available while in use by another ap-
plication or user.

• Exit the ScanGear in use.

207

Scanner is not selected.
Click [Scanner Selection] to select scanner.
Scanner driver will be closed.

• With network connection, specify

the scanner to use with IJ Network
Scanner Selector EX.

208

IJ Network Scanner Selector cannot be found.
Reinstall scanner driver.
Scanner driver will be closed.

• Delete MP Drivers, then reinstall

MP Drivers from the Setup CD-
ROM or the web page.

Refer to "Deleting the Unnecessary
MP Drivers" for your model from
Home of the 

Online Manual

 for how

to delete MP Drivers.

250

An error has occurred.
Turn the device off and then back on.
Scanner driver will be closed.

• Turn the device off and then back

on.

252

Cannot write or read file.

• Exit running applications, check

that there is sufficient free space
on the hard disk, then scan again.

533

Содержание PIXMA G2160

Страница 1: ...G2000 series Online Manual Printer Functions Overview Printing Scanning Troubleshooting English ...

Страница 2: ...ne Storage Integration Function 35 Handling Paper Originals Ink Tanks etc 36 Loading Paper 37 Loading Plain Paper Photo Paper 38 Loading Envelopes 41 Loading Originals 44 Loading Originals on the Platen Glass 45 Originals You Can Load 47 Refilling Ink Tanks 48 Refilling Ink Tanks 49 Checking Ink Status 56 Maintenance 58 If Printing Is Faint or Uneven 59 Maintenance Procedure 60 Printing the Nozzle...

Страница 3: ...nside of the Machine Bottom Plate Cleaning 84 Overview 86 Safety 87 Safety Precautions 88 Regulatory Information 89 Main Components and Their Use 101 Main Components 102 Front View 103 Rear View 105 Inside View 106 Operation Panel 107 Power Supply 109 Confirming that the Power Is On 110 Turning the Machine On and Off 111 Notice for the Power Plug Power Cord 113 Notice for Unplugging the Power Cord...

Страница 4: ...Precautions 136 Keeping Print Quality High 137 Transporting Your Printer 138 Legal Restrictions on Scanning Copying 140 Specifications 141 Information about Paper 144 Media Types You Can Use 145 Paper Load Limit 147 Media Types You Cannot Use 149 Printing Area 150 Printing Area 151 Other Sizes than Letter Legal Envelopes 152 Letter Legal 153 Envelopes 154 Administrator Password 155 Authentication ...

Страница 5: ...efore Printing 201 Setting Paper Dimensions Custom Size 202 Editing the Print Document or Reprinting from the Print History 204 Changing the Print Quality and Correcting Image Data 208 Setting the Print Quality Level Custom 209 Printing a Color Document in Monochrome 211 Specifying Color Correction 213 Optimal Photo Printing of Image Data 215 Adjusting Colors with the Printer Driver 216 Printing w...

Страница 6: ... MP Drivers 293 Deleting the Unnecessary MP Drivers 294 Before Installing the MP Drivers 295 Installing the MP Drivers 296 Sharing the Printer on a Network 298 Settings on Print Server 299 Settings on Client PC 300 Restrictions on Printer Sharing 302 Printing Using Canon Application Software 304 My Image Garden Guide 305 Copying 306 Making Copies on Plain Paper 307 Switching Page Size between A4 a...

Страница 7: ...383 Scanning in Basic Mode 384 Scanning in Advanced Mode 387 Scanning Multiple Documents from the ADF Auto Document Feeder in Advanced Mode 389 Scanning Multiple Documents at One Time with ScanGear Scanner Driver 391 Correcting Images and Adjusting Colors with ScanGear Scanner Driver 395 Correcting Images Unsharp Mask Reduce Dust and Scratches Fading Correction etc 396 Adjusting Colors Using a Col...

Страница 8: ...c OS 475 Troubleshooting 476 Printing Problems 478 Printing Does Not Start 479 Paper Jams 481 Print Results Are Unsatisfactory 482 Cannot Complete Printing 484 Paper Is Blank Printing Is Blurry Colors Are Wrong White Streaks Appear 485 Colors Are Unclear 489 Lines Are Misaligned 491 Lines Incomplete or Missing Windows 492 Images Incomplete or Missing Windows 493 Ink Blots Paper Curl 494 Paper Is S...

Страница 9: ...s 523 Cannot Scan at the Correct Size 524 Original Is Placed Correctly but the Scanned Image Is Slanted 525 Scanned Image Is Enlarged Reduced on the Computer Monitor 526 Software Problems 527 The E mail Client You Want to Use Does Not Appear in the Screen for Selecting an E mail Client 528 IJ Scan Utility Error Messages 529 ScanGear Scanner Driver Error Messages 531 Mechanical Problems 534 Power D...

Страница 10: ...Code for Error Paper Jams 559 1300 560 Paper Is Jammed inside Machine 561 Other Cases 565 1000 566 1200 567 1403 568 1470 569 1471 570 1472 571 1473 572 1474 573 1475 574 1476 575 1640 576 1700 577 1701 578 1890 579 2900 580 2901 581 5011 582 5012 583 5050 584 5100 585 5200 586 5400 587 5700 588 5B00 589 5B01 590 ...

Страница 11: ...6000 591 6800 592 6801 593 6930 594 6931 595 6932 596 6933 597 6936 598 6937 599 6938 600 6940 601 6941 602 6942 603 6943 604 6944 605 6945 606 6946 607 B202 608 B203 609 B204 610 B205 611 ...

Страница 12: ...e must be observed for safe operation Important Instructions including important information To avoid damage and injury or improper use of the product be sure to read these indications Note Instructions including notes for operation and additional explanations Basics Instructions explaining basic operations of your product Note Icons may vary depending on your product Touch enabled Device Users Wi...

Страница 13: ...ight c 2003 2004 Apple Computer Inc All rights reserved Redistribution and use in source and binary forms with or without modification are permitted provided that the following conditions are met 1 Redistributions of source code must retain the above copyright notice this list of conditions and the following disclaimer 2 Redistributions in binary form must reproduce the above copyright notice this...

Страница 14: ... that is based on or derived from the Work and for which the editorial revisions annotations elaborations or other modifications represent as a whole an original work of authorship For the purposes of this License Derivative Works shall not include works that remain separable from or merely link or bind by name to the interfaces of the Work and Derivative Works thereof Contribution shall mean any ...

Страница 15: ...wing places within a NOTICE text file distributed as part of the Derivative Works within the Source form or documentation if provided along with the Derivative Works or within a display generated by the Derivative Works if and wherever such third party notices normally appear The contents of the NOTICE file are for informational purposes only and do not modify the License You may add Your own attr...

Страница 16: ...END OF TERMS AND CONDITIONS Part 1 CMU UCD copyright notice BSD like Copyright 1989 1991 1992 by Carnegie Mellon University Derivative Work 1996 1998 2000 Copyright 1996 1998 2000 The Regents of the University of California All Rights Reserved Permission to use copy modify and distribute this software and its documentation for any purpose and without fee is hereby granted provided that the above c...

Страница 17: ... with or without modification are permitted provided that the following conditions are met Redistributions of source code must retain the above copyright notice this list of conditions and the following disclaimer Redistributions in binary form must reproduce the above copyright notice this list of conditions and the following disclaimer in the documentation and or other materials provided with th...

Страница 18: ...THERWISE ARISING IN ANY WAY OUT OF THE USE OF THIS SOFTWARE EVEN IF ADVISED OF THE POSSIBILITY OF SUCH DAMAGE Part 5 Sparta Inc copyright notice BSD Copyright c 2003 2009 Sparta Inc All rights reserved Redistribution and use in source and binary forms with or without modification are permitted provided that the following conditions are met Redistributions of source code must retain the above copyr...

Страница 19: ...ACT STRICT LIABILITY OR TORT INCLUDING NEGLIGENCE OR OTHERWISE ARISING IN ANY WAY OUT OF THE USE OF THIS SOFTWARE EVEN IF ADVISED OF THE POSSIBILITY OF SUCH DAMAGE Part 7 Fabasoft R D Software GmbH Co KG copyright notice BSD Copyright c Fabasoft R D Software GmbH Co KG 2003 oss fabasoft com Author Bernhard Penz Redistribution and use in source and binary forms with or without modification are perm...

Страница 20: ...S nor the names of its contributors may be used to endorse or promote products derived from this software without specific prior written permission THIS SOFTWARE IS PROVIDED BY THE COPYRIGHT HOLDERS AND CONTRIBUTORS AS IS AND ANY EXPRESS OR IMPLIED WARRANTIES INCLUDING BUT NOT LIMITED TO THE IMPLIED WARRANTIES OF MERCHANTABILITY AND FITNESS FOR A PARTICULAR PURPOSE ARE DISCLAIMED IN NO EVENT SHALL...

Страница 21: ...me all products supported by this guide will be considered for the search If you want to narrow down the search results add your product s model name or your application s name to the keywords Searching for Functions Enter your product s model name and a keyword for the function you want to learn about Example When you want to learn how to load paper Enter your product s model name load paper in t...

Страница 22: ...he search window and perform a search Searching for Reference Pages Enter your model name and a reference page title You can find reference pages more easily by entering the function name as well Example When you want to browse the page referred to by the following sentence on a scanning procedure page Refer to Color Settings Tab for your model from Home of the Online Manual for details Enter your...

Страница 23: ...Using the Machine Printing Photos from a Computer Copying Originals 23 ...

Страница 24: ...n the Windows 8 1 operating system hereinafter referred to as Windows 8 1 is used 1 Open the paper support A 2 Pull out the paper output tray B then open the output tray extension C 3 Load paper vertically WITH THE PRINT SIDE FACING YOU 4 Align the paper guides D with the paper width 5 Click the My Image Garden icon E in Quick Menu 24 ...

Страница 25: ... installed applications 6 Click the Photo Print icon F 7 Click the folder G with photos you want to print 8 Click the photos H you want to print For Windows To select two or more photos at a time click photos while pressing the Ctrl key For Mac OS To select two or more photos at a time click photos while pressing the command key 9 Click Print I 25 ...

Страница 26: ...Click Print K For Mac OS Click OK when the confirmation message appears then click Print Note My Image Garden lets you use images on your computer such as photos taken with a digital camera in a number of ways My Image Garden Guide Windows My Image Garden Guide Mac OS 26 ...

Страница 27: ... and copy them to plain paper 1 Open the paper support A 2 Pull out the paper output tray B then open the output tray extension C 3 Load paper vertically WITH THE PRINT SIDE FACING YOU 4 Align the paper guides D with the paper width 5 Open the document cover E 27 ...

Страница 28: ...CING DOWN and align it with the alignment mark F 7 Close the document cover gently 8 Press the Black button or Color button G Important Do not open the document cover until copying is complete Note For details on copy features refer to Copying 28 ...

Страница 29: ...inter Functions Print Photos Easily Using My Image Garden Easy Scan with the Auto Function Scan Originals Larger than the Platen Scan Multiple Originals at One Time Online Storage Integration Function 29 ...

Страница 30: ...hotos easily when you search for them later on Calendar View People View Display Recommended Items in Slide Shows Based on the information registered to photos Quick Menu automatically selects the photos on your computer and creates recommended items such as collages and cards The created items appear in slide shows If there is an item you like you can easily print it in just two steps 1 In Image ...

Страница 31: ... the selected photos are placed automatically according to the theme Other Various Functions My Image Garden has many other useful functions Refer to the following for details What You Can Do with My Image Garden Windows What You Can Do with My Image Garden Mac OS 31 ...

Страница 32: ...Function By using the auto function of IJ Scan Utility you can scan easily by automatically detecting the item type Refer to the following for details Easy Scanning with Auto Scan Windows Easy Scanning with Auto Scan Mac OS 32 ...

Страница 33: ...ight halves of an item larger than the platen and combine them back into one image Items up to approximately twice as large as the platen are supported Refer to the following for details Scanning Originals Larger than the Platen Image Stitch Windows Scanning Originals Larger than the Platen Image Stitch Mac OS 33 ...

Страница 34: ...n Utility you can scan two or more photos small items placed on the platen at one time and save each image individually Refer to the following for details Scanning Multiple Originals at One Time Windows Scanning Multiple Originals at One Time Mac OS 34 ...

Страница 35: ...E ACCOUNT page of Evernote for account creation Settings For Windows In the Settings Dialog Box of IJ Scan Utility select the item you want to set then select Evernote for Send to an application in Application Settings Refer to Settings Dialog Box for your model from Home of the Online Manual for details For Mac OS In the Settings Dialog of IJ Scan Utility select the item you want to set then sele...

Страница 36: ...als Ink Tanks etc Loading Paper Loading Plain Paper Photo Paper Loading Envelopes Loading Originals Loading Originals on the Platen Glass Originals You Can Load Refilling Ink Tanks Refilling Ink Tanks Checking Ink Status 36 ...

Страница 37: ...Loading Paper Loading Plain Paper Photo Paper Loading Envelopes 37 ...

Страница 38: ...ou Can Use 1 Prepare paper Align the edges of paper If paper is curled flatten it Note Align the edges of paper neatly before loading Loading paper without aligning the edges may cause paper jams If paper is curled hold the curled corners and gently bend them in the opposite direction until the paper becomes completely flat For details on how to flatten curled paper see Correct curl before loading...

Страница 39: ...IDE FACING YOU 5 Slide the paper guides D to align them with both sides of the paper stack Do not slide the paper guides too hard against the paper The paper may not be fed properly Important Always load paper in the portrait orientation E Loading paper in the landscape orientation F can cause paper jams 39 ...

Страница 40: ...Note Do not load sheets of paper higher than the load limit mark G Note When printing select the size and type of the loaded paper on the print settings screen of the printer driver 40 ...

Страница 41: ... moistened and adhesive 1 Prepare envelopes Press down on all four corners and edges of the envelopes to flatten them If the envelopes are curled hold the opposite corners and gently twist them in the opposite direction If the corner of the envelope flap is folded flatten it Use a pen to press the leading edge in the inserting direction flat and sharpen the crease The figures above show a side vie...

Страница 42: ...DDRESS SIDE FACING YOU The folded flap of the envelope will be faced down on the left side Up to 10 envelopes can be loaded at a time 5 Slide the paper guides D to align them with both sides of envelopes Do not slide the paper guides too hard against the envelopes The envelopes may not be fed properly 42 ...

Страница 43: ...ar side F Address side Note Do not load envelopes higher than the load limit mark G Note When printing select the size and type of the loaded envelopes on the print settings screen of the printer driver 43 ...

Страница 44: ...Loading Originals Loading Originals on the Platen Glass Originals You Can Load 44 ...

Страница 45: ...lowing when loading the original on the platen glass Do not place any objects weighing 4 4 lb 2 0 kg or more on the platen glass Do not put any pressure of 4 4 lb 2 0 kg or more on the platen glass such as pressing down the original Failure to observe the above may cause the scanner to malfunction or the platen glass to break The machine cannot scan the shaded area A 0 04 inch 1 mm from the edges ...

Страница 46: ...Important After loading the original on the platen glass be sure to close the document cover before starting to copy or scan 46 ...

Страница 47: ...Originals You Can Load Item Details Types of originals Text document magazine newspaper Printed photo postcard business card disc BD DVD CD etc Size width x height Max 8 5 x 11 7 inches 216 x 297 mm 47 ...

Страница 48: ...Refilling Ink Tanks Refilling Ink Tanks Checking Ink Status 48 ...

Страница 49: ... Windows Changing the remaining ink level notification setting Mac OS If print results become faint or white streaks appear despite sufficient ink levels see Maintenance Procedure For precautionary notes on handling ink bottles see Notes on ink bottles Refilling Procedure When you need to refill an ink tank follow the steps below Important Please ensure the printer remains flat after initial setup...

Страница 50: ... machine to malfunction Do not touch tubes or other parts inside the machine 3 Open ink tank cover To refill the black ink tank open the left ink tank cover C To refill color ink tanks open the right ink tank cover D 4 Grab and remove the tank cap E of the ink tank to be refilled Place the removed tank cap on the upper tank cap holder F 50 ...

Страница 51: ...ully remove the tank cap of the ink tank Ink on the inside of the tank cap may spatter when removing it 5 Take a new ink bottle out of its package 6 Hold the ink bottle upright and twist the bottle cap G to remove 51 ...

Страница 52: ...inlet I Next stand the ink bottle upside down and squeeze the sides of the ink bottle to refill the ink tank Important Make sure that each color of ink tanks is filled with corresponding color of ink bottles When refilling ink tanks do not squeeze the bottle sides too hard Ink may spatter Do not fill the ink tank above the ink tank s upper limit line J Ink above this line may spill over causing ma...

Страница 53: ...e scanning unit cover once and then close it gently Note If the remaining ink level notification function is enabled the Ink lamp and the Alarm lamp are lit when ink runs out This setting is enabled by default If the lamps are lit perform the following To continue enabling the remaining ink level notification function Hold down the Black button or the Color button for at least 5 seconds The Alarm ...

Страница 54: ...the ink bottles are laid down ink may leak When refilling ink tanks take sufficient care to prevent ink from spattering onto surroundings Ink may stain clothes or other belongings permanently Washing may not remove ink stains Do not use ink bottles and ink contained therein except to refill tanks of printers specified by Canon Do not leave ink bottles in areas exposed to high temperature such as n...

Страница 55: ...When an ink tank is out of ink promptly refill it Ink Tips 55 ...

Страница 56: ...nd the Alarm lamp will flash to inform you of the error Count the number of flashes of the Ink lamp and take appropriate action An Error Occurs The remaining ink level notification function works from initial printing to the time when one of the inks reaches the lower limit line shown on the ink tank For the remaining ink level notification function to work appropriately each ink tank must be fill...

Страница 57: ...olor ink and or black ink has run out Refill ink tanks with ink Note For details on the remaining ink level notification function see below Changing the remaining ink level notification setting Windows Changing the remaining ink level notification setting Mac OS 57 ...

Страница 58: ...Maintenance If Printing Is Faint or Uneven Performing Maintenance Functions from Your Computer Windows Performing Maintenance Functions from Your Computer Mac OS Cleaning 58 ...

Страница 59: ...f Printing Is Faint or Uneven Maintenance Procedure Printing the Nozzle Check Pattern Examining the Nozzle Check Pattern Cleaning the Print Head Cleaning the Print Head Deeply Aligning the Print Head 59 ...

Страница 60: ...lity and Correcting Image Data Windows Changing the Print Quality and Correcting Image Data Mac OS When the Print Results Are Blurred or Uneven Step1 Print the nozzle check pattern From the machine Printing the Nozzle Check Pattern From the computer Printing a Nozzle Check Pattern Windows Printing a Nozzle Check Pattern Mac OS Step2 Examine the nozzle check pattern If there are missing lines or ho...

Страница 61: ...cleaning from a computer Cleaning the Print Heads Windows Cleaning the Print Heads Mac OS If the problem is still not resolved the print head may be damaged Contact the service center When the Print Results Are Not Even such as the Ruled Lines Are Misaligned Step Align the print head From the machine Aligning the Print Head From the computer Aligning the Print Head Position Automatically Windows A...

Страница 62: ...sheet of A4 or Letter sized plain paper 1 Make sure that the power is turned on 2 Load a single sheet of A4 or Letter sized plain paper in the rear tray 3 Pull out the paper output tray then open the output tray extension 4 Hold down the Stop button until the Alarm lamp flashes once then release it immediately The nozzle check pattern will be printed Do not perform any other operations until the m...

Страница 63: ...re are missing lines in pattern A or horizontal white streaks in pattern B If there are missing lines in pattern A Cleaning the print head is required C Good D Bad lines are missing If there are horizontal white streaks in pattern B Cleaning the print head is required E Good F Bad horizontal white streaks are present 63 ...

Страница 64: ...d on 2 Hold down the Stop button until the Alarm lamp flashes twice then release it immediately The machine starts cleaning the print head The cleaning will be complete when the ON lamp lights after flashing Do not perform any other operations until the machine completes the cleaning of the print head This takes about 1 minute 3 Check the print head condition To check the print head condition prin...

Страница 65: ...1 Make sure that the power is turned on 2 Hold down the Stop button until the Alarm lamp flashes three times then release it immediately The machine starts cleaning the print head deeply The cleaning will be complete when the ON lamp lights after flashing Do not perform any other operations until the machine completes the deep cleaning of the print head This takes about 3 minutes 3 Check the print...

Страница 66: ... need to prepare a single sheet of A4 or Letter sized plain paper including recycled paper Be sure to use paper that is white and clean on both sides 1 Make sure that the power is turned on 2 Load a single sheet of A4 or Letter sized plain paper in the rear tray 3 Pull out the paper output tray then open the output tray extension 4 Hold down the Stop button until the Alarm lamp flashes eight times...

Страница 67: ...rint head position adjustment will be complete when the ON lamp lights after flashing Remove the print head alignment sheet on the platen glass Important Do not open the document cover or move the print head alignment sheet on the platen glass until adjusting the print head position is complete If adjusting the print head position has failed the Alarm lamp flashes Press the Black or Color button t...

Страница 68: ...r Computer Windows Cleaning the Print Heads Cleaning the Paper Feed Rollers Aligning the Print Head Aligning the Print Head Position Automatically Aligning the Print Head Position Printing a Nozzle Check Pattern Cleaning Inside the Printer 68 ...

Страница 69: ...display the items you need to check before performing cleaning 3 Execute cleaning Make sure that the printer is on and then click Execute Print head cleaning starts 4 Complete cleaning The Nozzle Check dialog box opens after the confirmation message 5 Check the results To check whether the print quality has improved click Print Check Pattern To cancel the check process click Cancel If cleaning the...

Страница 70: ...rocess click Cancel Important Deep Cleaning consumes a larger amount of ink than Cleaning Cleaning the print head frequently will rapidly deplete your printer s ink supply Consequently perform cleaning only when necessary System Cleaning Execute System Cleaning if the status does not improve even after Deep Cleaning is performed 1 Open the printer driver setup window 2 Click System Cleaning on the...

Страница 71: ... rapidly deplete your printer s ink supply Therefore execute system cleaning only when necessary If System Cleaning is run when the remaining ink level is insufficient it may cause a failure Note If there is no sign of improvement after System Cleaning turn off the printer wait 24 hours and then perform Deep Cleaning again If there is still no sign of improvement the ink may have run out or the pr...

Страница 72: ...s of paper from the rear tray 2 Open the printer driver setup window 3 Click Roller Cleaning on the Maintenance tab The confirmation message appears 4 Execute paper feed roller cleaning Make sure that the printer is on and then click OK Paper feed roller cleaning starts 5 Complete paper feed roller cleaning After the rollers have stopped follow the instruction in the message load three sheets of p...

Страница 73: ...adjustment position are corrected and conditions such as color and line streaking are improved If the print results appear uneven because of line shifts or other conditions adjust the position of the print head On this printer you can adjust the print head either automatically or manually 73 ...

Страница 74: ... Click OK and when the confirmation message appears click OK 5 Click Print Head Alignment on the Maintenance tab The Start Print Head Alignment dialog box opens 6 Load paper in the printer Load two sheets of A4 size or Letter size plain paper into the rear tray 7 Execute head alignment Make sure that the printer is on and click Align Print Head Follow the instruction in the message Important Do no...

Страница 75: ...noticeable horizontal stripes A Least noticeable horizontal stripes B Most noticeable horizontal stripes 9 Confirm the displayed message and click OK The second pattern is printed Important Do not open the scanning unit cover while printing is in progress 10 Check the printed pattern Enter the numbers of the patterns with the least noticeable stripes in the associated boxes Even if the patterns wi...

Страница 76: ... the best pattern pick the setting that produces the least noticeable horizontal stripes A Least noticeable horizontal stripes B Most noticeable horizontal stripes Note To print and check the current setting open the Start Print Head Alignment dialog box and click Print Alignment Value 76 ...

Страница 77: ...tab The Start Print Head Alignment dialog box opens 3 Load paper in the printer Load one sheet of A4 size or Letter size plain paper into the rear tray Note The number of sheets to be used differs when you select the manual head alignment 4 Print head alignment pattern printing Make sure that the printer is on and click Align Print Head The adjustment pattern is printed Important Do not open the s...

Страница 78: ...k Items to display the items that you need to check before printing the nozzle check pattern 3 Load paper in the printer Load one sheet of A4 size or Letter size plain paper into the rear tray 4 Print a nozzle check pattern Make sure that the printer is on and click Print Check Pattern Printing of the nozzle check pattern begins Click OK when the confirmation message appears The Pattern Check dial...

Страница 79: ...tom Plate Cleaning 1 Open the printer driver setup window 2 Click Bottom Plate Cleaning on the Maintenance tab The Bottom Plate Cleaning dialog box opens 3 Load paper in the printer As instructed in the dialog box fold the A4 size or Letter size plain paper in half horizontally and then unfold the sheet Load the paper into the rear tray in the portrait orientation with the crest of the crease faci...

Страница 80: ...Cleaning Cleaning the Exterior of the Machine Cleaning the Platen Glass and Document Cover Cleaning the Paper Feed Roller Cleaning the Inside of the Machine Bottom Plate Cleaning 80 ...

Страница 81: ... before cleaning the machine Do not use tissue paper paper towels rough textured cloth or similar materials for cleaning so as not to scratch the surface Paper tissue powder or fine threads may remain inside the machine and cause problems such as print head blockage and poor printing results Never use volatile liquids such as thinners benzene acetone or any other chemical cleaner to clean the mach...

Страница 82: ...se problems such as print head blockage and poor printing results Never use volatile liquids such as thinners benzene acetone or any other chemical cleaner to clean the machine as this may cause a malfunction or damage the surface of the machine Use a soft clean lint free and dry cloth Wipe the platen glass A and the inner side of the document cover white sheet B gently Make sure not to leave any ...

Страница 83: ...tton until the Alarm lamp flashes eleven times then release it immediately The paper feed roller will rotate as it is cleaned without paper 3 Make sure that the paper feed roller has stopped rotating then load three sheets of A4 or Letter sized plain paper in the rear tray 4 Pull out the paper output tray then open the output tray extension 5 Hold down the Stop button until the Alarm lamp flashes ...

Страница 84: ...ay with the open side facing you 4 Pull out the paper output tray then open the output tray extension 5 Hold down the Stop button until the Alarm lamp flashes twelve times then release it immediately The paper cleans the inside of the machine as it feeds through the machine Check the folded parts of the ejected paper If they are smudged with ink perform Bottom Plate Cleaning again Note When perfor...

Страница 85: ...85 ...

Страница 86: ...Changing Printer Settings from Your Computer Mac OS Changing Settings from Operation Panel Initializing Machine Settings Ensuring Optimal Printing Results Ink Tips Printing Tips Be Sure to Make Paper Settings after Loading Paper Canceling a Print Job Machine Handling Precautions Keeping Print Quality High Transporting Your Printer Legal Restrictions on Scanning Copying Specifications 86 ...

Страница 87: ...Safety Safety Precautions Regulatory Information 87 ...

Страница 88: ...f the printer may cause injury For the printer s weight refer to the Specification Do not place any object on the printer Especially do not place metal objects paper clips staples etc or containers of flammable solvents alcohol thinners etc on top of the printer Do not transport or use the printer on a slant vertically or upside down as the ink may leak and damage the printer When loading a thick ...

Страница 89: ... receiver Connect the equipment into an outlet on a circuit different from that to which the receiver is connected Consult the dealer or an experienced radio TV technician for help Use of a shielded cable is required to comply with Class B limits in Subpart B of Part 15 of the FCC Rules Do not make any changes or modifications to the equipment unless otherwise specified in the manual If such chang...

Страница 90: ...lle für die Entsorgung von Elektro und Elektronik Altgeräten oder Ihrem örtlichen Entsorgungsunternehmen Weitere Informationen zur Rückgabe und Entsorgung von Elektro und Elektronik Altgeräten finden Sie unter www canon europe com weee Union Européenne Norvège Islande et Liechtenstein uniquement Ce symbole indique que ce produit ne doit pas être jeté avec les ordures ménagères conformément à la di...

Страница 91: ...ektrische en elektronische apparatuur naar www canon europe com weee Sólo para la Unión Europea y el Área Económica Europea Noruega Islandia y Liechtenstein Este símbolo indica que este producto no debe desecharse con los desperdicios domésticos de acuerdo con la directiva RAEE 2012 19 UE y con la legislación nacional Este producto debe entregarse en uno de los puntos de recogida designados como p...

Страница 92: ...atura elettrica al momento dell acquisto di una nuova o un impianto autorizzato al riciclaggio dei rifiuti di apparecchiature elettriche ed elettroniche La gestione impropria di questo tipo di rifiuti può avere un impatto negativo sull ambiente e sulla salute umana causato dalle sostanze potenzialmente pericolose che potrebbero essere contenute nelle apparecchiature elettriche ed elettroniche Un c...

Страница 93: ... om returnering og genanvendelse af affald af elektrisk og elektronisk udstyr får du ved at besøge www canon europe com weee Μόνο για την Ευρωπαϊκή Ένωση και τον ΕΟΧ Νορβηγία Ισλανδία και Λιχτενστάιν Αυτό το σύμβολο υποδηλώνει ότι αυτό το προϊόν δεν πρέπει να απορρίπτεται μαζί με τα οικιακά απορρίμματα σύμφωνα με την Οδηγία σχετικά με τα Απόβλητα Ηλεκτρικού και Ηλεκτρονικού Εξοπλισμού ΑΗΗΕ 2012 19...

Страница 94: ...iikkalaiteromun keräyspisteeseen Sähkö ja elektroniikkalaiteromun virheellinen käsittely voi vahingoittaa ympäristöä ja ihmisten terveyttä koska laitteet saattavat sisältää ympäristölle ja terveydelle haitallisia aineita Lisäksi tuotteen asianmukainen hävittäminen säästää luonnonvaroja Lisätietoja sähkö ja elektroniikkalaiteromun keräyspisteistä saat kaupunkien ja kuntien tiedotuksesta jätehuoltov...

Страница 95: ... odvoz komunálního odpadu Další informace týkající se vracení a recyklace OEEZ naleznete na adrese www canon europe com weee Csak az Európai Unió és az EGT Norvégia Izland és Liechtenstein országaiban Ez a szimbólum azt jelzi hogy a helyi törvények és a WEEE irányelv 2012 19 EU szerint a termék nem kezelhető háztartási hulladékként A terméket a kijelölt nyilvános gyűjtőpontokon kell leadni például...

Страница 96: ...nto produkt nesmie likvidovať spolu s komunálnym odpadom Produkt je potrebné odovzdať do určenej zberne napr prostredníctvom výmeny za kúpu nového podobného produktu alebo na autorizované zberné miesto ktoré spracúva odpad z elektrických a elektronických zariadení EEZ Nesprávna manipulácia s takýmto typom odpadu môže mať negatívny vplyv na životné prostredie a ľudské zdravie pretože elektrické a e...

Страница 97: ...ymo Šį gaminį reikia atiduoti į tam skirtą surinkimo punktą pvz pagal patvirtintą keitimo sistemą kai perkamas panašus gaminys arba į elektros ir elektroninės įrangos EEĮ atliekų perdirbimo punktą Netinkamas tokios rūšies atliekų tvarkymas dėl elektros ir elektroninėje įrangoje esančių pavojingų medžiagų gali pakenkti aplinkai ir žmonių sveikatai Padėdami užtikrinti tinkamą šio gaminio šalinimo tv...

Страница 98: ...адъци За повече информация относно връщането и рециклирането на продукти от излязло от употреба ЕЕО посетете www canon europe com weee Doar pentru Uniunea Europeană şi EEA Norvegia Islanda şi Liechtenstein Acest simbol indică faptul că acest produs nu trebuie aruncat o dată cu reziduurile menajere în conformitate cu Directiva DEEE Directiva privind deşeurile de echipamente electrice şi electronice...

Страница 99: ...anje za reciklažu istrošene električne i elektronske opreme EEE Nepravilno rukovanje ovom vrstom otpada može da ima moguće negativne posledice po životnu sredinu i ljudsko zdravlje usled potencijalno opasnih materijala koji se uglavnom vezuju za EEE U isto vreme vaša saradnja na ispravnom odlaganju ovog proizvoda će doprineti efikasnom korišćenju prirodnih resursa Za više informacija o tome gde mo...

Страница 100: ...certified to an environmental stewardship scheme which complies with EN12281 or a similar quality standard In addition it can support printing on media down to a weight of 64g m2 lighter paper means less resources used and a lower environmental footprint for your printing needs 100 ...

Страница 101: ...Main Components and Their Use Main Components Power Supply 101 ...

Страница 102: ...Main Components Front View Rear View Inside View Operation Panel 102 ...

Страница 103: ...h sides of the paper stack 4 rear tray Load paper here Two or more sheets of the same size and type of paper can be loaded at the same time and fed automatically one sheet at a time Loading Plain Paper Photo Paper Loading Envelopes 5 paper output tray Printed paper is ejected Open before printing 6 output tray extension Open to support ejected paper 103 ...

Страница 104: ... 7 platen glass Load an original here 8 operation panel Use to change the settings of the machine or to operate it Operation Panel 104 ...

Страница 105: ...o connect the machine with a computer Important Do not touch the metal casing Do not plug in or unplug the USB cable while the machine is printing or scanning originals with the computer 2 power cord connector Plug in the supplied power cord 105 ...

Страница 106: ... ink tanks or to remove jammed paper 3 ink tanks The black ink tank is on the right and the color ink tanks cyan magenta and yellow are on the left If any ink levels are low refill the low tanks 4 cartridge holder Install the cartridge here Note For details on refilling ink tanks see Refilling Ink Tanks 106 ...

Страница 107: ...lashes The machine is getting ready to print or printing is in progress Alarm lamp flashes An error has occurred and the machine is not ready to print ON lamp flashes and Alarm lamp flashes alternately An error that requires contacting the service center may have occurred An Error Occurs 3 Alarm lamp Lights or flashes when an error occurs When performing machine maintenance or machine settings opt...

Страница 108: ...pying You can also press this button to finalize your selection for the setting item 7 Color button Starts color copying You can also press this button to finalize your selection for the setting item In the software applications or manuals the Color and Black buttons are collectively called the Start or OK button 108 ...

Страница 109: ...Power Supply Confirming that the Power Is On Turning the Machine On and Off Notice for the Power Plug Power Cord Notice for Unplugging the Power Cord 109 ...

Страница 110: ...Confirming that the Power Is On The ON lamp is lit when the machine is turned on Note It may take a while for the machine to start printing immediately after you turn on the machine 110 ...

Страница 111: ...mp lights up or flashes see An Error Occurs You can set the machine to automatically turn on when a print or scan operation is performed This feature is set to off by default Managing the Printer Power Windows Managing the Printer Power Mac OS Turning off the machine 1 Press the ON button to turn off the machine When the ON lamp stops flashing the machine is turned off Important When you unplug th...

Страница 112: ...o automatically turn off when no operations are performed or no print jobs are sent to the machine for a certain interval This feature is set to on by default Managing the Printer Power Windows Managing the Printer Power Mac OS 112 ...

Страница 113: ...er cord is hot The power plug power cord is rusty The power plug power cord is bent The power plug power cord is worn The power plug power cord is split Caution If you find anything unusual with the power plug power cord described above unplug the power cord and call for service Using the machine with one of the unusual conditions above may cause a fire or an electric shock 113 ...

Страница 114: ...m that the ON lamp is off Unplugging the power cord while the ON lamp is lit or flashing may cause drying or clogging of the print head and print quality may be reduced 1 Press the ON button to turn the machine off 2 Confirm that the ON lamp is off 3 Unplug the power cord The specification of the power cord differs depending on the country or region of use 114 ...

Страница 115: ...Changing Settings Changing Printer Settings from Your Computer Windows Changing Printer Settings from Your Computer Mac OS Changing Settings from Operation Panel Initializing Machine Settings 115 ...

Страница 116: ...Computer Windows Changing the Print Options Registering a Frequently Used Printing Profile Changing the remaining ink level notification setting Managing the Printer Power Reducing the Printer Noise Changing the Printer Operation Mode 116 ...

Страница 117: ...ta being cut off The procedure for changing the print options is as follows 1 Open the printer driver setup window 2 Click Print Options on the Page Setup tab The Print Options dialog box opens Note When you use the XPS printer driver the functions available to you are different 3 Change the individual settings If necessary change the setting of each item and then click OK The Page Setup tab is di...

Страница 118: ... a printing profile is as follows Registering a Printing Profile 1 Open the printer driver setup window 2 Set the necessary items From Commonly Used Settings on the Quick Setup tab select the printing profile to be used and if necessary change the settings after Additional Features You can also register necessary items on the Main and Page Setup tabs 3 Click Save The Save Commonly Used Settings di...

Страница 119: ...ver version the print settings that are already registered will be deleted from Commonly Used Settings Registered print settings cannot be saved and preserved If a profile is deleted register the print settings again Deleting Unnecessary Printing Profile 1 Select the printing profile to be deleted Select the printing profile you want to delete from the Commonly Used Settings list on the Quick Setu...

Страница 120: ...he error message from being displayed Then click Set to apply the selected setting Important Before enabling Function for Notifying the Remaining Ink Level replenish all inks to the upper limit line and reset the remaining ink level count by running Resets the Remaining Ink Level Count However if you reset the count by operating the operation panel of the printer the setting in the printer driver ...

Страница 121: ...nction automatically turns off the printer when there are no operations from the printer driver or the printer for a specified period of time 1 Open the printer driver setup window 2 Make sure that the printer is on and then click Auto Power on the Maintenance tab The Auto Power Settings dialog box opens Note If the printer is off or if communication between the printer and the computer is disable...

Страница 122: ...u want to disable this function select Disable from the list according to the same procedure Note When the printer is turned off the Canon IJ Status Monitor message varies depending on the Auto Power On setting When the setting is Enable Printer is standing by is displayed When the setting is Disable Printer is offline is displayed 122 ...

Страница 123: ...et mode Select this option when you wish to reduce the operating noise of the printer Use quiet mode during specified hours Select this option when you wish to reduce the operating noise of the printer during a specified period of time Set the Start time and the End time of the quiet mode you wish to be activated If both are set to the same time the quiet mode will not function Important You can s...

Страница 124: ...Note The effects of the quiet mode may be less depending on the print quality settings 124 ...

Страница 125: ...he Maintenance tab is set to automatic head alignment but you can change it to manual head alignment If the printing results of automatic print head alignment are not satisfactory perform manual head alignment Check this check box to perform the manual head alignment Uncheck this check box to perform the automatic head alignment Rotate 90 degrees left when orientation is Landscape On the Page Setu...

Страница 126: ...e ink drying wait time Reducing the ink drying wait time speeds up printing 4 Apply the settings Click OK and when the confirmation message appears click OK The printer operates with the modified settings hereafter 126 ...

Страница 127: ...Changing Settings from Operation Panel Quiet setting Turning on off Machine Automatically 127 ...

Страница 128: ...ress Color button To disable the function press the Black button Important Operating speed is reduced compared to when the quiet mode is not selected Note You can set the quiet mode from the operation panel of the machine or the machine driver No matter how you set the quiet mode the mode is applied when you perform operations from the operation panel of the machine or printing and scanning from t...

Страница 129: ...rform printing or scanning operations from the computer For Windows you can select whether you turn the machine on automatically from ScanGear scanner driver Turning off Machine Automatically You can enable the machine to turn off automatically when no operation is made or no printing data is sent to the machine for a specified period of time 1 Make sure machine is turned on 2 Press and hold Stop ...

Страница 130: ... machine settings press and hold the Stop button and release it when the Alarm lamp flashes 24 times All the machine settings are initialized After initializing the machine perform setup again as necessary Note You cannot set the current position of the print head back to the default 130 ...

Страница 131: ...g Optimal Printing Results Ink Tips Printing Tips Be Sure to Make Paper Settings after Loading Paper Canceling a Print Job Machine Handling Precautions Keeping Print Quality High Transporting Your Printer 131 ...

Страница 132: ...ts condition When the printer performs cleaning a small amount of ink is consumed In this case all colors of ink may be consumed Cleaning function The cleaning function helps the printer to suck air bubbles or ink itself from the nozzle and thus prevents print quality degradation or nozzle clogging Does black and white printing use color ink Black and white printing may use ink other than black in...

Страница 133: ... paper or performing borderless printing the area where papers go through may get smeared with ink Clean the inside of your machine with Bottom Plate Cleaning Check how to load the paper correctly Is the paper loaded in the correct orientation To load paper in the rear tray load paper WITH THE PRINTING SIDE FACING YOU Loading Paper Is the paper curled The curled paper causes paper jam Flatten the ...

Страница 134: ...lts Are Unsatisfactory There are various types of paper paper with special coating on the surface for printing photos with optimal quality and paper suitable for documents Each media type has specific preset settings such as how ink is used and sprayed distance from nozzles etc so that you can print on that type with optimal image quality This allows you to print with the settings best suited for ...

Страница 135: ...r press the ON button If you press the ON button while printing is in progress the print data sent from the computer queues in the machine and you may not be able to continue to print Press the Stop button to cancel printing 135 ...

Страница 136: ... any object on the document cover Do not place any object on the document cover It will fall into the rear tray when the document cover is opened and cause the machine to malfunction Also place the machine where objects will not fall on it 136 ...

Страница 137: ...press the ON button to turn off the power the machine caps the print head nozzles automatically to prevent from drying If you unplug the power cord from the wall outlet before the ON lamp is turned off the print head will not be capped properly and this will cause drying or clogging When unplugging the power cord make sure that the ON lamp is not lit Print periodically Just as the tip of a felt pe...

Страница 138: ...print head thus preventing it from drying Do not remove the cartridge Ink may leak When transporting the machine pack the machine in a plastic bag so that ink does not leak When a shipping agent is handling transport of the machine have its box marked THIS SIDE UP to keep the machine with its bottom facing down Mark also with FRAGILE or HANDLE WITH CARE 1 Make sure the machine is on 2 Hold down th...

Страница 139: ...nplug the power cord from the machine 6 Use adhesive tape to secure all the covers on the machine to keep them from opening during transportation Then pack the machine in the plastic bag 7 Attach the protective material to the machine when packing the machine in the box 139 ...

Страница 140: ...Certificates of deposit Postage stamps canceled or uncanceled Identifying badges or insignias Selective service or draft papers Checks or drafts issued by governmental agencies Motor vehicle licenses and certificates of title Traveler s checks Food stamps Passports Immigration papers Internal revenue stamps canceled or uncanceled Bonds or other certificates of indebtedness Stock certificates Copyr...

Страница 141: ...onditions Recommended conditions Temperature 59 to 86 F 15 to 30 C Humidity 10 to 80 RH no condensation For the temperature and humidity conditions of papers such as photo paper refer to the paper s packaging or the supplied instructions Storage environment Temperature 32 to 104 F 0 to 40 C Humidity 5 to 95 RH no condensation Power supply AC 100 240 V 50 60 Hz Power consumption Printing Copy Appro...

Страница 142: ... Gray 16 bit 8 bit Color 48 bit 24 bit RGB each 16 bit 8 bit Minimum System Requirements Conform to the operating system s requirements when higher than those given here Windows Operating System Windows 10 Windows 8 1 Windows 8 Windows 7 Windows 7 SP1 Windows Vista SP2 Windows XP SP3 32 bit only Windows 8 1 includes Windows 8 1 Update Hard Disk Space 3 1 GB Note For bundled software installation T...

Страница 143: ...tware installation Windows Internet Explorer 8 9 10 or 11 is required to install Easy WebPrint EX Windows Some functions may not be available with Windows Media Center Windows NET Framework 4 or 4 5 must be installed to use the Windows software Windows XPS Essentials Pack is required to print on Windows XP Windows The TWAIN driver ScanGear is based on the TWAIN 1 9 Specification and requires the D...

Страница 144: ...Information about Paper Media Types You Can Use Paper Load Limit Media Types You Cannot Use Printing Area Printing Area Other Sizes than Letter Legal Envelopes Letter Legal Envelopes 144 ...

Страница 145: ...ine paper access our website Note You may not be able to purchase some Canon genuine papers depending on the country or region of purchase Paper is not sold in the US by Model Number Purchase paper by name Paper for printing documents Canon Red Label Superior WOP111 1 Canon Océ Office Colour Paper SAT213 1 Paper for printing photos Glossy Photo Paper Everyday Use GP 501 Photo Paper Glossy GP 701 P...

Страница 146: ... size 2 17 x 3 50 inches 55 0 x 89 0 mm Maximum size 8 50 x 26 61 inches 215 9 x 676 0 mm Paper Weight You can use paper in the following weight range 17 to 28 lb 64 to 105 g m2 plain paper except for Canon genuine paper Do not use heavier or lighter paper except for Canon genuine paper as it could jam in the machine Notes on Storing Paper Take out only the necessary number of paper from the packa...

Страница 147: ...100 sheets Approx 50 sheets Canon Océ Office Colour Paper SAT213 Approx 80 sheets Approx 50 sheets Paper for printing photos Media Name Model No Rear Tray Glossy Photo Paper Everyday Use GP 501 3 10 sheets A4 Letter 20 sheets 4 x 6 10 x 15 cm Photo Paper Glossy GP 701 3 10 sheets A4 Letter 20 sheets 4 x 6 10 x 15 cm Photo Paper Plus Glossy II PP 201 3 10 sheets A4 Letter 5 x 7 13 x 18 cm 8 x 10 20...

Страница 148: ... or environmental conditions either very high or low temperature or humidity In such cases reduce the number of paper you load at a time to less than half 2 We recommend that you remove the previously printed paper or envelope from the paper output tray before continuously printing to avoid blurs and discoloration 3 When loading paper in stacks the print side may become marked as it is fed or pape...

Страница 149: ...er weighing more than 28 lb 105 g m2 except for Canon genuine paper Plain paper or notepad paper cut to a small size when printing on paper smaller than A5 Picture postcards Postcards affixed with photos or stickers Envelopes with a double flap Envelopes with an embossed or treated surface Envelopes whose gummed flaps are already moistened and adhesive Any type of paper with holes Paper that is no...

Страница 150: ...Printing Area Printing Area Other Sizes than Letter Legal Envelopes Letter Legal Envelopes 150 ...

Страница 151: ...y Photo Paper Everyday Use GP 501 Photo Paper Glossy GP 701 Photo Paper Plus Glossy II PP 201 Photo Paper Plus Glossy II PP 301 Photo Paper Pro Luster LU 101 Photo Paper Plus Semi gloss SG 201 Matte Photo Paper MP 101 Performing Borderless Printing on any other type of paper may substantially reduce printing quality and or result in printouts with altered color hues Borderless Printing on plain pa...

Страница 152: ...inches 120 2 x 169 8 mm 8 x 10 20 x 25 cm 7 73 x 9 69 inches 196 4 x 246 0 mm Square 5 x 5 13 x 13 cm 4 53 x 4 53 inches 115 0 x 115 0 mm Card 2 17 x 3 58 55 x 91 mm 1 89 x 3 26 inches 48 2 x 83 0 mm Recommended printing area A 1 23 inches 31 2 mm B 1 28 inches 32 5 mm Printable area Other than Square size C 0 12 inch 3 0 mm D 0 20 inch 5 0 mm E 0 13 inch 3 4 mm F 0 13 inch 3 4 mm Square size C 0 ...

Страница 153: ...etter 8 00 x 10 69 inches 203 2 x 271 4 mm Legal 8 00 x 13 69 inches 203 2 x 347 6 mm Recommended printing area A 1 23 inches 31 2 mm B 1 28 inches 32 5 mm Printable area C 0 12 inch 3 0 mm D 0 20 inch 5 0 mm E 0 25 inch 6 4 mm F 0 25 inch 6 3 mm 153 ...

Страница 154: ...ting Area width x height Envelope DL 4 06 x 7 20 inches 103 2 x 183 0 mm Envelope Com 10 3 85 x 8 04 inches 97 9 x 204 3 mm Recommended printing area A 0 31 inch 8 0 mm B 1 14 inches 29 0 mm C 0 13 inch 3 4 mm D 0 13 inch 3 4 mm 154 ...

Страница 155: ...haracters Model whose serial number is used as the administrator password For the models other than the above the printer serial number is used as the administrator password Where Serial Number Is Located The following character restrictions apply to the password that you change Set the password by using 4 to 32 characters The allowed characters are single byte alphanumeric characters For security...

Страница 156: ...ding on the printer you are using For security reasons we recommend you change the password Note Use an OS or web browser below to use Remote UI iOS devices OS iOS 6 1 or later Browser Default browser of iOS device Mobile Safari Android devices OS Android 2 3 3 or later Browser Default browser of Android device browser or Chrome Mac OS devices OS Mac OS X v 10 6 or later Browser Safari 5 1 or late...

Страница 157: ...rs four alphabets followed by five numbers Example Note The printer serial number is written on the warranty Depending on the printer you are using you can check the serial number by printing out the network setting information of the printer For more on printing search for NR044 on your printer s Online Manual and see the instructions shown 157 ...

Страница 158: ...eries Model name Using the card slot via a network MG7700 ser ies MG7500 ser ies MG7100 ser ies MG6900 ser ies MG6800 ser ies MG6700 ser ies MG6600 ser ies MG6500 ser ies MG6400 ser ies MG5700 ser ies No card slot MG5600 ser ies No card slot MG5500 ser ies No card slot MG3600 ser ies No card slot MG3500 ser ies No card slot MG2900 ser ies No card slot MG2500 ser ies No card slot MG2400 ser ies No ...

Страница 159: ...O series G series Model name Using the card slot via a network MX series No card slot MB series No card slot E series No card slot P series No card slot iP series No card slot iX series No card slot iB series No card slot PRO series No card slot G series No card slot 159 ...

Страница 160: ...Printing Printing from Computer 160 ...

Страница 161: ...Printing from Computer Printing from Application Software Windows Printer Driver Printing from Application Software Mac OS Printer Driver Printing Using Canon Application Software 161 ...

Страница 162: ... Printer Driver Printing with Easy Setup Basic Various Printing Methods Changing the Print Quality and Correcting Image Data Overview of the Printer Driver Printer Driver Description Updating the MP Drivers Sharing the Printer on a Network 162 ...

Страница 163: ...Open the printer driver setup window 4 Select a frequently used profile In Commonly Used Settings on the Quick Setup tab select a printing profile suited for the purpose When you select a printing profile the Additional Features Media Type and Printer Paper Size settings are automatically switched to the values that were preset 5 Select the print quality For Print Quality select High Standard or D...

Страница 164: ... The print quality settings that can be selected may differ depending on a printing profile 6 Complete the setup Click OK When you execute print the document is printed with settings that match your purpose 164 ...

Страница 165: ...ent Settings check box all settings specified on the Quick Setup Main and Page Setup tabs are saved and you can print with the same settings from the next time as well In the Commonly Used Settings window click Save to register the specified settings 165 ...

Страница 166: ... driver Photo Paper Pro Luster LU 101 Photo Paper Pro Luster Photo Paper Plus Semi gloss SG 201 Photo Paper Plus Semi gloss Photo Paper Glossy GP 501 GP 601 Glossy Photo Paper Matte Photo Paper MP 101 Matte Photo Paper Canon genuine papers Business Letter Printing Media name Model No Media Type in the printer driver High Resolution Paper HR 101N High Resolution Paper Canon genuine papers Original ...

Страница 167: ... Printing Scaled Printing Page Layout Printing Tiling Poster Printing Booklet Printing Duplex Printing Stamp Background Printing Registering a Stamp Registering Image Data to be Used as a Background Setting Up Envelope Printing Displaying the Print Results before Printing Setting Paper Dimensions Custom Size Editing the Print Document or Reprinting from the Print History 167 ...

Страница 168: ... the printer driver setup window 2 Select the paper size Select a page size from the Page Size list on the Page Setup tab 3 Set Orientation Select Portrait or Landscape for Orientation Check Rotate 180 degrees check box when you want to perform printing with the original being rotated 180 degrees 4 Complete the setup Click OK When you execute print the document will be printed with the selected pa...

Страница 169: ...cify the number of copies to be printed 3 Specify the print order Check the Print from Last Page check box when you want to print from the last page in order and uncheck the check box when you want to print from the first page Check the Collate check box when you are printing multiple copies of a document and want to print out all pages in each copy together Uncheck this check box when you want to...

Страница 170: ...tion software and this printer driver the number of copies may be multiplied numbers of the two settings or the specified printing order may not be enabled Print from Last Page appears grayed out and is unavailable when Tiling Poster is selected for Page Layout When Booklet is selected for Page Layout Print from Last Page and Collate appear grayed out and cannot be set When Duplex Printing Manual ...

Страница 171: ...be stapled Check the position of the stapling margin from Stapling Side on the Page Setup tab The printer analyzes the Orientation and Page Layout settings and automatically selects the best staple position When you want to change the setting select from the list 3 Set the margin width If necessary click Specify Margin and set the margin width and then click OK 171 ...

Страница 172: ...ou execute print the data is printed with the specified staple side and margin width Important Stapling Side and Specify Margin appear grayed out and are unavailable when Borderless Tiling Poster or Booklet is selected for Page Layout Scaled is selected for Page Layout When Duplex Printing Manual is also selected only Stapling Side can be specified 172 ...

Страница 173: ... as a photo without providing any margin around it set borderless printing The procedure for performing borderless printing is as follows You can also set borderless printing in Additional Features on the Quick Setup tab Setting Borderless Printing 1 Open the printer driver setup window 2 Set borderless printing Select Borderless from the Page Layout list on the Page Setup tab Click OK when the co...

Страница 174: ...ual Stapling Side settings and the Stamp Background Stamp button on the Page Setup tab appear grayed out and are unavailable When Envelope or High Resolution Paper is selected from the Media Type list on the Main tab you cannot perform borderless printing Depending on the type of the media used during borderless printing the print quality may deteriorate at the top and bottom of the sheet or stain...

Страница 175: ...eft Important When the amount of extension is decreased an unexpected margin may be produced on the print depending on the size of the paper Note When the Amount of Extension slider is set to the leftmost position image data will be printed in the full size When Preview before printing is checked on the Main tab you can confirm whether there will be no margin before printing 175 ...

Страница 176: ...ayout list on the Page Setup tab 3 Select the paper size of the document Using Page Size select the page size that is set with your application software 4 Select the print paper size Select the size of the paper loaded in the printer from the Printer Paper Size list When the Printer Paper Size is smaller than the Page Size the page image will be reduced When the Printer Paper Size is larger than t...

Страница 177: ...nt settings are displayed in the settings preview on the left side of the printer driver 5 Complete the setup Click OK When you execute print the document will be enlarged or reduced to fit to the page size 177 ...

Страница 178: ...e Page Setup tab 3 Select the paper size of the document Using Page Size select the page size that is set with your application software 4 Set the scaling rate by using one of the following methods Select a Printer Paper Size When the printer paper size is smaller than the Page Size the page image will be reduced When the printer paper size is larger than the Page Size the page image will be enlar...

Страница 179: ... in a value into the Scaling box The current settings are displayed in the settings preview on the left side of the printer driver 5 Complete the setup Click OK When you execute print the document will be printed with the specified scale 179 ...

Страница 180: ... used to create the original has the scaled printing function configure the settings on your application software You do not need to configure the same setting in the printer driver Note Selecting Scaled changes the printable area of the document 180 ...

Страница 181: ...ect Page Layout from the Page Layout list on the Page Setup tab The current settings are displayed in the settings preview on the left side of the printer driver 3 Select the print paper size Select the size of the paper loaded in the printer from the Printer Paper Size list 4 Set the number of pages to be printed on one sheet and the page order If necessary click Specify specify the following set...

Страница 182: ...To change the page arrangement order select a placement method from the list Page Border To print a page border around each document page check this check box 5 Complete the setup Click OK on the Page Setup tab When you execute print the specified number of pages will be arranged on each sheet of paper in the specified order 182 ...

Страница 183: ...The procedure for performing tiling poster printing is as follows Setting Tiling Poster Printing 1 Open the printer driver setup window 2 Set tiling poster printing Select Tiling Poster from the Page Layout list on the Page Setup tab The current settings are displayed in the settings preview on the left side of the printer driver 3 Select the print paper size Select the size of the paper loaded in...

Страница 184: ...perating environments are used Print Cut Paste lines in margins To leave out cut lines uncheck this check box Print page range Specifies the printing range Select All under normal circumstances To reprint only a specific page select Pages and enter the page number you want to print To specify multiple pages enter the page numbers by separating them with commas or by entering a hyphen between the p...

Страница 185: ...displayed Note Click the deleted pages to display them again Right click the settings preview to select Print all pages or Delete all pages 2 Complete the setup After completing the page selection click OK When you execute print only specified pages will be printed Important Since tiling poster printing enlarges the document when printing it the print results may become coarse 185 ...

Страница 186: ...let printing is as follows 1 Open the printer driver setup window 2 Set booklet printing Select Booklet from the Page Layout list on the Page Setup tab The current settings are displayed in the settings preview on the left side of the window 3 Select the print paper size Select the size of the paper loaded in the printer from the Printer Paper Size list 4 Set the margin for stapling and the margin...

Страница 187: ...ox 5 Complete the setup Click OK on the Page Setup tab When you execute print the document will be printed on one side of a sheet of paper When the printing of one side is complete set the paper correctly by following the message and click OK When the printing of the other side is complete fold the paper at the center of the margin and make a booklet Important Booklet cannot be selected when a med...

Страница 188: ...Duplex Printing Manual check box on the Page Setup tab 3 Select the layout Select Normal size Fit to Page Scaled or Page Layout from the Page Layout list 4 Specify the side to be stapled The best Stapling Side is selected automatically from the Orientation and Page Layout settings To change the setting select another stapling side from the list 5 Set the margin width If necessary click Specify Mar...

Страница 189: ... other than Plain Paper is selected from Media Type on the Main tab Duplex Printing Manual appears grayed out and is unavailable When Borderless Tiling Poster or Booklet is selected from the Page Layout list Duplex Printing Manual and Stapling Side appear grayed out and are unavailable Note If the back side of the paper becomes smudged during duplex printing perform Bottom Plate Cleaning in the Ma...

Страница 190: ... to print date time and user name The Background function allows you to print a light illustration behind the document data The procedure for performing stamp background printing is as follows Printing a Stamp CONFIDENTIAL IMPORTANT and other stamps that are used often in companies are pre registered 1 Open the printer driver setup window 2 Click Stamp Background Stamp on the Page Setup tab The St...

Страница 191: ...s check box is unchecked the stamp is printed behind the document data and may be hidden in the overlapping sections depending on the application software used Place stamp over text cannot be used when the XPS printer driver is used When the XPS printer driver is used the stamp is normally printed in the foreground of the document Print semitransparent stamp Check this check box to print a semi tr...

Страница 192: ...kground click this Background first page only To print the background only on the first page check this check box 5 Complete the setup Click OK on the Page Setup tab When you execute print the data is printed with the specified background Important When Borderless is selected the Stamp Background Stamp button appears grayed out and is unavailable Note The stamp and background are not printed on bl...

Страница 193: ...of an existing stamp Unnecessary stamps can be deleted at any time The procedure for registering a new stamp is as follows Registering a New Stamp 1 Open the printer driver setup window 2 Click Stamp Background Stamp on the Page Setup tab The Stamp Background Stamp dialog box opens Note With the XPS printer driver the Stamp Background button has become the Stamp button and only the stamp function ...

Страница 194: ...er Name the creation date time and user name of the printed object are displayed in Stamp Text If necessary change the settings of TrueType Font Style Size and Outline You can select the color of the stamp by clicking Select Color Important Stamp Text appears grayed out and is unavailable when Date Time User Name is selected Placement tab Select the stamp position from the Position list You can al...

Страница 195: ...og box opens 3 Configure the stamp while viewing the preview window 4 Overwrite save the stamp Click Save overwrite on the Save settings tab When you want to save the stamp with a different title type a new title in the Title box and click Save Click OK when the confirmation message appears 5 Complete the setup Click OK The Stamp Background Stamp dialog box opens again The registered title appears...

Страница 196: ...er some of the settings of an existing background An unnecessary background can be deleted The procedure for registering image data to be used as a background is as follows Registering New Background 1 Open the printer driver setup window 2 Click Stamp Background on the Page Setup tab The Stamp Background dialog box opens Note With the XPS printer driver the Stamp Background button has become the ...

Страница 197: ...kground image data with the Intensity slider Moving the slider to the right darkens the background and moving the slider to the left lightens the background To print the background at the original bitmap intensity move the slider to the rightmost position 6 Save the background Click the Save settings tab and enter a title in the Title box and then click Save Click OK when the confirmation message ...

Страница 198: ...he Title box and click Save Click OK when the confirmation message appears 5 Complete the setup Click OK then it returns to Stamp Background dialog box The registered title appears in the Background list Deleting an Unnecessary Background 1 Click Select Background in the Stamp Background dialog box The Background Settings dialog box opens 2 Select the background to be deleted Select the title of t...

Страница 199: ... Settings on the Quick Setup tab 4 Select the paper size When the Envelope Size Setting dialog box is displayed select Envelope Com 10 Envelope DL Yougata 4 4 13 x9 25 or Yougata 6 3 86 x7 48 and then click OK 5 Set the orientation To print the addressee horizontally select Landscape for Orientation 6 Select the print quality Select High or Standard that matches your purpose for Print Quality 7 Co...

Страница 200: ...e messages are displayed To hide the guide messages check the Do not show this message again check box To show the guide again click the View Printer Status button on the Maintenance tab and start the Canon IJ Status Monitor Then click Envelope Printing from Display Guide Message of the Option menu to enable the setting 200 ...

Страница 201: ...ults display on the Quick Setup tab 1 Open the printer driver setup window 2 Set the preview Check the Preview before printing check box on the Main tab 3 Complete the setup Click OK When you execute print the Canon IJ Preview opens and displays the print results Important In the Manual Color Adjustment dialog box the Color Adjustment tab contains the Print a pattern for color adjustment check box...

Страница 202: ...a custom size in Printer Paper Size on the Quick Setup tab 1 Open the printer driver setup window 2 Select the paper size Select Custom for Page Size on the Page Setup tab The Custom Paper Size dialog box opens 3 Set the custom paper size Specify Units and enter the Width and Height of the paper to be used Then click OK 4 Complete the setup Click OK on the Page Setup tab When you execute print the...

Страница 203: ...the values If the application software does not have such a function or if the document does not print correctly perform the above procedure from the printer driver to set the values Printing may be disabled depending on the size of the specified user defined media For information about printable sizes for user defined media see Supported Media Types 203 ...

Страница 204: ...ieve the document print history to print the document The procedure for using the Canon IJ XPS Preview is as follows Print Combine Documents Delete Document Reset Documents View Thumbnails Move Document Undo Move Page Delete Page Note By clicking View Thumbnails you can display or hide thumbnails of the print documents selected in the Document Name list Clicking Undo reverses the change that just ...

Страница 205: ...se to select multiple documents When you combine documents the documents selected before the combining are deleted from the list and the combined document is added to the list Changing the sequence of print documents or print pages To change the sequence of the print documents go to the Document Name list and select the print document to be moved Next on the Edit menu select Move Document from Doc...

Страница 206: ...ults for certain print pages Check the preview before printing Depending on the print settings of the print document some functions may not be available in the Canon IJ XPS preview Note You can rename Document Name to any name 5 Executing print Click Print When you execute print the printer uses the specified settings to print the data Reprinting from the Print History When you click Save Print Hi...

Страница 207: ...Related Topic Displaying the Print Results before Printing 207 ...

Страница 208: ...ing Color Correction Optimal Photo Printing of Image Data Adjusting Colors with the Printer Driver Printing with ICC Profiles Adjusting Color Balance Adjusting Color Balance Using Sample Patterns Printer Driver Adjusting Brightness Adjusting Intensity Adjusting Contrast Adjusting Intensity Contrast Using Sample Patterns Printer Driver 208 ...

Страница 209: ...the Main tab select Custom for Print Quality and click Set The Custom dialog box opens 3 Setting the print quality level Drag the slider bar to select the print quality level and click OK 4 Complete the setup Click OK on the Main tab When you execute print the image data is printed with the selected print quality level Important Certain print quality levels cannot be selected depending on the sett...

Страница 210: ...Related Topics Specifying Color Correction Adjusting Color Balance Adjusting Brightness Adjusting Intensity Adjusting Contrast 210 ...

Страница 211: ...ox on the Main tab 3 Complete the setup Click OK When you execute print the document is converted to grayscale data It allows you to print the color document in monochrome Important When the Grayscale Printing check box is checked the printer driver processes image data as sRGB data In this case actual colors printed may differ from those in the original image data When using the grayscale printin...

Страница 212: ...Note During Grayscale Printing inks other than black ink may be used as well 212 ...

Страница 213: ...e an application software to specify a printing ICC profile select None The procedure for specifying color correction is as follows You can also set color correction on the Quick Setup tab by choosing Photo Printing under Commonly Used Settings and then choosing Color Intensity Manual Adjustment under Additional Features 1 Open the printer driver setup window 2 Select the manual color adjustment O...

Страница 214: ... an application software to print data 4 Complete the setup Click OK on the Main tab When you execute print the document data is printed with the specified color correction Important When ICM is disabled in the application software ICM is unavailable for Color Correction and the printer may not be able to print the image data properly When the Grayscale Printing check box on the Main tab is checke...

Страница 215: ...tion software to be used There are two typical printing methods Check the color space sRGB of the image data and the application software to be used and then select the printing method suited to your purpose Adjusting Colors with the Printer Driver Describes the procedure for printing sRGB data by using the color correction function of the printer driver To print using Canon Digital Photo Color Th...

Страница 216: ...driver is as follows 1 Open the printer driver setup window 2 Select the manual color adjustment On the Main tab select Manual for Color Intensity and click Set The Manual Color Adjustment dialog box opens 3 Select color correction Click Matching tab and select Driver Matching for Color Correction 4 Set the other items If necessary click Color Adjustment tab and adjust the color balance Cyan Magen...

Страница 217: ...Specifying Color Correction Adjusting Color Balance Adjusting Brightness Adjusting Intensity Adjusting Contrast 217 ...

Страница 218: ...nput ICC profile specified in the image data To use this printing method use your application software to select color management items and specify an input ICC profile and a printing ICC profile in the image data Even if you print using a printing ICC profile that you created yourself from your application software be sure to select color management items from your application software For instru...

Страница 219: ...put ICC profiles or does allow you to specify one by using the color space of the input ICC profile sRGB found in the data 1 Open the printer driver setup window 2 Select the manual color adjustment On the Main tab select Manual for Color Intensity and click Set The Manual Color Adjustment dialog box opens 3 Select color correction Click Matching tab and select ICM ICC Profile Matching for Color C...

Страница 220: ...ngs and then click OK 6 Complete the setup Click OK on the Main tab When you execute print the printer uses the color space of the image data Related Topics Setting the Print Quality Level Custom Specifying Color Correction Adjusting Color Balance Adjusting Brightness Adjusting Intensity Adjusting Contrast 220 ...

Страница 221: ...mple shows the case when color balance is used to intensify cyan and to diminish yellow so that the overall colors are more uniform No adjustment Adjust color balance The procedure for adjusting color balance is as follows You can also set color balance on the Quick Setup tab by choosing Photo Printing under Commonly Used Settings and then choosing Color Intensity Manual Adjustment under Additiona...

Страница 222: ...settings preview on the left side of the printer driver After adjusting each color click OK 4 Complete the setup Click OK on the Main tab When you execute print the document is printed with the adjusted color balance Important When the Grayscale Printing check box on the Main tab is checked the color balance Cyan Magenta Yellow appear grayed out and are unavailable Related Topics Setting the Print...

Страница 223: ...a list together with the adjustment values Described below is the procedure for adjusting the color balance while looking at the pattern 1 Open the printer driver setup window 2 Select the manual color adjustment On the Main tab select Manual for Color Intensity and click Set The Manual Color Adjustment dialog box opens 3 Selecting pattern print On the Color Adjustment tab select the Print a patte...

Страница 224: ...genta Yellow appear grayed out and are unavailable Printer Paper Size Select the paper size to be used for pattern printing Note Depending on the paper size selected on the Page Setup tab there may be sizes that cannot be selected Amount of Pattern Instances Select Largest Large or Small to set the number of patterns to be printed Note Largest and Large cannot be selected when certain paper sizes ...

Страница 225: ... Color Adjustment dialog box On the Main tab select OK and then execute printing The printer then prints a pattern in which the color balance that you set is the center value 6 Adjusting the color balance Look at the print results and select the image that you like best Then enter the color balance numbers indicated at the bottom of that image into the Cyan Magenta and Yellow fields on the Color A...

Страница 226: ...ollowing items are grayed out and cannot be set Preview before printing on the Main tab Stapling Side and Specify Margin on the Page Setup tab When Duplex Printing Manual is set only Stapling Side can be set You can print a pattern only if the Page Layout setting on the Page Setup tab is Normal size or Borderless When the Grayscale Printing check box on the Main tab is checked Cyan Magenta and Yel...

Страница 227: ... selected Normal is selected Dark is selected The procedure for adjusting brightness is as follows You can also set brightness on the Quick Setup tab by choosing Photo Printing under Commonly Used Settings and then choosing Color Intensity Manual Adjustment under Additional Features 1 Open the printer driver setup window 2 Select the manual color adjustment On the Main tab select Manual for Color ...

Страница 228: ...eview on the left side of the printer driver 4 Complete the setup Click OK on the Main tab When you execute print the data is printed at the specified brightness Related Topics Setting the Print Quality Level Custom Specifying Color Correction Adjusting Color Balance Adjusting Intensity Adjusting Contrast 228 ...

Страница 229: ...ollows You can also set intensity on the Quick Setup tab by choosing Photo Printing under Commonly Used Settings and then choosing Color Intensity Manual Adjustment under Additional Features 1 Open the printer driver setup window 2 Select the manual color adjustment On the Main tab select Manual for Color Intensity and click Set The Manual Color Adjustment dialog box opens 3 Adjust intensity Movin...

Страница 230: ...h color click OK 4 Complete the setup Click OK on the Main tab When you execute print the image data is printed with the adjusted intensity Related Topics Setting the Print Quality Level Custom Specifying Color Correction Adjusting Color Balance Adjusting Color Balance Using Sample Patterns Printer Driver Adjusting Brightness Adjusting Contrast Adjusting Intensity Contrast Using Sample Patterns Pr...

Страница 231: ...t reduce the contrast No adjustment Adjust the contrast The procedure for adjusting contrast is as follows You can also set contrast on the Quick Setup tab by choosing Photo Printing under Commonly Used Settings and then choosing Color Intensity Manual Adjustment under Additional Features 1 Open the printer driver setup window 2 Select the manual color adjustment On the Main tab select Manual for ...

Страница 232: ...view on the left side of the printer driver After adjusting each color click OK 4 Complete the setup Click OK on the Main tab When you execute print the image is printed with the adjusted contrast Related Topics Setting the Print Quality Level Custom Specifying Color Correction Adjusting Color Balance Adjusting Color Balance Using Sample Patterns Printer Driver Adjusting Brightness Adjusting Inten...

Страница 233: ...n a list together with the adjustment values Described below is the procedure for adjusting the intensity contrast while looking at the pattern 1 Open the printer driver setup window 2 Select the manual color adjustment On the Main tab select Manual for Color Intensity and click Set The Manual Color Adjustment dialog box opens 3 Selecting pattern print On the Color Adjustment tab select the Print ...

Страница 234: ...lected on the Page Setup tab there may be sizes that cannot be selected Amount of Pattern Instances Select Largest Large or Small to set the number of patterns to be printed Note Largest and Large cannot be selected when certain paper sizes or output paper sizes are selected Color Variation Between Instances Set the amount of color change between neighboring patterns Note Large is about double the...

Страница 235: ...prints a pattern in which the intensity contrast that you set is the center value 6 Adjusting the intensity contrast Look at the print results and select the image that you like best Then enter the intensity contrast numbers indicated at the bottom of that image into the Intensity and Contrast fields on the Color Adjustment tab Clear the Print a pattern for color adjustment check box and click OK ...

Страница 236: ...tern for color adjustment is selected on the Color Adjustment tab the following items are grayed out and cannot be set Preview before printing on the Main tab Stapling Side and Specify Margin on the Page Setup tab When Duplex Printing Manual is set only Stapling Side can be set You can print a pattern only if the Page Layout setting on the Page Setup tab is Normal size or Borderless Depending on y...

Страница 237: ...iew of the Printer Driver Canon IJ Printer Driver How to Open the Printer Driver Setup Window Canon IJ Status Monitor Canon IJ Preview Deleting the Undesired Print Job Instructions for Use Printer Driver 237 ...

Страница 238: ...XPS printer driver the standard printer driver must already be installed on your computer Installing the Printer Driver To install the regular printer driver load the Setup CD ROM that comes with the printer and then install the driver from Start Setup Again To install the XPS printer driver load the Setup CD ROM that comes with the printer and then select XPS Driver from Add Software Specifying t...

Страница 239: ... such as print head cleaning or to configure a printing profile that is common to all application software 1 Select as described below If you are using Windows 10 Windows 8 1 or Windows 8 select Control Panel Hardware and Sound Devices and Printers If you are using Windows 7 select the Start menu Devices and Printers If you are using Windows Vista select the Control Panel Hardware and Sound Printe...

Страница 240: ...ask bar Click the button of the status monitor displayed on the task bar The Canon IJ Status Monitor appears Note To open the Canon IJ Status Monitor when the printer is not printing open the printer driver setup window and click View Printer Status on the Maintenance tab The information displayed on the Canon IJ Status Monitor may differ depending on the country or region where you are using your...

Страница 241: ...der and number of pages You can also change the media type settings When you want to display a preview before printing open the printer driver setup window click the Main tab and check the Preview before printing check box When you do not want to display a preview before printing uncheck the check box Important If you are using the XPS printer driver see Editing the Print Document or Reprinting fr...

Страница 242: ...r displayed on the task bar The Canon IJ Status Monitor appears 2 Display the print jobs Click Display Print Queue The print queue window opens 3 Delete the print jobs Select Cancel All Documents from the Printer menu When the confirmation message appears click Yes The deletion of the print job is complete Important Users who have not been granted access permission for printer management cannot de...

Страница 243: ...tab Print a pattern for color adjustment on the Color Adjustment tab in the Manual Color Adjustment dialog box Since the resolution in the preview display differs from the printing resolution text and lines in the preview display may appear different from the actual print result With some applications the printing is divided into multiple print jobs To cancel printing delete all divided print jobs...

Страница 244: ...g box 5 Open Word s Print dialog box again 6 Open the printer driver setup window and click OK 7 Start printing If bitmap printing is enabled in Adobe Illustrator Adobe Systems Incorporated printing may take time or some data may not be printed Print after unchecking the Bitmap Printing check box in the Print dialog box 244 ...

Страница 245: ...Description Quick Setup tab Description Main tab Description Page Setup tab Description Maintenance tab Description Canon IJ Preview Description Canon IJ XPS Preview Description Canon IJ Status Monitor Description 245 ...

Страница 246: ...es either by dragging the individual profiles or by holding down the Ctrl key and pressing the up or down arrow keys Standard These are the factory settings If Page Size Orientation and Copies were set from the application software those settings have priority Photo Printing If you select this setting when printing a photo the photo paper and photo size generally used are set The Borderless Printi...

Страница 247: ...ng profile Note Printing profiles that are registered in the initial settings cannot be deleted Settings Preview The paper illustration shows how the original will be laid out on a sheet of paper You can check an overall image of the layout Preview before printing Shows what the print result will look like before you actually print the data Check this check box to display a preview before printing...

Страница 248: ...r the value in Amount of Extension Grayscale Printing This function converts the data to monochrome data when printing your document Draft This setting is appropriate for test printing Rotate 180 degrees Prints the document by rotating it 180 degrees against the paper feed direction The width of print area and the amount of extension that are configured in other application software will be revers...

Страница 249: ...s appropriate for the purpose To set the print quality level individually click the Main tab and for Print Quality select Custom The Set becomes enabled Click Set to open the Custom dialog box and then specify the desired settings High Gives priority to print quality over printing speed Standard Prints with average speed and quality Draft This setting is appropriate for test printing Paper Source ...

Страница 250: ...og box Select the icons of the printing profiles to be registered to Commonly Used Settings and change the items to be saved in the printing profiles Icon Select the icon for the printing profile you wish to save The selected icon appears with its name in the Commonly Used Settings list on the Quick Setup tab Save the paper size setting Saves the paper size to the printing profile in Commonly Used...

Страница 251: ...r entering a user defined paper size Paper Size Specifies the Width and the Height of the custom paper Measurement is shown according to the units specified in Units Related Topics Printing with Easy Setup Setting a Page Size and Orientation Setting the Number of Copies and Printing Order Execute Borderless Printing Duplex Printing Setting Up Envelope Printing Displaying the Print Results before P...

Страница 252: ...ype that matches the paper that is loaded in the printer This ensures that printing is carried out properly for the specified paper Paper Source Shows the source from which paper is supplied Rear Tray Paper is always supplied from the rear tray Print Quality Selects your desired printing quality Select one of the following to set the print quality level that is appropriate for the purpose Importan...

Страница 253: ...olor Adjustment tab and select the Color Correction method on the Matching tab Note If you want to use an ICC profile to adjust colors use the Manual Color Adjustment dialog box to set the profile Grayscale Printing This function converts the data to monochrome data when printing your document Check this check box to print a color document in monochrome Preview before printing Shows what the print...

Страница 254: ...necessary select a preview image from Standard Landscape or Graphics whichever is most similar to the print results View Color Pattern Displays a pattern for checking color changes produced by color adjustment If you want to display the preview image with a color pattern check this check box Cyan Magenta Yellow Adjusts the strengths of Cyan Magenta and Yellow Moving the slider to the right makes a...

Страница 255: ... to enable this button The Pattern Print dialog box opens and allows you to set pattern printing settings Pattern Print dialog box Performs the setup for printing of patterns that allow you to check the color balance and intensity contrast of documents Parameters to Adjust Select the item to be checked by pattern printing Cyan Magenta Yellow Prints a pattern that allows you to check the cyan magen...

Страница 256: ... Medium Matching Tab Allows you to select the method for adjusting colors to match the type of document to be printed Color Correction Allows you to select Driver Matching ICM ICC Profile Matching or None to match the purpose of the print operation Important When Grayscale Printing is checked on the Main tab Color Correction appears grayed out and is unavailable Driver Matching With Canon Digital ...

Страница 257: ...come ICC Profile Matching Related Topics Setting the Print Quality Level Custom Adjusting Color Balance Adjusting Brightness Adjusting Intensity Adjusting Contrast Adjusting Color Balance Using Sample Patterns Printer Driver Adjusting Intensity Contrast Using Sample Patterns Printer Driver Specifying Color Correction Adjusting Colors with the Printer Driver Printing with ICC Profiles Printing a Co...

Страница 258: ...ws you to specify any vertical and horizontal dimensions for the paper size Orientation Selects the printing orientation If the application used to create your document has a similar function select the same orientation that you selected in that application Portrait Prints the document so that its top and bottom positions are unchanged relative to the paper feed direction This is the default setti...

Страница 259: ...t the printer can automatically reduce the size when it prints the document Check this check box to reduce the size when printing the document Borderless Chooses whether you are printing on a full page without any page margins or printing with page margins In borderless printing originals are enlarged to extend slightly off the paper Thus printing can be performed without any margins border Use Am...

Страница 260: ...unction can be used only when Plain Paper is selected for Media Type and one of Normal size Fit to Page Scaled or Page Layout is selected Stapling Side Selects the stapling margin position The printer analyzes the Orientation and Page Layout settings and automatically selects the best stapling margin position Check Stapling Side and select from the list to change it Specify Margin Opens the Specif...

Страница 261: ...the Stamp Background button has become the Stamp button and only the stamp function can be used Depending on the type of printer driver you are using and the environment Stamp and Background may not be available Custom Paper Size dialog box This dialog box allows you to specify the size width and height of the custom paper Units Select the unit for entering a user defined paper size Paper Size Spe...

Страница 262: ... the words Cut and Paste in the margins These words serve as guidelines for pasting together the pages into a poster Check this check box to print the words Note Depending on the type of printer driver you are using and the environment this function may not be available Print Cut Paste lines in margins Specifies whether to print cut lines that serve as guidelines for pasting together the pages int...

Страница 263: ...nt does not fit on one page the document is reduced when printed Margin Specifies the width of the stapling margin The width of the side specified by Stapling Side becomes the stapling margin Print Options dialog box Makes changes to print data that is sent to the printer Depending on the type of printer driver you are using and the environment this function may not be available Disable ICM requir...

Страница 264: ...ta is prohibited If the print result has missing image data or unintended colors selecting this check box may improve the condition Important Uncheck this check box under normal circumstances Note Do not allow application software to compress print data tab cannot be used with the XPS printer driver Print after creating print data by page The print data is created in page units and printing starts...

Страница 265: ...ges In addition to the pre registered ones you can register and use your original stamp or background Note With the XPS printer driver the Stamp Background button has become the Stamp button and only the stamp function can be used Stamp Stamp printing is a function that prints a stamp over a document Check this check box and select a title from the list to print a stamp Define Stamp Opens the Stam...

Страница 266: ...nt the background on the first page only or print on all pages when the document has two or more pages Check the Background check box to enable this Check this check box to print a background on the first page only Stamp Tab The Stamp tab allows you to set the text and bitmap file bmp to be used for a stamp Preview Window Shows the status of the stamp configured in each tab Stamp Type Specifies th...

Страница 267: ...ider to the right increases the size moving the slider to the left decreases the size Transparent white area Specifies whether to make white filled areas of the bitmap transparent Check this check box to make white filled areas of the bitmap transparent Note Click Defaults to set Stamp Type to text Stamp Text to blank TrueType Font to Arial Style to Regular Size to 36 points Outline unchecked and ...

Страница 268: ...letes an unnecessary stamp Specify the title of an unnecessary stamp from the Stamps list and click this button Background Tab The Background tab allows you to select a bitmap file bmp to be used as a background or determine how to print the selected background Preview Window Shows the status of the bitmap set on the Background tab File Specifies the name of the bitmap file to be used as the backg...

Страница 269: ...background or delete an unnecessary background Title Enter the title to save the background image you specified Up to 64 characters can be entered Note Spaces tabs and returns cannot be entered at the beginning or end of a title Backgrounds Shows a list of registered background titles Specify a title to display the corresponding background in Title Save Save overwrite Saves the image data as a bac...

Страница 270: ...ng Performs deep cleaning Perform deep cleaning when two cleaning attempts do not resolve the print head problem Note Deep Cleaning consumes a larger amount of ink than Cleaning Cleaning the print heads frequently will rapidly deplete your printer s ink supply Therefore perform cleaning only when necessary Ink Group When you click Cleaning or Deep Cleaning the Ink Group window is displayed Selects...

Страница 271: ...deviated colors and lines Align the print head immediately after installing the print head When you click Print Head Alignment the Start Print Head Alignment dialog box is displayed Nozzle Check Prints a nozzle check pattern Perform this function if printing becomes faint or a specific color fails to print Print a nozzle check pattern and check whether the print head is working properly If the pri...

Страница 272: ... feeding may fail if paper dust has stuck to the printer s paper feed rollers In this case clean the paper feed rollers to improve the print result Power Off Turns off the printer from the printer driver Perform this function to turn off the printer when you cannot press the ON button POWER button on the printer because the printer is out of your reach You must press the ON button POWER button on ...

Страница 273: ...n error message may appear because the computer cannot collect the printer status If this happens click OK to display the most recent settings specified on your computer View Print History This function starts the Canon IJ XPS preview and displays the print history Note You can use this function only with the XPS printer driver View Printer Status Starts the Canon IJ Status Monitor Perform this fu...

Страница 274: ...ment dialog box This dialog box allows you to adjust the attachment position for the print head or to print the current setting value for the print head position Align Print Head Aligns the print head Print head alignment corrects the installation positions of the print head and improves deviated colors and lines Align the print head immediately after installing the print head Print Alignment Valu...

Страница 275: ... you reset the count by operating the operation panel of the printer the setting in the printer driver is unnecessary If you disable Function for Notifying the Remaining Ink Level you must visually check the remaining ink level Replenish the ink before the ink level falls below the lower limit line Resets the Remaining Ink Level Count Click Reset to reset the remaining ink level count Important Wh...

Страница 276: ...me for Use quiet mode during specified hours quiet mode is not applied to operations copy direct print etc performed directly from the printer Custom Settings dialog box When you click Custom Settings the Custom Settings dialog box is displayed If necessary switch between various modes of printer operation Prevent paper abrasion The printer can increase the gap between the print head and the paper...

Страница 277: ... the printer driver modules Language Specifies the language you wish to use in the printer driver setup window Important If the font for displaying the language of your choice is not installed in your system the characters will be garbled Related Topics Cleaning the Print Heads Aligning the Print Head Position Printing a Nozzle Check Pattern Changing the remaining ink level notification setting Cl...

Страница 278: ...he Main tab File Menu Selects the print operation Start Printing Ends the Canon IJ Preview and then starts printing the document that is displayed on the preview screen This command has the same function as the Start Printing on the toolbar Cancel Printing Ends the Canon IJ Preview and cancels the printing of the document that is displayed on the preview screen This command has the same function a...

Страница 279: ...be selected Last Page Displays the last page of the document If the currently displayed page is the last page this command is grayed out and cannot be selected Page Selection Displays the Page Selection dialog box This command allows you to specify the page number of the page to be displayed Zoom Menu Selects the ratio of the actual size printed on the paper to the preview display size You can als...

Страница 280: ...lick this button while spooling Print Page Information Screen Displays print setup information for each page at the left side of the preview screen This screen also allows you to change the media type and paper source settings Important If the media type and paper source are set from the application software those settings have priority and the changed settings may become ineffective Printer Paper...

Страница 281: ...heck the Preview before printing check box on the Main tab Important To use the Canon IJ XPS Preview you must have Microsoft NET Framework 4 Client Profile installed on your computer File Menu Selects print operation and print history settings Print Prints the documents selected in the document list The printed documents are deleted from the list and when all documents are printed the Canon IJ XPS...

Страница 282: ...ng print documents Combine Documents Combines the documents selected in the document list into one document If only one document is selected this command is grayed out and cannot be selected This command has the same function as the Combine Documents on the toolbar Reset Documents Returns the document selected in the document list to their status before they were added to the Canon IJ XPS Preview ...

Страница 283: ...is dialog box allows you to set Page Layout Printing Pages Page Order and Page Border Duplex Printing Opens the Duplex Printing dialog box This dialog box allows you to set Duplex Printing Manual Stapling Side and Margin Copies Opens the Copies dialog box This dialog box allows you to set Copies Collate and Print from Last Page Pages Selects the method for editing print pages Delete Page Deletes t...

Страница 284: ...not be selected Previous Document Displays the document located before the currently displayed document If the currently selected document is the first document this command is grayed out and cannot be selected Next Document Displays the document located after the currently displayed document If the currently selected document is the last document this command is grayed out and cannot be selected ...

Страница 285: ... toolbar Whole Displays the entire page of data as one page 50 Reduces the displayed data to 50 of the actual size to be printed 100 Displays the data at the actual size to be printed 200 Enlarges the displayed data to 200 of the actual size to be printed 400 Enlarges the displayed data to 400 of the actual size to be printed Option Menu Toggles the show hide status of the following information Vi...

Страница 286: ...ment list contains only one document the document is grayed out and cannot be selected Reset Documents Returns the document selected in the document list to their status before they were added to the Canon IJ XPS Preview The combined documents are separated and the original documents are restored View Thumbnails Reduces all pages in the document selected in the document list and displays them at t...

Страница 287: ...ant The number displayed in Pages and the output page count are different To check the output page count check the status bar at the bottom of the preview window Status Displays the status of the print documents Documents that are undergoing data processing are displayed as Processing data Important Documents showing Processing data cannot be printed or edited Wait until the data processing ends P...

Страница 288: ...ightly Important When Grayscale Printing is checked Cyan Magenta and Yellow appear grayed out and are unavailable Brightness Selects the brightness of your print Pure white and black will not change but colors between white and black will change Intensity Adjusts the overall intensity of your print Moving the slider to the right increases the intensity and moving the slider to the left decreases t...

Страница 289: ...navailable Copies Specifies the number of copies you want to print You can specify a value from 1 to 999 If the numbers of copies cannot be changed for the print document this item is grayed out and is unavailable Exit Ends the Canon IJ XPS Preview The documents remaining in the document list will be deleted from the list Print Prints the documents selected in the document list The printed documen...

Страница 290: ...s Monitor allows you to check the status of the printer and ink with messages You can check the information on the printing document and the printing progress during printing When a printer error occurs it shows the cause and solution Follow the instruction in the message Printer Canon IJ Status Monitor shows an icon when a warning or error occurs to the printer Indicates that a warning operator c...

Страница 291: ...en envelope printing starts To hide this guide message select the Do not show this message again check box To display the guide messages again click Envelope Printing on the Display Guide Message in the Option menu and enable this setting Hagaki Printing Displays the guide message before the printer begins hagaki printing To hide this guide message select the Do not show this message again check b...

Страница 292: ...Updating the MP Drivers Obtaining the Latest MP Drivers Deleting the Unnecessary MP Drivers Before Installing the MP Drivers Installing the MP Drivers 292 ...

Страница 293: ...ed problems may be solved You can access our website and download the latest MP Drivers for your model Important You can download the MP Drivers for free but any Internet access charges incurred are your responsibility Before installing the latest MP Drivers delete the previously installed version Related Topics Before Installing the MP Drivers Installing the MP Drivers 293 ...

Страница 294: ...a confirmation warning dialog box may appear when starting installing or uninstalling software This dialog box appears when administrative rights are required to perform a task When you are logged on to an administrator account click Yes or Continue Allow to continue Some applications require an administrator account to continue In such cases switch to an administrator account and restart the oper...

Страница 295: ...Status Confirm that the USB port of this printer and the computer are firmly connected with the USB cable Turn off the printer Checking the Personal Computer Settings Terminate all running applications Log on as a user who has the administrator account Important Before installing the latest MP Drivers delete the previously installed version Related Topics Obtaining the Latest MP Drivers Installing...

Страница 296: ...ivers Take the appropriate action as described on the screen Note To use this printer on a network you must manually select the connection destination from the client To manually select a connection destination click Cancel in the Connect Cable window When the confirmation message appears click Yes In the Installation Incomplete window select the Select printer port check box click Manual Selectio...

Страница 297: ...Related Topics Obtaining the Latest MP Drivers Deleting the Unnecessary MP Drivers Before Installing the MP Drivers 297 ...

Страница 298: ...on Client PC This section describes the procedure for setting a computer that uses this printer though a network When you execute print the data is sent to the printer through the print server system Important In case an error occurred when a document is printed by the client system to a shared printer the error message of Canon IJ Status Monitor will be displayed both on the client system and the...

Страница 299: ...ard and then select Printer properties Sharing tab from the displayed File menu If you are using Windows Vista press the Alt key on your keyboard and then select Run as administrator Sharing from the displayed File menu If you are using Windows XP select Sharing from the File menu Important In Windows 10 Windows 8 1 Windows 8 Windows 7 or Windows Vista a confirmation warning dialog box may appear ...

Страница 300: ...Start menu Network Add Printer The Add Printer window appears 3 Add a printer If you are using Windows 10 Windows 8 1 or Windows 8 click the icon for the printer that you have configured on the print server system to be shared and then click Next If you are using Windows 7 or Windows Vista select Add a network wireless or Bluetooth printer and click the icon for the printer that you have configure...

Страница 301: ...s Add a printer When Welcome to the Add Printer Wizard screen appears click Next 3 Add a printer Select A network printer or a printer attached to another computer then click Next On the Specify a Printer window click Next and then search for the print server system Click the icon for the printer that you have configured on the print server system to be shared and then click Next Note If the icon ...

Страница 302: ... window on the client system Open Run as administrator Server Properties from the displayed File menu Uncheck Show informational notifications for network printers on the Advanced tab and then restart the computer If you are using Windows XP Open Server Properties from the File menu of the Printers and Faxes window on the print server system Uncheck Notify when remote documents are printed on the ...

Страница 303: ...n the Same Printer Driver is Installed in the Print Server System and the Client System as the Local Printer The net crawl function may automatically create a network printer icon on the client system 303 ...

Страница 304: ...Printing Using Canon Application Software My Image Garden Guide 304 ...

Страница 305: ... the latest application How to Check the Version Earlier Versions Select the version of your My Image Garden V3 1 x V3 0 x V2 1 x V2 0 x V1 1 x For Mac OS Latest Version My Image Garden V3 3 x V3 2 x It is recommended that you use the latest version of the application Access the Canon website and download the latest application How to Check the Version Earlier Versions Select the version of your M...

Страница 306: ...Copying Making Copies on Plain Paper Basics Switching Page Size between A4 and Letter 306 ...

Страница 307: ...you want Press the same button Color button or Black button as the one which you previously pressed To cancel copying Press the Stop button Important Do not open the document cover or remove the original from the platen glass until scanning is completed While the machine is scanning the original the ON lamp keeps flashing Note To set the print quality to Draft speed priority You can set the print ...

Страница 308: ...Alarm lamp flashes 14 times The ON lamp starts flashing instead of remaining lit 3 Press Black button to select A4 or Color button to select Letter The ON lamp stops flashing and remains lit and the paper size is changed Note When you switch the page size to A4 or Letter load paper of the selected size When the page size is set to A4 load A4 plain paper When the page size is set to Letter load Let...

Страница 309: ...Scanning Scanning from Computer Windows Scanning from Computer Mac OS 309 ...

Страница 310: ...Scanning from Computer Windows Using IJ Scan Utility Scanning Using Application Software ScanGear Other Scanning Methods Scanning Tips Positioning Originals Scanning from Computer 310 ...

Страница 311: ...ments Scanning Photos Scanning with Favorite Settings Scanning Originals Larger than the Platen Image Stitch Adjusting Cropping Frames in the Image Stitch Window Scanning Multiple Originals at One Time Saving after Checking Scan Results Sending Scanned Images via E mail Extracting Text from Scanned Images OCR IJ Scan Utility Screens 311 ...

Страница 312: ...uitable for photos according to the item type or your purpose Note Refer to IJ Scan Utility Main Screen for details on the IJ Scan Utility main screen Save Scanned Images Automatically Scanned images are automatically saved in a preset folder You can change the folder as required Note The default save folders are as follows Windows 10 Windows 8 1 Windows Vista Documents folder Windows 8 Windows 7 ...

Страница 313: ...Important Some functions are available only when My Image Garden is installed Note Refer to Settings Dialog Box for how to set the applications to integrate with 313 ...

Страница 314: ...lities IJ Scan Utility Windows 8 1 Windows 8 Select IJ Scan Utility on the Start screen If IJ Scan Utility is not displayed on the Start screen select the Search charm and then search for IJ Scan Utility Windows 7 Windows Vista Windows XP From Start menu select All Programs Canon Utilities IJ Scan Utility IJ Scan Utility 314 ...

Страница 315: ... the platen of your scanner or printer Positioning Originals Scanning from Computer 3 Start IJ Scan Utility 4 Click Auto Scanning starts Note Click Cancel to cancel the scan To apply suitable corrections based on the item type click Settings then select the Apply recommended image correction checkbox in the Settings Auto Scan dialog box Scanned images are saved in the folder set for Save in in the...

Страница 316: ...gs then set the paper size resolution etc in the Settings Document Scan dialog box as required When setting is completed click OK 4 Click Document Scanning starts Note Click Cancel to cancel the scan Scanned images are saved in the folder set for Save in in the Settings Document Scan dialog box displayed by clicking Settings In the Settings Document Scan dialog box you can also make advanced scan ...

Страница 317: ...ttings then set the paper size resolution etc in the Settings Photo Scan dialog box as required When setting is completed click OK 4 Click Photo Scanning starts Note Click Cancel to cancel the scan Scanned images are saved in the folder set for Save in in the Settings Photo Scan dialog box displayed by clicking Settings In the Settings Photo Scan dialog box you can also make advanced scan settings...

Страница 318: ... Custom Scan dialog box as required When setting is completed click OK Note Once the settings are made you can scan with the same settings from the next time 3 Place the item on the platen Positioning Originals Scanning from Computer 4 Click Custom Scanning starts Note Click Cancel to cancel the scan Scanned images are saved in the folder set for Save in in the Settings Custom Scan dialog box disp...

Страница 319: ... as the platen are supported Note The following explains how to scan from the item to be placed on the left side 1 Start IJ Scan Utility 2 Click Settings then set the item type resolution etc in the Settings Scan and Stitch dialog box as required When setting is completed click OK 3 Click Stitch The Image Stitch window appears 4 In Select Output Size select an output size according to the paper si...

Страница 320: ...Scan from Left is selected in Scan Direction 6 Place the item that is to be displayed on the left side of the screen face down on the platen 7 Click Start Scanning Image 1 The first item is scanned and appears in 1 320 ...

Страница 321: ...ght side of the screen face down on the platen 9 Click Start Scanning Image 2 The second item is scanned and appears in 2 Note Click Cancel to cancel the scan 10 Adjust the scanned images as required Use the Toolbar to rotate or zoom in out or drag the images to adjust their positions 321 ...

Страница 322: ... to be saved Adjusting Cropping Frames in the Image Stitch Window To scan an item again select the image in the Preview area or the thumbnail at the top of the screen then click Delete The selected image is deleted allowing you to scan the item again 11 Click Save 322 ...

Страница 323: ...mbined image is saved Note Refer to Image Stitch Window for details on the Image Stitch window You can make advanced scan settings in the Settings Scan and Stitch dialog box displayed by clicking Settings 323 ...

Страница 324: ... the Adjust cropping frames checkbox an active cropping frame is automatically specified around the image in the Preview area You can drag the cropping frame to specify the area When you perform a scan the image in the area specified with the cropping frame will be scanned Adjusting a Cropping Frame The cursor will change into Arrow when it is positioned over a cropping frame Click and drag the mo...

Страница 325: ...hick items Refer to Scanning Multiple Documents at One Time with ScanGear Scanner Driver for your model from Home of the Online Manual for details Using Auto Scan Whether there are multiple items or not is detected automatically Click Auto in the IJ Scan Utility main screen and scan Easy Scanning with Auto Scan Not Using Auto Scan In the Settings dialog box set Paper Size to Auto scan and scan Not...

Страница 326: ...4 Click Custom Scan 5 Select Select Source according to the items to be scanned 6 Select Auto scan for Paper Size then click OK 326 ...

Страница 327: ...log Box Settings Photo Scan Dialog Box Settings Custom Scan Dialog Box 7 Click Custom Multiple items are scanned at one time Note Click Cancel to cancel the scan Scanned images are saved in the folder set for Save in in the corresponding Settings dialog box displayed by clicking Settings In each Settings dialog box you can also make advanced scan settings 327 ...

Страница 328: ...ou cannot check the scan results before saving when scanned using Auto scan Note The screens for scanning photos are used as examples in the following descriptions 1 Start IJ Scan Utility 2 Click Settings The Settings dialog box appears 3 Click Photo Scan 4 Select the Check scan results checkbox then click OK 328 ...

Страница 329: ...Document Scan Dialog Box Settings Photo Scan Dialog Box Settings Custom Scan Dialog Box Settings Scan and Stitch Dialog Box Settings ScanGear Dialog Box 5 Click Photo Scanning starts When scanning is completed the Save Settings dialog box appears Note Click Cancel to cancel the scan 6 Change the image order or file save options as required 329 ...

Страница 330: ...ns in the Save Settings dialog box Note The default save folders are as follows Windows 10 Windows 8 1 Windows Vista Documents folder Windows 8 Windows 7 Windows XP My Documents folder 7 Click OK Scanned images are saved according to the settings 330 ...

Страница 331: ... mail Note The screens for scanning photos are used as examples in the following descriptions 1 Start IJ Scan Utility 2 Click Settings The Settings dialog box appears 3 Click Photo Scan 4 Select Attach to e mail in Application Settings then select an e mail client 331 ...

Страница 332: ...can add e mail clients to use for attachments from the pull down menu If None Attach Manually is selected manually attach scanned and saved images to e mail 5 Click OK The IJ Scan Utility main screen appears 332 ...

Страница 333: ...s will be attached to a new message Note Click Cancel to cancel the scan The scanned images are saved according to the settings made in the Settings dialog box When the Check scan results checkbox is selected in the Settings dialog box the Save Settings dialog box appears After you set the save options and click OK the scanned images are saved and automatically attached to a new message of the spe...

Страница 334: ... text when scanning via Document Custom or ScanGear The screens for scanning documents are used as examples in the following descriptions 1 Start IJ Scan Utility 2 Click Settings The Settings dialog box appears 3 Click Document Scan Note For Resolution only 300 dpi or 400 dpi can be set when Start OCR is selected in Application Settings 334 ...

Страница 335: ...ble application is not installed the text in the image is extracted and appears in your text editor Text to be displayed is based on Document Language in the Settings General Settings dialog box Select the language you want to extract in Document Language and scan You can add the application from the pull down menu 5 Click OK 335 ...

Страница 336: ...anning starts When scanning is completed the scanned images are saved according to the settings and the extracted text appears in the specified application Note Click Cancel to cancel the scan Text displayed in your text editor is for guidance only Text in the image of the following types of documents may not be detected correctly Documents containing text with font size outside the range of 8 poi...

Страница 337: ... text in the wrong orientation rotated characters Documents containing special fonts effects italics or hand written text Documents with narrow line spacing Documents with colors in the background of text Documents containing multiple languages 337 ...

Страница 338: ...ttings Auto Scan Dialog Box Settings Document Scan Dialog Box Settings Photo Scan Dialog Box Settings Custom Scan Dialog Box Settings Scan and Stitch Dialog Box Settings ScanGear Dialog Box Settings General Settings Dialog Box Save Settings Dialog Box Image Stitch Window 338 ...

Страница 339: ...of the product that IJ Scan Utility is currently set to use If the displayed product is not the one you want to use select the desired product from the list Auto Detects the item type automatically and saves them to a computer The data format for saving will also be set automatically Save settings and the response after scanning can be specified in the Settings Auto Scan dialog box Document Scans ...

Страница 340: ...mage Scan save settings and the response after scanning can be specified in the Settings Scan and Stitch dialog box ScanGear Starts ScanGear scanner driver in which you can make image corrections and color adjustments when scanning Scan save settings and applications can be specified in the Settings ScanGear dialog box Instructions Opens this guide Settings Displays the Settings dialog box in whic...

Страница 341: ...ow to respond when scanning from IJ Scan Utility or My Image Garden Settings Auto Scan Dialog Box Settings Document Scan Dialog Box Settings Photo Scan Dialog Box Settings Custom Scan Dialog Box Settings Scan and Stitch Dialog Box Settings ScanGear Dialog Box General Settings Tab You can set the product to use file size restriction on e mail attachment language to detect text in images and folder ...

Страница 342: ...e Garden the setting items for Application Settings do not appear Supported Items Photos postcards business cards magazines newspapers documents and BD DVD CD Important To scan the following types of items specify the item type and size in the Settings Document Scan dialog box Settings Photo Scan dialog box or Settings Custom Scan dialog box then click Photo Document or Custom in the IJ Scan Utili...

Страница 343: ...ons In that case deselect the checkbox and scan Note Scanning takes longer than usual when you enable this function 2 Save Settings Area File Name Enter the file name of the image to be saved When you save a file the date and four digits are appended to the set file name in the _20XX0101_0001 format Note When you select the Save to a subfolder with current date checkbox the date and four digits ar...

Страница 344: ...Note PDF files that are searchable in the language selected in Document Language on the General Settings tab of the Settings dialog box are created Save to a subfolder with current date Select this checkbox to create a current date folder in the folder specified in Save in and save scanned images in it The folder will be created with a name such as 20XX_01_01 Year_Month_Date If this checkbox is no...

Страница 345: ...enu Do not start any application Saves to the folder specified in Save in Note To add an application or folder to the pull down menu select Add from the pull down menu then click Add in the displayed Select Application or Select Destination Folder dialog box and specify the application or folder Instructions Opens this guide Defaults You can restore the settings in the displayed screen to the defa...

Страница 346: ...vanced scan settings to scan items as documents 1 Scan Options Area 2 Save Settings Area 3 Application Settings Area Important When the Settings dialog box is displayed from the Scan screen of My Image Garden the setting items for Application Settings do not appear 1 Scan Options Area Select Source Select the type of item to be scanned Scanning documents Document Scanning magazines Magazine 346 ...

Страница 347: ...is selected in Application Settings Image Processing Settings Click Plus to set the following Note When Color Mode is Black and White only Reduce gutter shadow Correct slanted text document and Detect the orientation of text document and rotate image appear Apply Auto Document Fix Select this checkbox to sharpen text in a document or magazine for better readability Important The color tone may dif...

Страница 348: ...ay not be corrected properly since the text cannot be detected correctly Documents in which the text lines are inclined more than 10 degrees or the angles vary by line Documents containing both vertical and horizontal text Documents with extremely large or small fonts Documents with small amount of text Documents containing figures images Hand written text Documents containing both vertical and ho...

Страница 349: ...l down menu then click Add in the displayed Select Destination Folder dialog box and specify the destination folder The default save folders are as follows Windows 10 Windows 8 1 Windows Vista Documents folder Windows 8 Windows 7 Windows XP My Documents folder Important When the Settings dialog box is displayed from My Image Garden this option does not appear Data Format Select the data format in ...

Страница 350: ...folder in the folder specified in Save in and save scanned images in it The folder will be created with a name such as 20XX_01_01 Year_Month_Date If this checkbox is not selected files are saved directly in the folder specified in Save in Check scan results Displays the Save Settings dialog box after scanning Important When the Settings dialog box is displayed from My Image Garden this option does...

Страница 351: ...an specify the application from the pull down menu Do not start any application Saves to the folder specified in Save in Note To add an application or folder to the pull down menu select Add from the pull down menu then click Add in the displayed Select Application or Select Destination Folder dialog box and specify the application or folder Instructions Opens this guide Defaults You can restore t...

Страница 352: ...ettings to scan items as photos 1 Scan Options Area 2 Save Settings Area 3 Application Settings Area Important When the Settings dialog box is displayed from My Image Garden the setting items for Application Settings do not appear 1 Scan Options Area Select Source Photo is selected Color Mode Select the color mode in which to scan the item Paper Size Select the size of the item to be scanned 352 ...

Страница 353: ...rpen outline Emphasizes the outline of the subjects to sharpen the image 2 Save Settings Area File Name Enter the file name of the image to be saved When you save a file the date and four digits are appended to the set file name in the _20XX0101_0001 format Note When you select the Save to a subfolder with current date checkbox the date and four digits are appended to the set file name Save in Dis...

Страница 354: ...heckbox is not selected files are saved directly in the folder specified in Save in Check scan results Displays the Save Settings dialog box after scanning Important When the Settings dialog box is displayed from My Image Garden this option does not appear 3 Application Settings Area Open with an application Select this when you want to enhance or correct the scanned images You can specify the app...

Страница 355: ...in Note To add an application or folder to the pull down menu select Add from the pull down menu then click Add in the displayed Select Application or Select Destination Folder dialog box and specify the application or folder Instructions Opens this guide Defaults You can restore the settings in the displayed screen to the default settings 355 ...

Страница 356: ... your preference 1 Scan Options Area 2 Save Settings Area 3 Application Settings Area Important When the Settings dialog box is displayed from the Scan screen of My Image Garden the setting items for Application Settings do not appear 1 Scan Options Area Select Source Select the type of item to be scanned Select Auto to detect the item type automatically and to set Color Mode Paper Size and Resolu...

Страница 357: ...efer to Positioning Originals Scanning from Computer for how to place items Note To convert text in the image into text data after scanning specify Select Source instead of selecting Auto To reduce moire set Select Source to Magazine or select the Reduce moire checkbox in Image Processing Settings Color Mode Select the color mode in which to scan the item Note Only Color is available when Select S...

Страница 358: ...select the checkbox and scan Note Scanning takes longer than usual when you enable this function When Select Source is Photo Important When Color Mode is Black and White Image Processing Settings is not available Sharpen outline Emphasizes the outline of the subjects to sharpen the image When Select Source is Magazine or Document Note When Color Mode is Black and White only Reduce gutter shadow Co...

Страница 359: ...on for your model from Home of the Online Manual for details Correct slanted text document Detects the scanned text and corrects the angle within 0 1 to 10 degrees or 0 1 to 10 degrees of the document Important The following types of documents may not be corrected properly since the text cannot be detected correctly Documents in which the text lines are inclined more than 10 degrees or the angles ...

Страница 360: ... the _20XX0101_0001 format Note When you select the Save to a subfolder with current date checkbox the date and four digits are appended to the set file name Save in Displays the folder in which to save the scanned images To add a folder select Add from the pull down menu then click Add in the displayed Select Destination Folder dialog box and specify the destination folder The default save folder...

Страница 361: ...at supports keyword search Select this checkbox to convert text in images into text data and create PDF files that support keyword search Important This appears only when PDF PDF Multiple Pages or Auto is selected in Data Format Note PDF files that are searchable in the language selected in Document Language on the General Settings tab of the Settings dialog box are created Save to a subfolder wit...

Страница 362: ...the pull down menu Attach to e mail Select this when you want to send e mails with the scanned images attached You can specify the e mail client you want to start from the pull down menu Start OCR Select this when you want to convert text in the scanned image into text data You can specify the application from the pull down menu Do not start any application Saves to the folder specified in Save in...

Страница 363: ...tings for scanning items larger than the platen 1 Scan Options Area 2 Save Settings Area 3 Application Settings Area Important When the Settings dialog box is displayed from the Scan screen of My Image Garden the setting items for Application Settings do not appear 1 Scan Options Area Select Source Select the type of item to be scanned Scanning photos Photo Scanning documents Document Scanning mag...

Страница 364: ... Source is Magazine or Document Sharpen outline Emphasizes the outline of the subjects to sharpen the image Reduce show through Sharpens text in an item or reduces show through in newspapers etc Reduce moire Reduces moire patterns Printed materials are displayed as a collection of fine dots Moire is a phenomenon where uneven gradation or a stripe pattern appears when such photos or pictures printe...

Страница 365: ...and White PDF Compression Select the compression type for saving PDF files Standard It is recommended that you normally select this setting High Compresses the file size when saving allowing you to reduce the load on your network server Important This appears only when PDF or PDF Multiple Pages is selected in Data Format When Black and White is selected in Color Mode this option does not appear Cr...

Страница 366: ...he scanned images You can specify the application from the pull down menu Send to an application Select this when you want to use the scanned images as they are in an application that allows you to browse or organize images You can specify the application from the pull down menu Send to a folder Select this when you also want to save the scanned images to a folder other than the one specified in S...

Страница 367: ...ve Settings Area 2 Application Settings Area Important When the Settings dialog box is displayed from My Image Garden the setting items for Application Settings do not appear 1 Save Settings Area File Name Enter the file name of the image to be saved When you save a file the date and four digits are appended to the set file name in the _20XX0101_0001 format Note When you select the Save to a subfo...

Страница 368: ...xels can be scanned When the Enable large image scans checkbox is selected in Save Settings or when Start OCR is selected in Application Settings you can select JPEG Exif TIFF or PNG JPEG Image Quality You can specify the image quality of JPEG files Important This appears only when JPEG Exif is selected in Data Format PDF Compression Select the compression type for saving PDF files Standard It is ...

Страница 369: ...ote When this checkbox is not selected images up to 10208 pixels x 14032 pixels can be scanned Check scan results Displays the Save Settings dialog box after scanning Important When the Settings dialog box is displayed from My Image Garden this option does not appear 2 Application Settings Area Open with an application Select this when you want to enhance or correct the scanned images You can spec...

Страница 370: ...s to the folder specified in Save in Note To add an application or folder to the pull down menu select Add from the pull down menu then click Add in the displayed Select Application or Select Destination Folder dialog box and specify the application or folder Instructions Opens this guide Defaults You can restore the settings in the displayed screen to the default settings 370 ...

Страница 371: ...ed product is not the one you want to use select the desired product from the list E mail Attachment Size You can restrict the size of scanned images to be attached to an e mail You can select Small Suitable for 640 x 480 Windows Medium Suitable for 800 x 600 Windows Large Suitable for 1024 x 768 Windows or No Change Document Language You can select the language for detecting text in images and fo...

Страница 372: ...m My Image Garden the Save Settings dialog box does not appear 1 Preview Operation Buttons 2 Scan Results Area 3 Save Settings Area 1 Preview Operation Buttons Rotate Left 90 Rotate Right 90 Rotates scanned images 90 degrees counter clockwise or clockwise Select the image you want to rotate then click Rotate Left 90 or Rotate Right 90 Important The preview operation buttons do not appear when the ...

Страница 373: ...e default save folders are as follows Windows 10 Windows 8 1 Windows Vista Documents folder Windows 8 Windows 7 Windows XP My Documents folder Data Format Select the data format in which to save the scanned images You can select JPEG Exif TIFF PNG PDF or PDF Multiple Pages Important You cannot select PDF or PDF Multiple Pages in the following cases When scanned by clicking Photo in the IJ Scan Uti...

Страница 374: ...o text data and create PDF files that support keyword search Important This appears only when PDF or PDF Multiple Pages is selected in Data Format Note PDF files that are searchable in the language selected in Document Language on the General Settings tab of the Settings dialog box are created Save to a subfolder with current date Select this checkbox to create a current date folder in the folder ...

Страница 375: ... Area Note The displayed items vary depending on the select source and view 1 Settings and Operation Buttons Select Output Size B4 B5 x 2 Scans the left and right halves of a B4 size item separately A3 A4 x 2 Scans the left and right halves of an A3 size item separately 11 x 17 Letter x 2 Scans the left and right halves of an item twice as large as Letter size separately Full Platen x 2 Scans the ...

Страница 376: ...Scan from Right Displays the first scanned image on the right side Scan Image 1 Start Scanning Image 1 Scans the first item Scan Image 2 Start Scanning Image 2 Scans the second item 376 ...

Страница 377: ...umbnail View area Enlarge Reduce Allows you to enlarge or reduce the preview image Left clicking the Preview area enlarges the displayed image Right clicking the Preview area reduces the displayed image Rotate Left Rotates the preview image 90 degrees counter clockwise Rotate 180 Rotates the preview image 180 degrees Rotate Right Rotates the preview image 90 degrees clockwise Open Guide Opens this...

Страница 378: ...ing the first item by clicking Start Scanning Image 1 The image is scanned in the direction specified in Scan Direction and 2 appears next to it After scanning the second item by clicking Start Scanning Image 2 The two scanned images appear 378 ...

Страница 379: ...Related Topic Scanning Originals Larger than the Platen Image Stitch 379 ...

Страница 380: ...ltiple Documents from the ADF Auto Document Feeder in Advanced Mode Scanning Multiple Documents at One Time with ScanGear Scanner Driver Correcting Images and Adjusting Colors with ScanGear Scanner Driver ScanGear Scanner Driver Screens Positioning Originals Scanning from Computer Adjusting Cropping Frames ScanGear General Notes Scanner Driver Important Available functions and settings vary depend...

Страница 381: ...tware This software enables you to preview scan results or set document type and output size etc when scanning documents It is useful when you want to scan in a specific color tone as it allows you to make various corrections and adjust brightness contrast etc Screens There are two modes Basic Mode and Advanced Mode Switch modes by clicking a tab on the upper right of the screen Note ScanGear star...

Страница 382: ...Advanced Mode Use the Advanced Mode tab to specify the color mode output resolution image brightness color tone etc when scanning 382 ...

Страница 383: ...ty Refer to Starting IJ Scan Utility for your model from Home of the Online Manual for how to start IJ Scan Utility 2 Click ScanGear in the IJ Scan Utility main screen The ScanGear screen appears Starting from an Application Follow these steps example to start ScanGear from an application The procedure varies depending on the application For details refer to the application s manual 1 Start the ap...

Страница 384: ...ew and scan Photos that have a whitish background Documents printed on white paper hand written text business cards etc Thin documents Thick documents The following types of documents may not be scanned correctly Documents smaller than 1 2 inches 3 cm square Photos that have been cut to various shapes Note When using a model supporting ADF duplex scanning you can scan both sides of the documents a...

Страница 385: ...layed when an ADF type is selected for Select Source Note Colors are adjusted based on the document type selected in Select Source 4 Set Destination Note Skip ahead to Step 7 when an ADF type is selected for Select Source 5 Set Output Size according to purpose Output size options vary by the item selected in Destination 6 Adjust the cropping frames scan areas as required Adjust the size and positi...

Страница 386: ...Information to open a dialog box in which you can check the current scan settings document type etc A response of ScanGear after scanning can be specified in Status of ScanGear dialog after scanning on the Scan tab of the Preferences dialog box Related Topic Basic Mode Tab 386 ...

Страница 387: ... types of documents may not be scanned correctly In that case click Thumbnail on the Toolbar to switch to whole image view and scan Photos that have a whitish background Documents printed on white paper hand written text business cards etc Thin documents Thick documents The following types of documents may not be scanned correctly Documents smaller than 1 2 inches 3 cm square Photos that have been...

Страница 388: ...ect image and adjust colors as required Adjusting Cropping Frames ScanGear Image Settings Color Adjustment Buttons 7 Click Scan Scanning starts Note Click Information to open a dialog box in which you can check the current scan settings document type etc A response of ScanGear after scanning can be specified in Status of ScanGear dialog after scanning on the Scan tab of the Preferences dialog box ...

Страница 389: ... without preview 1 Place the documents on the ADF of the machine then start ScanGear scanner driver Placing Documents ADF Auto Document Feeder Starting ScanGear Scanner Driver 2 Click the Advanced Mode tab and select Document ADF Simplex or Document ADF Duplex for Select Source Note Settings are not retained when you switch modes You can select Document ADF Duplex when using a model supporting ADF...

Страница 390: ... a dialog box in which you can check the current scan settings document type etc A response of ScanGear after scanning can be specified in Status of ScanGear dialog after scanning on the Scan tab of the Preferences dialog box Related Topic Advanced Mode Tab 390 ...

Страница 391: ...c Thin documents Thick documents Scanning Multiple Documents in Whole Image View The following types of documents may not be scanned correctly Documents smaller than 1 2 inches 3 cm square Photos that have been cut to various shapes Note You can also scan multiple documents at one time from the Advanced Mode tab Use the Advanced Mode tab to make advanced scan settings such as the color mode output...

Страница 392: ...ze 4 Set Destination 5 Set Output Size according to purpose 6 Adjust the cropping frames and set Image corrections as required Note You can correct each image separately Select the frame you want to correct In thumbnail view you can only create one cropping frame per image To create multiple cropping frames in an image scan in whole image view 392 ...

Страница 393: ... steps if thumbnails are not displayed correctly when previewed or if you want to scan multiple documents as a single image Note Positions of slanted documents are not corrected in whole image view 1 After previewing images click Thumbnail on the Toolbar Switch to whole image view Note When the whole image is displayed the icon changes to Whole Image 2 Set Destination 3 Set Output Size according t...

Страница 394: ...u can also create two or more cropping frames If an area is not specified the document will be scanned at the document size Auto Crop If an area is specified only the portion in the specified area will be scanned Adjusting Cropping Frames ScanGear 5 Set Image corrections as required 6 Click Scan Areas framed by broken lines are scanned Note A response of ScanGear after scanning can be specified in...

Страница 395: ... Driver Correcting Images Unsharp Mask Reduce Dust and Scratches Fading Correction etc Adjusting Colors Using a Color Pattern Adjusting Saturation and Color Balance Adjusting Brightness and Contrast Adjusting Histogram Adjusting Tone Curve Setting Threshold 395 ...

Страница 396: ...ow of a function and select an item from the pull down menu Important Do not apply these functions to images without moire dust scratches or faded colors The color tone may be adversely affected Refer to Image Settings for details and precautions on each function Note Refer to Scanning in Advanced Mode to start the Advanced Mode tab of ScanGear and scan Adjusting the image brightness and color ton...

Страница 397: ...ing the base color in recycled paper newspapers etc when scanning documents Set Reduce Show through to ON OFF ON Sharpening slightly out of focus images Set Unsharp Mask to ON OFF ON Reducing gradations and stripe patterns Set Descreen to ON OFF ON 397 ...

Страница 398: ...es to Low Medium or High according to the degree of dust and scratches None Medium Correcting photos that have faded with time or due to colorcast Set Fading Correction to Low Medium or High according to the degree of fading or colorcast None Medium Reducing graininess Set Grain Correction to Low Medium or High according to the degree of graininess None Medium Correcting shadows that appear betwee...

Страница 399: ...None Medium 399 ...

Страница 400: ...ue to colorcast Colorcast is a phenomenon where a specific color affects the entire picture due to the weather or ambient strong colors Click an arrow in Color Adjustment to emphasize the corresponding color Cyan red magenta green and yellow blue are complementary color pairs each pair produces a shade of gray when mixed You can reproduce the natural colors of the scene by reducing the cast color ...

Страница 401: ...ellow and Magenta arrows to correct Before After Note Color adjustments are applied only to the cropping frames scan areas or the frame selected in thumbnail view You can select multiple frames or cropping frames by clicking them while pressing the Ctrl key You can also select a color tone from the color pattern displayed on the left of the Color Pattern screen You can also use this function to ad...

Страница 402: ...ndow Saturation Adjust the image s saturation vividness You can brighten colors that have faded with time etc Move Slider under Saturation to the left to decrease the saturation darken the image and to the right to increase the saturation brighten the image You can also enter a value 127 to 127 Saturation decreased Original image Saturation increased Note The natural color tone of the original ima...

Страница 403: ...r produces a shade of gray when mixed You can reproduce the natural colors of the scene by reducing the cast color and increasing the complementary color It is usually difficult to correct the image completely by adjusting only one color pair It is recommended that you find a portion in the image where it should be white and adjust all three color pairs so that the portion turns white You can also...

Страница 404: ... switch to detailed view Click Up arrow to return to the previous view Click Defaults to reset all adjustments in the current window Channel Each dot of an image is a mixture of Red Green and Blue in various proportions gradation These colors can be adjusted individually as a channel Master Adjust the Red Green and Blue combined Red Adjust the Red channel Green Adjust the Green channel Blue Adjust...

Страница 405: ...n the image too much and shadows may be lost if you darken the image too much Contrast Contrast is the degree of difference between the brighter and darker parts of an image Increasing contrast will increase the difference thus sharpening the image Decreasing contrast will decrease the difference thus softening the image Move Slider under Contrast to the left to decrease and right to increase the ...

Страница 406: ...Note Increasing the contrast is effective in adding a three dimensional feel to soft images However shadows and highlights may be lost if you increase the contrast too much 406 ...

Страница 407: ...ure of Red Green and Blue in various proportions gradation These colors can be adjusted individually as a channel Master Adjust the Red Green and Blue combined Red Adjust the Red channel Green Adjust the Green channel Blue Adjust the Blue channel Note Only Grayscale will be displayed in Channel when Color Mode is Grayscale Reading Histograms You can see the histogram of a specified area for each C...

Страница 408: ...vel 0 The parts at Mid point Slider will turn to the color exactly between the black point and white point All parts to the right of White point Slider will turn white level 255 When Image Adjustment is set to anything but None the adjustments shown below are performed automatically Moving the Black point and White point Sliders Move the Black point Slider or White point Slider to adjust brightnes...

Страница 409: ...s with more data distributed to the highlight side Move the Mid point Slider toward the highlight side Images with more data distributed to the shadow side Move the Mid point Slider toward the shadow side Adjusting Histograms Using the Droppers When you select a Channel and click the Black point Mid point or White point Dropper the mouse pointer on the preview image changes to a dropper Click a Dr...

Страница 410: ...cked with White point Dropper will be the brightest point You can also enter a value 10 to 255 Click Dropper for Gray Balance and click the area you want to adjust the color in the preview image The clicked point will be set as the achromatic color reference and the rest of the image is adjusted accordingly For instance if snow in a photo appears bluish click the bluish part to adjust the whole im...

Страница 411: ... mixture of Red Green and Blue in various proportions gradation These colors can be adjusted individually as a channel Master Adjust the Red Green and Blue combined Red Adjust the Red channel Green Adjust the Green channel Blue Adjust the Blue channel Note Only Grayscale will be displayed in Channel when Color Mode is Grayscale Reading Tone Curves With ScanGear scanning images via a scanner is the...

Страница 412: ... The midtone data of the input side is stretched toward the highlight of the output side resulting in a bright toned image when viewed on a monitor Underexposure Concave curve The midtone data of the input side is stretched toward the shadow of the output side resulting in a dark toned image when viewed on a monitor High contrast S curve The highlight and shadow of the input side are enhanced resu...

Страница 413: ...Downward sloping line The input and output sides are reversed resulting in a negative positive inverted image Edit custom curve You can drag specific points on the Tone Curve to freely adjust the brightness of the corresponding areas 413 ...

Страница 414: ...ent window Adjusting Threshold The brightness of color and grayscale images is expressed in a value between 0 and 255 However in creating black and white images all colors are mapped to either black 0 or white 255 Threshold is the borderline value that determines a color as black or white Move Slider to the right to increase the threshold value and thus increase the black areas Move the slider to ...

Страница 415: ...ar Scanner Driver Screens Basic Mode Tab Advanced Mode Tab Input Settings Output Settings Image Settings Color Adjustment Buttons Preferences Dialog Box Scanner Tab Preview Tab Scan Tab Color Settings Tab 415 ...

Страница 416: ...hen scanning from the ADF Auto Document Feeder 1 Settings and Operation Buttons Select Source Photo Color Scan color photos Magazine Color Scan color magazines Document Color Scan documents in color Document Grayscale Scan documents in black and white Document Color ADF Simplex Scan documents from the ADF in color Document Grayscale ADF Simplex Scan documents from the ADF in black and white Docume...

Страница 417: ...t type will also be active If you select Magazine Color the descreen function will be active Display Preview Image Preview Performs a trial scan Note When using the machine for the first time scanner calibration starts automatically Wait a while until the preview image appears Destination Select what you want to do with the scanned image Print Select this to print the scanned image on a printer Im...

Страница 418: ...ining the aspect ratio Monitor Size 1024 x 768 pixels etc Select an output size in pixels A cropping frame of the selected monitor size will be displayed and the portion within the cropping frame will be scanned You can drag the cropping frame to enlarge reduce it while maintaining the aspect ratio Add Delete Opens the Add Delete the Output Size dialog box in which you can specify custom output si...

Страница 419: ... the scan area within the Preview area If an area is not specified the document will be scanned at the document size Auto Crop If an area is specified only the portion in the cropping frame will be scanned Adjusting Cropping Frames ScanGear Image corrections Allows you to apply corrections to images Important Apply Auto Document Fix and Correct fading are available when Recommended is selected on ...

Страница 420: ...ings tab of the Preferences dialog box Perform Scan Scan Starts scanning Note When scanning starts the progress will be displayed Click Cancel to cancel the scan Preferences Opens the Preferences dialog box in which you can make scan preview settings Close Closes ScanGear scanner driver 2 Toolbar You can adjust or rotate preview images The buttons displayed on the Toolbar vary by view In thumbnail...

Страница 421: ...lable when two or more frames are displayed Selects the images in thumbnail view and outlines them in blue Select All Cropping Frames Available when two or more cropping frames are specified Turns the cropping frames into thick broken lines and applies the settings to all of them Remove Cropping Frame Removes the selected cropping frame Information Displays the version of ScanGear and the current ...

Страница 422: ...ect multiple images by clicking them while pressing the Ctrl key Unselected no outline The settings will not be applied Double click a frame to zoom in on the image Click Frame Advance at the bottom of the screen to display the previous or next frame Double click the frame again to return the display to its non magnified state When Whole Image is displayed on the Toolbar Items on the Platen are sc...

Страница 423: ...g frame on the displayed image In thumbnail view you can only create one cropping frame per image In whole image view you can create multiple cropping frames Adjusting Cropping Frames ScanGear Related Topic Scanning in Basic Mode 423 ...

Страница 424: ...view The preview function is not available when scanning from the ADF Auto Document Feeder 1 Settings and Operation Buttons Favorite Settings You can name and save a group of settings Input Settings Output Settings Image Settings and Color Adjustment Buttons on the Advanced Mode tab and load it as required It is convenient to save a group of settings if you will be using it repeatedly You can also...

Страница 425: ...rrections to the image brightness and color tones can be made including adjustments to the image s overall brightness or contrast and adjustments to its highlight and shadow values histogram or balance tone curve Zoom Zooms in on a frame or zooms in on the image in the area specified with a cropping frame scan area When zoomed in Zoom changes to Undo Click Undo to return the display to its non mag...

Страница 426: ...he next action may appear Follow the prompt to complete For details refer to Status of ScanGear dialog after scanning in Scan Tab Preferences dialog box It will take time to process the images if the total size of the scanned images exceeds a certain size In that case a warning message appears it is recommended that you reduce the total size To continue scan in whole image view Preferences Opens t...

Страница 427: ...ing the image Right click the image to zoom out Rotate Left Rotates the preview image 90 degrees counter clockwise The result will be reflected in the scanned image The image returns to its original state when you preview again Rotate Right Rotates the preview image 90 degrees clockwise The result will be reflected in the scanned image The image returns to its original state when you preview again...

Страница 428: ...s to all of them Remove Cropping Frame Removes the selected cropping frame Information Displays the version of ScanGear and the current scan settings document type etc Open Guide Opens this page 3 Preview Area This is where a trial image appears after you click Preview You can also check the results of the settings image corrections color adjustments etc made in 1 Settings and Operation Buttons Wh...

Страница 429: ...selected no outline The settings will not be applied When Whole Image is displayed on the Toolbar Items on the Platen are scanned and displayed as a single image All portions in the cropping frames will be scanned Note You can specify the cropping frame on the displayed image In thumbnail view you can only create one cropping frame per image In whole image view you can create multiple cropping fra...

Страница 430: ...aper Size Select the size of the document to be scanned This setting is available in whole image view only When scanning both sides of the documents automatically from the ADF select A4 or Letter When you select a size the Preview area size changes accordingly Important Some applications have a limit to the amount of scan data they can receive Available scan range is as follows 21000 pixels x 3000...

Страница 431: ...n black and white photos or to create black and white images This mode renders the image in 256 levels 8 bit of black and white Black and White Select this mode to scan photos and documents in black and white This mode renders the image in black and white The contrast in the image is divided at certain levels threshold level into black and white and is rendered in two colors The threshold level ca...

Страница 432: ...played and its aspect ratio is fixed Note The values you can enter will be within the range of the selected document size The minimum size is 96 pixels x 96 pixels when Output Resolution is 600 dpi scaled at 100 When Auto Crop is performed in whole image view the aspect ratio will not be maintained since the size will be prioritized Refer to Adjusting Cropping Frames ScanGear for details on croppi...

Страница 433: ...i When Select Source is Document ADF Simplex or Document ADF Duplex You can enter a value within the range of 25 dpi to 600 dpi Output Size Select an output size Select Flexible to set custom sizes or select a size for printing or displaying Select Add Delete to set custom size and save it as a new output size option Flexible You can specify the output resolution and scale and adjust the cropping ...

Страница 434: ... or move it while maintaining the aspect ratio Add Delete Opens the Add Delete the Output Size dialog box in which you can specify custom output sizes In the Add Delete the Output Size dialog box you can specify multiple output sizes and save them at one time Saved items will be registered to the Output Size list and can be selected along with the predefined items Adding Select Print or Image disp...

Страница 435: ... Images in Preview Tab Preferences dialog box Switch Aspect Ratio Available when Output Size is set to anything but Flexible Click this button to rotate the cropping frame Click again to return it to the original orientation Data Size The data size when scanned with the current settings is displayed Note When the data size exceeds a certain size the value appears in red In that case a warning mess...

Страница 436: ...ing items Image Adjustment When Image Adjustment is set the brightness of the specified portion of the image is optimized Images can be adjusted according to the automatically detected document type or the specified document type The result of the adjustment will be reflected in the entire image None Image Adjustment will not be applied Auto Applies Image Adjustment by automatically detecting the ...

Страница 437: ...t this setting Important Reduce Show through can be set when Recommended is selected on the Color Settings tab of the Preferences dialog box and Document or Magazine is selected for Image Adjustment Unsharp Mask Emphasizes the outline of the subjects to sharpen the image when scanning photos OFF Unsharp Mask will not be applied ON Emphasizes the outline of the subjects to sharpen the image It is r...

Страница 438: ... that have faded with time or have a colorcast Colorcast is a phenomenon where a specific color affects the entire picture due to the weather or ambient strong colors None Fading Correction will not be applied Low Select this to correct a small amount of fading and colorcast Medium It is recommended that you normally select this setting High Select this to correct a large amount of fading and colo...

Страница 439: ...t level is too strong with the medium setting Medium It is recommended that you normally select this setting High Select this when the effect level is too weak with the medium setting Important You can set Gutter Shadow Correction after preview Do not place objects that weigh 4 4 lbs 2 0 kg or more on the platen Also do not press on the document with a force exceeding 4 4 lbs 2 0 kg If you press h...

Страница 440: ...e document with black cloth if white spots streaks or colored patterns appear in scan results due to ambient light entering between the document and the Platen If the shadow is not corrected properly adjust the cropping frame scan area on the preview image Adjusting Cropping Frames ScanGear 440 ...

Страница 441: ...Color Adjustment Buttons the results will be reflected in the preview image Click a Color Adjustment Button to set the following items Saturation Color Balance Adjust the saturation vividness and color tone of the image Use this function to brighten colors that have faded with time or due to colorcast Colorcast is a phenomenon where a specific color affects the entire picture due to the weather or...

Страница 442: ...e no settings to make in this screen For a color image select a color in Channel to check either Red Green or Blue or select Master to check three colors together If you place the cursor on the preview image the portion will be enlarged and its RGB values only L when Color Mode is Grayscale before and after the adjustments will be displayed Threshold Set the boundary threshold at which black and w...

Страница 443: ...gs List and click Delete Click Save to save the settings displayed in Tone Curve Settings List or Threshold Settings List You can load and apply the saved tone curve threshold settings to a preview image To load the settings select the saved item from the pull down menu Note Save up to 20 items Defaults Reset all adjustments saturation color balance brightness contrast histogram and tone curve 443...

Страница 444: ...settings specify the folder in which to save images temporarily and set the music file to play during or at the end of a scan Preview Tab Allows you to select what to do with Preview when ScanGear is started how to display cropping frames after previewing images and the cropping size for thumbnails of scanned documents Scan Tab Allows you to select what to do with ScanGear after scanning image Col...

Страница 445: ...Settings dialog box Note If the machine is off or bi directional communication is disabled a message may appear because the computer cannot collect the machine status In that case click OK to exit ScanGear scanner driver Auto Power On Select Enable to turn on the machine automatically when data is received Auto Power Off Specify the amount of time you want to set from the list When this time lapse...

Страница 446: ...g or printing may take longer than usual when this function is used Do not use quiet mode Select this option when you wish to use the machine with volume of normal operating noise Always use quiet mode Select this option when you wish to reduce the operating noise of the machine Use quiet mode during specified hours Select this option when you wish to reduce the operating noise of the machine duri...

Страница 447: ...ile mid rmi midi Audio file wav aif aiff MP3 file mp3 Calibration Settings When you set Execute at Every Scan to ON the scanner will be calibrated every time before previewing and scanning to reproduce correct color tones in scanned images Note Even when Execute at Every Scan is set to OFF the scanner may be calibrated automatically in some cases such as immediately after you turn the machine on C...

Страница 448: ... Advanced Mode tab settings are also saved None No preview image will be displayed at startup Note Select None if you do not want to save the preview image Cropping Frame on Previewed Images Select how to display cropping frames after previewing images Execute auto cropping on previewed images The cropping frame scan area will automatically be displayed in the document size after previewing Displa...

Страница 449: ...e standard size Standard The standard size Smaller Displays 95 in width and height of the area displayed for the standard size Note When you change the Cropping Size for Thumbnail View setting the preview images will be refreshed and cropped to the new size As the preview images are refreshed the color adjustments and other settings applied to them are reset 449 ...

Страница 450: ... original application when scanning is completed Do not close ScanGear automatically Select this to return to the ScanGear screen for another scan when scanning is completed Display the dialog to select next action Select this to open a screen and select what to do when scanning is completed Note Even if Do not close ScanGear automatically or Display the dialog to select next action is set some ap...

Страница 451: ...inter colors thus reducing time and trouble to manually match the monitor and printer colors Source Scanner Select scanner profile Target Select target profile Monitor Select this checkbox to display preview image with optimum correction for monitor Defaults Returns to the default Color Matching settings Note The Color Adjustment Buttons on the Advanced Mode tab are not available when you select C...

Страница 452: ...nual for the monitor printer and application settings Monitor Gamma By setting the gamma value of a monitor you can adjust the input data to the brightness characteristics of the monitor Adjust the value if your monitor s gamma value does not match the default value set in ScanGear and the colors of the original image are not accurately reflected in the monitor Click Defaults to return to the defa...

Страница 453: ... the item type or size automatically Important When scanning by specifying the paper size in IJ Scan Utility or ScanGear scanner driver align an upper corner of the item with the corner at the arrow alignment mark of the platen Photos that have been cut to various shapes and items smaller than 1 2 inches 3 cm square cannot be cropped accurately when scanning Reflective disc labels may not be scann...

Страница 454: ...J Scan Utility With network connection items may not be scanned correctly when five or more items are placed In that case reduce the number of items placed on the platen to four or less then scan again Positions of slanted items 10 degrees or less are cor rected automatically Important Refer to Loading Originals for your model from Home of the Online Manual for details on the por tions in which it...

Страница 455: ... document guides to the width of the documents Insert the documents face up until a beep sounds Note When scanning duplex documents place the front sides facing up They will not be scanned in the correct page order if placed the other way around 455 ...

Страница 456: ...Scan Utility Initial Cropping Frame In thumbnail view No cropping frame is specified You can drag the mouse over a thumbnail to specify a cropping frame In whole image view An active cropping frame is automatically specified around the preview image You can drag the cropping frame in the Preview area to specify the area Note You can change the auto crop setting in the Preferences dialog box Refer ...

Страница 457: ...e in the direction of the arrow the cropping frame will expand or contract accordingly The cursor will change into Crosshair Arrow when it is positioned within a cropping frame Click and drag the mouse to move the entire cropping frame Note On the Advanced Mode tab you can specify the cropping frame size by entering the values into Width and Height in Input Settings You can rotate a cropping frame...

Страница 458: ...lso select multiple cropping frames by clicking them while pressing the Ctrl key If you select multiple cropping frames and change the settings on a tab at the right of ScanGear the settings will be applied to all the selected cropping frames When you create a new cropping frame it retains the settings of the latest cropping frame Note Create up to 12 cropping frames Scanning takes longer than usu...

Страница 459: ... select it and click Remove Cropping Frame on the Toolbar Alternatively press the Delete key When there are multiple cropping frames all the selected cropping frames active cropping frame and selected cropping frames are deleted simultaneously 459 ...

Страница 460: ... using a network compatible model by connecting to a network the machine cannot be accessed from multiple computers at the same time When using a network compatible model by connecting to a network scanning takes longer than usual Make sure that you have adequate disk space available when scanning large images at high resolutions For example at least 300 MB of free space is required to scan an A4 ...

Страница 461: ...rrectly in some applications In that case increase the operating system s virtual memory and retry When image size is too large such as when scanning large images at high resolution your computer may not respond or the progress bar may remain at 0 depending on the application In that case cancel the action for example by clicking Cancel on the progress bar then increase the operating system s virt...

Страница 462: ...Other Scanning Methods Scanning with WIA Driver Scanning Using the Control Panel Windows XP Only 462 ...

Страница 463: ...g screen appears 3 Specify the settings Scanner The currently set product name is displayed To change the scanner click Change and select the product you want to use Profile Select Photo Default or Documents according to the type of item to be scanned To save a new Profile select Add profile You can specify the details in the Add New Profile dialog box Source Select a scanner type Paper size This ...

Страница 464: ... menu of Paint Select the command to scan an item in the application 3 Select the type of picture according to the item to be scanned Select from Color picture Grayscale picture Black and white picture or text and Custom Settings Note To scan with the values previously set in Adjust the quality of the scanned picture select Custom Settings 4 Click Adjust the quality of the scanned picture and set ...

Страница 465: ...for your item Reset Click to restore the original settings 5 Click Preview to preview the image The preview image appears on the right Drag to specify the scan area 6 Click Scan Scanning starts then the scanned image appears in the application 465 ...

Страница 466: ... XXX series where XXX is the model name The Scanner and Camera Wizard dialog box appears 3 Click Next 4 Select Picture type according to the item to be scanned Note To scan with the values previously set in Custom settings select Custom 5 Click Custom settings to set the preferences as required Brightness Move the slider to adjust the brightness Move it to the left to darken and right to brighten ...

Страница 467: ...sharpening the image You can also enter a value 127 to 127 Resolution DPI Enter the resolution Specify a value between 50 dpi and 600 dpi Resolution Picture type Select the type of scan you want for your item Reset Click to restore the original settings 6 Click Preview to preview the image The preview image appears on the right Drag to specify the scan area 7 Click Next and follow the instructions...

Страница 468: ...Scanning Tips Resolution Data Formats Color Matching 468 ...

Страница 469: ... a Computer tab of the Settings dialog box ScanGear Scanner Driver Output Resolution in Output Settings on the Advanced Mode tab Appropriate Resolution Settings Set the resolution according to the use of the scanned image Item Type Use Color Mode Appropriate Resolution Color photo Copying Printing Color 300 dpi Creating a postcard Color 300 dpi Saving to a computer Color 300 dpi Using on a website...

Страница 470: ...e processing speed will slow down significantly and you will experience inconvenience such as lack of memory Set the minimum required resolution according to the use of the image Note When you will be printing the scanned image by enlarging it scan by setting a higher resolution than the recommended one above 470 ...

Страница 471: ...e every time they are saved and cannot be returned to their original state JPEG is not available for black and white images TIFF Standard File Extension tif A data format featuring a relatively high compatibility between various computers and applications TIFF is suitable for editing saved images Note Some TIFF files are incompatible IJ Scan Utility supports the following TIFF file formats Uncompr...

Страница 472: ...put profile target The image s color space is converted from the scanner s color space to sRGB by ScanGear When displaying on a monitor the image s color space is converted from sRGB to the monitor s color space based on the operating system s monitor settings and the application s working space settings When printing the image s color space is converted from sRGB to the printer s color space base...

Страница 473: ...items smaller than 1 2 inches 3 cm square cannot be cropped accurately when scanning Reflective disc labels may not be scanned as expected For Photos Postcards Business Cards or BD DVD CD For Magazines Newspapers or Documents Placing a Single Item Place the item face down on the platen with 0 4 inch 1 cm or more space between the edges diagonally striped area of the platen and the item Portions pl...

Страница 474: ... or more space between the edges diagonally striped area of the platen and items and be tween items Portions placed on the diagonally striped area cannot be scanned more than 0 4 inch 1 cm Note You can place up to 12 items Positions of slanted items 10 degrees or less are corrected automatically 474 ...

Страница 475: ...Scanning from Computer Mac OS Using IJ Scan Utility Using Scanner Driver Scanning Tips Positioning Originals Scanning from Computer 475 ...

Страница 476: ...ot Connect to Computer Properly Cannot Install MP Drivers Easy WebPrint EX Does Not Start or Easy WebPrint EX Menu Does Not Appear Windows Print Scan Results Are Unsatisfactory Printing Does Not Start Copying Printing Stops Print Results Are Unsatisfactory No Ink Comes Out Paper Jams Paper Does Not Feed Properly No Paper Error Scan Results Are Unsatisfactory Windows Scan Results Are Unsatisfactory...

Страница 477: ... Problems Printing Problems Scanning Problems Windows Scanning Problems Mac OS Mechanical Problems Installation and Download Problems Errors and Messages If You Cannot Solve a Problem Repairing Your Machine 477 ...

Страница 478: ...Printing Problems Printing Does Not Start Paper Jams Print Results Are Unsatisfactory No Ink Comes Out Paper Does Not Feed Properly No Paper Error Copying Printing Stops 478 ...

Страница 479: ...inting If printing starts normally there is a problem with the relay device Contact the vendor of the relay device There could also be a problem with the USB cable Replace the USB cable and retry the printing Check3 If printing from a computer delete unnecessary print jobs For Windows Deleting the Undesired Print Job For Mac OS Deleting the Undesired Print Job Check4 Is your machine s printer driv...

Страница 480: ... ROM or the Canon website If printing does not start even though the machine is connected to the computer using a USB cable and the port named USBnnn is selected In Windows 10 click Start button and select All apps Canon Utilities Canon My Printer Canon My Printer and then select Diagnose and Repair Printer Follow the on screen instructions to set the correct printer port and then select your mach...

Страница 481: ...automatically Take the appropriate action described in the message For Windows For Mac OS The screen differs depending on the OS you are using To remove the jammed paper see List of Support Code for Error Paper Jams Note You can also search for details on resolving the errors indicated by the support code shown Search 481 ...

Страница 482: ...cking the paper and print quality settings differs depending on what you are using your machine for Check the page size and media type settings using the printer driver For Windows Printing with Easy Setup For Mac OS Printing with Easy Setup Check2 Make sure appropriate print quality is selected using printer driver Select a print quality suited to the paper and to what you are printing If you not...

Страница 483: ...mplete or Missing Windows Images Incomplete or Missing Windows Ink Blots Paper Curl Paper Is Smudged Printed Surface Is Scratched Back of Paper Is Smudged Vertical Line Next to Image Uneven or Streaked Colors 483 ...

Страница 484: ...inter driver Select Do not allow application software to compress print data check box and click OK Clear the check box once printing is complete Check2 Is print data extremely large Windows Click Print Options on Page Setup sheet of the printer driver Then set Prevention of Print Data Loss to On in the dialog that appears This may reduce print quality Check3 Your hard disk may not have sufficient...

Страница 485: ...Paper Is Blank Printing Is Blurry Colors Are Wrong White Streaks Appear Paper Is Blank Printing Is Blurry Colors Are Wrong 485 ...

Страница 486: ...ozzle check pattern and examine the pattern If problem is not resolved after performing print head cleaning twice Perform print head deep cleaning If problem is not resolved after performing print head deep cleaning Perform system cleaning From computer For Windows Cleaning the Print Heads For Mac OS Cleaning the Print Heads From operation panel To perform system cleaning press and hold the Stop b...

Страница 487: ...ink tank with the corresponding color of ink After refilling the ink tank perform system cleaning From computer For Windows Cleaning the Print Heads For Mac OS Cleaning the Print Heads From operation panel To perform system cleaning press and hold the Stop button until the Alarm lamp flashes 5 times and then release the button Important Before performing system cleaning check the remaining ink lev...

Страница 488: ...able side When copying see also the sections below Check5 Is platen glass dirty Clean the platen glass Cleaning the Platen Glass and Document Cover Check6 Make sure original is properly loaded on platen glass Loading Originals Check7 Is original loaded with side to be copied facing down on platen glass Check8 Did you copy a printout done by this machine If you use a printout done by this machine a...

Страница 489: ...after performing print head deep cleaning Perform system cleaning From computer For Windows Cleaning the Print Heads For Mac OS Cleaning the Print Heads From operation panel To perform system cleaning press and hold the Stop button until the Alarm lamp flashes 5 times and then release the button Important Before performing system cleaning check the remaining ink level of all colors If the remainin...

Страница 490: ... the Stop button until the Alarm lamp flashes 5 times and then release the button Important Before performing system cleaning check the remaining ink level of all colors If the remaining ink level is below the single dot a refill the ink tank of corresponding color Performing system cleaning when the remaining ink level is not enough may damage the machine Note Printed colors may not match screen ...

Страница 491: ...djust the print head position Aligning the Print Head Note If the problem is not resolved after performing the print head alignment perform print head alignment manually from your computer For Windows Aligning the Print Head Position For Mac OS Aligning the Print Head Position Check3 Increase print quality and try printing again Increasing the print quality using the printer driver may improve the...

Страница 492: ...ut Printing or Binding margin function is in use thin lines may not be printed Try thickening the lines in the document Check2 Is print data extremely large Click Print Options on Page Setup sheet of the printer driver Then set Prevention of Print Data Loss to On in the dialog that appears This may reduce print quality 492 ...

Страница 493: ...ay be improved Click Print Options on Page Setup sheet of the printer driver Select Do not allow application software to compress print data check box and click OK Clear the check box once printing is complete Check2 Is print data extremely large Click Print Options on Page Setup sheet of the printer driver Then set Prevention of Print Data Loss to On in the dialog that appears This may reduce pri...

Страница 494: ...etting on plain paper the paper may absorb too much ink and become wavy causing paper abrasion Check the intensity setting in the printer driver For Windows Adjusting Intensity For Mac OS Adjusting Intensity Check3 Use Photo Paper to print photos To print data with high color saturation such as photographs or images with dark colors we recommend that you use Photo Paper Plus Glossy II or other Can...

Страница 495: ... printing If the paper you are using is not suitable for borderless printing the print quality may be reduced at the top and bottom edges of the paper Printing Area Check3 Correct curl before loading paper When using Photo Paper Plus Semi gloss even if the sheet is curled load one sheet at a time as it is Rolling this paper in the opposite direction to flatten it may crack the paper surface and re...

Страница 496: ...w to curl the paper outward up to 0 1 inch 3 mm B in height before printing This may improve the print result C Print side We recommend feeding paper that has been curled outward one sheet at a time Check4 Set printer to prevent paper abrasion Adjusting the setting to prevent paper abrasion will widen the clearance between the print head and the paper If you notice abrasion even with the media typ...

Страница 497: ...f you are printing with a high intensity setting on plain paper the paper may absorb too much ink and become wavy causing paper abrasion Check the intensity setting in the printer driver For Windows Adjusting Intensity For Mac OS Adjusting Intensity Check6 Do not print outside recommended printing area If you print outside the recommended printing area of your paper ink may stain the lower edge of...

Страница 498: ...rned on 2 Open printer driver setup window How to Open the Printer Driver Setup Window 3 Click Maintenance tab and Custom Settings 4 Drag Ink Drying Wait Time slide bar to set wait time and click OK 5 Check message and click OK For Mac OS 1 Make sure machine is turned on 2 Open Canon IJ Printer Utility Opening the Canon IJ Printer Utility 3 Select Custom Settings in pop up menu 4 Drag Ink Drying W...

Страница 499: ...ity settings Print Results Are Unsatisfactory Check2 Perform bottom plate cleaning to clean inside of machine Cleaning the Inside of the Machine Bottom Plate Cleaning Note During duplex printing or too much printing ink may stain the inside of the machine 499 ...

Страница 500: ...er size to match the loaded paper Print Results Are Unsatisfactory Note The direction of the vertical line pattern may vary depending on the image data or the print setting This machine performs automatic cleaning when necessary to keep printouts clean Although the ink is normally ejected onto the ink absorber at the outer edge of the paper it may get onto the paper if the loaded paper is larger t...

Страница 501: ...ns such as print head cleaning Print the nozzle check pattern to determine whether the ink ejects properly from the print head nozzles For details on printing the nozzle check pattern print head cleaning and print head deep cleaning see If Printing Is Faint or Uneven If nozzle check pattern is not printed correctly After performing the print head cleaning print the nozzle check pattern and examine...

Страница 502: ...nk level is below the single dot a refill the ink tank of corresponding color Performing system cleaning when the remaining ink level is not enough may damage the machine If the problem is not resolved yet the print head may be damaged Contact your nearest Canon service center to request a repair Important Do not tilt the machine when moving it since the ink may leak out When transporting the mach...

Страница 503: ...blem is not resolved after performing print head cleaning twice Perform print head deep cleaning If problem is not resolved after performing print head deep cleaning Perform system cleaning From computer For Windows Cleaning the Print Heads For Mac OS Cleaning the Print Heads From operation panel To perform system cleaning press and hold the Stop button until the Alarm lamp flashes 5 times and the...

Страница 504: ...print head may be damaged Contact your nearest Canon service center to request a repair Important Do not tilt the machine when moving it since the ink may leak out When transporting the machine for repairing it see Repairing Your Machine 504 ...

Страница 505: ...e to less than half of the paper load limit Always load the paper in portrait orientation regardless of the printing orientation When you load the paper place the print side facing UP and slide the paper guides to align with both sides of the paper Loading Paper Check3 Is paper too thick or curled Media Types You Cannot Use Check4 When loading envelopes consider the following When printing on enve...

Страница 506: ...down Doing so may cause the ink to leak Check7 Clean paper feed roller Cleaning the Paper Feed Roller Note Cleaning the paper feed roller abrades it so do this only when necessary If the measures above do not solve the problem contact your nearest Canon service center to request a repair Important Do not tilt the machine when moving it since the ink may leak out When transporting the machine for r...

Страница 507: ...nting several copies printing may pause to allow the ink to dry Check3 Has machine been printing continuously for a long period If the machine has been printing continuously for a long time the print head or other parts around it may overheat The machine may stop printing at a line break for a period of time and then resume printing In this case wait a while without doing anything If the printing ...

Страница 508: ...Scanning Problems Windows Scanning Problems Scan Results Are Unsatisfactory Software Problems IJ Scan Utility Error Messages ScanGear Scanner Driver Error Messages 508 ...

Страница 509: ...canGear Scanner Driver Screen Does Not Appear Cannot Scan Multiple Originals at One Time Cannot Scan Properly with Auto Scan Slow Scanning Speed There is not enough memory Message Is Displayed Computer Stops Operating during Scanning Scanner Does Not Work after Upgrading Windows Scanned Image Does Not Open 509 ...

Страница 510: ...nner or printer is turned on Check 2 Connect the USB cable to a different USB port on the computer Check 3 If the USB cable is connected to a USB hub remove it from the USB hub and connect it to a USB port on the computer Check 4 Restart the computer 510 ...

Страница 511: ...rinter name is displayed multiple times select the one that does not include WIA Note The operation may differ depending on the application Use the WIA driver when scanning from a WIA compliant application Scanning with WIA Driver Check 3 Make sure that the application supports TWAIN You cannot start ScanGear scanner driver from applications not supporting TWAIN Check 4 Scan and save images with I...

Страница 512: ...nected to a USB hub remove it from the USB hub and connect it to a USB port on the computer Check 5 Make sure that MP Drivers is installed If not installed install MP Drivers from the Setup CD ROM or the web page Check 6 Select your scanner or printer on the application s menu Note The operation may differ depending on the application Check 7 Make sure that the application supports TWAIN You canno...

Страница 513: ...eck 1 Make sure that the items are placed correctly Positioning Originals Scanning from Computer Check 2 Check if you can properly scan one item Some applications do not support multiple image scanning In that case scan each item individually 513 ...

Страница 514: ... Make sure that the items are placed correctly Positioning Originals Scanning from Computer Check 2 Multiple item scanning may not be supported Some applications do not support multiple image scanning In that case scan each item individually 514 ...

Страница 515: ...2 Set Fading Correction Grain Correction etc to None Refer to Image Settings for your model from Home of the Online Manual for details Check 3 In IJ Scan Utility deselect the Correct slanted text document Detect the orientation of text document and rotate image checkbox and scan again Settings Document Scan Dialog Box Settings Custom Scan Dialog Box 515 ...

Страница 516: ... There is not enough memory Message Is Displayed Check 1 Exit other applications and try again Check 2 Reduce the resolution or output size and scan again Resolution 516 ...

Страница 517: ...ient free hard disk space then scan again Error message may appear if there is not enough hard disk space to scan and save when the image size is too large such as when scanning a large item at high resolution Check 3 In Folder to Save Temporary Files of IJ Scan Utility specify a folder on a drive with sufficient free space Settings General Settings Dialog Box Check 4 Multiple devices may be conne...

Страница 518: ...click Yes 4 When uninstallation is complete click OK IJ Scan Utility is deleted Note A confirmation or warning dialog box may appear when installing uninstalling or starting up software This dialog box appears when administrative rights are required to perform a task If you are logged on to an administrator account follow the on screen instructions Windows XP 1 From the Start menu select Control P...

Страница 519: ...a format is not supported by the application scan the image again and select a popular data format such as JPEG when saving it Refer to the application s manual for details If you have any questions contact the manufacturer of the application 519 ...

Страница 520: ...y Image Displayed on the Monitor Is Poor Scanned Image Is Surrounded by Extra White Areas Cannot Scan at the Correct Size Original Is Placed Correctly but the Scanned Image Is Slanted Scanned Image Is Enlarged Reduced on the Computer Monitor 520 ...

Страница 521: ...n Dialog Box Settings Scan and Stitch Dialog Box On the Basic Mode tab of ScanGear scanner driver select Magazine Color in Select Source Refer to Basic Mode Tab for your model from Home of the Online Manual for details On the Advanced Mode tab of ScanGear set Descreen in Image Settings to ON Refer to Image Settings for your model from Home of the Online Manual for details Note If moire appears whe...

Страница 522: ...nced Mode tab of ScanGear set Image Adjustment in Image Settings to None Refer to Image Settings for your model from Home of the Online Manual for details On the Color Settings tab in the Preferences dialog box of ScanGear set Color Matching Refer to Color Settings Tab for your model from Home of the Online Manual for details 522 ...

Страница 523: ...the item size You can also manually specify the scan area in thumbnail view or when there are white margins along the item for example in photos or when you want to create custom cropping frames Adjusting Cropping Frames in the Image Stitch Window Note Refer to Adjusting Cropping Frames ScanGear for your model from Home of the Online Manual for how to adjust cropping frames with ScanGear scanner d...

Страница 524: ...Cannot Scan at the Correct Size Check Make sure that the items are placed correctly Positioning Originals Scanning from Computer 524 ...

Страница 525: ...he Scanned Image Is Slanted Check When Document or Magazine is selected for Select Source deselect the Correct slanted text document checkbox and scan the item again Settings Document Scan Dialog Box Settings Custom Scan Dialog Box 525 ...

Страница 526: ...or details If you have any questions contact the manufacturer of the application Note You cannot reduce the image size in Paint To reduce the display size open the images in an application Check 2 Change the resolution setting in ScanGear scanner driver and scan again The higher the resolution the larger the resulting image will be Resolution 526 ...

Страница 527: ...Software Problems The E mail Client You Want to Use Does Not Appear in the Screen for Selecting an E mail Client 527 ...

Страница 528: ... Check Check that the e mail client s MAPI is enabled Refer to the e mail client s manual for how to set MAPI If the problem is not solved even when MAPI is enabled select None Attach Manually in the screen for selecting an e mail client then manually attach the image to the outgoing e mail 528 ...

Страница 529: ...2 An internal error has occurred Take the following measures Check the scanner status Restart the scanner Restart the computer then try again Reinstall the scanner driver An internal error has occurred Take the following measures Check the scanner status Restart the scanner Restart the computer then try again Reinstall MP Drivers 230 A scanner driver supporting this software is not installed In st...

Страница 530: ...dialog box or Save in in the corresponding Settings dialog box 244 You do not have the required privileges to access the specified folder Grant access permission to the specified folder 530 ...

Страница 531: ...onnected from LAN if using on LAN Please check and try again Scanner driver will be closed Make sure that your scanner or printer is turned on Delete MP Drivers then reinstall MP Drivers from the Setup CD ROM or the web page Refer to Deleting the Unnecessary MP Drivers for your model from Home of the Online Manual for how to delete MP Drivers Make sure that the selected appli cation source is corr...

Страница 532: ...for how to delete MP Drivers 202 An internal error has occurred Scanner driver will be closed Take the following meas ures Check the scanner status Restart the scanner Restart the computer then try again Reinstall the scanner driver An internal error has occurred Take the following measures Check the scanner status Restart the scanner Restart the computer then try again Reinstall MP Drivers Follow...

Страница 533: ...rk connection specify the scanner to use with IJ Network Scanner Selector EX 208 IJ Network Scanner Selector cannot be found Reinstall scanner driver Scanner driver will be closed Delete MP Drivers then reinstall MP Drivers from the Setup CD ROM or the web page Refer to Deleting the Unnecessary MP Drivers for your model from Home of the Online Manual for how to delete MP Drivers 250 An error has o...

Страница 534: ...Mechanical Problems Power Does Not Come On Power Shuts Off By Itself Cannot Connect to Computer Properly Printer Status Monitor Not Displayed Windows 534 ...

Страница 535: ...nplug machine leave it for at least 2 minutes and then plug it back in and turn it on again If this does not solve the problem contact your nearest Canon service center to request a repair Important Do not tilt the machine when moving it since the ink may leak out When transporting the machine for repairing it see Repairing Your Machine 535 ...

Страница 536: ...ver setup window and in Auto Power in Maintenance sheet select Disable for Auto Power Off If you are using a Mac OS and if you do not want the machine to turn off automatically Open Canon IJ Printer Utility select Power Settings in the pop up menu and then select Disable for Auto Power Off on Auto Power Note You can also enable the machine to turn on off automatically from the operation panel Turn...

Страница 537: ... supports Hi Speed USB connection Does the USB port on your computer support Hi Speed USB connection Does the USB cable or the USB hub support Hi Speed USB connection Be sure to use a certified Hi Speed USB cable We recommend that the USB cable be no longer than 10 feet 3 meters or so Does the operating system of your computer support Hi Speed USB connection Install the latest update for your comp...

Страница 538: ...e sure Enable Status Monitor is selected on the Option menu of the printer status monitor 1 Open printer driver setup window How to Open the Printer Driver Setup Window 2 On Maintenance sheet click View Printer Status 3 Select Enable Status Monitor on Option menu if it is not selected 538 ...

Страница 539: ...Installation and Download Problems Cannot Install MP Drivers Easy WebPrint EX Does Not Start or Easy WebPrint EX Menu Does Not Appear Windows 539 ...

Страница 540: ... or Windows Vista click Start and then click Computer In Windows XP click Start and then click My Computer 2 Double click CD ROM icon in the window that appears If the contents of the CD ROM appear double click MSETUP4 EXE If you cannot install the MP Drivers with the Setup CD ROM install them from the Canon website Note If the CD ROM icon does not appear try the following Remove the CD ROM from y...

Страница 541: ...d then reinstall the MP Drivers Deleting the Unnecessary MP Drivers Reinstall the MP Drivers with the Setup CD ROM or install them from the Canon website Note If the installer was stopped due to a Windows error Windows operation may be unstable and you may not be able to install the drivers Restart your computer and then reinstall the drivers For Mac OS Download the drivers from the support page o...

Страница 542: ...ll it may appear in the notification area on the desktop Click the message and follow the instructions to install Easy WebPrint EX Internet access is required to install or download Easy WebPrint EX Check2 Is Canon Easy WebPrint EX selected on Toolbars menu in Internet Explorer s View menu If Canon Easy WebPrint EX is not selected Easy WebPrint EX is disabled Select Canon Easy WebPrint EX to enabl...

Страница 543: ...Errors and Messages An Error Occurs Message Appears The printer is performing another operation Appears on Computer Screen 543 ...

Страница 544: ...Support Code 2 flashes Machine is out of paper or paper does not feed 1000 3 flashes Paper is jammed in paper output slot or in rear tray 1300 4 flashes Cartridge is not installed properly 1470 5 flashes Print head may be damaged 1403 Cartridge cannot be recognized 1471 Appropriate cartridge is not installed 1476 7 flashes Cartridge is not installed in correct position 1474 More than one cartridge...

Страница 545: ...ccurred 5B00 5B01 10 flashes An error requiring a repair has occurred B202 B203 B204 B205 Other cases than above Printer error has occurred 5011 5012 5050 5200 5400 5700 6800 6801 6930 6931 6932 6933 6936 6937 6938 6940 6941 6942 6943 6944 6945 6946 When a Support Code and a Message Are Displayed on Computer Screen For Windows For Mac OS 545 ...

Страница 546: ...ffers depending on the OS you are using Note You can also search for details on resolving the errors indicated by the support code shown Search To resolve errors that do not have support codes see Message Appears 546 ...

Страница 547: ...rror message that appears on the computer and click OK The machine starts printing See Notice for Unplugging the Power Cord for unplugging the power cord Writing Error Output Error Communication Error Windows Check1 If ON lamp is off make sure machine is plugged in and turn it on The ON lamp flashes while the machine is initializing Wait until the ON lamp stops flashing and remains lit Check2 Make...

Страница 548: ...er If My Printer is not displayed on Start screen select Search charm and then search for My Printer Set the correct printer port on Diagnose and Repair Printer Follow the on screen instructions to set the correct printer port and then select your machine s name In Windows 7 Windows Vista or Windows XP click Start and select All programs Canon Utilities Canon My Printer Canon My Printer and then s...

Страница 549: ... USB cable is securely plugged in to machine and computer 3 Click General tab and check for a device problem If a device error is shown see Windows Help to resolve it Other Error Messages Windows Check If an error message appears outside printer status monitor check the following Could not spool successfully due to insufficient disk space Delete any unnecessary files to increase the amount of free...

Страница 550: ...appear Make sure the program name is IJPLMUI exe and allow it If you clear Send automatically from the next time check box the information will not be sent automatically from next time and a confirmation screen will appear at the time of the next survey To send the information automatically see Changing confirmation screen setting If you do not agree to participate in survey program Click Do not a...

Страница 551: ... Fax Extended Survey Program 3 Select Change If you select Yes after you have followed the on screen instructions the confirmation screen will appear at the time of the next survey If you select No the information will be sent automatically Note If you select Uninstall or Remove in Windows XP the Inkjet Printer Scanner Fax Extended Survey Program is uninstalled Follow the on screen instructions In...

Страница 552: ...the Inkjet Printer Scanner Fax Extended Survey Program icon will appear in the dock at the time of the next survey If you do not agree to participate in survey program Click Do not agree The confirmation screen closes and the survey is skipped The confirmation screen will reappear one month later To stop sending information Click Turn off This stops the Inkjet Printer Scanner Fax Extended Survey P...

Страница 553: ... Utilities folder and Inkjet Extended Survey Program folder 2 Double click Canon Inkjet Printer Scanner Fax Extended Survey Program icon Do not display the confirmation screen when information is sent If the check box is selected the information will be sent automatically If the check box is not selected Inkjet Printer Scanner Fax Extended Survey Program icon will appear in the Dock at the time of...

Страница 554: ...inter installation Note During installation the printer requires the operation that ink is loaded into the inside of printer from the ink tank This operation takes about 6 minutes to complete Wait until the operation is complete Check2 This message may appear while the printer is in operation This message closes when the operation is complete Wait until the operation is complete 554 ...

Страница 555: ...ound smoke or odor turn it off immediately Unplug the machine and contact the seller you bought it from or your nearest Canon service center Never attempt to repair or disassemble the machine yourself If you attempt to repair or take apart the machine your warranty will be invalidated even if it has not expired Before contacting the service center note the following Product name Your machine s nam...

Страница 556: ... so that ink does not leak When a shipping agent is handling transport of the machine have its box marked THIS SIDE UP to keep the machine with its bottom facing down Mark also with FRAGILE or HANDLE WITH CARE 1 Make sure machine is turned on If the machine cannot be turned on unplug it and go to step 4 2 If an error has occurred press machine s Black or Color button After the Alarm lamp is turned...

Страница 557: ...nplug the printer cable from the computer and from the machine then unplug the power cord from the machine 8 Use adhesive tape to secure all the covers on the machine to keep them from opening during transportation Then pack the machine in the plastic bag 9 Attach the protective material to the machine when packing the machine in the box 557 ...

Страница 558: ...he appropriate action in response Support Code Appears on Computer Screen 1000 to 1ZZZ 1000 1200 1300 1403 1470 1471 1472 1473 1474 1475 1476 1640 1700 1701 1890 2000 to 2ZZZ 2900 2901 5000 to 5ZZZ 5011 5012 5050 5100 5200 5400 5700 5B00 5B01 6000 to 6ZZZ 6000 6800 6801 6930 6931 6932 6933 6936 6937 6938 6940 6941 6942 6943 6944 6945 6946 A000 to ZZZZ B202 B203 B204 B205 For paper jam support code...

Страница 559: ...e appropriate procedure as shown below If you can see the jammed paper at the paper output slot or the rear tray 1300 If the paper tears and you cannot remove it from the paper output slot or from the rear tray Paper Is Jammed inside Machine Cases other than above Other Cases 559 ...

Страница 560: ...ng before you turn off the machine If the paper tears and you cannot remove the jammed paper from the paper output slot or the rear tray remove the paper from inside the machine Paper Is Jammed inside Machine 2 Reload paper and press machine s Black or Color button The printer resumes printing Reprint the page you were printing if it was not printed properly due to the paper jam If you turned off ...

Страница 561: ...ne to remove it press the Stop button to stop the printing before you turn off the machine 1 Turn off machine and unplug it 2 Open scanning unit cover Important Do not touch clear film A white belt B or tubes C 3 Check if jammed paper is under cartridge holder If the jammed paper is under the cartridge holder move the cartridge holder to the far right or left whichever makes it easier to remove th...

Страница 562: ...4 Hold jammed paper firmly in both hands If the paper is rolled up pull out it 5 Slowly pull out paper so as not to tear it 562 ...

Страница 563: ...chine 7 Close scanning unit cover All jobs in the print queue are canceled Redo the printing Note When reloading the paper make sure you are using suitable paper and loading it correctly If a paper jam message appears on your computer screen when you resume printing after removing all the jammed paper there may be some paper still inside the machine Check the machine again for any remaining bits o...

Страница 564: ...Important Do not tilt the machine when moving it since the ink may leak out When transporting the machine for repairing it see Repairing Your Machine 564 ...

Страница 565: ...gn objects in rear tray If there are any foreign objects in the rear tray be sure to turn off the machine unplug it and then remove the foreign object Important Do not tilt the machine or do not it upside down Doing so may cause the ink to leak Check3 Is paper curled Correct curl before loading paper 565 ...

Страница 566: ... rear tray Paper is not loaded properly What to Do Take the corresponding actions below Load paper in the rear tray Align the paper guides with the both edges of the paper when you load paper After carrying out the above measures press the machine s Black or Color button 566 ...

Страница 567: ...1200 Cause Scanning unit cover is open What to Do Close the scanning unit cover and wait for a while Do not close it while you are refilling an ink tank 567 ...

Страница 568: ...maged What to Do Contact your nearest Canon service center to request a repair Important Do not tilt the machine when moving it since the ink may leak out When transporting the machine for repairing it see Repairing Your Machine 568 ...

Страница 569: ...nning unit cover and then push the cartridge locking cover to make sure the cartridges are installed properly Alternatively push the joint button Important Remove the label and the protective tape of the cartridge to install it After that close the scanning unit cover 569 ...

Страница 570: ...ized What to Do Printing cannot be executed because the cartridge may not be installed properly or may not be compatible with this machine Install the appropriate cartridge If you want to cancel printing press the machine s Stop button 570 ...

Страница 571: ...ized What to Do Printing cannot be executed because the cartridge may not be installed properly or may not be compatible with this machine Install the appropriate cartridge If you want to cancel printing press the machine s Stop button 571 ...

Страница 572: ...ized What to Do Printing cannot be executed because the cartridge may not be installed properly or may not be compatible with this machine Install the appropriate cartridge If you want to cancel printing press the machine s Stop button 572 ...

Страница 573: ...is not installed in correct position What to Do Make sure each cartridge is installed in the correct position If printing is in progress press the machine s Stop button to cancel printing and then install the cartridge 573 ...

Страница 574: ...1475 Cause More than one cartridge of the same color is installed What to Do Install the cartridge in the correct position 574 ...

Страница 575: ...cartridge is not installed What to Do Printing cannot be executed because the cartridge is not compatible with this machine Install the appropriate cartridge If you want to cancel printing press the machine s Stop button 575 ...

Страница 576: ...ink level is below the lower limit line the printer may consume a certain amount of ink to return to printable status and may also become damaged To continue printing press the printer s Start button After this operation the remaining ink level notification function will not operate To reuse this function refill each color of ink to the upper limit line shown on the ink tank and press the printer ...

Страница 577: ...hine s Black or Color button to continue printing Contact your nearest Canon service center to request a repair Important Do not tilt the machine when moving it since the ink may leak out When transporting the machine for repairing it see Repairing Your Machine 577 ...

Страница 578: ...hine s Black or Color button to continue printing Contact your nearest Canon service center to request a repair Important Do not tilt the machine when moving it since the ink may leak out When transporting the machine for repairing it see Repairing Your Machine 578 ...

Страница 579: ... removed from the cartridge holder If the protective material or tape is still there remove it and close the scanning unit cover If this does not solve the problem contact your nearest Canon service center to request a repair Important Do not tilt the machine when moving it since the ink may leak out When transporting the machine for repairing it see Repairing Your Machine 579 ...

Страница 580: ...in the correct position and orientation on the platen glass Make sure the platen glass and the print head alignment sheet are not dirty Make sure the loaded paper is correct For automatic print head alignment load A4 or Letter sized plain paper Make sure the print head nozzle is not clogged Check the print head condition by printing the nozzle check pattern If the error is not resolved perform man...

Страница 581: ...oad print head alignment sheet on platen glass Place the printed side down and align the mark in the upper left corner of the sheet with the alignment mark 2 Slowly close the document cover and press machine s Black or Color button The machine starts scanning the print head alignment sheet and automatically adjusts the print head position 581 ...

Страница 582: ...in the machine again and turn it back on If this does not solve the problem contact your nearest Canon service center to request a repair Important Do not tilt the machine when moving it since the ink may leak out When transporting the machine for repairing it see Repairing Your Machine 582 ...

Страница 583: ...in the machine again and turn it back on If this does not solve the problem contact your nearest Canon service center to request a repair Important Do not tilt the machine when moving it since the ink may leak out When transporting the machine for repairing it see Repairing Your Machine 583 ...

Страница 584: ...in the machine again and turn it back on If this does not solve the problem contact your nearest Canon service center to request a repair Important Do not tilt the machine when moving it since the ink may leak out When transporting the machine for repairing it see Repairing Your Machine 584 ...

Страница 585: ... cartridges are properly installed Turn the machine back on If this does not solve the problem contact your nearest Canon service center to request a repair Important When clearing an impediment to cartridge holder motion be careful not to touch clear film A white belt B or tubes C Do not tilt the machine when moving it since the ink may leak out When transporting the machine for repairing it see ...

Страница 586: ...leaning press and hold the Stop button until the Alarm lamp flashes 5 times and then release the button Important Before performing system cleaning check the remaining ink level of all colors If the remaining ink level is below the single dot a refill the ink tank of corresponding color Performing system cleaning when the remaining ink level is not enough may damage the machine If this does not so...

Страница 587: ...in the machine again and turn it back on If this does not solve the problem contact your nearest Canon service center to request a repair Important Do not tilt the machine when moving it since the ink may leak out When transporting the machine for repairing it see Repairing Your Machine 587 ...

Страница 588: ...in the machine again and turn it back on If this does not solve the problem contact your nearest Canon service center to request a repair Important Do not tilt the machine when moving it since the ink may leak out When transporting the machine for repairing it see Repairing Your Machine 588 ...

Страница 589: ...curred What to Do Contact your nearest Canon service center to request a repair Important Do not tilt the machine when moving it since the ink may leak out When transporting the machine for repairing it see Repairing Your Machine 589 ...

Страница 590: ...curred What to Do Contact your nearest Canon service center to request a repair Important Do not tilt the machine when moving it since the ink may leak out When transporting the machine for repairing it see Repairing Your Machine 590 ...

Страница 591: ...in the machine again and turn it back on If this does not solve the problem contact your nearest Canon service center to request a repair Important Do not tilt the machine when moving it since the ink may leak out When transporting the machine for repairing it see Repairing Your Machine 591 ...

Страница 592: ...in the machine again and turn it back on If this does not solve the problem contact your nearest Canon service center to request a repair Important Do not tilt the machine when moving it since the ink may leak out When transporting the machine for repairing it see Repairing Your Machine 592 ...

Страница 593: ...in the machine again and turn it back on If this does not solve the problem contact your nearest Canon service center to request a repair Important Do not tilt the machine when moving it since the ink may leak out When transporting the machine for repairing it see Repairing Your Machine 593 ...

Страница 594: ...in the machine again and turn it back on If this does not solve the problem contact your nearest Canon service center to request a repair Important Do not tilt the machine when moving it since the ink may leak out When transporting the machine for repairing it see Repairing Your Machine 594 ...

Страница 595: ...in the machine again and turn it back on If this does not solve the problem contact your nearest Canon service center to request a repair Important Do not tilt the machine when moving it since the ink may leak out When transporting the machine for repairing it see Repairing Your Machine 595 ...

Страница 596: ...in the machine again and turn it back on If this does not solve the problem contact your nearest Canon service center to request a repair Important Do not tilt the machine when moving it since the ink may leak out When transporting the machine for repairing it see Repairing Your Machine 596 ...

Страница 597: ...in the machine again and turn it back on If this does not solve the problem contact your nearest Canon service center to request a repair Important Do not tilt the machine when moving it since the ink may leak out When transporting the machine for repairing it see Repairing Your Machine 597 ...

Страница 598: ...in the machine again and turn it back on If this does not solve the problem contact your nearest Canon service center to request a repair Important Do not tilt the machine when moving it since the ink may leak out When transporting the machine for repairing it see Repairing Your Machine 598 ...

Страница 599: ...in the machine again and turn it back on If this does not solve the problem contact your nearest Canon service center to request a repair Important Do not tilt the machine when moving it since the ink may leak out When transporting the machine for repairing it see Repairing Your Machine 599 ...

Страница 600: ...in the machine again and turn it back on If this does not solve the problem contact your nearest Canon service center to request a repair Important Do not tilt the machine when moving it since the ink may leak out When transporting the machine for repairing it see Repairing Your Machine 600 ...

Страница 601: ...in the machine again and turn it back on If this does not solve the problem contact your nearest Canon service center to request a repair Important Do not tilt the machine when moving it since the ink may leak out When transporting the machine for repairing it see Repairing Your Machine 601 ...

Страница 602: ...in the machine again and turn it back on If this does not solve the problem contact your nearest Canon service center to request a repair Important Do not tilt the machine when moving it since the ink may leak out When transporting the machine for repairing it see Repairing Your Machine 602 ...

Страница 603: ...in the machine again and turn it back on If this does not solve the problem contact your nearest Canon service center to request a repair Important Do not tilt the machine when moving it since the ink may leak out When transporting the machine for repairing it see Repairing Your Machine 603 ...

Страница 604: ...in the machine again and turn it back on If this does not solve the problem contact your nearest Canon service center to request a repair Important Do not tilt the machine when moving it since the ink may leak out When transporting the machine for repairing it see Repairing Your Machine 604 ...

Страница 605: ...in the machine again and turn it back on If this does not solve the problem contact your nearest Canon service center to request a repair Important Do not tilt the machine when moving it since the ink may leak out When transporting the machine for repairing it see Repairing Your Machine 605 ...

Страница 606: ...in the machine again and turn it back on If this does not solve the problem contact your nearest Canon service center to request a repair Important Do not tilt the machine when moving it since the ink may leak out When transporting the machine for repairing it see Repairing Your Machine 606 ...

Страница 607: ...in the machine again and turn it back on If this does not solve the problem contact your nearest Canon service center to request a repair Important Do not tilt the machine when moving it since the ink may leak out When transporting the machine for repairing it see Repairing Your Machine 607 ...

Страница 608: ... to Do Turn off the machine and unplug it Contact your nearest Canon service center to request a repair Important Do not tilt the machine when moving it since the ink may leak out When transporting the machine for repairing it see Repairing Your Machine 608 ...

Страница 609: ... to Do Turn off the machine and unplug it Contact your nearest Canon service center to request a repair Important Do not tilt the machine when moving it since the ink may leak out When transporting the machine for repairing it see Repairing Your Machine 609 ...

Страница 610: ... to Do Turn off the machine and unplug it Contact your nearest Canon service center to request a repair Important Do not tilt the machine when moving it since the ink may leak out When transporting the machine for repairing it see Repairing Your Machine 610 ...

Страница 611: ... to Do Turn off the machine and unplug it Contact your nearest Canon service center to request a repair Important Do not tilt the machine when moving it since the ink may leak out When transporting the machine for repairing it see Repairing Your Machine 611 ...

Отзывы: