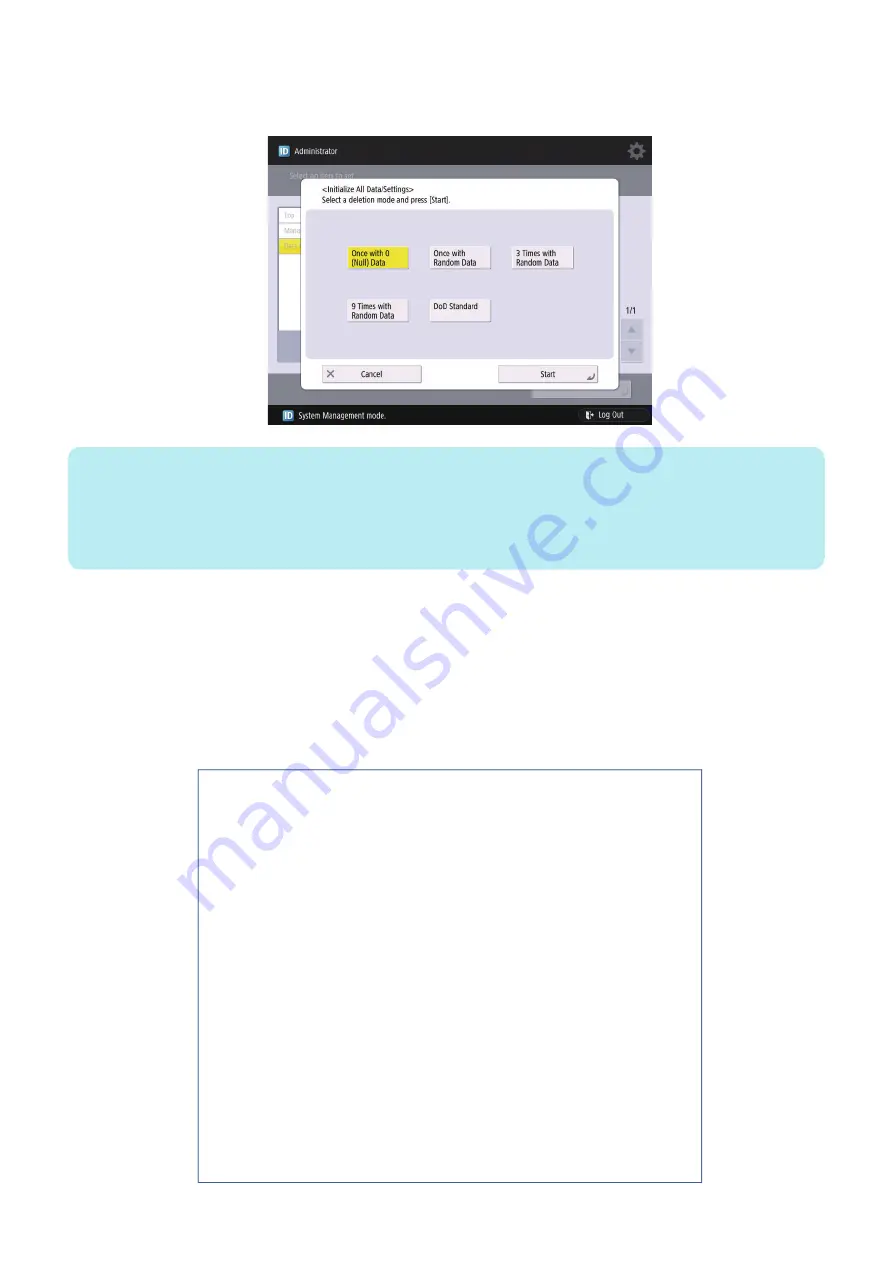
3. Press [Start].
If the user has not given any instruction on which item in the deletion mode should be used, select the default "Once with 0
(Null) Data".
NOTE:
• When all the data are initialized, the user data on the HDD and the user data on the Flash PCB are deleted. For the items to
be deleted, refer to the backup list.
• Performing "Initialize All Data" turns auto gradation adjustment values and TPM settings to OFF. Therefore, to enable normal
operation the next time, the operation performed at installation is necessary.
• Performing Initialize All Data/Settings does not delete the license of the system option.
Report output upon completion of Initialize All Data/Settings
A report is output after "Initialize All Data/Settings" is completed.
Consider using this report to provide to user as a material to inform of work details when executing Initialize All Data/Settings
upon user's request.
Operation after Initialize All Data/Settings
The machine is started normally at restart after Initialize All Data/Settings without displaying the message (Turn OFF the main
power supply on the right side of the machine) on the screen to prompt shutdown.
The report is output after startup.
******************************
*** System Information ***
******************************
<< Initialize All Data/Settings Report >>
Serial Number ZZZ99999
Device Name iR-ADV XXXX (iAXXXX)
Overwrite Method for Deletion Mode Once with Random Data (*1)
The following data stored in the device has been completely erased.
- Data stored in the temporary data area
- User generated data
- Settings under Settings/Registration (restored to factory defaults)
Removal
640
Содержание imageRUNNER ADVANCE 525 I
Страница 1: ...Revision 1 0 iR ADV 715 615 525 Series Service Manual ...
Страница 15: ...Product Overview 1 Product Lineup 6 Specifications 9 Parts Name 14 ...
Страница 75: ... Paper Path Model with Built in Finisher Paper Path Model with Built in Finisher 2 Technology 65 ...
Страница 95: ...Periodical Service 3 Periodically Replaced Parts 86 Consumable Parts List 87 ...
Страница 120: ... Procedure 1 3x Removing the Front Cover Procedure 1 2x 2 4 Parts Replacement and Cleaning 110 ...
Страница 122: ...2 1x 3x 3 4 Parts Replacement and Cleaning 112 ...
Страница 124: ...1 2 3 4 Parts Replacement and Cleaning 114 ...
Страница 125: ...4 Removing the Control Panel Procedure 1 2 4 Parts Replacement and Cleaning 115 ...
Страница 126: ...3 2x 4 3x 2x 4 Parts Replacement and Cleaning 116 ...
Страница 127: ...5 6 CAUTION Do not drop the Control Panel while turning over it 4 Parts Replacement and Cleaning 117 ...
Страница 128: ...7 1x 1x 8 2x 4 Parts Replacement and Cleaning 118 ...
Страница 130: ...1 2 3 2x 4 Parts Replacement and Cleaning 120 ...
Страница 136: ... Procedure 1 2 1x NOTE Check the position of the claw in the figure 4 Parts Replacement and Cleaning 126 ...
Страница 169: ...23 Press the A part and remove the Feed Frame Unit A 4 Parts Replacement and Cleaning 159 ...
Страница 180: ...22 Press the A part and remove the Feed Frame Unit A 4 Parts Replacement and Cleaning 170 ...
Страница 190: ...21 Press the A part and remove the Feed Frame Unit A 4 Parts Replacement and Cleaning 180 ...
Страница 196: ...3 4 Parts Replacement and Cleaning 186 ...
Страница 204: ...2 4x 16x 3 4 Parts Replacement and Cleaning 194 ...
Страница 210: ... Procedure 1 2x 1x 4 Parts Replacement and Cleaning 200 ...
Страница 211: ...2 2x 3x 1x 4 Parts Replacement and Cleaning 201 ...
Страница 212: ...3 CAUTION Do not touch the speaker part A of the Fax unit A 2x 1x 4 Parts Replacement and Cleaning 202 ...
Страница 215: ...Image Formation System Removing the Transfer Unit Procedure 1 2 3 1x 4 Parts Replacement and Cleaning 205 ...
Страница 217: ...2 1x 4 Parts Replacement and Cleaning 207 ...
Страница 221: ...5 Removing the Low Voltage Power Supply PCB on page 195 Procedure 1 4x 1x 4 Parts Replacement and Cleaning 211 ...
Страница 223: ...2 1x 3 4 1x 4 Parts Replacement and Cleaning 213 ...
Страница 226: ... Procedure 1 2 3 1x 4 Parts Replacement and Cleaning 216 ...
Страница 227: ...4 11x 5 1x 6 1x 4 Parts Replacement and Cleaning 217 ...
Страница 228: ...7 6x 1x 8 4 Parts Replacement and Cleaning 218 ...
Страница 238: ... Procedure 1 2x 2x 2 4 Parts Replacement and Cleaning 228 ...
Страница 240: ... Procedure 1 2 3 1x 4 Parts Replacement and Cleaning 230 ...
Страница 241: ...4 5 3x 1x 2x 4 Parts Replacement and Cleaning 231 ...
Страница 242: ...Adjustment 5 Pickup Feed System 233 Actions at Parts Replacement 235 ...
Страница 251: ...Troubleshooting 6 Initial Check 242 Test Print 243 Debug Log 248 ...
Страница 277: ...Error Jam Alarm 7 Overview 268 Error Code 271 Error Code FAX 324 Alarm Code 327 Jam Code 336 ...
Страница 598: ...6 7 8 1x 9 NOTE Use the screw removed in steps 3 1x 9 Installation 588 ...
Страница 602: ...2 3 2x 4 3x 2x 9 Installation 592 ...
Страница 603: ...5 6 7 1x 1x 8 2x 9 Installation 593 ...
Страница 604: ...9 6x 10 2x Installing the NFC Kit 1 1x 9 Installation 594 ...
Страница 605: ...2 1x 3 TP M3x4 1x 4 1x 9 Installation 595 ...
Страница 606: ... Installing the Control Panel 1 2x 2 6x 9 Installation 596 ...
Страница 607: ...3 2x 4 1x 1x 5 6 9 Installation 597 ...
Страница 619: ...21 22 Without the Finisher With the Finisher 9 Installation 609 ...
Страница 638: ...APPENDICES Service Tools 629 General Circuit Diagram 630 Soft counter specifications 635 Removal 639 ...
Страница 639: ...Service Tools Special Tools None Solvents and Oils None Service Tools 629 ...


