


0KCY-03U
Storing Received Faxes into Memory (Memory Reception)
You can store received faxes into memory without printing them as soon as you receive them. The documents
in memory can be printed at any time. This feature is helpful when printing confidential documents; you can
print them whenever it is convenient for you and prevent unauthorized persons from seeing them
unintentionally.
Storing Documents into Memory
Printing Documents in Memory
Checking/Deleting Documents in Memory
The documents in memory can be also forwarded to a destination.
Forwarding Received Faxes
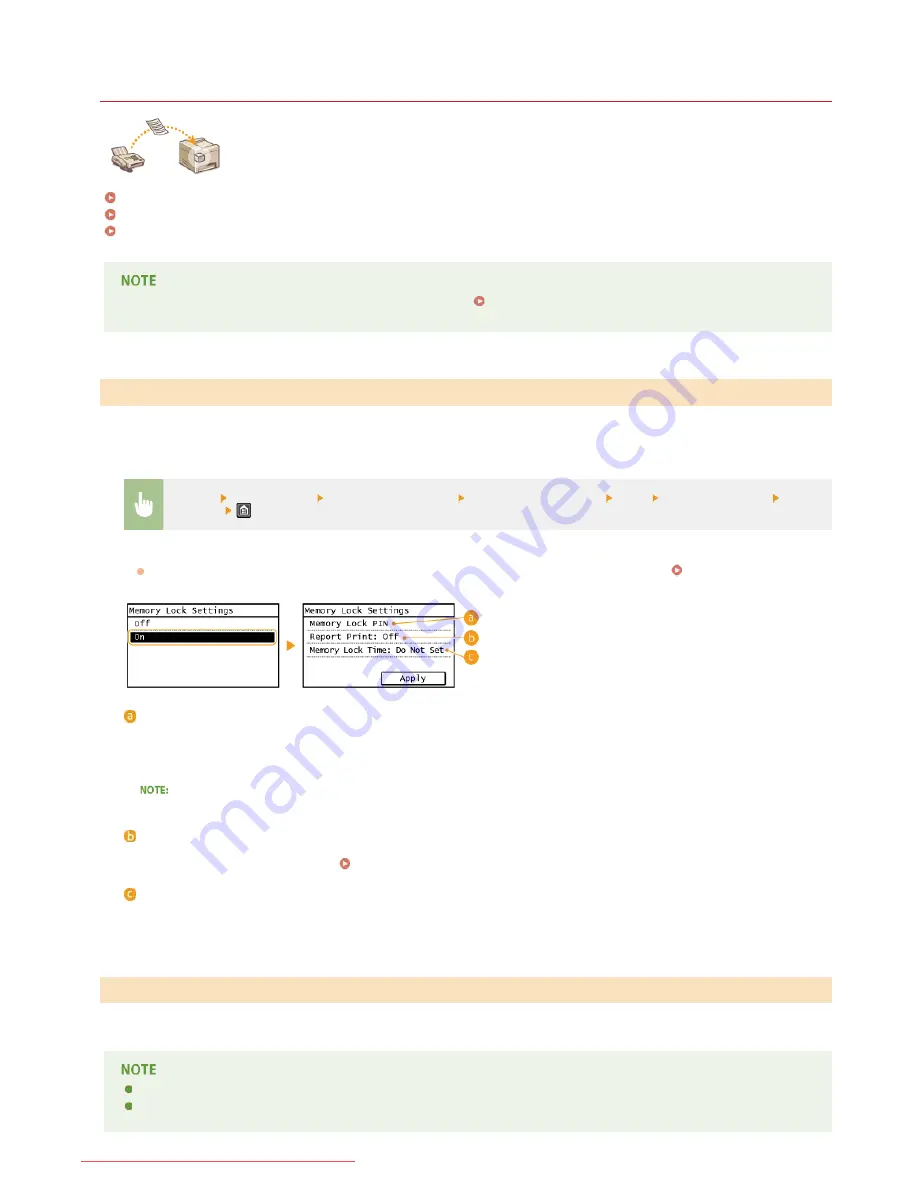
To store received documents into memory, set <Memory Lock Settings> to <On>. You can also specify optional settings such as a
security setting that makes a password necessary to unlock the feature and a time setting that specifies a period of time during the day
in which received documents are stored in memory.
<Menu>
<Fax Settings>
<RX Function Settings>
<Memory Lock Settings>
<On> Specify each setting
<Apply>
If a screen for entering a PIN is displayed, enter the PIN with the numeric keys and tap <Apply>.
Setting the System
Manager PIN
<Memory Lock PIN>
Enables you to register a password of up to seven digits. To register a password, use the numeric keys to enter a password, and
tap <Apply>. Enter the same numbers again for confirmation, and tap <Apply>. This password is necessary when you change the
memory reception settings or when you deactivate the Memory Reception feature to print all the stored documents. If you do not
want to register a password, just tap <Apply> without entering anything.
Passwords with only zeros, as in "00" or "0000000", are not allowed.
<Report Print>
Enables you to print RX Result reports every time documents are stored into memory. To print reports, tap <On>. You also need
to set <RX Result Report> to <On>.
RX Result Report
<Memory Lock Time>
Specify a period of time during the day in which received documents are stored in memory. If you do not set a period of time, the
machine stores every document into memory when Memory Reception is turned on.
To print received documents in memory, set <Memory Lock Settings> to <Off>. All the documents in memory are printed.
You cannot select a specific document for printing.
If a time for the feature to deactivate has been specified, the documents are automatically printed at the specified time.
Storing Documents into Memory
Printing Documents in Memory
㻝㻞㻠㻌㻛㻌㻠㻣㻡
Downloaded from ManualsPrinter.com Manuals
Содержание imageclass MF229DW
Страница 1: ...Downloaded from ManualsPrinter com Manuals...
Страница 7: ...Contact Us 475 Downloaded from ManualsPrinter com Manuals...
Страница 31: ...Tap Apply Tap End LINKS Display 4 5 Downloaded from ManualsPrinter com Manuals...
Страница 59: ...Tap Yes 5 Downloaded from ManualsPrinter com Manuals...
Страница 65: ...Exiting Quiet Mode Press to exit quiet mode Downloaded from ManualsPrinter com Manuals...
Страница 67: ...the hook Downloaded from ManualsPrinter com Manuals...
Страница 72: ...LINKS Basic Copy Operations Downloaded from ManualsPrinter com Manuals...
Страница 92: ...LINKS Receiving Faxes Downloaded from ManualsPrinter com Manuals...
Страница 116: ...Sending Faxes Checking Status and Log for Sent and Received Documents Downloaded from ManualsPrinter com Manuals...
Страница 126: ...LINKS Receiving Faxes Checking Status and Log for Sent and Received Documents Downloaded from ManualsPrinter com Manuals...
Страница 128: ...The document is forwarded to the specified destination Downloaded from ManualsPrinter com Manuals...
Страница 134: ...Downloaded from ManualsPrinter com Manuals...
Страница 162: ...LINKS Printing a Document Downloaded from ManualsPrinter com Manuals...
Страница 169: ...LINKS Printing a Document Downloaded from ManualsPrinter com Manuals...
Страница 173: ...Printing a Document Printing Borders Printing Dates and Page Numbers Downloaded from ManualsPrinter com Manuals...
Страница 210: ...LINKS Scanning from the Machine Downloaded from ManualsPrinter com Manuals...
Страница 269: ...LINKS Setting Up Print Server Downloaded from ManualsPrinter com Manuals...
Страница 280: ...LINKS Setting IPv4 Address Setting IPv6 Addresses Viewing Network Settings Downloaded from ManualsPrinter com Manuals...
Страница 287: ...Downloaded from ManualsPrinter com Manuals...
Страница 310: ...Downloaded from ManualsPrinter com Manuals...
Страница 317: ...LINKS Remote UI Screens Downloaded from ManualsPrinter com Manuals...
Страница 416: ...Downloaded from ManualsPrinter com Manuals...
Страница 455: ...Downloaded from ManualsPrinter com Manuals...
Страница 457: ...Click Back Exit 6 Downloaded from ManualsPrinter com Manuals...
Страница 476: ...Downloaded from ManualsPrinter com Manuals...
Страница 506: ...Downloaded from ManualsPrinter com Manuals...
Страница 510: ...The uninstaller starts Click Uninstall Click OK 4 5 Downloaded from ManualsPrinter com Manuals...


