


7-62
2003 Buell XB9R: Electrical
HOME
17. Install upper fork clamp. See
INSTALLATION
under
2.17
FORK CLAMPS, UPPER AND LOWER
.
18. Connect:
a.
headlight connector [38].
b.
Front brake switch [121] to right switch housing.
c.
Clutch switch [95] to left switch housing.
d. Left switch housing connector [24] and right switch
housing connector [22].
e.
Ignition switch [33]
f.
Ground terminals on front of steering head.
g.
Horn connectors [122].
h.
Instrument module connector [39].
i.
Install electronic control module. See
INSTALLA-
TION
under
4.29 ELECTRONIC CONTROL MOD-
ULE
.
j.
Bank angle sensor connector [134].
k.
Flasher connector [30].
19. See
Figure 7-79.
Verify proper fairing wire routing and
cable strap locations.
20. Verify that front forks can be turned from full left to full
right lock without wire harness binding or pinching.
21. Install fairing. See
INSTALLATION
under
2.37 FRONT
FAIRING, WINDSHIELD, AND MIRRORS
.
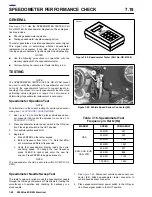
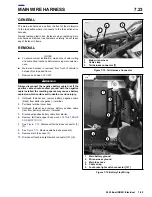
22. See
Figure 7-73.
Connect foot brake light switch connec-
tor [121] (5). Install cable strap (4).
23. Install main fuse case (3).
24. Install main battery ground (1) and wire harness ground
(2). Tighten fastener to 48-72 in-lbs (5.4-8.1 Nm).
25. See
Figure 7-72.
Connect tail harness connector (3).
Attach cable strap (2).
26. Install starter side of positive battery cable to starter.
1
WARNING
1
WARNING
Always connect the positive battery cable first. If the
positive cable should contact ground with the negative
cable installed, the resulting sparks may cause a battery
explosion which could result in death or serious injury.
27. Install positive battery cable (red) to positive terminal of
battery. Tighten to 72-96 in-lbs (8-11 Nm).
28. Connect negative battery cable. Tighten to 72-96 in-lbs
(8-11 Nm).
29. Install tail frame upper body work. See
2.36 TAIL FRAME
AND BODY WORK
.
1
WARNING
1
WARNING
After installing seat, pull upward on front of seat to be
sure it is locked in position. If seat is loose, it could shift
during vehicle operation and startle the rider, causing
loss of control which could result in death or serious
injury.
30. Install seat. See
2.38 SEAT.
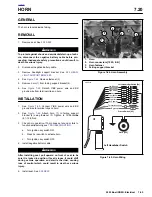
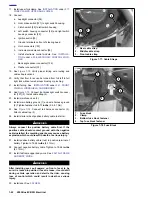
Figure 7-77. Cable Straps
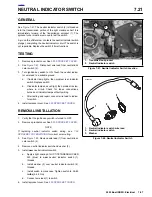
Figure 7-78. Fuse Block
1.
Rear cable strap
2.
Middle cable strap
3.
Front cable strap
1
2
3
8828
1
2
3
4
1.
Fuse block
2.
Clamp
3.
Bottom fuse block fastener
4.
Top fuse block fastener
8829
Содержание XB9R 2003
Страница 2: ...1 2 Edit Me Printed June 5 2002 12 26 pm ...
Страница 35: ...D 2 2003 Buell XB9R Appendix D HOME Figure D 2 Rear Brake Systems Top View b1115xbx ...
Страница 36: ...2003 Buell XB9R Appendix D D 3 HOME Figure D 3 Rear Brake Systems Left Side View b1116xcx ...
Страница 44: ...2003 Buell XB9R Appendix D D 11 HOME Figure D 11 Clutch and Throttle Cables Right Side View b1124xax ...
Страница 47: ...D 14 2003 Buell XB9R Appendix D HOME NOTES ...
Страница 49: ......
Страница 77: ...1 28 2003 Buell XB9R Maintenance HOME NOTES ...
Страница 103: ...1 54 2003 Buell XB9R Maintenance HOME NOTES ...
Страница 105: ... 2 ...
Страница 191: ......
Страница 263: ...3 72 2003 Buell XB9R Engine HOME NOTES ...
Страница 299: ...4 2 2003 Buell XB9R Fuel System HOME NOTES ...
Страница 385: ...4 88 2003 Buell XB9R Fuel System HOME NOTES ...
Страница 421: ...4 124 2003 Buell XB9R Fuel System HOME NOTES ...
Страница 423: ......
Страница 445: ...5 22 2003 Buell XB9R Starter HOME NOTES ...
Страница 447: ......
Страница 469: ...6 22 2003 Buell XB9R Drive Transmission HOME NOTES ...
Страница 497: ...6 50 2003 Buell XB9R Drive Transmission HOME NOTES ...
Страница 499: ......
Страница 565: ...7 66 2003 Buell XB9R Electrical HOME NOTES ...