NOTE:
When gas valve GV is energized, R-W circuit is closed.
After a power interruption, the gas valve closes within 7 sec and
the furnace skips the blower on delay and immediately starts the
blower.
2. Cooling mode
When the thermostat "calls for cooling" R, G, and Y circuits
close. Simultaneously, the R-Y circuit starts the outdoor
condensing unit, and the R-G circuit energizes cooling fan
relay coil CFR and heating fan relay coil HFR. The
normally open contacts of heating relay HFR and cooling
relay CFR close, energizing the cooling speed of blower
motor BLWM. The EAC terminals are energized with 115v
when blower is operating on either heating or cooling
speed.
3. Continuous blower mode
When the R-G circuit is made, the blower motor operates on
cooling speed. During a "call for heat", the blower stops,
allowing the furnace heat exchangers to heat up more
quickly. When blower motor comes back on, it runs on
heating speed. The blower reverts to continuous operation
after the heating cycle blower off delay is completed.
C.
Start-up Procedures
Ensure that all connections have been properly made.
Light
the
pilot
using
the
procedures
outlined
on
the
lighting/operating instruction label attached to the furnace. How-
ever, when lighting the pilot for the first time, perform the
following additional steps:
1. After all connections have been made, purge the lines and
check for leaks.
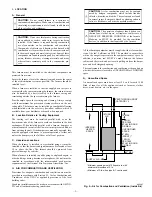
WARNING:
Never purge a line into a combustion
chamber. Never use matches, candles, flame or other
sources of ignition to check for gas leakage. Use a
soap-and-water solution to check for gas leaks. Failure to
follow this warning could result in fire, explosion, per-
sonal injury, or death.
2. Allow 5 minutes to elapse after purging gas lines, then light
pilot in accordance with lighting/operating instructions on
the furnace.
The pilot flame should be soft blue in color and surround
3/8 in. to 1/2 in. of the thermocouple element tip. The flame
must never come in contact with any other part of the
thermocouple or its lead wire. The flame should merge with
the carryover flame. When the pilot flame requires adjust-
ment:
a. Locate adjustment screw on top of main gas valve next
to pilot tube. (See Fig. 12.)
b. Remove capscrew and turn adjustment screw clockwise
(in) to decrease pilot gas flow, or counterclockwise (out)
to increase pilot gas flow.
c. When proper adjustment is obtained, replace capscrew.
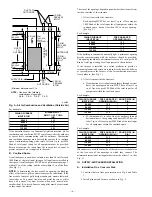
Fig. 10—Heating and Cooling Application Wiring Diagram
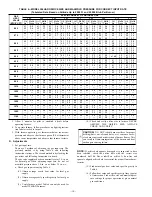
TABLE 5—ELECTRICAL DATA
UNIT SIZE
VOLTS—
HERTZ—
PHASE
OPERATING VOLTAGE RANGE
MAX UNIT AMPS MIN WIRE GAGE
MAX WIRE LENGTH
(FT)‡
MAX FUSE OR
HACR-TYPE
CKT BKR AMPS†
Max*
Min*
024071
115—60—1
127
104
6.7
14
44
15
036071
115—60—1
127
104
8.4
14
35
15
036091
115—60—1
127
104
9.2
14
32
15
048091
115—60—1
127
104
10.2
14
29
15
048110
115—60—1
127
104
10.0
14
30
15
060110
115—60—1
127
104
13.1
12
36
20
060135
115—60—1
127
104
14.3
12
33
20
* Permissible limits of the voltage range at which the unit will operate satisfactorily (assumes full accessory load).
† Time-delay fuse is recommended.
‡ Length shown is as measured 1 way along wire path between unit and service panel for maximum 2 percent voltage drop.
A78461
115-VOLT FIELD-
SUPPLIED
FUSED
DISCONNECT
AUXILIARY
J-BOX
CONTROL
BOX
24-VOLT
TERMINAL
BLOCK
TWO-WIRE
HEATING-
ONLY
FOUR
WIRE
FIELD-SUPPLIED
FUSED DISCONNECT
CONDENSING
UNIT
TWO
WIRE
FURNACE
R
G
C
W
R
G
Y
GND
GND
FIELD 24-VOLT WIRING
FIELD 115-, 208/230-, 460-VOLT WIRING
FACTORY 24-VOLT WIRING
FACTORY 115-VOLT WIRING
NOTE:
208/230- OR
460-VOLT
THREE
PHASE
208/230-
VOLT
SINGLE
PHASE
WHT
BLK
WHT
BLK
If any of the original wire,
as supplied, must be replaced, use
same type or equivalent wire.
NOTE: Connect Y-terminal as
shown for proper
operation.
W
Y
GND
THERMOSTAT
TERMINALS
—8—
→


