Create and Print Labels Using Your Computer
> Create Labels Using P-touch Editor (Windows)
Create Labels Using P-touch Editor (Windows)
To use your printer with your computer, install P-touch Editor and the printer driver.
For the latest drivers and software, go to your model's
Downloads
page on the Brother support website at
.
1. Start the P-touch Editor
.
•
Windows 10/Windows Server 2016/Windows Server 2019:
Click
Start
>
Brother P-touch
>
P-touch Editor
, or double-click the
P-touch Editor
icon on the desktop.
•
Windows 8.1/Windows Server 2012/Windows Server 2012 R2:
Click the
P-touch Editor
icon on the
Apps
screen, or double-click the
P-touch Editor
icon on the
desktop.
•
Windows 7
Click
Start
>
All Programs
>
Brother P-touch
>
P-touch Editor
, or double-click the
P-touch Editor
icon on the desktop.
P-touch Editor starts.
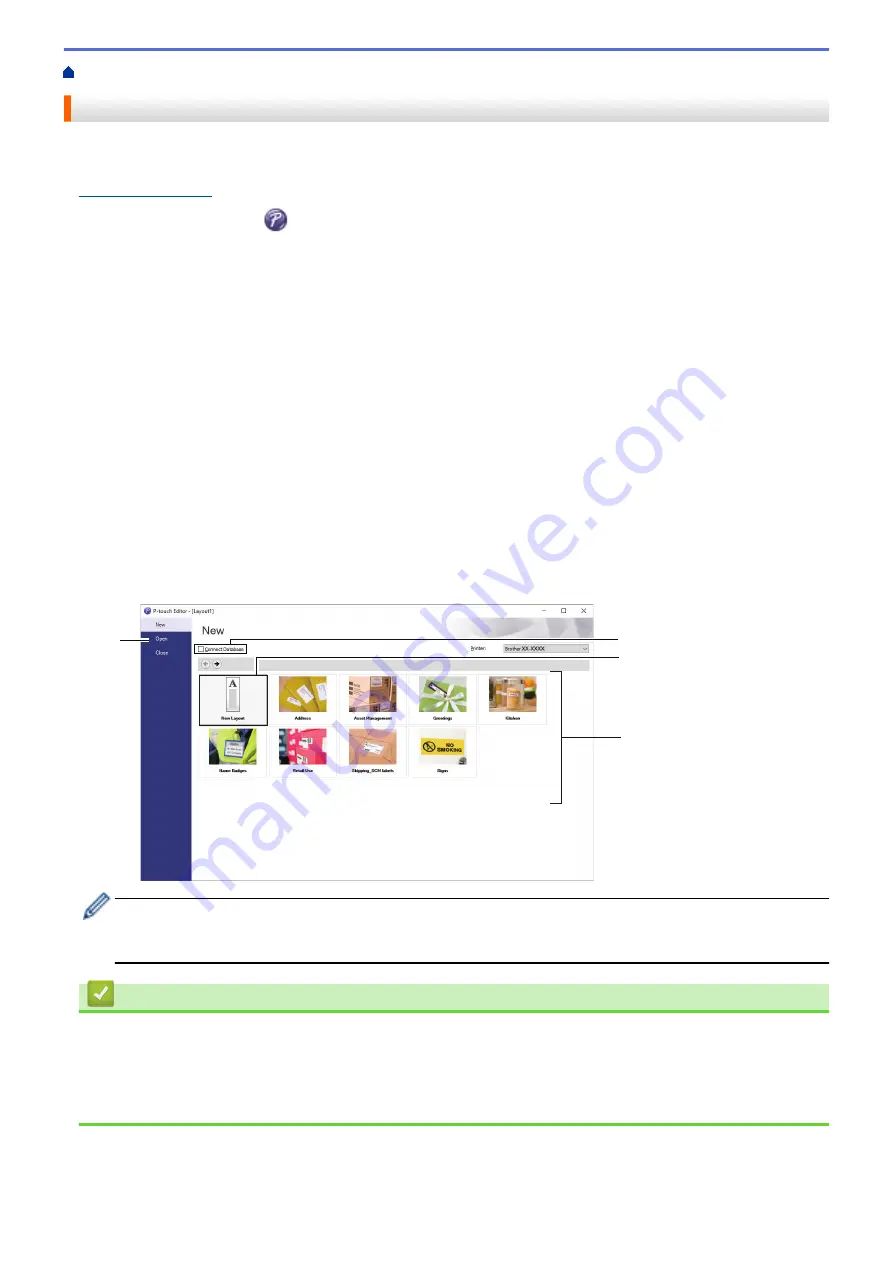
2. Do one of the following:
•
To open an existing layout, click
Open
(1).
•
To connect a preset layout to a database, select the check box next to
Connect Database
(2).
•
To create a new layout, double-click the
New Layout
pane (3), or click the
New Layout
pane (3) and then
click →.
•
To create a new layout using a preset layout, double-click a category button (4), or select a category
button (4) and then click →.
2
1
3
4
To change how P-touch Editor starts, click
Tools
>
Options
in the P-touch Editor menu bar to display the
Options
dialog box. On the left side, select the
General
heading, and then the setting you want in the
Operations
list box under
Startup Settings
.
Related Information
•
Create and Print Labels Using Your Computer
•
Main Window of P-touch Editor Express Mode (Windows)
•
Main Window of P-touch Editor Professional Mode (Windows)
•
Main Window of P-touch Editor Snap Mode (Windows)
41
Содержание RJ-3230B
Страница 1: ...User s Guide RJ 3230B RJ 3250WB 2021 Brother Industries Ltd All rights reserved ...
Страница 122: ...Home Security Use SNMPv3 Use SNMPv3 Manage Your Network Machine Securely Using SNMPv3 118 ...
Страница 129: ...Home Update Update Update P touch Editor Update the Firmware 125 ...
Страница 131: ...Related Information Update 127 ...
Страница 163: ...Related Information Change Printer Settings Using the Printer 159 ...
Страница 164: ...Home Routine Maintenance Routine Maintenance Maintenance 160 ...
Страница 167: ...Related Information Routine Maintenance 163 ...
Страница 195: ...Related Information Battery Charger Optional PA BC 003 191 ...
Страница 213: ...Related Topics Active Docking Station Optional Problems 209 ...
Страница 215: ...1 1 Eject Button Related Information 4 bay Active Docking Station Optional PA 4CR 003 211 ...
Страница 217: ...Related Information 4 bay Active Docking Station Optional PA 4CR 003 213 ...
Страница 220: ...Side view Battery Charger Front view Back view 216 ...
Страница 221: ...Top view Bottom view Side view Cross section 217 ...
Страница 222: ...Single Active Docking Station Front view Back view Top view Bottom view 218 ...
Страница 223: ...Side view Cross section 219 ...
Страница 224: ...4 bay Active Docking Station Top view Bottom view 220 ...
Страница 225: ...Back view Side view 221 ...
Страница 226: ...Cross section Related Information Appendix 222 ...
Страница 228: ...Related Information Appendix 224 ...
Страница 231: ...USA CAN Version A ...


