background image

268

Brocade MLX Series and NetIron XMR Hardware Installation Guide

53-1002373-02

Installing a Brocade NetIron XMR 16000 router

4

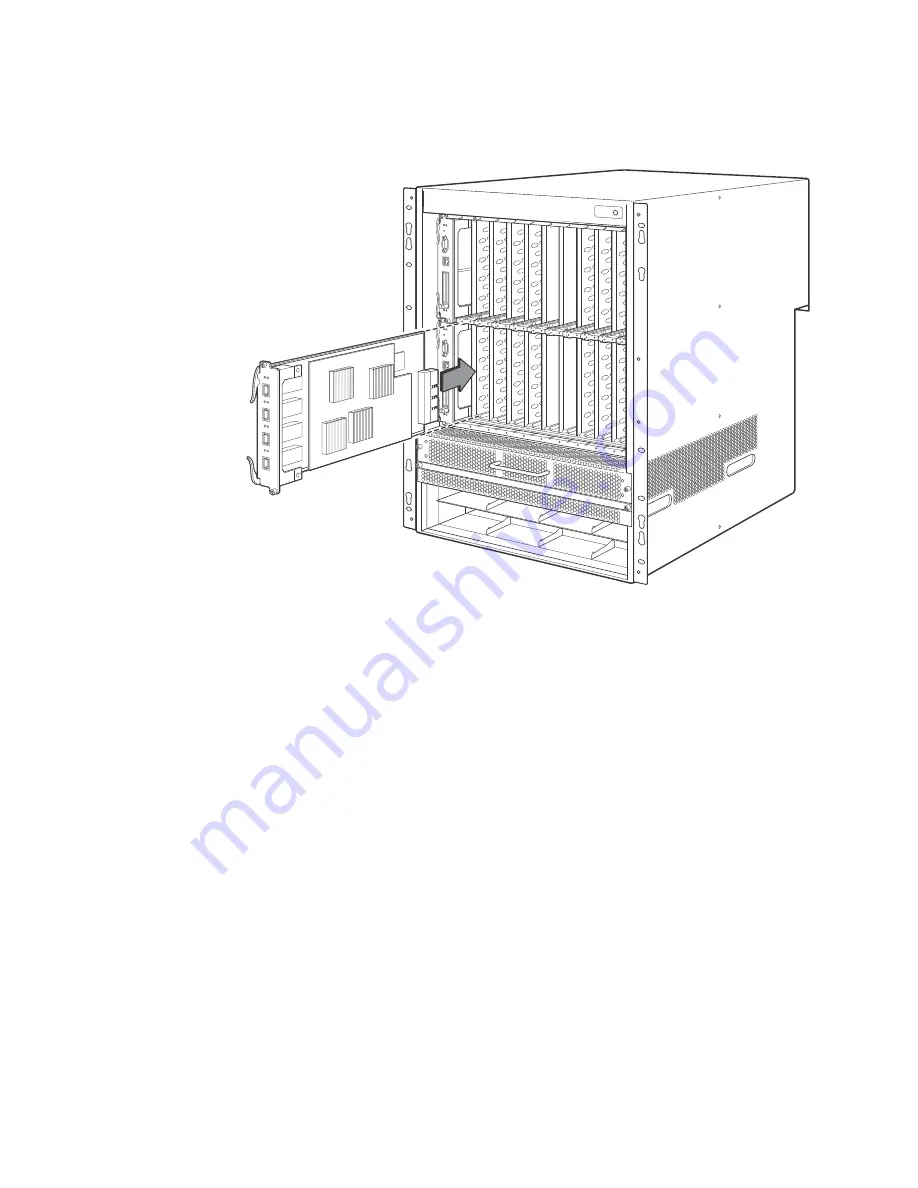
FIGURE 186

Installing a module in the Brocade NetIron XMR 16000 router

5. Tighten the screws at each end of the module faceplate by pushing them in and turning them 

clockwise. Complete the tightening process using the flat-blade screwdriver.

Installing power supplies in a Brocade NetIron XMR 16000 router

This section describes how to install power supplies in the Brocade NetIron XMR 16000 router.

Follow these steps to install a power supply in a Brocade NetIron XMR 16000 router.

1. Remove the power supply slot blank.

2. Remove the power supply from the packaging.

3. Insert the power supply into the slot, using the guides on each side of the slot. Refer to 

1

Interface  module

Содержание MLXe-16

Страница 1: ...53 1002373 02 26 September 2011 53 1002373 02 Brocade MLX Series and Brocade NetIron XMR Hardware Installation Guide Supported Release Multi Service IronWare R05 2 00b...

Страница 2: ...programs that accompany it The product described by this document may contain open source software covered by the GNU General Public License or other open source license agreements To find out which...

Страница 3: ...ications xvi Getting technical help xvii Chapter 1 Product Overview Brocade router overview 1 Router applications 1 Hardware features 1 Brocade MLXe routers 2 Brocade MLX routers 8 Brocade NetIron XMR...

Страница 4: ...80 Preparing the installation site 80 Unpacking a Brocade MLXe 8 router 80 Installing a Brocade MLXe 8 router in a rack 80 Installing Brocade MLXe 8 modules 82 Installing power supplies in the Brocade...

Страница 5: ...ing proper operation 142 Observing the LEDs 142 Displaying the module status 145 146 Chapter 3 Installing a Brocade MLX Router Installation precautions 147 General precautions 147 Power precautions 14...

Страница 6: ...ade MLX 32 router shipping carton contents 195 Unpacking your Brocade MLX 32 router 196 Installing a Brocade MLX 32 router in a rack 197 Installing Brocade MLX 32 router modules 209 Brocade MLX 32 cab...

Страница 7: ...npacking a Brocade NetIron XMR 16000 router 262 Installing a Brocade NetIron XMR 16000 router in a rack 263 Installing Brocade NetIron XMR 16000 modules 265 Installing power supplies in a Brocade NetI...

Страница 8: ...asswords 313 Configuring IP addresses 314 Support of subnet masks 315 Assigning an IP address to a management interface 315 Assigning IP addresses to an interface virtual interface or loopback interfa...

Страница 9: ...ng a management module 350 Replacing the Compact Flash Card in an MR2 management module 350 Replacing an interface module 351 Removing and replacing an interface module 351 Replacing a switch fabric m...

Страница 10: ...gency approvals 387 Electromagnetic approvals 387 Hardware specifications for Brocade NetIron XMR routers 387 Power specifications 387 Physical dimensions 389 Operating environment 389 Storage environ...

Страница 11: ...Brocade MLX Series and Brocade NetIron XMR Hardware Installation Guide xi 53 1002373 02 Dangers 426...

Страница 12: ...xii Brocade MLX Series and Brocade NetIron XMR Hardware Installation Guide 53 1002373 02...

Страница 13: ...tallation instructions for Brocade NetIron XMR routers Chapter 5 Using Brocade Structured Cabling Components provides information on how to use the cabling components with Brocade MLX Series and Broca...

Страница 14: ...MLXe 4 router Brocade MLXe 8 router Brocade MLXe 16 router Brocade MLXe 32 router Brocade MLX 4 router Brocade MLX 8 router Brocade MLX 16 router Brocade MLX 32 router Brocade NetIron XMR 4000 router...

Страница 15: ...rocade MLX Series and Brocade NetIron Family Configuration Guide Notes cautions and danger notices The following notices and danger statements are used in this manual They are listed below in order of...

Страница 16: ...for informational purposes only Notice to the reader This document may contain references to the trademarks of the following corporations These trademarks are the properties of their respective compan...

Страница 17: ...R Hardware Installation Guide xvii 53 1002373 02 Document conventions Getting technical help To contact Technical Support go to http www brocade com services support index page for the latest e mail a...

Страница 18: ...xviii Brocade MLX Series and NetIron XMR Hardware Installation Guide 53 1002373 02 Document conventions...

Страница 19: ...outing Advanced scalable Metro Ethernet Layer 2 services Advanced Layer 2 Layer 3 VPN and multicast capabilities support residential triple play and business services Comprehensive hardware based secu...

Страница 20: ...ch router refer to Appendix A Brocade MLXe Chassis bundles Brocade MLXe 4 router components You can install the following components in the router slots Up to two management modules one active and one...

Страница 21: ...components that ships with each router refer to Appendix A Brocade MLXe Chassis bundles Figure 2 displays the Brocade MLXe 8 router FIGURE 2 Brocade MLXe 8 router 14 15 16 17 1 2 8 10 12 6 3 9 7 5 4 1...

Страница 22: ...ponents You can install the following components in the router slots Up to two management modules one active and one redundant Up to four switch fabric modules Up to 16 interface modules Up to eight p...

Страница 23: ...e MLXe 16 router FIGURE 3 Brocade MLXe 16 router 1 16 Interface slots 1 16 20 Switch fabric slot 4 24 31 Power supplies 17 Switch fabric slot 1 21 Management slot 1 18 Switch fabric slot 2 22 Manageme...

Страница 24: ...32 router components You can install the following components in the router slots Up to two management modules Up to eight switch fabric modules Up to 32 interface modules Up to eight power supplies...

Страница 25: ...slot 8 46 Power supply 2 52 Power supply 8 35 Switch fabric slot 3 41 Management slot 1 47 Power supply 3 36 Switch fabric slot 4 42 Management slot 2 48 Power supply 4 37 Switch fabric slot 5 43 Capt...

Страница 26: ...ribed the components you can install in the router slots Brocade MLX 4 router components You can install the following components in the router slots Up to two management modules one active and one re...

Страница 27: ...to four power supplies AC or DC Figure 6 displays the Brocade MLX 8 router FIGURE 6 Brocade MLX 8 router 8 10 12 6 9 7 5 4 3 14 15 11 16 17 1 2 13 18 1 Interface slot 1 6 Switch fabric slot 2 11 Inte...

Страница 28: ...t Up to four switch fabric modules Up to 16 interface modules Up to eight power supplies AC or DC Figure 7 displays the Brocade MLX 16 router FIGURE 7 Brocade MLX 16 router 1 16 Interface slots 1 16 2...

Страница 29: ...ion Guide 11 53 1002373 02 Hardware features 1 Brocade MLX 32 router components You can install the following components in the router slots Two management modules Up to eight switch fabric modules Up...

Страница 30: ...lot 8 46 Power supply 2 52 Power supply 8 35 Switch fabric slot 3 41 Management slot 1 47 Power supply 3 36 Switch fabric slot 4 42 Management slot 2 48 Power supply 4 37 Switch fabric slot 5 43 Capti...

Страница 31: ...nstall in the router slots For a detailed list of components that ships with each router refer to Brocade NetIron XMR 4000 router components You can install the following components in the router slot...

Страница 32: ...ur power supplies AC or DC Figure 10 displays the Brocade NetIron XMR 8000 router FIGURE 10 Brocade NetIron XMR 8000 router 8 10 12 6 9 7 5 4 3 14 15 11 16 17 1 2 13 18 1 Interface slot 1 6 Switch fab...

Страница 33: ...four switch fabric modules Up to 16 interface modules Up to eight power supplies AC or DC Figure 11 displays the Brocade NetIron XMR 16000 router FIGURE 11 Brocade NetIron XMR 16000 router 1 16 Inter...

Страница 34: ...erface modules Up to eight power supplies AC or DC Figure 12 displays the Brocade NetIron XMR 32000 router FIGURE 12 Brocade NetIron XMR 32000 router r 44 45 43 43 Pwr Active Pwr Active Pwr Active Pwr...

Страница 35: ...ber Description NI MLX MR MR Brocade MLXe and Brocade MLX management module 1 GB SDRAM dual auxiliary flash slots EIA or TIA 232 and 10 100 1000 Ethernet ports for out of band management NI MLX 32 MR...

Страница 36: ...chassis NOTE Prior to installing or replacing the MR2 management module you must read the Hardware Installation Notes that shipped with the hardware NOTE Although management modules are designed to b...

Страница 37: ...cards ship with the label on the bottom of the card take caution to insert the card with the label on the bottom side NOTE Some older auxiliary flash cards can be inserted the wrong way in the slot b...

Страница 38: ...twork You can then access the router and configure monitor and manage the system from a management station NOTE The existing management network into which you can connect the 10 100 1000 Ethernet port...

Страница 39: ...ntly accessing a auxiliary flash card although there is one inserted in the slot Active Lower Left On The module is functioning as the active management module Off The module is functioning as the red...

Страница 40: ...Requires SFP optics BR MLX 100GX 1 1 MLXe MLX XMR MLXE XMR MLX 1 port 100 GbE X Module with IPv4 IPv6 MPLS hardware support requires CFP optics Supports 1M IPv4 routes in FIB in XMR mode and 512K IPv4...

Страница 41: ...000 module with IPv4 IPv6 MPLS hardware support requires SFP optics Note Copper SFPs are supported at 1000Mbps only NI XMR 1GX20 SFP 20 XMR NetIron XMR Series 20 port FE GE 100 1000 module with IPv4 I...

Страница 42: ...ule slots in any chassis with one slot active and one slot inactive In all devices the lower number of the two occupied slots becomes the active slot NOTE Because of the possibility of overheating 2x1...

Страница 43: ...d reload the device Brocade config Brocade config system init tm credit size credit_1024b Brocade config exit Brocade write memory Brocade reload NOTE The 100GbE module requires a minimum software ver...

Страница 44: ...cuments data_sheets product_data_sheets Optics_DS p df For more information about fiber optic transceivers and associated cabling refer to Installing a fiber optic transceiver on page 318 Power supply...

Страница 45: ...Brocade Optics Family Data Sheet available online in the following location http www brocade com downloads documents data_sheets product_data_sheets Optics_DS p df MLXe 16 six four 1200W PSU for 4 4 r...

Страница 46: ...8x10GE X modules installed Power supply requirements MLXe 4 one one 1200W PSU for 1 1 redundancy install two 1200W PSU two to four two 1200W PSU for 2 2 redundancy install four 1200W PSU one 1800W PS...

Страница 47: ...port and 4 port 10 Gbps Ethernet interface module front panels FIGURE 17 Gen 1 2 port and 4 port 10 Gbps Ethernet module front panels The front panel of the 2 port module includes the following featu...

Страница 48: ...ceivers provide an optical or physical medium dependent PMD interface for single or multi mode fiber that can be used with either the LAN physical layer PHY or WAN physical layer WAN PHY For a list of...

Страница 49: ...Ethernet interface modules installed Power supply requirements MLXe 4 three one 1200W PSU for 1 1 redundancy install two 1200W PSU four two 1200W PSU for 2 2 redundancy install four 1200W PSU MLX 4 an...

Страница 50: ...atus of each port as described in Table 11 BR MLX 10GX4 X and BR MLX 10Gx4 X ML interface module Ethernet ports The BR MLX 10GX4 X interface module has four physical ports that allow you to connect yo...

Страница 51: ...router when installing BR MLX 10GX4 X interface modules TABLE 12 Power supply requirements for BR MLX 10GX4 X and BR MLX 10Gx4 X ML interface modules Router type Number of Gen 2 10GX4 X interface mod...

Страница 52: ...es and management modules to Multi Service IronWare software R05 0 00 or later For more information refer to the Hardware Installation Notes that shipped with the modules NOTE NI MLX 10Gx8 D interface...

Страница 53: ...modules to the appropriate software release Refer to the Hardware Installation Notes that shipped with the interface module NOTE NI MLX 10Gx8 D modules do not support Multiprotocol Label Switching MP...

Страница 54: ...rs BR MLX 1GCx24 X ML support s up to 512K IPv4 routes in hardware and BR MLX 1GCx24 X version supports up to 1M IPv4 routes in hardware BR MLX 1GCx24 X ML does not include a software license but can...

Страница 55: ...port on a module or slot The number of indexes that can be assigned per module is 20 40 or 64 depending on the number of ports on the module When installing 24 port copper or fiber interface modules y...

Страница 56: ...BR MLX 1GFx24 X and BR MLX 1GFx24 X ML modules you must upgrade the software on all interface modules and management modules to the appropriate software release For more information on the appropriat...

Страница 57: ...d BR MLX 1GFx24 X ML fiber interface modules FIGURE 22 BR MLX 1GFx24 X and BR MLX 1GFx24 X ML fiber interface module front panel The front panel includes the following features Arrow shaped LEDs in ce...

Страница 58: ...rt 1 Gbps fiber interface module Router type Number of 24 port 1 Gbps fiber interface module installed Power supply requirements MLXe 4 three one 1200W PSU for 1 1 redundancy install two 1200W PSU fou...

Страница 59: ...on http www brocade com downloads documents data_sheets product_data_sheets Optics_DS p df 20 port 10 100 1000 Ethernet interface module Figure 24 shows the front panel of the 20 port 10 100 1000 Ethe...

Страница 60: ...1 connector on one end that connects to the mini RJ21 connector on the interface module The other end of the cable splits into six cables with RJ45 connectors on each cable The NI MLX 1Gx48 T A module...

Страница 61: ...rocade to purchase this module TABLE 21 Power supply requirements for NI MLX 1Gx48 T A modules Router type Number of NI MLX 1Gx48 T A modules installed Power supply requirements MLXe 4 one one 1200W P...

Страница 62: ...1 Module power usage 260W Slot16 pri 1 module type NI MLX 1Gx48 T A 48 port 10 100 1000Base T MRJ21 Module power usage 260W FANS Bottom fan tray fan 1 Status OK Speed LOW 50 Bottom fan tray fan 2 Stat...

Страница 63: ...following port states Active or Local Fail TX Pkt RX Pkt and Carrier Rcvd or Remote Fail Two IN and two OUT RJ 48 connectors to provide a BITS external clock source and to propagate a common clock sou...

Страница 64: ...pagate a common clock source Line or BITS among POS modules Figure 29 and Figure 30 illustrate these features FIGURE 29 1 port OC 192c POS interface module FIGURE 30 2 port OC 192c POS interface modul...

Страница 65: ...ally detected error condition Off Port is disabled TX Pkt Center of board 2nd from top position One LED per port as defined by column position Blinking Green Blinks during transmission of packets from...

Страница 66: ...the default clocking configuration Loop Timing This option receives timing from the line Line Timing This interface receives timing from the line and is used to clock all ports on the same interface...

Страница 67: ...and ships with eight switch fabric modules NOTE Brocade MLX Series and Brocade NetIron XMR router switch fabric modules are dedicated which means that they function properly in these routers only If y...

Страница 68: ...normal mode or turbo mode but will boot in turbo mode only if all active interface modules are Gen 2 modules For a list of Gen 1 and Gen 2 modules refer to Table 3 Power supplies Brocade offers the f...

Страница 69: ...are required and four are redundant Because power is supplied over a common power bus any power supply installed in addition to required power supplies provides backup for any power supply that fails...

Страница 70: ...in a standard 19 inch EIA310 D rack For instructions about how to mount the router in a rack refer to the installation chapter that is appropriate for your router model You can also mid mount your 4...

Страница 71: ...e You can install an optional upward air deflector on the fans of 32 slot routers using a fan deflector kit from Brocade For more information refer to Cooling system for Brocade MLX Series and Brocade...

Страница 72: ...Brocade NetIron XMR Hardware Installation Guide 53 1002373 02 Router modules 1 FIGURE 33 Fan locations for Brocade MLXe 8 routers FIGURE 34 Front fan location for Brocade MLX 16 routers 1 Fan module...

Страница 73: ...Brocade MLX Series and Brocade NetIron XMR Hardware Installation Guide 55 53 1002373 02 Router modules 1 FIGURE 35 Rear fan location for Brocade MLXe 16 routers 1 Rear fan assemblies 1...

Страница 74: ...ending on the results the router will Leave the fan speed as is Increase the fan speed Decrease the fan speed Shut down a module to prevent damage If the temperature of a module exceeds specified high...

Страница 75: ...ere are two fan assemblies located in the rear of the router For Brocade MLX 16 routers each fan assembly contains one 4 speed fan Eight fan controllers support redundancy High speed fans for Brocade...

Страница 76: ...Hardware Installation Guide 53 1002373 02 Router modules 1 FIGURE 37 Fan locations for Brocade MLX and Brocade NetIron XMR 4 slot routers FIGURE 38 Fan locations for Brocade MLX and Brocade NetIron XM...

Страница 77: ...tion Guide 59 53 1002373 02 Router modules 1 FIGURE 39 Front fan location for Brocade MLX and Brocade NetIron XMR 16 slot routers FIGURE 40 Rear fan location for Brocade MLX and Brocade NetIron XMR 16...

Страница 78: ...reading Depending on the results the router will Leave the fan speed as is Increase the fan speed Decrease the fan speed Shut down a module to prevent damage If the temperature of a module exceeds sp...

Страница 79: ...ctions Rack mount kit Brocade MLX Series and Brocade NetIron XMR routers can be mounted in a standard 19 inch EIA310 D 2 post rack using the pre installed mounting brackets For flush mounting simply u...

Страница 80: ...62 Brocade MLX Series and Brocade NetIron XMR Hardware Installation Guide 53 1002373 02 Supported software features 1...

Страница 81: ...et on page 100 Installing a Brocade MLXe 32 router on page 109 Attaching a management station on page 140 Activating the power source on page 141 Verifying proper operation on page 142 The illustratio...

Страница 82: ...ere the operating ambient temperature might exceed 40 C 104 F CAUTION Make sure the air flow around the front sides and back of the router is not restricted CAUTION If you do not install a module in a...

Страница 83: ...ts are properly grounded then use the power cord supplied with the router to connect it to the power source DANGER If the installation requires a different power cord than the one supplied with the ro...

Страница 84: ...nly A restricted access area is a location where access can be gained only by service personnel through the use of a special tool lock and key or other means of security CAUTION For the DC input circu...

Страница 85: ...lug ensure the bare copper wire has been cleaned and antioxidant is applied to the bare wire Installing 2x100GbE interface modules in Brocade MLXe routers This section provides installation instructi...

Страница 86: ...2x100G interface module into a working device you must change the system tm credit size to 1024b which readies the device to forward 100 Gbps traffic Log into your system and enter the following comma...

Страница 87: ...Do not use the port cover tabs to lift the module They are not designed to support the weight of the module which can fall and be damaged FIGURE 43 Port covers and connector covers 6 Insert the module...

Страница 88: ...terface module is sensitive to dust and debris Keep the optics covers in place until you are ready to connect the fiber cable Clean all fiber cables properly before you connect them to the 2x100G inte...

Страница 89: ...es in a Brocade MLXe 4 router on page 76 Attaching a management station on page 140 and Connecting the router to a network device on page 317 Unpacking a Brocade MLXe 4 router The Brocade MLXe 4 route...

Страница 90: ...g steps NOTE When connecting the device to the rack frame use thread forming screws and paint piercing washers 1 Determine the position of each router in the rack according to the weight of the router...

Страница 91: ...outer is to install right to left beginning with the lowest row and moving up For instructions about installing 2x100GbE interface modules refer to Installing 2x100GbE interface modules in Brocade MLX...

Страница 92: ...uter ships with the required switch fabric modules installed If you are installing a redundant management module see the chapter titled Using a Redundant Management Module in the Brocade MLX Series an...

Страница 93: ...hich may have been configured for a different module type remove the old configuration information by following these steps a Use the show running config command in config mode to determine the curren...

Страница 94: ...tartup config done FIGURE 48 Installing a module Installing power supplies in a Brocade MLXe 4 router You need a small Phillips or flat blade screwdriver to install power supplies Follow these steps t...

Страница 95: ...power connections must use a surge protection device SPD to protect the AC power supplies from damage due to excessive power line surges Follow these steps to connect the AC power cord 1 Locate the p...

Страница 96: ...as shown in Figure 50 FIGURE 50 The Brocade MLXe 4 DC power supply 2 Use a 2 Phillips screwdriver to remove the power lugs 3 Crimp 8 AWG power supply wire into the power lugs and reconnect the lugs t...

Страница 97: ...xidant is applied to the bare wire CAUTION To ensure adequate bonding when attaching the ground lug a minimum of 20 PSI of torque is required to be applied to the mounting hardware used to attach the...

Страница 98: ...er cabling is installed at the site For information on cabling refer to Installing power supplies in the Brocade MLXe 8 router on page 85 Attaching a management station on page 140 and Connecting the...

Страница 99: ...re installing your Brocade MLXe 8 router in a cabinet or 4 post rack refer to on page 146 NOTE When connecting the device to the rack frame use thread forming screws and paint piercing washers Follow...

Страница 100: ...You should also use star washers with any single hole grounding lugs to keep the lugs from rotating Repeat step 2 through step 5 to mount each router in the rack moving from lowest to highest Installi...

Страница 101: ...e modules and management modules to the appropriate software release before installing them For more information on the appropriate software release refer to the Hardware Installation Notes that shipp...

Страница 102: ...y has been removed before inserting a module in the same slot Follow this procedure to install a module in the router 1 If you are installing a module in a slot which may have been configured for a di...

Страница 103: ...and to ensure that the slot will be correctly configured for the new module after a reboot Brocade config write memory Write startup config done FIGURE 54 Installing a module in a Brocade MLXe 8 route...

Страница 104: ...alling power supplies CAUTION Carefully follow the mechanical guides on each side of the power supply slot and make sure the power supply is properly inserted in the guides Never insert the power supp...

Страница 105: ...r cord than the one supplied with the router make sure you use a power cord displaying the mark of the safety agency that defines the regulations for power cords in your country The mark is your assur...

Страница 106: ...enclosure Before crimping the ground wire into the provided ground lug ensure the bare copper wire has been cleaned and antioxidant is applied to the bare wire CAUTION For the NEBS compliant installat...

Страница 107: ...The following sections describe how to install a Brocade MLXe 16 router NOTE Illustrations may differ slightly from the actual equipment Preparing the installation site Before installing the router pl...

Страница 108: ...Lifting guidelines for Brocade MLXe 16 routers DANGER A fully populated Brocade MLXe 16 router is heavy TWO PEOPLE ARE REQUIRED WHEN LIFTING HANDLING OR MOUNTING THESE DEVICES Follow these guidelines...

Страница 109: ...he rack For example place routers with the fewest modules near the top of the rack routers with more modules near the middle of the rack and fully populated routers near the bottom of the rack 2 Posit...

Страница 110: ...in a Brocade MLXe 16 slot router The Brocade MLXe 16 router ships with the required switch fabric modules installed The installation sequence for multiple modules is important to ensure proper fit Al...

Страница 111: ...ware configurations that you can perform and how to manage the redundancy feature NOTE Brocade MLXe modules are dedicated which means that you must install them in Brocade MLXe routers only If you ins...

Страница 112: ...to enter the following command Brocade set fan speed auto The Brocade MLXe 16 router ships with slot blanks installed in all empty module slots The slot blanks help ensure proper airflow inside the ro...

Страница 113: ...ting the plug into the ESD connector on the chassis 3 Remove the module from the packaging 4 Insert the module into the slot and slide the module along the card guide until the ejectors on either side...

Страница 114: ...ng power supplies in a Brocade MLXe 16 router DANGER High Touch Current Earth connection is essential before connecting supply Follow these steps to install a power supply in a Brocade MLXe 16 router...

Страница 115: ...the router This action causes the power supply connector to engage the backplane connector NOTE Do not overtighten screws when installing power supplies 5 For information about connecting power to th...

Страница 116: ...safely with the router 4 For information about powering on the system refer to Activating the power source on page 141 Connecting DC power You can supply DC power to the Brocade MLXe 16 router using a...

Страница 117: ...d have an agency approved crimped connector provided with the device attached to one end with the other end attached to building ground The connector must be crimped with the proper tool allowing it t...

Страница 118: ...acket 29 31 1 Left transport bracket 29 31 1 Alignment washers 4 Phillips pan head screws 10 32x 63 square cone 30 Floating clip nut 10 32 26 Retainer nut 10 32 26 Snap plastic rivets 12 Phillips flat...

Страница 119: ...r in a cabinet or rack using the Cabinet 4 Post Rack Mount Kit starting with the lowest device first The kits contain a variety of screws nuts clip nuts and washers for use in the following ways Use f...

Страница 120: ...re two sizes of side plates to accommodate cabinets or racks with depths of 27 28 inches and depths of 29 31 inches Be sure to select the side plate that is appropriate for your cabinet or rack 5 The...

Страница 121: ...uct assembly Refer to Figure 67 FIGURE 67 Install side air ducts to the mounting shelf MLXe 4 and MLXe 8 7 Select the rail extender that is appropriate for the depth of your cabinet or rack and attach...

Страница 122: ...Figure 69 MLXe 4 slot router shown FIGURE 69 Install the router on the mounting shelf 9 Install the transport brackets to the cabinet or rack rails and to the side plates on the router using six 10 32...

Страница 123: ...m becoming unstable or falling over DANGER Mount the routers you install in a rack or cabinet as low as possible Place the heaviest router at the bottom and progressively place lighter routers above t...

Страница 124: ...cabinet 2 3 Attach the side plates to the router using 8 4 40 flat head screws Refer to Figure 72 FIGURE 72 Attach the side plates to the rear sides of the device 4 Attach the telescoping rails to the...

Страница 125: ...or rack 6 Secure the transport brackets to the rear of the router using 10 10 32 screws and to the cabinet or rack mounting posts using 6 10 32 screws Refer to Figure 75 NOTE The transport brackets p...

Страница 126: ...he air block bracket to the front of the cabinet Refer to Figure 76 FIGURE 76 Install the air block bracket 8 Attach the cable management comb Refer to Figure 77 For cable management instructions refe...

Страница 127: ...al lift to move and install the router Be sure to allow enough working room for the lift NOTE Make sure your site provides 200 240 AC power Ensure that the proper power and network cabling is installe...

Страница 128: ...Brocade MLXe 32 router ships in a wooden crate bolted to a wooden platform that rests on a pallet Follow these steps to uncrate the router 1 The router shipping crate must be in the upright position...

Страница 129: ...cabinet Refer to Installing your 32 slot router in a 4 post rack or open cabinet on page 118 for installation instructions Installation requirements Allow 1 to 2 hours to complete this procedure Your...

Страница 130: ...n the location and orientation of the device relative to other equipment in the rack For cooling purposes allow a minimum of six inches of space between the front and back of the device and walls or o...

Страница 131: ...or a mid mount configuration using the factory installed mounting brackets For a mid mount configuration simply remove the factory installed mounting brackets from the front edges of the device and re...

Страница 132: ...res 33U of space in the rack plus 1U temporary space above for installation 3 Align the holes in the saddle with the holes on the mounting posts and attach the saddle using a minimum of eight standard...

Страница 133: ...e saddle in the rack FIGURE 81 Saddle installation Slide chassis onto the saddle 1 Saddle 2 Seat of saddle aligns with U marking on mounting posts as shown 1 Front port side of rack mounting post 2 Re...

Страница 134: ...ble hole on the rack mount bracket to attach the router to the rack mounting poles See Figure 83 5 Visually inspect the alignment of the router If the router is installed properly the mounting screws...

Страница 135: ...edges of the device Re attach the mounting brackets to the center sides of the device using the pre drilled holes in the device For a front mount use the brackets as they were installed at the factor...

Страница 136: ...d power supplies You will need the following items to install your 32 slot router in a 4 post rack or open cabinet A mechanical lift fitted with a lift plate instead of forks to move the device off th...

Страница 137: ...he lift and into the rack Once you have completed the preliminary installation preparations refer to Preliminary rack mount installation steps on page 112 follow these steps to mount your 32 slot rout...

Страница 138: ...and back of the rack using screws appropriate for your rack type You must provide these screws Refer to Figure 85 NOTE The narrow telescoping ends of the side rails should attached at the back of the...

Страница 139: ...02373 02 Installing a Brocade MLXe 32 router 2 FIGURE 86 Slide the chassis in the rack 6 Once the chassis is securely inserted in the rack fasten the mounting ears to the front rails of the rack using...

Страница 140: ...le slots and upper and lower shipping panels installed For instructions about installing 2x100GbE interface modules refer to Installing 2x100GbE interface modules in Brocade MLXe routers on page 67 DA...

Страница 141: ...es management slots 1 and 2 Switch fabric modules switch fabric slots 1 8 Interface modules Interface slots 1 32 Refer to Figure 12 for the locations of these slots NOTE Brocade MLXe modules are dedic...

Страница 142: ...ter the no module slot module command to remove the configuration from slot 1 Use the slot and module information shown as a result of the show running config command MLXe 32 config no module 1 ni mlx...

Страница 143: ...plies You can achieve 4 4 power redundancy by installing four additional power supplies If you install 21 or more NI MLX 1Gx48 T A modules in your router you will need a minimum of five power supplies...

Страница 144: ...2 cable management The Brocade MLXe 32 cable management system allows access to the power supplies at the bottom of the router and keeps the air inlet clear in the center of the router this is essenti...

Страница 145: ...CAUTION Be sure not to exceed the minimum recommended bend radius for the cables 2 in for MRJ 21 cables and 1 5 in for Category 5 RJ45 and fiber optic cables Cable routing for the upper left quadrant...

Страница 146: ...2 router 2 FIGURE 91 Routing upper left quadrant cables FIGURE 92 Routing upper left quadrant cables up 1 Upper left quadrant 3 Cables from slot 1 2 Side combs 18 4 Cables from slot 2 1 Upper left qua...

Страница 147: ...rough comb B 4 Route cables from slots 7 and 8 up through comb C Cable routing for the upper right quadrant Route cables from slots in numerical order starting with the cables for slot 15 1 Route cabl...

Страница 148: ...g upper right quadrant cables up 2 Route cables from slots 13 and 14 up through comb A Refer to Figure 94 3 Route cables from slots 11 and 12 up through comb B 4 Route cables from slots 9 and 10 up th...

Страница 149: ...Brocade MLXe 32 router 2 Cable routing for the lower left quadrant 1 Route cables from slots 18 and 17 directly to the left through the side comb Refer to Figure 95 FIGURE 95 Routing lower left quadr...

Страница 150: ...lower left quadrant cables 2 Route cables from slots 20 and 19 down through comb A Refer to Figure 95 3 Route cables from slots 22 and 21 down through comb B 4 Route cables from slots 24 and 23 down t...

Страница 151: ...cade MLXe 32 router 2 Cable routing for the lower right quadrant 1 Route cables from slots 32 and 31 directly to the right through the side comb Refer to Figure 97 FIGURE 97 Routing the lower right qu...

Страница 152: ...or service Gently move the cable bundles to the side to access a module Use the appropriate Phillips or flat blade screwdriver with an extended shaft to disconnect the cables from the module and remov...

Страница 153: ...le cinch holds up to 8 MRJ21 cables or 48 RJ45 cables For additional security use cable ties to secure cables to the cable management system hardware on the sides of the unit The cable routing slots a...

Страница 154: ...e the blank power supply faceplate 2 Remove the power supply from the packaging 3 Insert the power supply into the slot using the guides on each side of the slot Refer to Figure 100 FIGURE 100 Install...

Страница 155: ...otect the AC power supplies from damage due to excessive power line surges AC power is supplied through a power cord that is connected to each power supply in the Brocade MLXe 32 router Follow the ste...

Страница 156: ...afety cover FIGURE 102 Removing the safety cover 2400W power supply and 3000W power supply displayed 2 Use a 2 Phillips screwdriver to unscrew the power lugs Refer to Figure 103 FIGURE 103 Removing th...

Страница 157: ...FIGURE 104 Crimping the power supply wire in the lug 4 Reconnect the power lugs to the power supply unit 5 Connect the 48V wire to the negative terminal and the 0V wire to the positive terminal NOTE D...

Страница 158: ...t you connect to through the 10 100 Ethernet port must be separate and isolated from the network over which user packets are switched and routed For information about functionality on the management p...

Страница 159: ...k in place If you run the router with an uncovered slot the system may overheat 2 If you are supplying a DC power source to your router attach a power cable to each installed DC power supply as descri...

Страница 160: ...E 33 Router LED states and actions LED label Desired state Meaning Abnormal state Meaning or action Management module Active The Active LED on one of the installed management modules should be on The...

Страница 161: ...wer supplies see the entry for the AC power supply LED in this table for more information Mgmt Act During initialization steady blinking After initialization occasional blinking The active management...

Страница 162: ...The power supply is not supplying power to the router If the AC LED is green there is a problem with the power supply and it must be replaced ALM Off The power supply is in normal operating condition...

Страница 163: ...dule Status Ports Starting MAC M1 upper Brocade MLXe Mgmt Module Active M2 lower F0 Brocade MLXe Switch Fabric Module Active S1 S2 S3 S4 Brocade MLXe 4 Port 10Gig Module CARD_STATE_UP 4 000c db80 0000...

Страница 164: ...interactive mode CARD_STATE_LP_SYNC The software images are synchronized between the management module and interface module CARD_STATE_SYNC The system is currently synchronizing the software image bet...

Страница 165: ...190 Installing a Brocade MLX 32 router on page 195 Attaching a management station on page 227 Activating the power source on page 228 Verifying proper operation on page 229 The illustrations in this c...

Страница 166: ...ment where the operating ambient temperature might exceed 40 C 104 F CAUTION Make sure the airflow around the front sides and back of the device is not restricted CAUTION If you do not install a modul...

Страница 167: ...its are properly grounded then use the power cord supplied with the device to connect it to the power source DANGER If the installation requires a different power cord than the one supplied with the d...

Страница 168: ...special tool lock and key or other means of security CAUTION For the DC input circuit to the system of Brocade MLX 4 MLX 8 and MLX 16 routers 1200W supply make sure there is a 40 amp circuit breaker m...

Страница 169: ...er number is blocked The acceptable slots in which to install this module are odd numbered interface module slots 1 3 5 7 9 11 13 and 15 for a 16 slot chassis for example Adjacent even numbered slots...

Страница 170: ...redit size command is only available in R05 2 00 or later so it is important to upgrade all software to R05 2 00 before you install your 2x100G module 3 Remove the center slot guide In some devices yo...

Страница 171: ...all and be damaged FIGURE 106 Port covers and connector covers 6 Insert the module into the slot until the connectors securely engage the backplane In 4 and 8 slot devices the modules are installed ho...

Страница 172: ...ware Installation Guide53 1002373 02 Installing 2x100GbE interface modules in Brocade MLX routers 3 FIGURE 107 Installing 2x100G modules in a 4 or 8 slot device 4 slot shown FIGURE 108 Installing 2x10...

Страница 173: ...n cabling refer to Installing Brocade MLX 4 router power supplies on page 160 Attaching a management station on page 227 and Connecting the router to a network device on page 317 Unpacking a Brocade M...

Страница 174: ...re drilled holes NOTE You will need to provide four standard 12 24 pan head screws per router and a 2 Phillips screwdriver to secure each router in the rack Follow these steps to mount a Brocade MLX 4...

Страница 175: ...uter in a rack front mount configuration 4 Slide the router down so that the mounting screw heads are in the narrowest part of the keyhole slots 5 Tighten the screws to secure the router in place For...

Страница 176: ...be metallically connected to interfaces that connect to the outside plant OSP or its wiring These interfaces are designed for use as intra building interfaces only Type 2 or Type 4 ports as described...

Страница 177: ...te the router with an uncovered slot the system may overheat Although the slot blanks differ in size the procedure for removing them is identical You will need a flat blade screwdriver to remove slot...

Страница 178: ...ckaging 4 Insert the module into the router slot and slide the card along the card guide until the ejectors on either side of the module move close to the module front panel Refer to Figure 112 NOTE W...

Страница 179: ...Never insert the power supply upside down FIGURE 113 Installing a power supply in a Brocade MLX 4 router 4 Push the power supply front panel into the router until it engages the backplane connector 5...

Страница 180: ...ord displaying the mark of the safety agency that defines the regulations for power cords in your country The mark is your assurance that the power cord can be used safely with the router For informat...

Страница 181: ...ulations CAUTION For the NEBS compliant installation of Brocade MLX 4 8 and 16 slot routers with AC and DC systems use a ground wire of at least 6 American Wire Gauge AWG The ground wire should have a...

Страница 182: ...router plan the location and orientation relative to other devices and equipment For cooling purposes allow a minimum of six inches of space between the sides front and the back of the router and wall...

Страница 183: ...ure 117 shows the location of these screws You will need a 2 Phillips screwdriver to remove these screws FIGURE 117 Removing the shipping screws Lifting guidelines for Brocade MLX 8 routers Follow the...

Страница 184: ...ck 2 Using the keyhole slots in the router mounting brackets as a guide align one screw per rack post as shown in Figure 110 On one side of the rack the screw should align with the top hole in the mou...

Страница 185: ...est to highest Installing Brocade MLX 8 modules The Brocade MLX 8 router ships with the required switch fabric modules installed The sequence for installing multiple modules is important to ensure pro...

Страница 186: ...a Brocade MLX router the router and module will not function properly Although management modules are designed to be hot swappable you must upgrade the software on all interface modules and management...

Страница 187: ...supply or fan tray has been removed before inserting a module in the same slot Follow these steps to install a module 1 If you are installing a module in a slot which may have been configured for a d...

Страница 188: ...IGURE 120 Installing a module in a Brocade MLX 8 router NOTE When inserting the module into the router make sure that the faceplate does not overlap the faceplate of an adjacent interface module 8 Pus...

Страница 189: ...t panel into the router until it engages the backplane connector 5 Pull the latch handle on the power supply up to lock the power supply in place For information about connecting power to the router r...

Страница 190: ...ed with the device make sure you use a power cord displaying the mark of the safety agency that defines the regulations for power cords in your country The mark is your assurance that the power cord c...

Страница 191: ...de MLXe 8 and Brocade MLXe 16 routers with AC and DC systems use a ground wire of at least 6 American Wire Gauge AWG The ground wire should have an agency approved crimped connector provided with the...

Страница 192: ...e mounting hardware used to attach the ground lug FIGURE 124 Crimping the power supply wire in the lug 4 Connect the 48V cable to the negative terminal and the 0V cable to the positive terminal NOTE D...

Страница 193: ...the router to a network device on page 317 Unpacking a Brocade MLX 16 router The Brocade MLX 16 router ships with the following items Switch fabric modules installed in the slots marked SF and slot bl...

Страница 194: ...configuration For a mid mount configuration simply remove the factory installed mounting brackets from the front edges of the device and re attach them to the center sides of the device using the pre...

Страница 195: ...Mounting the Brocade MLX 16 router in a rack 4 Slide the router down so that the mounting screw heads are in the narrow portion of the keyhole slots 5 Tighten the screws to secure the router in place...

Страница 196: ...ement and switch fabric modules However there are specific switch fabric and fan requirements for NI MLX 10Gx8 M and NI MLX 1Gx48 T A modules in the 16 slot router Refer to Fan and switch fabric requi...

Страница 197: ...f you install a Brocade MLX module in another Brocade device or install a module intended for another Brocade device in a Brocade MLX router the router and module may not function properly Although ma...

Страница 198: ...router 1 If you are installing a module in a slot which may have been previously configured for a different module type remove the old configuration information using this procedure a Use the show ru...

Страница 199: ...thirteen or more NI MLX 1Gx48 T A modules are installed in your router you will need a minimum of five power supplies You can achieve 5 3 power redundancy by installing an additional three power supp...

Страница 200: ...nstalling NIBI 16 FAN EXH A fan assemblies NOTE You can remove and replace fan assemblies and switch fabric modules while the Brocade MLX 16 slot router is powered on and running CAUTION To avoid over...

Страница 201: ...emblies by inserting your fingers underneath each assembly and pulling it toward you as shown in Figure 129 DANGER Be careful not to insert your fingers into the fan while removing it The fan may stil...

Страница 202: ...6 not present Power 7 32015000 AC 1200W Installed OK Power 8 32015000 AC 1200W Installed OK Total power budget for chassis 7200 W Total power used by system core 762 W Total power used by LPs 3788 W T...

Страница 203: ...ed HI 100 Bottom fan tray fan 5 Status OK Speed HI 100 Bottom fan tray fan 6 Status OK Speed HI 100 Rev A Back Fan A revision 0x09 Status OK Speed HI 100 Rev A Back Fan B revision 0x09 Status OK Speed...

Страница 204: ...before connecting supply Follow these steps to install a power supply in a Brocade MLX 16 router 1 Remove the power supply slot blank CAUTION Empty power supply slots must be covered with slot blanks...

Страница 205: ...ecting AC power 6 For information about powering on the system refer to Activating the power source on page 228 Connecting AC power AC power is supplied through a power cord connected to the power sup...

Страница 206: ...is your assurance that the power cord can be used safely with the device 4 For information about powering on the system refer to Activating the power source on page 228 Connecting DC power You can sup...

Страница 207: ...r with AC and DC systems use a ground wire of at least 6 American Wire Gauge AWG The ground wire should have an agency approved crimped connector provided with the device attached to one end with the...

Страница 208: ...uter plan the location and orientation relative to other devices and equipment For cooling purposes allow a minimum of six inches of space between the sides front and the back of the router and walls...

Страница 209: ...ollowing tools to remove the router from the shipping crate A forklift or pallet jack with a minimum limit of 550 lbs to move the router crate on the pallet A mechanical lift with a minimum 350 lb lim...

Страница 210: ...r in a rack DANGER Make sure the rack or cabinet housing the router is adequately secured to prevent it from becoming unstable or falling over DANGER Mount the routers you install in a rack or cabinet...

Страница 211: ...ranch circuit connection Do not rely on a secondary connection to a branch circuit such as a power strip Ensure that the rack is mechanically secured to support the router model Ensure that the airflo...

Страница 212: ...mid mount configuration simply remove the factory installed mounting brackets from the front edges of the device and re attach them to the center sides of the device using the pre drilled holes Follo...

Страница 213: ...allow a minimum of six inches of space between the sides front and the back of the router and walls or other obstructions If a router is installed within a perforated enclosure the perforations must...

Страница 214: ...material lift with a metal lift plate installed in place of the forks The metal plate should be no wider than 17 inches so that it will fit between the rack mount rails A strap to stabilize the router...

Страница 215: ...ve the crate including the shipping panel in case the router needs to be shipped again Installing a Brocade MLX 32 router in a rack DANGER Make sure the rack or cabinet housing the router is adequatel...

Страница 216: ...cteristics is available Required voltage and frequency as indicated in the hardware reference manual Protection by a circuit breaker in accordance with local electrical codes Supply circuit line fusin...

Страница 217: ...eps Follow these initial steps to mount a 32 slot device in any rack or open cabinet To install your device in a 2 post rack or open cabinet not recommended refer to Installing your 32 slot device in...

Страница 218: ...y remove the factory installed mounting brackets from the front edges of the device and re attach them to the center sides of the device using the pre drilled holes Once you have completed the prelimi...

Страница 219: ...equires 33U of space in the rack plus 1U temporary space above for installation 3 Align the holes in the saddle with the holes on the mounting posts and attach the saddle using a minimum of eight stan...

Страница 220: ...saddle in the rack FIGURE 140 Saddle installation Slide chassis onto the saddle 1 Saddle 2 Seat of saddle aligns with U marking on mounting posts as shown 1 Front port side of rack mounting post 2 Re...

Страница 221: ...ailable hole on the rack mount bracket to attach the router to the rack mounting poles See Figure 142 5 Visually inspect the alignment of the router If the router is installed properly the mounting sc...

Страница 222: ...edges of the device Re attach the mounting brackets to the center sides of the device using the pre drilled holes in the device For a front mount use the brackets as they were installed at the factor...

Страница 223: ...and power supplies You will need the following items to install your 32 slot router in a 4 post rack or open cabinet A mechanical lift fitted with a lift plate instead of forks to move the device off...

Страница 224: ...lift and into the rack Once you have completed the preliminary installation preparations refer to Preliminary rack mount installation steps on page 199 follow these steps to mount your 32 slot router...

Страница 225: ...t and back of the rack using screws appropriate for your rack type You must provide these screws Refer to Figure 144 NOTE The narrow telescoping ends of the side rails should attached at the back of t...

Страница 226: ...2373 02 Installing a Brocade MLX 32 router 3 FIGURE 145 Slide the chassis in the rack 6 Once the chassis is securely inserted in the rack fasten the mounting ears to the front rails of the rack using...

Страница 227: ...pulating the router start with the middle slot and work towards the edge Always fill the bottom slots of the upper and lower card cage of the router first Refer to Figure 8 on page 12 for slot locatio...

Страница 228: ...ors especially when replacing an existing module An insertion and extraction tool has been provided in the Brocade MLX 32 accessory kit to make this task easier Refer to Figure 147 FIGURE 147 insertio...

Страница 229: ...se refer to the Hardware Installation Notes that shipped with the management module If you are installing a redundant management module refer to the chapter titled Using a Redundant Management Module...

Страница 230: ...wrist strap and ground yourself by inserting the plug into the ESD connector on the front of the router 3 Remove the module from the packaging 4 Insert the module into the router slot and slide the c...

Страница 231: ...power supplies You can achieve 5 3 power redundancy by installing three additional power supplies Brocade MLX 32 cable management Brocade MLX 32 cable management is designed to allow access to the pow...

Страница 232: ...s for each module into a single bundle This is especially important at the ends nearest the module connections Each cable cinch holds up to 8 MRJ21 cables or 48 RJ45 cables For additional security use...

Страница 233: ...AUTION Be sure not to exceed the minimum recommended bend radius for the cables 2 in for MRJ 21 cables and 1 5 in for Category 5 RJ45 and fiber optic cables Cable routing for the upper left quadrant R...

Страница 234: ...r left quadrant cables FIGURE 151 Routing upper left quadrant cables up 2 Route cables from slots 3 and 4 up through comb A Refer to Figure 151 1 Upper left quadrant 3 Cables from slot 1 2 Side combs...

Страница 235: ...s 7 and 8 up through comb C Cable routing for the upper right quadrant Route cables from slots in numerical order starting with the cables for slot 15 1 Route cables from slots 15 and 16 directly to t...

Страница 236: ...up through comb A Refer to Figure 153 3 Route cables from slots 11 and 12 up through comb B 4 Route cables from slots 9 and 10 up through comb C Cable routing for the lower left quadrant 1 Route cabl...

Страница 237: ...2 router 3 FIGURE 154 Routing lower left quadrant cables FIGURE 155 Routing lower left quadrant cables 1 Lower left quadrant 3 Cables from slot 18 2 Cables from slot 17 4 Side combs 18 1 Lower left qu...

Страница 238: ...5 3 Route cables from slots 22 and 21 down through comb B 4 Route cables from slots 24 and 23 down through comb C Cable routing for the lower right quadrant 1 Route cables from slots 32 and 31 directl...

Страница 239: ...es for service Gently move the cable bundles to the side to access a module Use the appropriate Phillips or flat blade screwdriver with an extended shaft to disconnect the cables from the module and r...

Страница 240: ...ling power supplies in a Brocade MLX 32 router DANGER High Touch Current Earth connection is essential before connecting supply Follow these steps to install a power supply in a Brocade MLX 32 router...

Страница 241: ...supply upside down 4 Push the power supply front panel toward the back of the router to engage the backplane connector 5 Pull the release latch on the power supply front panel up to lock the power su...

Страница 242: ...lled power supply Refer to Figure 160 2 Lift the cord retainer and connect an AC power cord to the power supply 3 Snap the cord retainer over the power plug to hold it in place FIGURE 160 Brocade MLX...

Страница 243: ...cover 2 Use a 2 Phillips screwdriver to unscrew the power lugs Refer to Figure 162 FIGURE 162 Removing the power lugs 2400W power supply and 3000W power supply displayed 3 Crimp the correct AWG power...

Страница 244: ...ave an agency approved crimped connector provided with the device attached to one end with the other end attached to building ground The connector must be crimped with the proper tool allowing it to b...

Страница 245: ...5 3 Pull down on the handle to remove the 3000W power supply Refer to Figure 159 on page 223 4 Use a 2 Phillips screwdriver to remove the screws securing the power lugs Refer to Figure 162 on page 225...

Страница 246: ...ts on page 390 For Ethernet port connections a Category 5 UTP crossover cable which you must supply For information about the management port pin assignments refer to Management port pin assignments o...

Страница 247: ...tem off simply unplug the power cords NOTE Wall outlets should be installed near the equipment and should be easily accessible 4 Verify that the router has initialized successfully Refer to Verifying...

Страница 248: ...e is receiving power Off The module is not receiving power Check the following Make certain that the module is installed properly For more information refer to the module installation section in this...

Страница 249: ...power supplies AC Green steady The power supply is receiving power from the AC power source Off The power supply is not receiving power from an AC power source You can do the following Make sure that...

Страница 250: ...steady The power supply is providing DC power to the router Off The power supply is not supplying power to the device If the DC IN LED is green then there is a problem with the power supply and it mu...

Страница 251: ...e between the management module and interface module CARD_STATE_SOFTWARE_LOADED The module has loaded the software image CARD_STATE_POWER_OFF The module does not have power CARD_STATE_UP The module is...

Страница 252: ...234 Brocade MLX Series and Brocade NetIron XMR Hardware Installation Guide53 1002373 02 Verifying proper operation 3...

Страница 253: ...alling a Brocade NetIron XMR 16000 router on page 262 Installing a Brocade NetIron XMR 32000 router on page 273 Attaching a management station on page 296 Activating the power source on page 297 Verif...

Страница 254: ...fety agency that defines the regulations for power cords in your country The mark is your assurance that the power cord can be used safely with the router DANGER All fiber optic interfaces use Class 1...

Страница 255: ...are properly grounded then use the power cord supplied with the router to connect it to the power source DANGER If the installation requires a different power cord than the one supplied with the route...

Страница 256: ...s area is a location where access can be gained only by service personnel through the use of a special tool lock and key or other means of security CAUTION For the DC input circuit to the system of Br...

Страница 257: ...interface module slots 1 3 5 7 9 11 13 and 15 for a 16 slot chassis for example Adjacent even numbered slots will be in blocked state In all cases the lower number odd number becomes the active slot...

Страница 258: ...of the CLI Remember to write to memory and reload the device Brocade config Brocade config system init tm credit size credit_1024b Brocade config exit Brocade write memory Brocade reload NOTE The syst...

Страница 259: ...Do not use the port cover tabs to lift the module They are not designed to support the weight of the module which can fall and be damaged FIGURE 165 Port covers and connector covers 6 Insert the modul...

Страница 260: ...erface module is sensitive to dust and debris Keep the optics covers in place until you are ready to connect the fiber cable Clean all fiber cables properly before you connect them to the 2x100G inter...

Страница 261: ...000 router ships with the following items Router chassis with the appropriate number of switch fabric modules installed in the slots marked SF and slot blanks installed in all other module slots Inser...

Страница 262: ...ount a Brocade NetIron XMR 4000 router in a rack 1 Determine the position of each router in the rack For example place routers with the fewest modules near the top of the rack routers with more module...

Страница 263: ...nal screws as needed 7 Repeat step 2 through step 6 to mount each subsequent router in the same rack Installing Brocade NetIron XMR 4000 modules The Brocade NetIron XMR 4000 router ships with the requ...

Страница 264: ...formation about how to disable and re enable power to interface modules see Disabling and re enabling power to interface modules on page 321 Table 40 provides the router slot numbers where you install...

Страница 265: ...You will need a flat blade screwdriver to perform this task CAUTION If you do not install a module in a slot you must keep the slot blank in place If you run the router with an uncovered slot it may o...

Страница 266: ...lade screwdriver Installing Brocade NetIron XMR 4000 router power supplies You will need a small Phillips or flat blade screwdriver to install power supplies Follow these steps to install a power supp...

Страница 267: ...Complete the tightening process using the flat blade screwdriver For information about connecting power to the router refer to Connecting AC power on page 249 or Connecting DC power on page 250 Connec...

Страница 268: ...at defines the regulations for power cords in your country The mark is your assurance that the power cord can be used safely with the router 4 For information about powering on the system refer to Act...

Страница 269: ...gs and reconnect the lugs to the power supply unit CAUTION For the NEBS compliant installation of a Brocade NetIron XMR 4000 8000 and 16000 routers with AC and DC systems use a ground wire of at least...

Страница 270: ...nagement station Activating the power source Verifying proper operation Installing a Brocade NetIron XMR 8000 router The following sections describe how to install a Brocade NetIron XMR 8000 router Pr...

Страница 271: ...later time Removing the shipping screws The Brocade NetIron XMR 8000 router ships with two shipping screws installed in the right side of the router These screws secure the fan tray protecting it fro...

Страница 272: ...ust provide four standard 12 24 pan head screws to secure the router Before performing this task you should have an assembled rack and a 2 Phillips head screwdriver Follow these steps to mount a Broca...

Страница 273: ...The Brocade NetIron XMR 8000 router ships with the required switch fabric modules installed The sequence for installing multiple modules is important to ensure proper fit For the Brocade NetIron XMR 8...

Страница 274: ...u can install modules Identification marks appear a the base of each slot The Brocade NetIron XMR 8000 router ships with slot blanks installed in all empty module slots The slot blanks cover empty slo...

Страница 275: ...e ESD wrist strap and ground yourself by inserting the plug into the ESD connector on the router chassis 2 Remove the module from the packaging 3 With the ejectors in the outward position insert the m...

Страница 276: ...echanical guides on each side of the power supply slot and make sure the power supply is properly inserted in the guides Never insert the power supply upside down FIGURE 180 Installing a power supply...

Страница 277: ...and connect an AC power cord to the power supply 3 Snap the cord retainer over the power plug to hold it in place FIGURE 181 Connecting a power cord to the power receptacle e DANGER If the installatio...

Страница 278: ...he Brocade NetIron XMR 8000 DC power supply 3 Use a 2 Phillips screwdriver to remove the power lugs as shown in Figure 182 4 Crimp the correct AWG power supply wire into the power lugs and reconnect t...

Страница 279: ...V cable to the negative terminal and the 0V cable to the positive terminal as marked on the power supply NOTE DC return must be isolated from the device ground DC I when connecting to the power supply...

Страница 280: ...ps with the following items Router chassis with the appropriate number of switch fabric modules installed in slots marked SF and slot blanks installed in all empty slots Insertion or extraction tool f...

Страница 281: ...can install up to three Brocade NetIron XMR 16000 routers in a standard 19 inch EIA310 D rack You can install your device in a front mount or a mid mount configuration using the factory installed mou...

Страница 282: ...position in the rack first as shown in Figure 185 With two or more people lifting the router slip the wide portion of each keyhole slot over the corresponding screw in the rack FIGURE 185 Mounting the...

Страница 283: ...ct to the outside plant OSP or its wiring These interfaces are designed for use as intra building interfaces only Type 2 or Type 4 ports as described in GR 1089 CORE Issue 5 and require isolation from...

Страница 284: ...stall modules from the left side to the right side of the router Refer to Figure 7 on page 10 for slot locations Follow these rules for populating a Brocade NetIron XMR 16000 router Install a manageme...

Страница 285: ...the fan speed was manually configured to slow and you are installing a module that requires more cooling power the slow setting will cause the module to overheat To configure the fan speed to auto en...

Страница 286: ...se Complete the tightening process using the flat blade screwdriver Installing power supplies in a Brocade NetIron XMR 16000 router This section describes how to install power supplies in the Brocade...

Страница 287: ...ide of the power supply slot and make sure the power supply is properly inserted Never insert the power supply upside down 4 Push the power supply faceplate toward the back of the router until the pow...

Страница 288: ...se a surge protection device SPD to protect AC power supplies from damage due to excessive power line surges 1 Locate the power receptacles in the power supplies on the back panel 2 Lift the cord reta...

Страница 289: ...pplied at 48 V and 30 A The DC to DC power supply provides the DC power to the router at 12 V and 100 A DANGER The procedure in this section is for qualified service personnel Follow these steps to co...

Страница 290: ...ed and antioxidant is applied to the bare wire CAUTION To ensure adequate bonding when attaching the ground lug a minimum of 20 PSI of torque is required to be applied to the mounting hardware used to...

Страница 291: ...NetIron XMR 32000 router ships with the following items Router chassis with the card slots empty and covered with upper and lower shipping panels The appropriate number of interface modules switch fab...

Страница 292: ...ve the crate 2 Use a power drill with Phillips and large flat blade screwdriver attachments to remove the bolts and screws that hold the front shipping panel in place as shown in Figure 191 Remove the...

Страница 293: ...from the front edges of the device and re attach them to the center sides of the device using the pre drilled holes You must provide eight standard 12 24 pan head screws to secure the router in the ra...

Страница 294: ...e the router to the mechanical lift with a strap to prevent tipping 7 Carefully position the router in front of the rack where it is to be installed 8 Remove the strap securing the router to the lift...

Страница 295: ...les Interface slots 1 32 DANGER The intra building port or ports of the equipment or subassembly is suitable for connection to intra building or unexposed wiring or cabling only The intra building por...

Страница 296: ...module in the same slot Follow these steps to install a module in the Brocade NetIron XMR 32000 router The installation steps are identical for management modules interface modules and switch fabric...

Страница 297: ...FIGURE 193 Installing a module in the Brocade NetIron XMR 32000 router 6 Tighten the screws at each end of the module faceplate by pushing them in and turning them clockwise Complete the tightening pr...

Страница 298: ...tor Brocade NetIron XMR 32000 cable management Brocade NetIron XMR 32000 cable management is designed to ensure access to the power supplies at the bottom of the router and to keep the air inlet clear...

Страница 299: ...e secure your cable management system will be If you bundle the cables correctly you will be able to move the bundles to the side to access the modules for service without disturbing the connections R...

Страница 300: ...ng for the upper left quadrant Route cabling from slots in numerical order starting with the cables for slot 1 1 Route cables for slots 1 and 2 directly to the left through the side comb Refer to Figu...

Страница 301: ...GURE 197 Routing upper left quadrant cables up 2 Route cables from slots 3 and 4 up through comb A Refer to Figure 197 3 Route cables from slots 5 and 6 up through comb B 4 Route cables from slots 7 a...

Страница 302: ...upper right quadrant Route cables from slots in numerical order starting with the cables for slot 15 1 Route cables from slots 15 and 16 directly to the right through the side comb Refer to Figure 198...

Страница 303: ...99 Routing upper right quadrant cables up 2 Route cables from slots 13 and 14 up through comb A Refer to Figure 199 3 Route cables from slots 11 and 12 up through comb B 4 Route cables from slots 9 an...

Страница 304: ...etIron XMR 32000 router 4 Cable routing for the lower left quadrant 1 Route cables from slots 18 and 17 directly to the left through the side comb Refer to Figure 200 FIGURE 200 Routing lower left qua...

Страница 305: ...Routing lower left quadrant cables 2 Route cables from slots 20 and 19 down through comb A Refer to Figure 201 3 Route cables from slots 22 and 21 down through comb B 4 Route cables from slots 24 and...

Страница 306: ...on XMR 32000 router 4 Cable routing for the lower right quadrant 1 Route cables from slots 32 and 31 directly to the right through the side comb Refer to Figure 202 FIGURE 202 Routing the lower right...

Страница 307: ...led correctly it is easier to access the modules for service Gently move the cable bundles to the side to access a module Use the appropriate Phillips or flat blade screwdriver with an extended shaft...

Страница 308: ...g cable bundles Installing Brocade NetIron XMR 32000 router power supplies DANGER High Touch Current Earth connection essential before connecting supply Follow the steps to install a power supply in a...

Страница 309: ...nserted in the guides Never insert the power supply upside down 4 After the power supply is fully inserted push the power supply front panel toward the back of the router This action causes the power...

Страница 310: ...source on page 297 Connecting AC power AC power is supplied through an AC power cord installed in each power supply in the Brocade NetIron XMR 32000 router NOTE For the NEBS compliant installation AC...

Страница 311: ...W DC to DC supply provides the DC power to the router at 12 V and 200 A The 3000 W DC to DC supply provides the DC power to the router at 12V and 245A DANGER The procedure in this section is for quali...

Страница 312: ...tion of a Brocade NetIron XMR 4000 8000 and 16000 routers with AC and DC systems use a ground wire of at least 6 American Wire Gauge AWG The ground wire should have an agency approved crimped connecto...

Страница 313: ...ect the power lugs to the power supply unit 5 Replace the safety cover Refer to Figure 210 FIGURE 210 Attaching the safety cover 6 Connect the wire to your DC power source making sure to connect the 4...

Страница 314: ...n page 293 3 Pull down on the handle to remove the 3000W power supply Refer to Figure 205 on page 291 4 Use a 2 Phillips screwdriver to remove the screws securing the power lugs Refer to Figure 208 on...

Страница 315: ...pin assignments on page 390 For Ethernet port connections a Category 5 UTP crossover cable which you must supply For information about the management port pin assignments refer to Management port pin...

Страница 316: ...stem off simply unplug the power cords NOTE Wall outlets should be installed near the equipment and easily accessible 4 Verify that the router has initialized successfully Refer to Verifying proper op...

Страница 317: ...receiving power Off The module is not receiving power Check the following Make certain that the module is installed properly For more information refer to the module installation section in this chapt...

Страница 318: ...o the following Make sure that the power cord is connected securely to the wall outlet and the power supply Make sure the wall outlet is rated for high line 200 240 VAC and 20A If not obtain a cable t...

Страница 319: ...MAC M1 upper Brocade router Mgmt Module Active M2 lower F0 Brocade router Switch Fabric Module Active S1 S2 S3 S4 Brocade router 4 Port 10Gig Module CARD_STATE_UP 4 000c db80 0000 S5 Brocade router 4...

Страница 320: ...he software images are synchronized between the management module and interface module CARD_STATE_SYNC The system is currently synchronizing the software image between the management module and interf...

Страница 321: ...211 Cable cinch overview mRJ21 procedures The following procedure demonstrates securing up to eight mRJ21 cables into the cable cinch When securing fewer than the maximum cables follow the procedure...

Страница 322: ...cinch with two mRJ21 cables To secure two mRJ21 cables place the Velcro strap through slot one and use the front and rear left recesses as shown in Figure 212 FIGURE 212 Two mRJ21 cables T Cable cinc...

Страница 323: ...53 1002373 02 mRJ21 procedures 5 Cable cinch with four mRJ21 cables Four mRJ21 cables may be secured as shown in Figure 214 FIGURE 214 Four mRJ21 cables Cable cinch with five mRJ21 cables Five mRJ21...

Страница 324: ...53 1002373 02 mRJ21 procedures 5 Cable cinch with six mRJ21 cables Six mRJ21 cables may be secured as shown in Figure 216 FIGURE 216 Six mRJ21 cables Cable cinch with seven mRJ21 cables Seven mRJ21 c...

Страница 325: ...re 218 FIGURE 218 Eight mRJ21 cables RJ45 procedures Use the following guidelines when using the cable cinch clips with RJ45 cables Cable cinch with one group of RJ45 cables RJ45 cables may be secured...

Страница 326: ...Cable cinch with two groups of RJ45 cables 12 RJ45 cables in two groups may be secured as shown in Figure 220 FIGURE 220 12 RJ45 cables in two groups Cable cinch with three groups of RJ45 cables 18 R...

Страница 327: ...Cable cinch with four groups of RJ45 cables 24 RJ45 cables in four groups may be secured as shown in Figure 222 FIGURE 222 24 RJ45 cables in four groups Cable cinch with five groups of RJ45 cables 30...

Страница 328: ...Cable cinch with six groups of RJ45 cables 36 RJ45 cables in six groups may be secured as shown in Figure 224 FIGURE 224 36 RJ45 cables in six groups Cable cinch with seven groups of RJ45 cables 42 R...

Страница 329: ...NetIron XMR Hardware Installation Guide 311 53 1002373 02 RJ45 procedures 5 Cable cinch with eight groups of RJ45 cables 48 RJ45 cables in eight groups may be secured as shown in Figure 226 FIGURE 226...

Страница 330: ...312 Brocade MLX Series and Brocade NetIron XMR Hardware Installation Guide 53 1002373 02 RJ45 procedures 5...

Страница 331: ...de you must already be logged into the Privileged level of the EXEC mode NOTE You cannot assign a password using the Web management interface You can assign passwords using the IronView Network Manage...

Страница 332: ...only password port config password text The text for the read only password and the port config password should be different from the text for the super user password Passwords can be up to 48 charact...

Страница 333: ...ive management module For example to assign the IP address 10 0 1 1 to the management module use these steps 1 At the opening CLI prompt enter enable Brocade enable 2 Enter the erase startup config co...

Страница 334: ...ocade enable 2 Enter the following command at the Privileged EXEC level prompt then press Enter This command erases the factory test configuration if it is still present Brocade erase startup config A...

Страница 335: ...ement interface The management port uses static IP routes from the interface routing tables If you configure the redistribution of static or directly connected routes for a particular routing protocol...

Страница 336: ...iber optic transceiver 1 Put on the ESD wrist strap and ground yourself by inserting the plug into the ESD connector on the router chassis 2 Remove the transceiver from the protective packaging 3 Remo...

Страница 337: ...r action Interface module Link On A link is established with the remote port Off A link is not established with the remote port Try the following Verify that the connection to the other network device...

Страница 338: ...ta 1 to 4 byte hex brief Beginning with version 03 6 00 of the Multi Service IronWare software the maximum allowable size is 9170 bytes NOTE If you send the ping to the IP broadcast address the device...

Страница 339: ...can disable power and re enable power to all interface modules or to a specified interface module using the power off command in the CLI as shown in the following example Brocade power off lp all Synt...

Страница 340: ...to minor When the GIEI flag is cleared These Syslog messages are generated in both the static and dynamic sections of the show logging command output A Syslog message is also sent to the SNMP log serv...

Страница 341: ...GIEI flag is cleared the first Syslog message in the static section of the log is updated to show that the GIEI is set to clear The second Syslog message in the static section is removed A copy of th...

Страница 342: ...ocade show logging Syslog logging enabled 0 messages dropped 0 flushes 1 overruns Buffer logging level ACDMEINW 50 messages logged level code A alert C critical D debugging M emergency E error I infor...

Страница 343: ...NS right fan tray fan 1 Status OK Speed MED HI 90 right fan tray fan 2 Status OK Speed MED HI 90 TEMPERATURE READINGS Active Mgmt Module 36 500C 49 625C Standby Mgmt Module 36 250C 51 0C SNM1 37 0C SN...

Страница 344: ...different amounts of power Total power available The total power budget for the device minus the total power used by the system core and the installed interface modules Slot Power On Priority The conf...

Страница 345: ...log levels in which case the software filters out messages at those levels Each time the software filters out a Syslog message this counter is incremented flushes The number of times the Syslog buffer...

Страница 346: ...ffer contains up to the maximum number of messages configured for the buffer 50 by default then begins removing the oldest messages at the bottom of the log to make room for new ones The static and dy...

Страница 347: ...cts the operating mode for switch fabric modules at startup or when the first switch fabric or interface module is installed The system uses this mode for all modules that are subsequently installed H...

Страница 348: ...normal Syntax no system init fabric date mode force normal If you remove the forced normal condition using the no version of this command you must enter the write memory command and restart the router...

Страница 349: ...ling of blades and may cause a blade to overheat and shutdown Changing temperature thresholds for modules and fan speeds The cooling system includes fans that operate at four speeds low medium medium...

Страница 350: ...mp poll period command For information about temp poll period command refer to Changing the temperature polling interval on page 336 If the temperature of a management module switch fabric module and...

Страница 351: ...nter the following command at the global CONFIG level of the CLI Brocade config fan threshold mp med 56 72 Syntax fan threshold module low high threshold med low threshold high threshold med hi low th...

Страница 352: ...s and fan speeds To check the current settings of the low and high temperature thresholds for modules and fan speeds you can enter the show fan threshold command at any level of the CLI Brocade show f...

Страница 353: ..._count 1 shut_off_count 0 0 0 0 0 0 0 0 0 0 0 0 0 0 0 0 Syntax show fan threshold The output displays the following information TABLE 50 Temperature threshold information for modules and fan speeds Th...

Страница 354: ...s for modules and fan speeds on page 331 You can manually set the fan speed using the set fan speed command in the Global CONFIG level of the CLI NOTE Auto control of fan speed is not monitored when c...

Страница 355: ...r the show log command at any CLI level Brocade show log Syntax show log Temperature log reduction Depending on settings and temperature readings fan speeds are changed dynamically within the followin...

Страница 356: ...hreshold low medium medium high or high is crossed The med option generates logs only when the medium medium high and high thresholds are crossed The med high option generates logs only when the mediu...

Страница 357: ...ue running the older image on all other interface modules The following sections discuss how to manage software image synchronization in these situations Synchronizing the software image on interface...

Страница 358: ...e module Secondary image in interface module flash memory TFTP server You can also specify an interactive boot which allows you to enter a separate command after the interface module comes up The comm...

Страница 359: ...mber The primary and secondary keywords specify the primary or secondary software image in flash memory on the management module The slot number parameter specifies the device slot number that contain...

Страница 360: ...r one or all interface modules from a specified source enter the lp boot system command in the global CONFIG level If you save this configuration by entering the write memory command the system implem...

Страница 361: ...slot devices 1 8 for 8 slot devices 1 16 for 16 slot devices or 1 32 for 32 slot devices Configuring an automatic boot from a TFTP server To configure an automatic boot for all interface modules from...

Страница 362: ...number parameter indicates that the slot number for which you are changing the priority You can specify 1 4 for 4 slot routers 1 8 for 8 slot routers 1 16 for 16 slot routers or 1 32 for 32 slot route...

Страница 363: ...y CPU on the management module You can then display usage averages for all tasks performed by the CPU on the management module for an interval of up to one hour You can display these statistics using...

Страница 364: ...ks in the last 1 seconds Name us sec idle 755423 100 monitor 13 0 wd 46 0 flash 0 0 dbg 6 0 boot 92 0 main 0 0 itc 0 0 tmr 588 0 ip_rx 211 0 scp 36 0 console 54 0 vlan 0 0 mac_mgr 38 0 mrp 0 0 vsrp 0...

Страница 365: ...0409cf98 8192 0 0 0 wd 31 susp 0000c658 0409af80 8192 0 0 0 boot 17 susp 0000c658 041dbe30 65536 0 0 0 main 3 susp 0000c658 2060cf38 65536 0 0 1 itc 6 susp 0000c658 20610af0 16384 0 0 1 tmr 5 susp 000...

Страница 366: ...remove entries for the MAC address 000d cb80 00d in all VLANs enter the following command at the Privileged EXEC level of the CLI Brocade clear mac address 000d cb80 00d0 Syntax clear mac address mac...

Страница 367: ...minimal maintenance for hardware components It is recommended that you perform the following regular maintenance tasks Clean the fiber optic connectors on a fiber optic transceiver port and the conne...

Страница 368: ...uld be placed NOTE MR and MR2 management modules should not be used together in the same chassis Please read the Hardware Installation Notes that came with your hardware before installing the MR2 The...

Страница 369: ...tion image on the interface module it may not be able to sync older FPGA images In this case the interface module may attempt to continuously reload Always upgrade or downgrade the FPGA images on repl...

Страница 370: ...esign of the cable management system allows you to access interface modules in the top row of the upper card cage without having to disconnect cables from the bottom row of the same card cage Simply m...

Страница 371: ...ave the following items available The protective covering that you removed from the fiber optic transceiver port when you initially installed the module An ESD wrist strap with a plug for connection t...

Страница 372: ...CLI command prompt Brocade show chassis This command displays status information for the fans and power supplies and temperature readings for various components in the device The power supplies are nu...

Страница 373: ...wing command Brocade config power supply monitoring clear all This will clear all collected failure timestamps for all available Power Supplies Are you sure enter y or n y You are asked to verify this...

Страница 374: ...turn on a power supply that has been shut down A power supply will shut down due to flapping or if a shutdown is enabled manually using the power off power supply command Refer to Enabling a power su...

Страница 375: ...er supply using the locking handle 1 Disconnect the power supply from the power source 2 Disconnect the power cables from the power supply 3 Remove the power supply from the device For a 4 slot device...

Страница 376: ...e sure the power supply is properly inserted in the guides Never insert the power supply upside down 5 After you insert the power supply push gently on the power supply faceplate until the power suppl...

Страница 377: ...ng fan assemblies You can replace a fan or a fan control module while the router is powered on and running The fans and fan control modules are located on the rear panel of the router NOTE Fan trays a...

Страница 378: ...ce a fan assembly 1 Put on the ESD wrist strap and ground yourself by inserting the plug into the ESD connector on the router 2 Using the screwdriver remove the screws that secure the fan assembly fac...

Страница 379: ...ate is flush with the router Pushing the fan assembly in seats the fan connector in the router connector 5 Secure the fan assembly to the router by replacing and tightening the four screws on the uppe...

Страница 380: ...move all fans from the device at once To replace a fan assembly you need the following A new fan assembly which you can order from Brocade A small flat blade screwdriver An ESD wrist strap with a plug...

Страница 381: ...ocade NetIron XMR Hardware Installation Guide 363 53 1002373 02 Replacing fan assemblies 8 FIGURE 232 Replacing a rear fan assembly from a MLX or XMR 16 slot router FIGURE 233 Replacing a fan assembly...

Страница 382: ...n the front of the router 2 Using the flat blade screwdriver loosen the four captive screws that secure the fan assembly to the front of the router 3 Grasp the handle on the fan assembly and pull it t...

Страница 383: ...d contain a 1 megohm series resistor NOTE If you did not remove the extra shipment screws from the router during installation you will not be able to remove the fan tray assembly You will need to remo...

Страница 384: ...acing fan assemblies 8 FIGURE 235 Replacing a fan tray assembly in a Brocade MLX or Brocade NetIron XMR 4 slot router FIGURE 236 Replacing a fan tray assembly in a Brocade MLX or Brocade NetIron XMR 8...

Страница 385: ...ure in seats the fan connector with the router connector 4 Tighten the four captive screws to secure the fan to the router 5 Access the CLI and enter the show chassis command to verify that the fans a...

Страница 386: ...ndicate proper alignment for the direction of airflow in the device The upper filter should be inserted with the arrow pointing up and the lower filter should be inserted with the arrow pointing down...

Страница 387: ...s to replace the air filter in a Brocade MLX or Brocade NetIron XMR 16 slot router 1 Loosen the two screws in the front of the filter retainer 2 Pull the filter retainer away from the router as shown...

Страница 388: ...n to the direction of airflow in the router Because air is pulled through the device the arrow must point up towards the fan tray 5 Attach the hook on the back of the filter retainer to the filter gra...

Страница 389: ...ter and discard it 4 Insert the replacement air filter by sliding it along the metal guides The filter is marked with an arrow that indicates how the filter should be installed for proper airflow in t...

Страница 390: ...Loosen the two screws in the front of the filter tray 2 Pull the filter tray away from the router as shown in Figure 244 or Figure 245 FIGURE 244 Replacing an air filter in a Brocade MLXe 4 slot rout...

Страница 391: ...sert a new air filter into the filter slot and tighten the two screws Installing upward deflectors on fan assemblies Before beginning this procedure verify that you have the correct number of upward d...

Страница 392: ...nto the fan while removing it from the device The fan blades may still be spinning at a high speed CAUTION Removing the rear fan modules on a 32 slot router provides access to bus bars and the backpla...

Страница 393: ...te FIGURE 248 Removing tape from the fan assembly 3 If louvers are present inside the fan assembly faceplate detach them by removing the 11 roll pins that secure the louvers to the inside of the fan a...

Страница 394: ...Refer to Figure 249 4 Remove the fan assembly handle by detaching the two screws from the inside of the fan assembly faceplate using a Phillips screwdriver Refer to Figure 250 FIGURE 250 Handle remova...

Страница 395: ...tape is not required Reinstalling the modified fan assembly in the chassis To reinstall the modified fan assembly complete the following steps 1 Insert the modified fan assembly into the fan slot and...

Страница 396: ...378 Brocade MLX Series and Brocade NetIron XMR Hardware Installation Guide 53 1002373 02 Replacing fan assemblies 8...

Страница 397: ...or spike of 10mS or less at either cold or warm start Any additional inrush current surges or spikes in the form of AC cycles or multiple AC cycles greater than 10mS and less than 150mS will be 25A p...

Страница 398: ...r MLXe routers 40W Switch fabric modules NI X SF3 switch fabric module 53W NI X SF1 switch fabric module 19W NI X 32 SF switch fabric module 60W High speed switch fabric modules NI X 4 HSF switch fabr...

Страница 399: ...06 5824 MLXe 8 33 3332 11372 17 3332 11372 69 3332 11372 MLXe 16 57 5674 19365 28 5674 19365 118 5674 19365 MLXe 32 N A N A N A 57 11391 38876 237 11391 38876 MLXe routers with48 T A interface modules...

Страница 400: ...als FCC Part 15 Subpart B Class A EN 55022 CE mark Class A TABLE 54 Brocade MLXe physical dimensions Router model Height Width Depth Depth with Fan FRU Weight empty Weight fully loaded Brocade MLXe 4...

Страница 401: ...llation Guide 383 53 1002373 02 Hardware specifications for Brocade MLXe routers 9 EN 55024 CE mark Immunity for Information Technology Equipment ICES 003 Canada Class A AS NZ 55022 Australia Class A...

Страница 402: ...sh current 30A peak maximum at 25 degrees C 77 degrees F DC Input Rating 48V 60 0 A maximum per power supply DC Operating Range 40 to 60V Inrush current 45A peak maximum at 25 degrees C 77 degrees F T...

Страница 403: ...de MLX 4 slot 8 slot and 16 slot routers 19W NI X SF3 8 16 slot switch fabric module Brocade MLX 4 slot 8 slot and 16 slot routers 53W NI X 32 SF 32 slot switch fabric module Brocade MLX 32 slot route...

Страница 404: ...rocade MLX 32 fan modules 8 cooling Interface fans 2 power supply fans 1150W TABLE 59 Brocade MLX router physical dimensions Model Height Width Depth Weight fully loaded Brocade MLX 4 17 68 cm 6 96 in...

Страница 405: ...EN 61000 3 2 EN 61000 3 3 EN 61000 6 1 Hardware specifications for Brocade NetIron XMR routers The following sections describe hardware specifications for Brocade NetIron XMR routers Power specificati...

Страница 406: ...tion for Brocade NetIron XMR router components Component Maximum power consumption in watts Management modules MR management module Brocade NetIron XMR 4000 8000 and 16000 30W MR management module Bro...

Страница 407: ...Fan assemblies Brocade NetIron XMR 4000 fan tray 66W Brocade NetIron XMR 8000 fan tray 132W Brocade NetIron XMR 16000 front fan tray 202W Brocade NetIron XMR 16000 rear fan module 2 fans are required...

Страница 408: ...Safety of Information Technology Equipment Electromagnetic approvals FCC Part 15 Subpart B Class A EN 55022 CE mark Class A EN 55024 CE mark Immunity for Information Technology Equipment ICES 003 Can...

Страница 409: ...you may experience unexpected results with some terminals FIGURE 253 Console port pin assignments with connection options to a terminal or PC Management port pin assignments The management port is an...

Страница 410: ...ments Pin number MDI X ports 1 TD 2 TD 3 RD 4 Not used 10BaseT CMT 100BaseTX 5 Not used 10BaseT CMT 100BaseTX 6 RD 7 Not used 10BaseT CMT 100BaseTX 8 Not used 10BaseT CMT 100BaseTX TABLE 68 Power cord...

Страница 411: ...rael X Italy X Japan X X X Korea South X Malaysia Alternate Recommended Mexico X X X Monaco X Netherlands X New Zealand X Norway X Poland X Portugal X Puerto Rico X X X Russia X Saudi Arabia X TABLE 6...

Страница 412: ...ported as per the country s legal requirements or contact Brocade technical support Scotland X Singapore X South Africa X Spain X Sweden X Switzerland X Taiwan X X X Turkey X United Arab Emirate X Uni...

Страница 413: ...nations you will need to make sure the supported software is loaded Pre Installation notice for the Brocade MLXe chassis bundles The following software requirements must be met for any chassis bundle...

Страница 414: ...odules NI X 4 HSF 1 1200W DC power supply NI X DCPWR 4 exhaust fan assembly kits BR MLXE 4 FAN 1 air filter BR MLXE 4 FLTR Management modules must be ordered separately Power cord is not included BR M...

Страница 415: ...SF 1 1200W DC power supply NI X DCPWR 4 exhaust fan assembly kits BR MLXE 4 FAN 1 air filter BR MLXE 4 FLTR Power cord is not included BR MLXE 4 MR2 M AC Bundle contents 1 Brocade MLXe 4 AC chassis 1...

Страница 416: ...I X 4 HSF 1 1800W AC power supply BR MLXE ACPWR 1800 4 exhaust fan assembly kits BR MLXE 4 FAN 1 air filter BR MLXE 4 FLTR Power cord is not included BR MLXE 4 MR2 X DC Bundle contents 1 Brocade MLXe...

Страница 417: ...les NI X 16 8 HSF 2 1200W DC power supplies NI X DCPWR 2 exhaust fan assembly kits BR MLXE 8 FAN 1 air filter BR MLXE 8 FLTR Management modules must be ordered separately Power cord is not included BR...

Страница 418: ...HSF 2 1200W DC power supply NI X DCPWR 2 exhaust fan assembly kits BR MLXE 8 FAN 1 air filter BR MLXE 8 FLTR Power cord is not included BR MLXE 8 MR2 M AC Bundle contents 1 Brocade MLXe 8 AC chassis 1...

Страница 419: ...X 4 HSF 2 1800W AC power supplies BR MLXE ACPWR 1800 2 exhaust fan assembly kits BR MLXE 8 FAN 1 air filter BR MLXE 8 FLTR Power cord is not included BR MLXE 8 MR2 X DC Bundle contents 1 Brocade MLXe...

Страница 420: ...s NI X 16 8 HSF 4 1200W DC power supplies NI X DCPWR 2 exhaust fan assembly kits BR MLXE 16 FAN 1 air filter BR MLXE 16 FLTR Management modules must be ordered separately Power cord is not included BR...

Страница 421: ...NI X ACPWR 2 exhaust fan assembly kits BR MLXE 16 FAN 1 air filter BR MLXE 16 FLTR Power cord is not included BR MLXE 16 MR2 M AC Bundle contents 1 Brocade MLXe 16 AC chassis 1 MR2 M management module...

Страница 422: ...plies BR MLXE ACPWR 1800 2 exhaust fan assembly kits BR MLXE 16 FAN 1 air filter BR MLXE 16 FLTR Power cord is not included BR MLXE 16 MR2 X DC Bundle contents 1 Brocade MLXe 16 DC chassis 1 MR2 X man...

Страница 423: ...rd is not included BR MLXE 32 DC Bundle contents 1 Brocade MLXe 32 chassis 7 high speed switch fabric modules NI X 32 HSF 4 2400W DC power supplies NIBI 32 DCPWR 2 power supply fans NIBI 32 PSFAN 8 ex...

Страница 424: ...e contents 1 Brocade MLXe 32 AC chassis 1 MR management module BR MLX 32 MR 7 high speed switch fabric modules NI X 32 HSF 4 2400W AC power supplies NIBI 32 ACPWR A 2 power supply fans NIBI 32 PSFAN 8...

Страница 425: ...supply fans NIBI 32 PSFAN 8 exhaust fan assembly kits BR MLXE 32 FAN 2 air filters BR MLXE 32 FLTR Cable management system Power cord is not included BR MLXE 32 MR2 M DC Bundle contents 1 Brocade MLXe...

Страница 426: ...supply fans NIBI 32 PSFAN 8 exhaust fan assembly kits BR MLXE 32 FAN 2 air filters BR MLXE 32 FLTR Cable management system Power cord is not included BR MLXE 32 MR2 X DC Bundle contents 1 Brocade MLXe...

Страница 427: ...e CAUTION Changes or modifications made to this device which are not expressly approved by the party responsible for compliance could void the user s authority to operate the equipment Industry Canada...

Страница 428: ...etr gt 87 4 dB A gem ss EN ISO 7779 For Brocade MLXe 4 routers Machine noise information regulation 3 GPSGV the highest sound pressure level value is 86 dB A in accordance with EN ISO 7779 Maschinenl...

Страница 429: ...ent ATTENTION Never use the power cord packed with your equipment for other products China The following statement applies to Brocade MLX Series and Brocade NetIron XMR devices English translation of...

Страница 430: ...measures Korea English translation of above statement Class A device Broadcasting Communication Device for Office Use This device obtained EMC registration for office use Class A and may be used in p...

Страница 431: ...d at the Anatel web site NOTE For regulatory purposes the Brocade MLX 4 and Brocade NetIron XMR 4000 are identified by model number BI RX 4 The Brocade MLX 8 and Brocade NetIron XMR 8000 are identifie...

Страница 432: ...414 Brocade MLX Series and Brocade NetIron XMR Hardware Installation Guide 53 1002373 02 Brazil B...

Страница 433: ...er te mit Direktstromquellen Brocade NetIron XMR 4000 8000 16000 und 32000 Brocade MLX 4 8 16 und 32 und Brocade MLXe 16 und 32 sind nur zur Installation in Sperrbereichen bestimmt Ein Sperrbereich is...

Страница 434: ...Chassis neben dem Erdungssymbol MISE EN GARDE Pour un syst me alimentation continue Brocade NetIron XMR 4000 8000 et 16000 Brocade MLX 4 8 et 16 et Brocade MLXe 16 utiliser un c ble de mise la terre...

Страница 435: ...fuente de alimentaci n El cableado de entrada para la conexi n al producto deber ser de cable de cobre catalogado 8 AWG marcado con VW 1 y tener una capacidad nominal m nima para 90 C CAUTION For the...

Страница 436: ...fuente de alimentaci n El cableado de entrada para la conexi n al producto deber ser de cable de cobre catalogado 8 AWG marcado con VW 1 y tener una capacidad nominal m nima para 90 C CAUTION For the...

Страница 437: ...nexi n al producto deber ser de cable de cobre catalogado 4 AWG marcado con VW 1 y tener una capacidad nominal m nima para 90 C CAUTION For the DC input circuit to the system of a Brocade NetIron XMR...

Страница 438: ...etzteils das ordnungegem in die F hrungen gesteckt werden muss Das Netzteil darf niemals umgedreht eingesteckt werden MISE EN GARDE Suivez attentivement les rep res m caniques de chaque c t du slot du...

Страница 439: ...erweise auf der Ger ter ckseite neben den Eingangsstromanschl ssen MISE EN GARDE Assurez vous que le dispositif ne risque pas de surcharger les circuits d alimentation le c blage et la protection de s...

Страница 440: ...et si une nouvelle invite appara t le formatage continue Soyez bien s r de vouloir formater la carte avant d entrer la commande PRECAUCI N Una vez que empiece con el proceso de formateado no se puede...

Страница 441: ...6000 et Brocade NetIron XMR 32000 n enlever qu un seul bo tier de ventilateur la fois Ne pas enlever les deux bo tiers du ch ssis en m me temps PRECAUCI N Para evitar el sobrecalentamiento del chasis...

Страница 442: ...miento el chasis con una ranura descubierta el sistema podr a sobrecalentarse Apriete los tornillos que fijan las cubiertas de las ranuras para impedir que se muevan al desmontar los paneles o m dulos...

Страница 443: ...emo y el otro extremo debe estar conectado a la tierra del edificio El conector debe rizarse con la herramienta apropiada de manera que se conecte a los dos tornillos de tierra del recinto CAUTION Be...

Страница 444: ...diacion de Laser No vea directamente con Instrumentos Opticos Clase 1M de Productos de Laser DANGER All fiber optic interfaces use Class 1 lasers GEFAHR Alle Glasfaser Schnittstellen verwenden Laser d...

Страница 445: ...que vous pouvez utiliser le cordon d alimentation avec le dispositif en toute s curit PELIGRO Si la instalaci n requiere un cord n de corriente distinto al que se ha suministrado con el instrumento v...

Страница 446: ...nected to a power source Otherwise you could be injured or the power supply or other parts of the device could be damaged GEFAHR Die Wechselstrom Netzteile k nnen w hrend des Betriebs des Geh use abge...

Страница 447: ...tero de un suministro de corriente alterna incluye un mango que bloquea el suministro de corriente al chasis El mango es un mecanismo de bloqueo solamente y no deber usarse para alzar ni transportar e...

Страница 448: ...dad del ventilador del sistema Brocade NetIron XMR 32000 es pesada y quedar desequilibrada al desmontarla Agarre el asa con las dos manos DANGER Make sure to choose the appropriate circuit device depe...

Страница 449: ...T LES MODULES D INTERFACE supervision matrice de commutation et cartes de lignes Pour soulever le ch ssis utiliser un appareil l vateur Quatre personnes au moins sont n cessaires pour positionner dans...

Страница 450: ...a cuatro personas o m s para colocar el chasis no poblado en el interior del armaz n DANGER High Touch Current Earth connection essential before connecting supply Brocade NetIron XMR 32000 Brocade MLX...

Страница 451: ...g DANGER Le ou les ports r serv s l utilisation de l appareil l int rieur d un b timent intra building sont uniquement destin s une connexion en int rieur ou avec du c blage non expos aux intemp ries...

Страница 452: ...434 Brocade MLX Series and Brocade NetIron XMR Hardware Installation Guide 53 1002373 02 Dangers C...

Отзывы: