background image

- 65 -

DANGER

Risk of injury from unavailable / deactivated pressure trigger

Tools without, or with deactivated, pressure trigger can be triggered without 

being placed on a part; significant risk of injury results from projectile rivets

•  The tools may only be used by trained personnel

• Wear safety glasses and gloves

•  Guide  the  rivet  into  the  nose  piece  only  directly  before  beginning  the 

riveting process

The pressure trigger can not be used in the following tool types due to the system:

• BST-RTB-EX-1

• BST-RTB-EX-2

• BST-RTB-HUCK 

• BST-RTB-Cherry

Содержание RTB-20

Страница 1: ...Battery Blind Riveting Tool RTB 20 S Operating instructions NOTE In case of doubt the original German version of the operating instructions applies ...

Страница 2: ...e 16 3 Important information about this tool 3 1 Handling the associated lithium ion battery 17 3 2 Information on the associated charger 18 3 3 Structural modifications 18 3 4 Cleaning the device and disposal 19 4 Start up and use 4 1 Tool structure 21 4 2 Operation 22 4 2 1 Inserting and removing the battery 22 4 2 2 Press start button 23 4 2 3 Front LED 23 4 2 4 LED indicator at the back and so...

Страница 3: ...ay 49 4 4 8 Signals LED 50 4 4 9 Signals Sound signals 51 4 4 10 Signals Vibration alarm 52 4 4 11 Graphics 53 4 4 12 System time 54 4 4 13 Basic settings 55 4 4 14 Update 56 4 4 15 Programming 57 4 4 16 Program 57 4 4 17 Program Option 64 4 5 Maintenance and service 66 4 6 Cleaning 66 4 6 1 General information 66 4 6 2 Clean clamping jaws 67 4 6 3 Service interval counter 68 5 Storage 6 Technical...

Страница 4: ...ns Our technical support and our technicians would be happy to assist you 1 1 Scope of delivery Battery Blind Riveting Tool USB Cable Type A on Mini B Operating instructions Machine capability test MCT 1 2 General information Read the tool operating instructions before initial operation Please pay particular attention to Chapter 2 General Safety Notes This operating instruction should make it easi...

Страница 5: ...ng this tool In addition to this operating instructions the applicable regulations on accident prevention and environmental protection should be observed NOTE After reading keep the operating instructions in a place accessible to every operator If you have any further questions please feel free to contact us ...

Страница 6: ...this operating instructions Do not dispose with household waste Do not dispose the battery in a fire Do not throw the battery into water EU conformity marking Registered trademark Use only indoors Protection class II Intrinsically safe transformer Battery is charging Defective battery Battery fully charged Direct current Universal Recycling Symbol ...

Страница 7: ...n lead to serious injuries and or damage to the tool NOTE Important and useful information on using this tool 1 5 Technical terms and abbreviations used Abbreviation Meaning C Degrees Celsius temperature AC Alternate current Ah Amp hours electric charge battery capacity ahv Overall vibration dB A Decibels sound pressure level A weighted DC Direct current Hz Hertz Frequency Li Ion Lithium ion batte...

Страница 8: ...Intended use also includes following all indications of the operating instructions and observance of inspection and maintenance works Any other use or use beyond that is considered improper use Neighter HS Technik GmbH as manufacturer nor Bossard AG as sales partner are liable for any resulting damage 1 7 Improper use DANGER The use of this tool for other purposes e g for hammering is not permitte...

Страница 9: ...working has to be reviewed at regular intervals In addition it is necessary to established safety measures for operator safety which are based upon an estimation of the vibration load during actual conditions of use 1 9 Duties of personnel Prior to its use all people who work with this tool are obligated to inform themselves of the applicable workplace safety and accident prevention regulations fo...

Страница 10: ... or more of the following improper use failure to observe these operating instructions improper installation commissioning operation and maintenance of the device Operating the device with defective safety devices or improperly installed or non functioning safety and protective devices Failure to observe the information in the operating instructions regarding transport storage assembly commissioni...

Страница 11: ...t of these operating instructions is retained by HS Technik GmbH Bossard AG Address of the manufacturer Address of the distributor Bossard AG Steinhauserstrasse 70 CH 6301 Zug Phone 41 41 749 6611 Telefax 41 41 749 6622 E Mail bossard bossard com Internet www bossard com HS Technik GmbH Im Martelacker 12 D 79588 Efringen Kirchen Phone 49 0 7628 91 11 0 Telefax 49 0 7628 91 11 90 E Mail info hs tec...

Страница 12: ...OTE Keep all safety information and instructions for the future NOTE Only have your device repaired by qualified professional staff and only with original replacement parts which are available at Bossard This ensures that the safety of the device is maintained The term power tool used in the safety information refers to mains operated power tools with mains cable and to battery operated power tool...

Страница 13: ...es can lead to electric shock and risk of fire 2 3 Safety of people a Be alert pay attention to what you are doing and take care when you are working with a power tool Do not use a power tool when you are tired or under the influence of drugs alcohol or medication A moment of inattention while using the power tool can result in serious injury b Wear personal protective equipment and always safety ...

Страница 14: ...ngerous and must be repaired c Remove the detachable battery before you make changes to device settings change application tool parts or put away the power tool This precaution prevents uninten tional start up of the power tool d Keep unused power tools out of the reach of children Do not let anyone use the pow er tool who is not familiar with it or has not read this operating instructions Power t...

Страница 15: ...tched on and off using the start button 2 5 Use and handling of battery tools a Charge the battery only with charging devices which are recommended by the man ufacturer There is a risk of fire if the battery is used on an unsuitable charger and the battery can be permanently damaged b Use only the specifically designated battery for the power tool The use of other bat teries can lead to injuries a...

Страница 16: ...can damage the bat tery and increase the risk of fire 2 6 Service a Only have your power tool repaired by qualified professional staff and only with orig inal replacement parts which can be available at HS Technik GmbH This ensures that the safety of the power tool is maintained b Never perform maintenance on damaged batteries All maintenance of batteries may only be completed by the manufacturer ...

Страница 17: ...oss approx 5 per year f Always transport the battery separately from the machine if possible This prevents accidental switching on of the machine as well as a total discharge of the battery g Do not subject the Lithium Ion battery to high temperatures above 50 C or direct sunlight If the battery gets warmer than 50 C during operation charging or discharg ing it must be immediately separated from t...

Страница 18: ...in a well ventilated location e Do not charge the battery at temperatures BELOW 10 C or ABOVE 40 C f Do not store the power tool the charger and the battery in locations in which tem peratures are above 50 C In particular avoid direct sunlight 3 3 Structural modifications No changes additions or conversions to the power tool may be made without the approval of the manufacturer All conversion measu...

Страница 19: ...ces and materials used must be handled and disposed of properly particularly when cleaning with solvents Do not throw the used battery into the household waste fire or water instead have it professional disposed of by a specialist or the manufacturer ...

Страница 20: ...openings Risk of injury due to improper use Improper use can lead to injuries or damage Use the tool only for the intended purposes Risk of injury from substances Substances such as lubricating oil and grease are flammable on the skin Avoid contact with such substances Should you still come into contact wash the affected area carefully NOTE Maintain your tool with care Follow the operating instruc...

Страница 21: ...ose piece 3 Riveting mandrel container 4 Multi colour LED 5 18 V Li ion battery 6 OLED Display 7 LED for work area lighting 4 2 7 1 5 6 3 6 Battery nose piece and threaded mandrel are not included in the standard scope of delivery and must be ordered separately ...

Страница 22: ... remove the battery push the fastening clip on the front side of the battery down and pull the battery forward and off Don t use force to install the battery If the battery can not be easily pushed on it was not correctly positioned NOTE Always push the battery all the way in until it locks into place with a click WARNING Risk of injury from falling battery If the battery is not correctly locked i...

Страница 23: ...he light emitting diode Looking directly into the light emitting diode can lead to eye injuries Never look directly into the light emitting diode The LED on the front of the tool is used to illuminate the assembly area After pressing the start button the LED lights up It turns off automatically after a few seconds The afterglow time of the LED can be parametrised in the SmartTool Manager under set...

Страница 24: ...fthebatteryhassufficientcapacity 4 2 5 OLED display After a sufficiently charged battery has been pushed on the tool will start After pressing the start button the tool is initialised The back circumferential indicator briefly lights up with multiple colours A beep sounds and on the back of the tool the display indicates the current status The tool is now ready for use After several seconds withou...

Страница 25: ... mandrel container approx 45 until it locks into place and is flush with the riveting mandrel container mount on the tool NOTE Blockage of the riveting mandrel container must be avoided otherwise the tool could be damaged The tool has a reminder function for emptying the riveting mandrel container To this end the emptying of the mandrel container can be set with the Service user in the SmartTool M...

Страница 26: ...inal undamaged riveting mandrel container Ensure that the container is correctly installed fully latched locking mechanism In order to prevent use of the tool without a riveting mandrel container the riveting mandrel container is monitored using a sensor The tool can not be operated without the riveting mandrel container and displays the following error message ...

Страница 27: ...age to the tool and cause injuries Do not use a rivet with a mandrel diameter below 4 0 mm without a reducing pipe 4 2 8 Selection of nose piece You can use the riveting tool for processing different size rivets When doing so note the exact specification of the rivet and adjust the nose piece and reducing pipe if necessary chapter 4 2 7 von page 27 The maximum riveting mandrel diameter is ø 1 5 4 ...

Страница 28: ...r Huck Arconic Howmet Gage Bilt BST RTB Cherry up to 6 3 mm mandrel diameter Cherry Aerospace partially Huck Arconic Howmet Gage Bilt Incl traction head There is no guarantee that all traction heads from the manufacturers named will fit Contact us for further information WARNING Risk of injury due to incorrect installation Incorrectly installed traction heads can lead to injuries Assemble the trac...

Страница 29: ...ea in the rivet manufacturer s information 1 Place blind rivet in nose piece 2 Guide the blind rivet into the hole provided 3 Press the blind rivet against the component in order to activate the pressure trigger chapter 4 2 11 on page 30 4 Start setting process by pressing the start button hold start button down 5 The tool will recognise the break chapter 4 2 12 on page 31 and automatically return...

Страница 30: ...eactivated pressure trigger can be triggered without being placed on a part significant risk of injury results from projectile rivets The tools may only be used by trained personnel Wear safety glasses and gloves Guide the rivet into the nose piece only directly before beginning the riveting process In order to deactivate the pressure trigger read out the tool by using the SmartTool Manager as des...

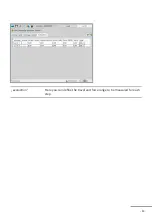
Страница 31: ...k into the starting position Depending on the traction head or fastener the break detection must be deactivated This can be done in the SmartTool Manager In order to deactivate the break detection read out the tool in the SmartTool Manager as described in chapter 4 4 17 on page 40 Click programming Select the program for example program 1 in which the pressure trigger should be de activated Click ...

Страница 32: ...om lasting damage 4 2 14 Standby and Shut down mode After approx 10 minutes without actuation the tool switches to standby mode The tool starts up again by briefly tapping on the start button After another approx 30 minutes without actuation automatic shut down Start up by pressing the start button if the battery has not yet been removed or right after sliding the battery back on Both are only pos...

Страница 33: ...r of the sym bol will change to yellow and then red When it reaches red an additional warning signal will sound the display will read warn batt and recommend changing the battery After several additional installations the tool will no longer start and the display will read batt low 2 with a crossed through battery The battery must then at the latest be changed chapter 4 2 1 on page 22 17 02 V batt...

Страница 34: ...function Counts the blind rivets processed per processing instance e g 001 003 means that the 1st rivet of 3 is being processed Text line Displays the text for the current status or expected action Main display window The main display window shows the worker the results of the riveting operations warnings commands symbols and texts to simplify the control of the tool As a result the worker always ...

Страница 35: ...19320012 READY The tool is ready for use P01 001 001 TRIGGER Tool was started successfully By briefly pressing the start button the device moves to its starting position and checks itself for functionality The device is then ready for operation 19320012 SCAN BARCODE Product ID must be scanned before the tool is released Symbol can be represented as a car or an aeroplane 19320012 SCAN BARCODE Produ...

Страница 36: ...olts and Huck adapter versions switch off the pres sure trigger in the SmartTool Manager 18360035 SERVICE Cleaning interval of the jaws reached Please clean the jaws and reset the rivet counter in the software 19320012 SCAN BARCODE Product ID must be scanned before the tool is released Symbol can be represented as an aeroplane or a car 19320012 SCAN IO 234 The scan of the barcode with the number 2...

Страница 37: ...e SmartTool Manager display setting Display OLED display Display of results Rivet counter P01 001 003 OK 2 kN 7 15 mm 9 45 9 45 The first of three rivet nuts was successful Achieved force 7 15 kN and a stroke of 9 45 mm This message is also available as a NOK notice SmartTool Manager display setting Display OLED display Display of results Travel P03 002 002 All OK All three riveting operations wer...

Страница 38: ...tup menu with the start button the selection must either be confirmed or discarded with the white display keys 19320012 SCAN OK Scanner The scanning of the Wi Fi settings was successful Tool is in idle mode It can be reactivated by pressing the Start button 20 90 V BATT OVER 0 Maximum battery voltage exceeded 17 00 V BATT EMPTY 1 Battery voltage too low P01 001 001 QUIT Tool requires acknowledgeme...

Страница 39: ... WLAN IP STOP Tool is in the wrong IP group FORCE MAX STOP Maximum permissible force exceeded contact the manufacturer CUR MAX STOP Maximum permissible current exceeded contact the manufacturer TEMP FET STOP If the maximum temperature of the control unit is exceeded contact the manufacturer TARA ERROR Sensor value error Contact manufacturer tool must be checked NA MOTOR Motor does not start correc...

Страница 40: ...NOTE Always use the most current version of the SmartTool Manager The SmartTool Manager is backward compatible i e it can also read and process older tool versions If an update of your tool is necessary the SmartTool Manager will inform you 1 Start the SmartTool Manager by double clicking the SmartTool Manager icon SmartTool Manager SmartTool Manager 2 Log in with the required User a list of the p...

Страница 41: ... 41 3 Insert the USB cable included into the Mini B socket at the bottom of the tool and the opposite end into an open USB interface on your laptop tablet PC 4 Click on the Read button on the top right ...

Страница 42: ... 42 5 The SmartTool Manager will now read the settings from your tool and will display its progress using a green bar At the end the tool overview will be displayed ...

Страница 43: ... 43 4 4 1 Setup Clicking on setup takes you to the tool settings menu Here for example the display LED display and energy savings settings can be parametrised 4 4 2 General Process control ...

Страница 44: ... works in the standard program with the counter activated Barcode Activates the barcode scanner in the tool A barcode must be scanned for release For more information on programming barcodes see the HST Tool Manager s operating instructions Extern control unit Activates the Wi Fi in the tool The tool is now released by an external controller Without release the tool is locked Barcode extern contro...

Страница 45: ... will activate Default value 600 seconds 10 minutes tool shut off after Time in seconds without action after which the tool turns off Default value 1 800 seconds 30 minutes LED lighting The LED lighting can be activated or deactivated with the check box afterglow The amount of time the LED lighting continues to glow after completion of the work process NOTE In systems in which the tool is operated...

Страница 46: ...he Setup menu on the tool handmode selecable If the function is active you can activate and deactivate manual mode via the Setup menu on the tool NOK confirmation active Activates and deactivates the NOK acknowledgement via the yellow menu button NOK confirmation with barcode If the function is active an NOK result can only be acknowledged by scanning a barcode NOK confirmation in manual mode acti...

Страница 47: ... 47 4 4 5 General TM version The TM tab will display the SmartTool Manager version required for this tool at minimum the version intended for the application and the version last written on the tool ...

Страница 48: ... 48 4 4 6 Management The data on the operating site and the inventory number of the tool can be saved under management Location max 20 characters Inventory number max 40 characters ...

Страница 49: ...smiley units Selection of units on the OLED display SI units or imperial units Default SI units kN and mm enable display Selection of the display on the OLED display upon release Target value shows the tool s target value e g 10 kN Barcode shows the scanned barcode max 9 characters Default Set value empty container Suppress message in favour of the result display The message that the container mus...

Страница 50: ...r of the LEDs can be changed by clicking on the coloured square duration The duration of the display in seconds max 25 5 seconds period The duration of the sequence of the 10 parametrisable indicator fields Period 1 00 seconds means that the 10 fields will be shown one after another within 1 00 seconds ...

Страница 51: ...3 0 seconds at start When the check box is selected a signal will sound when the tool starts during scan If the checkbox is selected a beep sounds when a barcode is success fully scanned empty container sound If this check box is selected a sound signal will sound in addition to the display notification when the riveting mandrel container needs to be emptied ...

Страница 52: ... 52 4 4 10 Signals Vibration alarm duration The time entry defines how long the vibration alarm is active for De fault for NOK events Single NOK 2 00 seconds and Total NOK 3 50 seconds ...

Страница 53: ...ate Defines the default sampling rate at which the curve is recorded default 333 Hz lagmax Defines the time for which graphic recording continues after the target criterion has been reached Recommended max value 0 250 seconds default 0 150 seconds record timemax Shows how many seconds can be recorded per setting for the selected criteria If the recording time is not sufficient the beginning of the...

Страница 54: ...the tool The internal memory for the RTC can be charged via USB as well as via the battery The internal memory is fully charged after about 30 minutes To ensure that the tool s time stamp is correct the internal memory for the RTC must be completely reloaded after 2 weeks at the latest If there is a difference of more than 30 seconds between the system time and the time on the tool a message will ...

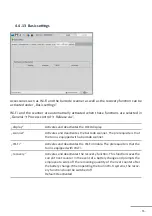
Страница 55: ...ivates the barcode scanner The prerequisite is that the tool is equipped with a barcode scanner Wi Fi Activates and deactivates the Wi Fi module The prerequisite is that the tool is equipped with Wi Fi recovery Activates and deactivates the recovery function This function saves the current rivet counter in the event of a battery change and prompts the employee to work off the remaining quantity of...

Страница 56: ... Recovery mode Then click start The progress of the update will be displayed using a status bar and confirmed at the end with done The tool is now up to date with the current firmware and has the same settings as prior to the update NOTE Do not pull out the USB cable during the update process ...

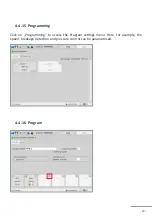
Страница 57: ... 57 4 4 15 Programming Click on Programming to access the Program settings menu Here for example the speed breakage detection and pressure control can be parametrised 4 4 16 Program ...

Страница 58: ... under General next step if OK In the drop down menu you can select which action should follow if this step is completed OK e g jump to the next step or end next stepif NOK In the drop down menu you can select which action should follow if this step is completed NOK e g jump to the next step or end stop before next step If the checkbox is selected the tool stops when the step condition is reached ...

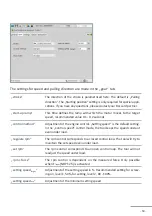
Страница 59: ...e control Setting speed is the default setting In the Control speed control mode the tool keeps the speed constant even under load regulate rpm The rpm control corresponds to a closed control loop The tool will try to maintain the set speed even under load set rpm The rpm control corresponds to an open control loop The tool will not readjust the speed under load rpm force The rpm control is depend...

Страница 60: ...e On Off symbol A green symbol means active greyed out means inactive RTB 20 and RTB 20 S force FTarget FTarget describes the force that the tool should achieve in this step When this value is reached the tool changes to the next step FStart If FTarget is activated Fstart appears This value defines the point at which the travel measurement for the setting step is to be started Flimit Flimit specif...

Страница 61: ...he tool stops and displays an NOK error message DANGER Risk of injury due to incorrect parametrisation Incorrect parametrisation can lead to injuries or damage Settings may only be made by experienced users time TTarget TTarget describes the time for which the tool should run in this step When this value is reached the tool changes to the next step Tlimit Tlimit describes the max time that the too...

Страница 62: ...range in which the operating point must lie and evaluates the riveting process with OK or NOK sampling rate For each step an individual sampling rate can be selected for the graph ic recording This allows the recording to be optimised If Standard is selected the step is recorded with the value set under Settings Graphics Sampling rate chapter 4 4 11 on page 53 current rejection This function suppr...

Страница 63: ... 63 evaluation Here you can define the travel and force range to be measured for each step ...

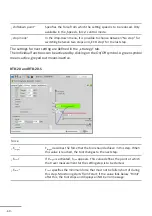
Страница 64: ...e deactivated Breakage detection is only active if the checkbox is enabled QuickRiv Technology The pressure control ensures that the blind rivet can only be processed when the pressure control is activated This prevents accidental trigger ing and ensures that the components to be processed are in contact with each other Pressure control is only active if the checkbox is enabled confirm OK If this ...

Страница 65: ... part significant risk of injury results from projectile rivets The tools may only be used by trained personnel Wear safety glasses and gloves Guide the rivet into the nose piece only directly before beginning the riveting process The pressure trigger can not be used in the following tool types due to the system BST RTB EX 1 BST RTB EX 2 BST RTB HUCK BST RTB Cherry ...

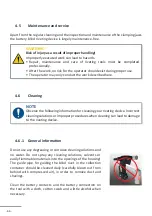
Страница 66: ...ng NOTE Observe the following information for cleaning your riveting device Incorrect cleaning solutions or improper procedures when cleaning can lead to damage to the riveting device 4 6 1 General information Do not use any degreasing or corrosive cleaning solutions and no water Do not spray any cleaning solutions solvents or easily flammable materials into the openings of the housing The guide p...

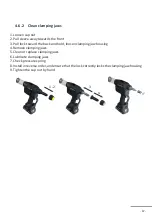
Страница 67: ...ock toward the back and hold loosen clamping jaw housing 4 Remove clamping jaws 5 Clean or replace clamping jaws 6 Lubricate clamping jaws 7 Check pressure spring 8 Install in reverse order and ensure that the lock correctly locks the clamping jaw housing 9 Tighten the cap nut by hand 1 2 3 4 ...

Страница 68: ... parametrised with the SmartTool Manager under the Service user The respective value entered will be multiplied by 1 000 i e when entering 10 the service notification will appear on the display after 10 000 sets If you enter 0 the function is deactivated The recommended service intervals are saved in the tool ex works We would be happy to inspect the tools for you after reaching the service interv...

Страница 69: ...e battery for a longer period of time it should be stored fully charged in a dry dust proof area Store the riveting device and charger in a dry environment protected against splashing water Store the riveting device and charger in a well ventilated space and protected against exposure to dust Ensure that the storage environment is free of aggressive chemicals and vapours ...

Страница 70: ...kg Weight with battery 5 0 Ah approx 2 3 kg Feed through max 6 3 mm BST LB 1825 battery Li Ion 18 V 2 5 Ah BST LB 1850 battery Li Ion 18 V 5 0 Ah BST BC 2830 charger 220 240 VAC 50 60 Hz 65 W Suitable for blind rivets 2 4 6 4 mm depending on material The values given for noise emissions and vibration were measured using a standardised test method and can be used for comparison with other power too...

Страница 71: ... 71 355 44 23 24 53 31 72 303 75 Specifications in mm Not shown to scale ...

Страница 72: ... rivet Setting in the program config uration Clean clamping jaws Replace clamping jaw Check which stroke is required for setting Check setting If the error still persists or is not listed please contact your local Bossard customer service You can also send general inquiries to this e mail address smartfactoryassembly bossard com Please note the following information Serial number of the riveting d...

Страница 73: ...ries are modified without our consent this declaration becomes invalid Tool description Programmable cordless blind riveting tool Type designation RBPF x Bossard SmartTool RTB 20 S Manufacturer HS Technik GmbH Im Martelacker 12 D 79588 Efringen Kirchen Directives 2006 42 EU 2014 30 EU Applied standards EN 62841 1 2015 AC 2015 EN 62841 2 2 2014 EN 61000 6 3 2007 A1 2011 AC 2012 EN 61000 6 2 2005 AC...

Страница 74: ...Notes ...

Страница 75: ...Notes ...

Страница 76: ...03 2021 www bossard com Technical data without guarantee Design suggestions are non binding Subject to changes ...

Отзывы: