12
en
Overview
Before use, read these instructions
carefully in order to become familiar with
important safety and operating instruc-
tions for this appliance.
Pleasekeeptheoperatinginstructionsina
safeplace.Ifpassingontheapplianceto
athirdparty,alwaysincludetheoperating
instructions.Theinstructionsdescribediffer
-
entfeaturesoftheaccessoryaswellasits
useondifferentappliances.
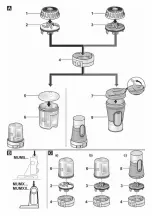
Overview
Fig.
A
1 Blade guard
2 Blade insert with grinding blade
(blackseal,metalbase)
3 Blade insert with blender/cutting
blade
(redseal,plasticbase)
4 Blade holder
Grinding/cutter attachment
5 Lid
1)
6 Glass container
1)
Withattachedlidsuitableforstoragein
the refrigerator.
Blender attachment
2)
7 Lid
Withclosablemouthpiece.ToGo.
8 Plastic container
Canbeusedasadrinkingcup.
1)
Numbervariesdependingonmodel.
2)
Forsomemodels.
Fig.
B
Operatingpositiononthebaseunit
Fig.
C
Combinationoptionsoftheattachments
(dependingonmodel):
a
Grindingfunction=
Blade holder (4) + blade insert with
grinding blade (2) + glass container (6)
b
Cutterfunction=
Blade holder (4) + blade insert with
cutting blade (3) + glass container (6)
c
Blenderfunction=
Blade holder (4) + blade insert with
blenderblade(3)+plasticcontainer(8)
Operation
W
Risk of injury from sharp blades!
Nevergripthebladebythebladeinsert!
Whenworkingwiththebladeinsert(assem
-
bly,disassembly,cleaning),alwaysattach
the blade guard.
■ Beforeusingforthefirsttime,thoroughly
cleanallparts,see“Cleaningandcare”.
Fig.
D
X
MUM5...
Fig.
E
X
MUMX...
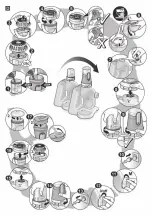
Preparing the attachment
Detail images 1-5
■
Put ingredients into the container.
Do not exceed
max
mark!
■ Gripbladeinsertonthebladeguardand
insert into the blade holder. Press it down
intoplace.
■ Removethebladeguard.
■
Place blade holder on the container and
closebyturningitanticlockwise.
Tip:
Tofacilitatelockingthebladeholder,
moisten the seal of the blade insert with a
little water or cooking oil.
■ Checkthattheredlockingleveronthe
bladeinsertiscompletelylocked(detail
image5).Ifitisnotcompletelylocked,
theattachmentcannotbeplacedonthe
baseunit!
■ Turntheattachmentover.
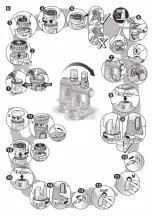
Working
Detail images 6-11
■
Press release button and move swivel
armtoverticalposition.
■ Coverunuseddriveswithdrivecovers.
■ Removetheblenderdrivecover.
■
Put on attachment (arrow on the blade
holderpointstoarrowonthebaseunit)
andpressdownwards(detailimage8).
■ Turnattachmentallthewayanticlock
-
wise(dotonthebladeholderpointsto
arrowonthebaseunit,detailimage9).
■ Insertthemainsplug.
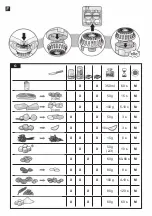
■ Turnrotaryswitchtosetting
M
and
hold.Thelongertheapplianceremains
switchedon,thefinertheingredients
are cut.


