background image

2

BA-077/1EN M6X.20XX


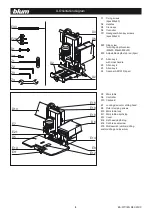
A- Orientation diagram

D1  Fixing screws


(4pcs M8x80)

D2 Handles

D3  Crane eye

D6 Controller

D11  Hexagonal Allen key screws 


(4pcs M8x20)

E29  Stop screw 


for drilling depth revolver


(M8x30, M8x40, M8x50)

E30  Adjustable depth stop rod (3psc)

Z1  Allen key 4 


with cross handle

Z2  Allen key 6 

Z3  Allen key 4 

Z4  Spanner SW10/13 (2psc)

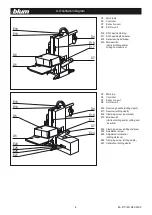
D5  Work table

D6 Controller

D10 Clipboard

E7  Locking device for drilling head

E8  Ruler clamping screws

E10  Work table lock

E11  Work table depth stop

E12 Cover

E16  Drill head depth stop

E18  Drill brake set screw

E19  Mode switch (vertical drilling    

and/or drilling and insertion)

%

130$&/5

&3

%

%

%

&

&

%

%

;

;
;

;

130$

&/5&3

&

&
&

&

&
%

&

&

%

&

&
&

%

Содержание PRO-CENTER

Страница 1: ...1EN M6X 20XX Please keep a copy of the instruction leaflet The instruction leaflet contains the EC Declaration of Conformity which must be produced for authorities upon request Blum PRO CENTER EN PR O CE NT ER ...

Страница 2: ... E30 Adjustable depth stop rod 3psc Z1 Allen key 4 with cross handle Z2 Allen key 6 Z3 Allen key 4 Z4 Spanner SW10 13 2psc D5 Work table D6 Controller D10 Clipboard E7 Locking device for drilling head E8 Ruler clamping screws E10 Work table lock E11 Work table depth stop E12 Cover E16 Drill head depth stop E18 Drill brake set screw E19 Mode switch vertical drilling and or drilling and insertion 13...

Страница 3: ...ical drilling and or drilling and insertion E23 Clamping screw drilling distance E24 Adjustment screw E25 Adjustment calibration drilling distance E26 Clamping screw drilling depth E27 Calibration drilling depth D5 Work table D6 Controller D7 Extraction port D8 Air filter unit E16 Drill head depth stop E17 Drill head depth adjuster E18 Set screw head brake E19 Mode switch Vertical drilling and or ...

Страница 4: ... How to operate the machine 13 3 1 Description of operator panels 13 3 2 Vertical drilling unit 14 3 3 Vertical drilling and fittings insertion 17 3 4 Vertical drilling only 18 3 5 Pre setting revolver for drilling depth 19 3 6 Pre setting revolver for work top setting 20 3 7 Horizontal drilling unit 21 3 8 Horizontal drilling 25 4 Working with PRO CENTER 27 4 1 Creating a setup plan 27 4 2 Overvi...

Страница 5: ...achine that will give you years of productive use with the proper care and maintenance We realise that your time is valuable However you should carefully read this instruction leaflet before you set up and use the ma chine for the first time In this way you will best determine how to adjust the assembly machine to your needs as well as protect yourself against injury In addition the instruction le...

Страница 6: ...cturer does not assume liability for uses not described in the instruction manual The machine is not explosion proof It should not be set up near a paint finishing system Before retooling cleaning maintenance or performing any work on drill bits turn the main switch E1 to pos 0 and disconnect the assembly machine from the pneumatic connection Completely read the instruction leaflet and the safety ...

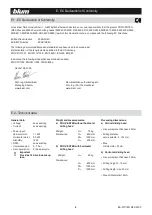
Страница 7: ... place noise level is work cycle 80 4 dB A measured at a height of 1 5 m and at 1 m forward of the worktable edge The ambi ent correction factor K3A is 4 dB and is calculated according to EN ISO 11204 Appendix A The difference between the extraneous noise level and the sound intensity level at each measuring point is 6dB The specified values are emission values which means that they are not necess...

Страница 8: ... ISO 11202 EN ISO 11204 DIN 33893 2 Höchst 06 07 09 Dipl Ing Herbert Blum Documentation authorised agent Managing Director Dipl Ing FH Thomas Maier www blum com www blum com E 2 Technical data General data Voltage see serial tag Current see serial tag Power input Vertical motor 1 1 kW Horizontal motor 0 5 kW Stand By 12 W RPM see serial tag Compressed air 5 7 bar Air consumption 2 litres per cycle...

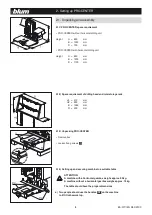
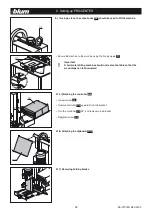
Страница 9: ... requirement of drilling head and ruler storage rack H1 613 mm H2 600 mm B 1282 mm D 350 mm 2 1 3 Unpacking PRO CENTER Remove box Loosen fixing screws D 2 1 4 Setting up and securing machine to a suitable table ATTENTION A machine with a horizontal gearbox weighs approx 95 kg A machine without a horizontal gearbox weighs approx 75 kg The table should have the proper dimensions a Two people should ...

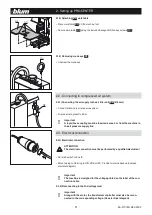
Страница 10: ...ttaching the controller D6 Loosen screw D4 Remove controller D6 upwards from the bracket Turn the controller D6 90 and replace in the bracket Retighten screw D4 2 1 6 Attaching the clipboard D10 2 1 7 Removing holding blocks 2 Setting up PRO CENTER Important A horizontal drilling machine should not rest on the table so that the wood chips can fall downward 130 5 3 ...

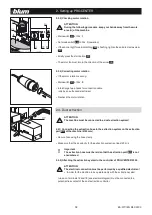
Страница 11: ... rapid hose coupling must be inserted a max 3 m from the machine in the air pressure supply line 2 3 Electrical connection 2 3 1 Electrical connection ATTENTION The electrical connection must be performed by a qualified electrician Set main switch to Pos 0 Mount a plug conforming to DIN VDE or IEC Provide for mains backup fuse see electrical diagram Important The machine is designed for the voltag...

Страница 12: ...Recheck the motor rotation 2 4 1 Connecting the extraction hose to the extraction system on the extraction port D7 of the machine Ø 50 mm Secure hose using the hose clamp Make sure that the air velocity for the extraction system is at least 20 m s 2 4 Dust extraction ATTENTION The machine must be connected to a dust extraction system Important The extraction hose must be laid so that the extractio...

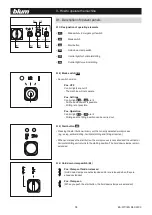
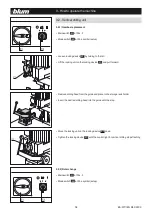
Страница 13: ...is not possible Pos Operation Control light E5 or E6 are lit Drilling and the fitting insertion can be carried out 3 1 3 Start button E3 Pressing the start button will carry out the currently selected work process e g setup vertical drilling horizontal drilling and fittings insertion When you release the start button the work process is cancelled and the vertical or horizontal drilling unit return...

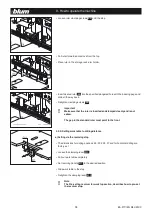
Страница 14: ...t the locking unit on the locking device E7 and pull forward Remove drilling head from the guide and place in the storage rack holder Insert the desired drilling head into the guide until the stop Move the locking unit on the locking device E7 down Tighten the locking device E7 until the control light for vertical drilling stops flashing 3 2 2 Ruler change Main switch E1 at Pos I Mode switch E2 at...

Страница 15: ...e ruler is inserted and clamped cleanly and is not askew The gap in the standard ruler must point to the front 3 2 3 Setting work table to drilling distance a Setting via the revolving stop The dimensions for drilling positions 9 5 20 22 5 37 and for horizontal drilling are factory set Loosen the clamping lever E10 Pull out work table completely Set revolving handle E11 to the desired position Sli...

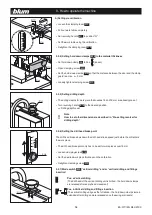
Страница 16: ...osition Drilling depth is set Note How to set other dimensions is described in Pre setting revolver for drilling depth 3 2 6 Setting the drill head brake point The drill head brake slows down the drill head stroke speed just before the drill enters the work piece The drill head brake point only has to be set for work pieces over 19 mm Loosen clamping screw E18 Set the desired work piece thickness ...

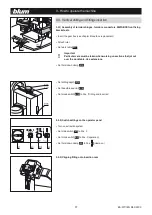
Страница 17: ...k table E11 Important Particular care must be taken when working on sections that jut out over the work table Use extensions Set hold down clamp E14 Set drilling depth E16 Set head brake point E18 Set mode switch E19 to Pos Drilling and insertion 3 3 2 Switch settings on the operator panel Turn on extraction system Set main switch E1 to Pos I Set mode switch E2 to Pos I operation Set hold down cla...

Страница 18: ...ended The drill hole is blown out 3 3 5 Inserting fittings Swivel down swing arm E20 to the stop Press the start button E3 until the fitting is completely inserted The vertical drilling unit moves downward Release the start button E3 The vertical drilling unit returns to the starting position Swivel up swing arm E20 The hold down clamps are released 3 4 Vertical drilling only 3 4 1 System drilling...

Страница 19: ...work piece The vertical drilling unit moves downward The drill bits rotate Release the start button E3 The vertical drilling unit does not return completely to the starting position the work stroke is shorter The hold down clamps are released The drill holes are blown out 3 5 Pre setting revolver for drilling depth 3 5 1 The drilling depths for panel thicknesses 16 and 19 mm are already pre set 2 ...

Страница 20: ... The dimensions for drilling positions 9 5 20 22 5 37 and for horizontal drilling H are factory set 3 additional dimensions can also be pre set 3 stop rods E30 are enclosed 3 6 2 Cutting stop rods to size The desired drilling position should be pre set Drilling position mm X mm 5 37 0 37 62 25 62 87 50 87 112 75 112 125 90 Mark dimension X on the stop rod E30 as shown in the top picture Cut the st...

Страница 21: ...nt Make sure that the mode switch E19 is set to the Pos vertical drilling and fittings insertion and the vertical drilling unit is completely set to the up position 3 7 1 Ruler change Main switch E1 at Pos I Mode switch E2 at Pos symbol setup Loosen ruler clamping screws E8 until the stop Pull ruler forward and remove from the top Place ruler in the storage rack ruler holder Insert horizontal rule...

Страница 22: ...position Press in locking mechanism E22 Use both hands to press down on the horizontal hold down clamp E21 until it locks in this position Note The control light for horizontal drilling must light up 3 7 4 Setting hold down clamps E14 to the material thickness Set hold down clamp E4 to Pos loosen Open clamping screw E15 Set the hold down clamps E14 so that the distance between the door and the cla...

Страница 23: ...ing the drilling distance Z fine setting For flush overlay connections Make vertical drilling 8 mm in the sample board approx 10 cm x 20 cm using the desired drilling distance z Open horizontal drilling unit cover Loosen clamping screw E23 Slide the sample board to the alignment pegs and turn the adjustment screw E24 to the stop Retighten clamping screw E23 Remove sample board Close horizontal dri...

Страница 24: ...ghten clamping screw E26 Main switch E1 at Pos I Set mode switch E2 to Pos symbol setup Press the start button E3 until the horizontal drilling unit is extended completely The horizontal drilling unit extends The drill bits do not rotate Release the start button E3 The horizontal drilling unit remains in this position Use a hex wrench to loosed the grub screw E28 Change drill bit Briefly press the...

Страница 25: ...le with a closed horizontal drilling cover Set the horizontal hold down clamp E21 to the down position Set hold down clamp E14 Set the drilling distance E25 Set drilling depth 3 8 2 Switch settings on the operator panel Turn on extraction system Set main switch E1 to Pos I Set mode switch E2 to Pos I operation Set hold down clamp E4 to Pos clamp on 3 8 1 Drilling side holes Insert the horizontal r...

Страница 26: ...ing drilling and insertion Press the start button E3 until the drilling depth is reached The vertical drilling unit moves downward and the horizontal hold down clamp secures the work piece The horizontal drilling unit extends The drill bits rotate Release the start button E3 The horizontal drilling unit returns to the starting position The vertical drilling unit also returns to the starting positi...

Страница 27: ...data Explanation of symbols 4 1 3 Creating work piece drawings on the set up plan Make hand drawings on set up plan or Coping drawing to set up plan Note To better understand the following description and procedures take a look at the included sample setup plan Enter partial description Enter work procedure Enter creation date Enter comments Enter page no Enter number of pages Vertical drilling Ho...

Страница 28: ... described in chapter 3 4 1 6 Setting work top Add drilling depth description colour to the setup plan The dimensions 9 5 20 22 5 37 and those for the horizontal drilling are already preset and marked with the colours yellow red orange green and white The set up for other dimensions is described in chapter 3 The dimensions for the drilling depth X and drilling distance Z should also be entered in ...

Страница 29: ...29 BA 077 1EN M6X 20XX 4 Working with PRO CENTER 4 2 Overview assembly drilling heads rulers ...

Страница 30: ... with PRO CENTER Drilling head Ruler hinge Dowel mounting plates Cruciform mounting plate cabinet profile System drilling Drilling head Ruler dowel cabinet connec tor cabinet connec tor cabinet connec tor METABOX front fixing bracket ...

Страница 31: ...its remove the drilling head from the machine Loosen the fixing screw using a hex wrench Insert drill bits into the chuck The flat surface of the drill shaft must be placed in the direction of the fixing screw Retighten fixing screw Important Insert cover caps into the unused chucks This will keep the bits clean and prevent the fixing screws from coming out on their own d Attaching insertion ram t...

Страница 32: ...lling head MZK 2100 for dowel plates and furniture connectors Drilling head with 2 spindles Swing arm for ram attachment Drill bits A 1 x Ø 10 mm Counter clockwise B 1 x Ø 10 mm Clockwise or B 1 x Ø 25 mm Clockwise Colour coded bits Counter clockwise red Clockwise black 4 3 4 MPV drilling head MZK 2110 for cruciform mounting plates and furniture connectors Drilling head with 2 spindles Swing arm f...

Страница 33: ...ts Counter clockwise red Clockwise black 4 3 6 SYH drilling head MZK 2200 01 for all Blum cabinet profiles Drilling head with 8 spindles Drill bits A 4 x Ø 5 mm Counter clockwise B 4 x Ø 5 mm Clockwise Colour coded bits Counter clockwise red Clockwise black 4 3 7 SYH drilling head MZK 2810 01 for hole groups and system drilling Drilling head with 9 spindles Drill bits A 4 x Ø 5 mm Counter clockwis...

Страница 34: ...ery fixing must be inserted first and then the front fixing bracket is inserted after the second insertion of the fitting 4 3 9 H drilling head M65 26XX horizontal drilling unit for dowel connections cabinet connector screws and furniture connectors Drilling head with 3 spindles Drilling head cannot be changed Drill bits A 2 x Ø mm Counter clockwise B 1 x Ø mm Clockwise Important The drill bit len...

Страница 35: ...ension and clamp 4 4 2 ST ruler MZL 2000 standard ruler The scale is symmetrical starting from the 0 point going to 850 mm This ruler can be used universally for vertical drilling 4 4 3 R ruler MZL 2010 Reversible ruler One sided scale starting from the 0 point to 850 mm This ruler is installed one sided either on the right or left It must be reversed to drill right or left pieces This makes the r...

Страница 36: ...be inserted for horizontal drilling Note The MZR 1200 centre stop can only be used for this ruler 4 4 6 V ruler MZL 2090 extension ruler Connecting extensions on the basic ruler from the 0 point to 2550 mm Assembly Slide extension ruler onto the ruler on the machine Clamp with the clamping knob Important Support the extension ruler using ruler supports 4 4 7 Ruler supports MZV 2100 for extension r...

Страница 37: ... a regular basis Check the electrical and compressed air lines on a regular basis 5 1 2 Replacing a damaged gearbox coupling ATTENTION Replace broken or damaged parts immediately Only use Blum original parts Use a flathead screwdriver to remove the damaged coupling Slip the replacement coupling onto the shaft until it aligns with the shaft at the top 5 Maintenance and service ...

Страница 38: ...ed downward Swivel up swing arm none Both control lights are flashing slowly a If you have switched from vertical to horizontal drilling The horizontal hold down clamp was not set to the down position Set the horizontal hold down clamp to the down position See chapter 3 Horizontal ruler was not inserted Insert horizontal ruler See chapter 3 Work table was not set to the H posi tion Set work table ...

Страница 39: ...ake sure that the ruler is clamped securely none There are chips between the ruler and the work piece Remove dirt and chips none The work table is not set correctly Set work table to the correct position See chapter 3 Extension ruler is not attached properly Check ruler attachment and extension none The work table was not clamped Secure work table with the clamping lever none The work piece was pl...

Страница 40: ... 3 Drilling through work pieces Use roof tip drill bit to drill through none Drill blockage in wood Improper material has been drilled Only use work pieces made from wood particle board or plastic coated wood none Head speed for drilling is too high Set proper head brake point See chapter 3 Drill bits are dull Repoint drill bits or replace none Drill rotation not set properly Install counter clock...

Страница 41: ... chuck and or use cover caps if no drill bits are inserted none The horizontal drilling unit is filled with chips Open horizontal drilling unit and remove chips none Drilling position is incorrect The drilling distance is not set properly Correct setting tighten clamping screw See chapter 3 The stops were not set properly on the ruler Check the position of the stops and correct if necessary none T...

Страница 42: ...1kW 5 0A 2830Upm C1 25µF Q2 U1 V1 W1 W2 U2 V2 C2 16µF 1x230V 50Hz S3 60 ED 0 55kW 4A 2830Upm 1F5 18V 0 T1 400V 346V 230V 200V 0V Prim 200 230 346 400V 50 60Hz mit Temperaturschalter Sek 18V 1 6A 10V 0 5A 10V 0 1F4 0 5AT 1 6AT M2 M1 1 2 0V 3 10V A2 1X4 20 1X1 3 1X3 5 1X2 64 L1 PE N 1X5 5 A2 2X1 S101 1 PE F0 10AT File PC AM 1x230V ai S101 2 3 4 3 4 3 4 3 4 1 2 S102 2 T1 T2 T3 L1 L2 L3 T1 T2 T3 L1 L2...

Страница 43: ...60 ED 2 75A 1 1kW 2820Upm 3x400V Q2 U1 V1 W1 W2 U2 V2 3x400V 3x400V 50Hz 60 ED 1 6A 0 55kW 2690Upm 1F5 18V 0 T1 400V 346V 230V 200V 0V 1 6AT Prim 200 230 346 400V 50 60Hz mit Temperaturschalter Sek 18V 1 6A 10V 0 5A 3x400V 3x230V 10V 0 1F4 0 5AT M2 M1 1 2 0V 3 10V A2 1X4 5 1X1 3 1X3 5 1X2 64 L1 L2 L3 X0 PE N 1X5 5 A2 2X1 S101 1 PE F0 10AT File PC AM 3x400V ai S101 2 3 4 3 4 3 4 3 4 1 2 S102 2 R1 T...

Страница 44: ...9 35 30 32 38 37 13 18 16 14 15 21 22 sw bn bl S8 S1 K2 K2 1 bn bl bl sw 1 2 1 2 1 2 1 2 1 2 1 2 1 2 Y1 1 Y1 2 Y2 Y3 Y4 Y5 Y6 Q1 Q2 A1 A2 A2 B1 A1 A1 A2 bl sw bn S1 bl bn S2 bl sw bn S3 S102 2 bl sw bn S4 bn bl bn bn bn bn bn bn bl bl 3 4 rot red blau blue 5 gr A1 1X2 64 1 PE 2 18V 3 0V 2X1 3 T1 File PC AM Klemmenplan ai K2 6 sec s ...

Страница 45: ...45 BA 077 1EN M6X 20XX 7 Diagrams 7 4 Pneumatic diagram Datei PC Pneumatik AM ai ...

Страница 46: ...our percer et poser des ferrures EL Μηχάνημα διάτρησης και τοποθέτησης IT Macchina forainseritrice LV Urbšanas un furnitūras iestrādāšanas iekārta LT Gręžimo montavimo staklės NL Boor en beslagmachines PL Maszyna do nawiercania i osadzania okuć PT Furadeira e máquina para a montagem de ferragens RO Maşină de găurit şi montat feronerie SV Borr och beslagsmonteringsmaskiner SK Vŕtací a lisovací stro...

Страница 47: ...47 BA 077 1EN M6X 20XX Notes ...

Страница 48: ...rinted in Austria IDNR 589 557 7 BA 077 1EN M6X 20XX DokId BAU0025050868 IDX 01 Julius Blum GmbH Beschlägefabrik 6973 Höchst Austria Tel 43 5578 705 0 Fax 43 5578 705 44 E Mail info blum com www blum com ...

Отзывы: