724-746-5500 | blackbox.com
Page 58
Chapter 3: System and Network Setup
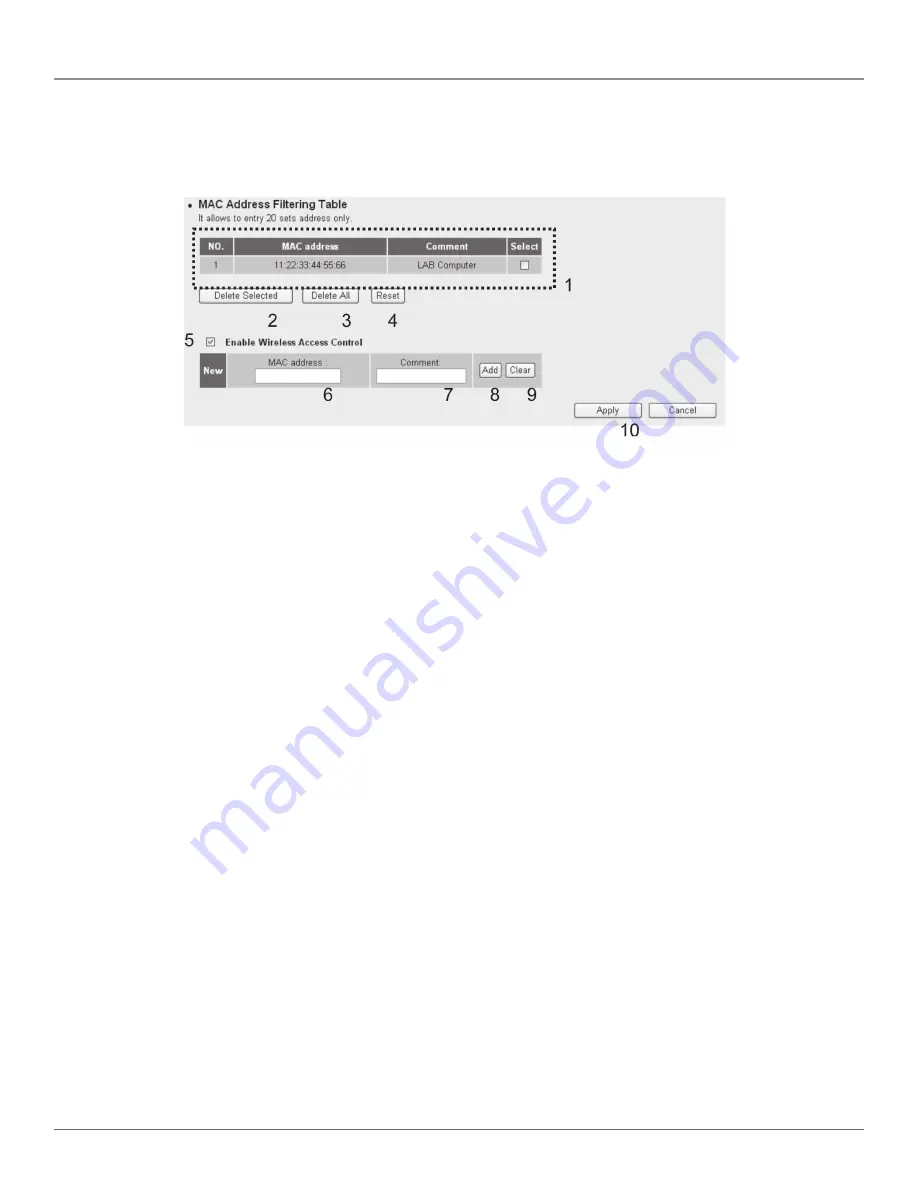
You can assign up to 20 MAC addresses using this function. Click on the “Wireless” menu on the left of the Web management
interface, then click on “Access Control,” and the following message will be displayed:
Figure 3-77. Wireless access control screen.
All allowed MAC addresses will be displayed in the MAC Address Filtering Table (1).
Table 3-32. Wireless access control screen options.
Item
Description
Delete Selected (2):
To delete a specific MAC address entry, check the select box for the MAC address you want to
delete, then click on the “Delete Selected” button. (You can select more than one MAC
address).
Delete All (3):
To delete all MAC addresses listed here, click on the “Delete All” button.
Reset (4):
Click on the “Reset” button to de-select all MAC addresses.
Enable Wireless
To enforce MAC address filtering, check “Enable Wireless Access Control.” When this item is
Access Control (5):
unchecked, the wireless router will not enforce MAC address filtering for wireless clients.
MAC Address (6):
Input your wireless device’s MAC address here; dash ( - ) or colon ( : ) are not required. (that is,
If the MAC address label of your wireless device indicates ‘aa-bb-cc-dd-ee-ff’ or
‘aa:bb:cc:dd:ee:ff’, just input aabbccddeeff.
Comment (7):
Input any text here as the comment for this MAC address, such as “ROOM 2A Computer.”
Input up to 16 alphanumerical characters here. This is optional and you can leave it blank,
however, we recommend that you use this field to write a comment for every MAC address as
a memory aid.
Add (8):
Click on the “Add” button to add the MAC address and associated comment to the MAC
address filtering table.
Clear (9):
Click on the “Clear” button to remove the value you input in the MAC address and comment
field.
Содержание WRT-300BGN-R2
Страница 93: ...Page 93 NOTES...
Страница 94: ...724 746 5500 blackbox com Page 94 NOTES...
Страница 95: ...Page 95 NOTES...


