


P
ag
e
145
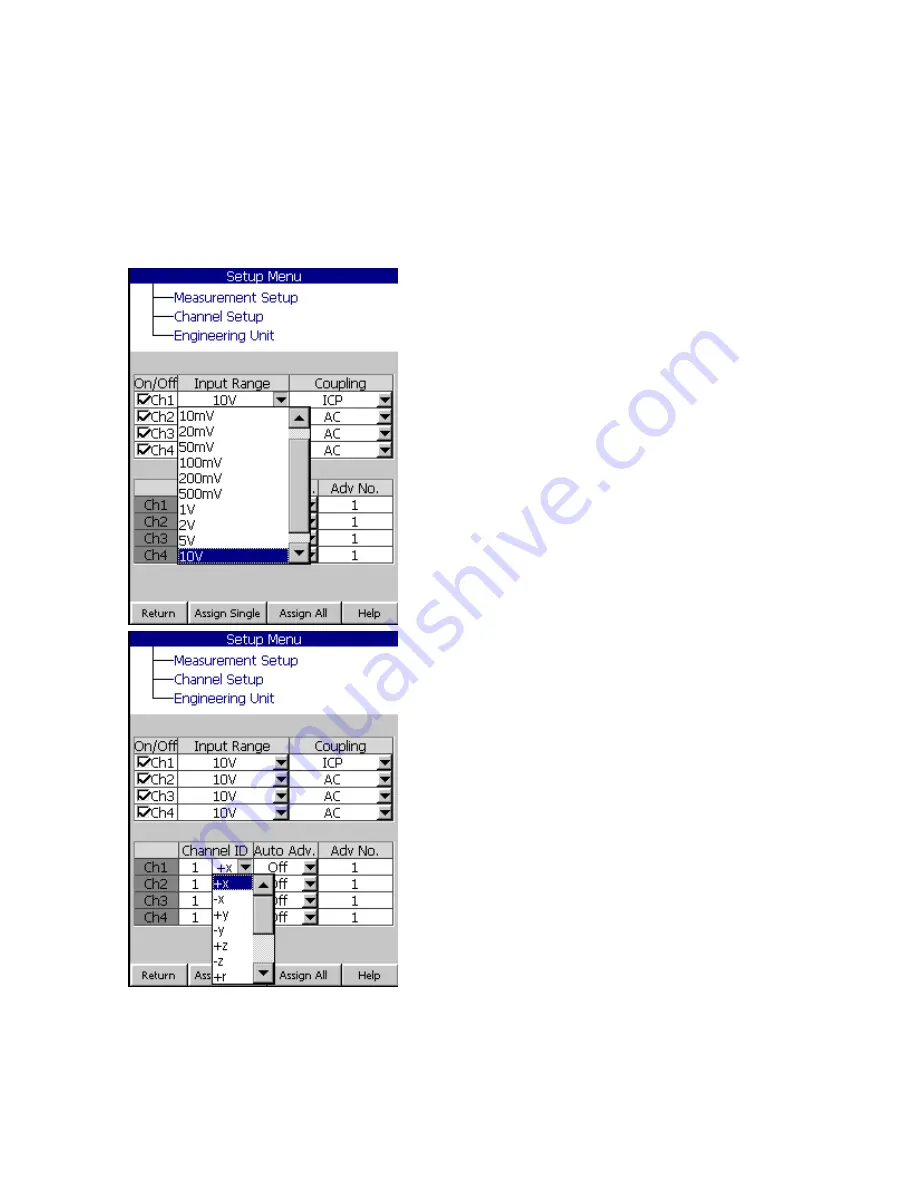
Channel Setup
The Channel setup is so that you can define each channel according to what you
are measuring. You can turn each channel On/Off, select the Input range,
Coupling, Window, and other parameters for making your measurement.
On/Off:
Select via the
[Navigation Keypad]
on/off by pressing the [
OK
] button. A checked
box means the channel is on.
Input range
:
Select Auto, 10mV, 20 mV, 50
mV, 100 mV, 200 mV, 500 mV, 1 V, 2V, 5V.
10V, or 20V from the pull-down menu.
This
should match the output of the device that
you are connecting to.
Coupling
: Select AC, DC, IEPE, 200V Mic.
Or 0V Mic. 0 V = the polarization voltage of
the microphone.
Channel ID
: Enter a value between 1 and
65546 via the Input box.
Direction
: You can select one of the
directions from a pull-down menu.
+X, -X, +Y, -Y, +Z, -Z, +R, -R, +T, -T, +P, -P.
The point ID’s will be stored in the data file for
identifying the points.
Auto Advance
: On/Off: Auto advance is a
feature that is useful for taking many data
points. If you have auto advance turned on,
then you can assign an advance number after
you save the data file. Each channel is
independent of each other, so you can auto advance only the channels you wish
to advance.
Advance Number:
Advances a file number after you save the file.
Содержание Fieldpaq
Страница 5: ...Page 4 ...
Страница 40: ...Page 39 Legend Select Off Channel No or Channel ID BG Color Select either White or Black background color ...
Страница 54: ...Page 53 Orbit x y ...
Страница 57: ...Page 56 FFT Examples 1 Insertion spike measurements 2 Fieldpaq modal test 3 Sound measurement 4 ...
Страница 61: ...Page 60 ...
Страница 104: ...Page 103 Power Spectrum Time Waveform Bearing Spectrum ...
Страница 199: ...Page 198 ...
Страница 200: ...Page 199 DVF specifications Maximum frequency band Maximum resolution Maximum file size ...
Страница 204: ...Page 203 Done ...
Страница 206: ...Page 205 5 Start the Data Explorer Program 6 Select File Import ...
Страница 215: ...Page 214 ...
Страница 222: ...6 ...


