background image

83

Kaleido-IP X320/X120

Installation & Service Manual

Importing a Database

To import a database

1 On  the 

Configure

 menu, point to 

Database

, and then click 

Import

.

The 

Import from Multiviewer

 window appears, prompting you for the IP address of the 

multiviewer whose database you want to import.

Your recent connections, and all the multiviewers that are on the same subnet as your 
PC are automatically included in the list.

2 Select the multiviewer from the list (if present), or type the appropriate IP address in 

the box, and then click 

OK

.

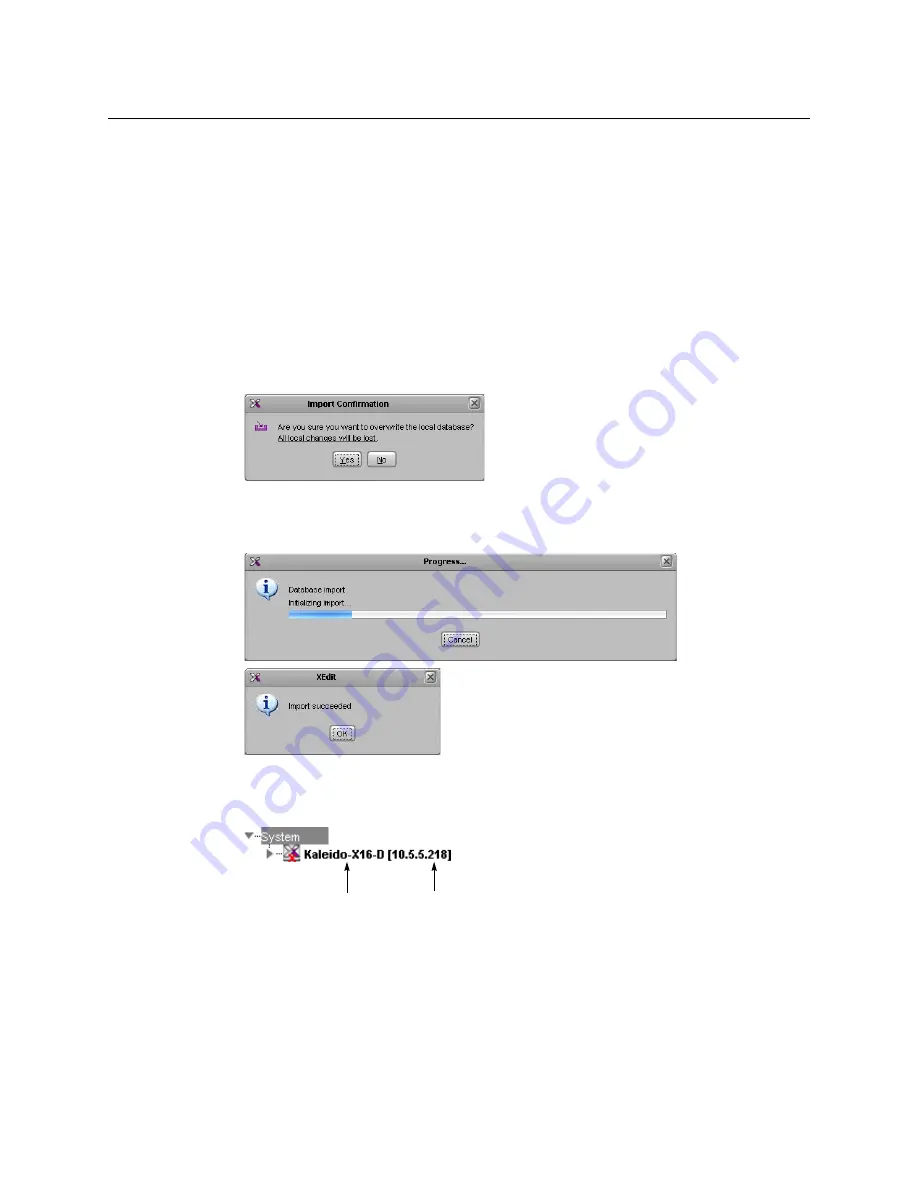
A window appears, prompting you to confirm that you really want to import the 
database from the multiviewer.

3 Click 

Yes

.

A progress window appears, followed by a message stating whether the import 
succeeded or not.

4 Click 

OK

.

The imported data has replaced the former content in your local workspace. The 
originating system’s multiviewer model and IP address now appear in the System list.

Multiviewer model IP address

Содержание grass valley Kaleido-IP X120

Страница 1: ...Installation Service Manual M926 8902 104 2018 06 19 KALEIDO IP X320 KALEIDO IP X120 HIGH QUALITY IP VIDEO MULTIVIEWERS...

Страница 2: ...iewers to use their product manuals for their own internal business use Manuals for Grass Valley products may not be reproduced or transmitted in any form or by any means electronic or mechanical incl...

Страница 3: ...prior to making any other equipment connections Identifies an external protective grounding terminal which may be connected to earth ground as a supplement to an internal grounding terminal Indicates...

Страница 4: ...id or aerosol cleaners use only a damp cloth Dangerous voltages may exist at several points in this equipment To avoid injury do not touch exposed connections and components while power is on High lea...

Страница 5: ...equipment Electrostatic Discharge ESD Protection Electrostatic discharge occurs when electronic components are improperly handled and can result in intermittent failure or complete damage adversely a...

Страница 6: ...ence dans le texte doit tre remplac par un fusible du m me calibre Identifie une borne de mise la terre de protection Il faut relier cette borne la terre avant d effectuer toute autre connexion l quip...

Страница 7: ...pas endommager les connecteurs Coupez l alimentation avant de nettoyer l quipement Ne pas utiliser de nettoyants liquides ou en a rosol Utilisez uniquement un chiffon humide Des tensions dangereuses...

Страница 8: ...parations autres que celles qui sont d crites dans le pr sent manuel sauf si vous tes qualifi pour le faire Confiez les r parations un technicien qualifi La maintenance doit se r aliser dans un milieu...

Страница 9: ...950 1 2nd Ed AM1 Safety of information technology equipment The power cords supplied with this equipment meet the appropriate national standards for the country of destination Electromagnetic Compatib...

Страница 10: ...2011 X GB T 26572 2011 X Indicates that this toxic or hazardous substance contained in at least one of the homogeneous materials for this part is above the limit requirement in GB T 26572 2011 Grass...

Страница 11: ...Cabling Diagram 21 Kaleido IP Multiviewer Ethernet Port Usage 21 Commissioning the Multiviewer 23 Changing the Output Resolution 24 4 IP Network Setup 27 Introduction 27 Networking Essentials 27 Chan...

Страница 12: ...tomizing Layouts Logical Sources and other Kaleido IP Elements 68 Available Hardware and Software Options 69 Network Interface Card Installation Location in the Server 71 Enabling Options 72 Restartin...

Страница 13: ...Decoding Capacity 102 Codec Support by Streaming Mode 104 Multiviewer Integration with other Systems and Equipment 106 Optional Drivers for Controlling Routing Devices from the Multiviewer 106 Drivers...

Страница 14: ...14 Table of Contents...

Страница 15: ...You can obtain the latest Kaleido Software drivers and sample databases from the Downloads section of the Grass Valley s website www grassvalley com dl multiviewers Document Number Title M770 2800 Kal...

Страница 16: ...tation on page 15 for instructions on how to define more rooms and layouts to suit your specific requirements Limitations The Kaleido IP multiviewer supports a subset of the features offered by other...

Страница 17: ...17 Kaleido IP X320 X120 Installation Service Manual Overview of the Kaleido IP System...

Страница 18: ...18 Overview Overview of the Kaleido IP System...

Страница 19: ...wo displays for every Kaleido IP unit Keyboard mouse for basic Kaleido IP configuration One dedicated 1000Base T or 100Base T Ethernet switch with enough ports for your Kaleido IP units client PCs and...

Страница 20: ...refer to the Supermicro SuperServer User s Manual See Related Documentation on page 15 Mechanical Installation Setting up the Kaleido IP Hardware To set up the Kaleido IP hardware Refer to the Supermi...

Страница 21: ...Usage On the rear panel of non virtual machine VM Kaleido IP multiviewers are Ethernet connections that should be used as follows The management port LAN1 is used for multiviewer management that is a...

Страница 22: ...r Ethernet Port Usage The media ports LAN2 and higher are to be used for media streams only 2022 6 encoded streams can only be used with media ports LAN5 and LAN6 This is a licensed option See Availab...

Страница 23: ...The Kaleido RCP2 is an optional device and may not have been shipped with your Kaleido IP system For information on this and other options for your multiviewer system contact your Grass Valley sales r...

Страница 24: ...0 transmitter receiver devices that allow you to install a display up to 1 000 meters 3 300 feet from the signal source In this case use the provided DisplayPort to HDMI cable between the Kaleido IP a...

Страница 25: ...resolution check box 4 Select the desired resolution from the Default DVI resolution list 5 Click OK The output resolution is adjusted accordingly Note The value indicated for Detected monitor resolut...

Страница 26: ...26 Multiviewer Cabling Changing the Output Resolution...

Страница 27: ...thout exceeding the network s bandwidth or the unit s decoding resources See Decoding Capacity on page 102 for details on the number of programs and total streaming bandwidth supported The Kaleido IP...

Страница 28: ...0 0 255 255 0 0 Gateway None None Link mode Auto negotiate Auto negotiate Media Port 2 IP address LAN3 172 30 3 71 172 30 3 71 Network mask 255 255 0 0 255 255 0 0 Gateway None None Link mode Auto ne...

Страница 29: ...more information about this 2 Connect a keyboard to one of the USB connectors of the Kaleido IP 3 Right click anywhere on the monitor wall point to Monitor Wall if you clicked a monitor and then click...

Страница 30: ...IP address in the address bar See Opening XAdmin on page 49 The XAdmin Status and Options page appears 2 Click System configuration in the navigation area on the left of the page The System Configurat...

Страница 31: ...IP addresss to be used for the Media Network This port must have IP connectivity to the associated streaming devices e g encoders multiplexers See also Kaleido IP Multiviewer Ethernet Port Usage on p...

Страница 32: ...to reboot the system immediately 11 Click OK Your Kaleido IP restarts 12 In XEdit a URL path can be used to identify a source located on a remote server to access HTTP RTSP or RTMP streams When using...

Страница 33: ...tion A message appears confirming that the changes have been applied e Click OK to dismiss the message 13 If this system must monitor sources from a VLAN environment then see Configuring Virtual LAN A...

Страница 34: ...ins a multicast group only when decoding is required that is when a source is being monitored on the wall In addition streams that are not decoded are joined momentarily in a polling manner one stream...

Страница 35: ...0i 49152 65535ii i For Windows XP and earlier ii For Windows 7 and later Java RMI TCP Remote Method Invocation client server communication Dynamic Allocation of ports Required for communication betwee...

Страница 36: ...a RMI TCP Remote Method Invocation client server communication Dynamic Allocation of ports Required for communication between client and Application Server This range can be restricted to match specif...

Страница 37: ...network TCP Used to obtain information from TSL devices that use the TSL UMD version 5 0 protocol Port Transport Notes 2000 TCP Used to control a multiviewer s internal router via the SAM Snell Pro B...

Страница 38: ...leido Software User s Manual To maintain the integrity of a cluster configuration such changes must be made by using the system configuration features available in XAdmin Note This is configurable in...

Страница 39: ...ectly on the multiviewer or you can work locally on the computer and then export your changes to the multiviewer If you have only one multiviewer or if you have more than one but you intend to always...

Страница 40: ...open a Web browser window and type the multiviewer s IP address in the address bar The multiviewer s home page appears 2 Click the XEdit button The browser prompts you to save an executable file to yo...

Страница 41: ...end of the installation process If you have Windows 7 or Windows 10 shortcuts are added to your desktop and to the Start menu under All Programs If you have Windows 8 1 or Windows 8 XEdit will appear...

Страница 42: ...our PC it downloads them from the multiviewer automatically in which case a message will appear to confirm the font update and instruct you to restart the application Click OK to continue and then ope...

Страница 43: ...do Software User s Manual See Related Documentation on page 15 Note Once it has been installed from the multiviewer XEdit remains on your PC and can be launched from the shortcut that was added to you...

Страница 44: ...ou may have open 2 Locate the Uninstall XEdit shortcut If you have Windows 7 or Windows 10 Open the Start menu click All Programs scroll to the Grass Valley or Miranda Technologies2 folder and then ex...

Страница 45: ...ton The browser prompts you to save an executable file to your hard drive Kaleido__RouterControl windows32 online exe3 This file is an online installer which will download Router Control and other com...

Страница 46: ...d the Router Control main application window appears The application automatically connects to your multiviewer The main window lists all logical routers configured within your multiviewer system in a...

Страница 47: ...e shortcut that was added to your desktop Apps view Start screen step on page 45 or from the Start menu Whenever you install a new version of the Kaleido Software on the multiviewer the next time you...

Страница 48: ...em Configuration Uninstalling Router Control An uninstall screen appears 4 Click Uninstall This removes Router Control including all shortcuts and other elements that were installed with it from your...

Страница 49: ...mber is different between the Kaleido Software version on the multiviewer and the XEdit version on your PC Click Yes to the Software Version Check screen There is a compatibility problem if the major...

Страница 50: ...bility view see Enabling the Compatibility View in Internet Explorer on page 60 Opening XAdmin from a Browser To open XAdmin from a browser 1 Open a Web browser window and enter the multiviewer s Mana...

Страница 51: ...The XAdmin Status and Options page appears You can access all XAdmin features by clicking the links in the navigation area on the left side of the page Registering your Multiviewer s Security Credenti...

Страница 52: ...Firefox The first time you try to access XAdmin in Firefox the browser may display the following page instead prompting you to confirm the multiviewer s security credentials To register your multiview...

Страница 53: ...onfirm Security Exception Your multiviewer s home page appears You will now be able to access your multiviewer s client applications without seeing the warning This will remain effective until the mul...

Страница 54: ...tials with your Browser Suppressing certificate error in Internet Explorer or Chrome The first time you try to access XAdmin in Internet Explorer or Chrome the browser may prompt you to confirm the mu...

Страница 55: ...verified To suppress this warning you need to perform the following in Internet Explorer even if your preferred browser is Chrome To register your multiviewer s security credentials with Internet Expl...

Страница 56: ...certificates 4 In Certificate click Install Certificate You must have administrator status to accept the certificate error If your user account does not have administrator status then close your brows...

Страница 57: ...57 Kaleido IP X320 X120 Installation Service Manual 5 In Certificate Import Wizard click Next 6 In Certificate Import Wizard click Place all certificates in the following store and then click Browse...

Страница 58: ...ration Registering your Multiviewer s Security Credentials with your Browser 7 In Select Certificate Store select Trusted Root Certification Authorities and then click OK 8 Back in Certificate Import...

Страница 59: ...security warning appears 10 Click Yes 11 Certificate Import Wizard reports that the import was successful 12 Click OK to continue and then click OK to close the Certificate window 13 Close all Interne...

Страница 60: ...me page in Internet Explorer 8 9 or 10 you may see a blank page instead of XAdmin s Status and Options page 4 To enable the compatibility view for your multiviewer s XAdmin Web client Click the Compat...

Страница 61: ...in 1 Open XAdmin See Opening XAdmin on page 49 2 Click Access control in the navigation area on the left side of the page The Access Control page appears 3 Type the password you want to enforce in bot...

Страница 62: ...er are also redirected to the login page 8 Type the password and then click Log in The XAdmin Status and Options page appears 9 Click Log out when you are ready to close your session A confirmation me...

Страница 63: ...st contain between 6 and 20 alphanumeric characters or symbols 4 Click Save A confirmation message appears 5 Click OK to close the message window The Apply settings button becomes available 6 Click Ap...

Страница 64: ...in XAdmin 1 Open XAdmin See Opening XAdmin on page 49 2 Click Access control in the navigation area on the left side of the page The Access Control page appears 3 Click Disable access control A confir...

Страница 65: ...n Session To close your XAdmin session 1 Click Log out in the navigation area on the left side of the current page when you are ready to close your session A confirmation message appears 2 Click OK Th...

Страница 66: ...statuses XAdmin Status and Options page 2 Click the arrow button at the end of a module s heading row to see more details the item At any time you can click the Refresh button to make sure the data d...

Страница 67: ...ing the Kaleido RCP2 with its default settings 1 On the Kaleido RCP2 unit press the ENTER button and hold it until the ESC button lights up The following message appears on the LCD display Configurati...

Страница 68: ...shooting with the Kaleido IP frame s USB ports on page 96 for more information about this a Right click anywhere on the monitor wall point to Monitor Wall if you clicked a monitor and then click Load...

Страница 69: ...320 only One license per Kaleido IP 2022 6 decode KIP OPT UCIP Decode license for 2022 6 video One license per Kaleido IP Kaleido IP X320 X120 feature options Option Part Number Feature Remote IP stre...

Страница 70: ...ons Grass Valley Technical Support on page 110 The Kaleido IP currently supports display rotation It is not possible to enable or verify these options in XAdmin s Status and Options page for this mult...

Страница 71: ...e SFP transceiver SFP ETH10G RT M85 Ethernet multimode fiber Cartridge 850nm with LC PC conni i For use with KIP OPT ETH 2S 9 20 1310 nm 10 3 G single mode SFP transceiver SFP ETH10G RT S13 Optical 10...

Страница 72: ...you want to enable an option 4 Locate the entry for the option you want to enable For example to activate the Extraction of CC Subtitling and XDS metadata option CC XDS Option for an input card you w...

Страница 73: ...73 Kaleido IP X320 X120 Installation Service Manual Once the option is enabled the license key is displayed and a Disable button replaces the Enable button...

Страница 74: ...1 Open XAdmin See Opening XAdmin on page 49 The XAdmin Status and Options page appears 2 Click Restart Shut down in the navigation area on the left side of the page The Restart Shut down page appears...

Страница 75: ...nce the monitor wall software has restarted the system notifies you Click OK The XAdmin Status and Options page appears Restart unit Your multiviewer will shut down and then start again during which t...

Страница 76: ...age The Head Streaming Configuration page appears Notes Kaleido IP VM multiviewers output to a single streaming head In the case ofa Kaleido IP VM disregard references to a second head in the procedur...

Страница 77: ...he streaming output is meant to feed a Kaleido IP multiviewer the following output resolution bit rate combinations should ensure good video quality on the monitor wall 1920 1080 at 15000 kbps 1280 72...

Страница 78: ...78 System Configuration Configuring Head Streaming on a Kaleido IP A message appears confirming that the configuration has been applied 7 Click OK to continue...

Страница 79: ...pters on a Kaleido IP To add Virtual LAN adapters on a Kaleido IP 1 Open XAdmin See Opening XAdmin on page 49 2 Click System configuration in the navigation area on the left side of the page The Syste...

Страница 80: ...nfiguration page appears 4 Edit the VLAN configuration file as required Refer to the Help pane for guidelines if needed 5 Click Apply configuration A message appears prompting you to restart the softw...

Страница 81: ...IP 1 Open XAdmin See Opening XAdmin on page 49 2 Click System configuration in the navigation area on the left side of the page The System Configuration page appears 3 Click Configure under Font confi...

Страница 82: ...us and Options page appears 9 Make sure the same font is available on the client PC where you use XEdit To install a font on Windows 7 or later right click the TTF file and then click Install 10 Close...

Страница 83: ...r PC are automatically included in the list 2 Select the multiviewer from the list if present or type the appropriate IP address in the box and then click OK A window appears prompting you to confirm...

Страница 84: ...t shows cluster members in alphabetical order based on their system name which appears first and is followed by the multiviewer model and IP address Bold text indicates the cluster member to which XEd...

Страница 85: ...Kaleido IP frame allows you to monitor the frame s health parameters such as Hardware Monitoring fan speed temperature voltage chassis intrusion redundant power failure power consumption disk health a...

Страница 86: ...ctor5Installer_5 4 0_build 703_linux_x64_20160629131648 bin 6 In the console run the installer with the following command SuperDoctor5Installer_5 4 0_build 703_linux_x64_20160629131648 bin i silent No...

Страница 87: ...ts within FRU components For the procedure to replace a FRU see Supermicro SuperServer 1028U Series User s Manual for model 1028U TR4 See Related Documentation on page 15 Contact Customer Support to o...

Страница 88: ...e The Technical Support page appears 3 Click system snapshot The system snapshot generation may take a few moments after which your browser prompts you to save the resulting compressed folder to your...

Страница 89: ...ewer on page 90 IMPORTANT Back up your system database Before upgrading the multiviewer system make sure you have a backup of the current system database so that you can return to the previous Kaleido...

Страница 90: ...2 Click the XAdmin button The XAdmin Status and Options page appears Firefox users If you see a security warning instead of the home page then see Registering your Multiviewer s Security Credentials...

Страница 91: ...Upgrade page appears 4 Click Choose a package to upload A file chooser window appears 5 Navigate to the RUN package to install select it and then click Open The upgrade file should have the following...

Страница 92: ...start the Kaleido IP unit 7 Once the upgrade has completed if you wish to keep a copy of the log messages scroll down to the bottom of the page right click Download the Upgrade log and save the log to...

Страница 93: ...wall display connected to Head 2 This may take a while Once the multiviewer has restarted the system notifies you 10 Click OK The XAdmin Status and Options page appears 11 Verify that the expected ve...

Страница 94: ...llowing types of dashboards Status dashboard displays IP address Kaleido Software version currently loaded layout Frame name Room associated Output head Update dashboard displays status of System upgr...

Страница 95: ...pears at the bottom right corner of the monitor and the command Hide dashboard replaces Show dashboard on the menu Dashboard on the monitor wall Note If you right click the monitor wall background dir...

Страница 96: ...Symptom Probable cause Test Corrective action Closed captioning XDS Dolby E SCTE Loudness does not work for certain tiles video feeds Insufficient licenses have been installed View license status in X...

Страница 97: ...a power supply around in the multiviewer frame to see if normal multiviewer operation can be restored If the frame has an empty power supply slot for example for a redundant power supply unit PSU you...

Страница 98: ...Batteries may explode if damaged or overheated Do not dispose of batteries as household waste Do not dismantle open or shred batteries Keep batteries out of the reach of children The electrolyte of t...

Страница 99: ...99 Kaleido IP X320 X120 Installation Service Manual For more information about recycling contact Grass Valley...

Страница 100: ...100 Maintenance Troubleshooting Disposal and Recycling Information...

Страница 101: ...with SFP28 connectors or 2 Gigabit Ethernet with QSFP28 connectors See Kaleido IP X320 X120 PCI network interface add on card options choose one on page 70 and Kaleido IP X320 X120 SFP hardware option...

Страница 102: ...duced by 8 Halving the bit rate increases the decoding capacity by approximately 33 Doubling the bit rate decreases the decoding capacity by approximately 25 Using H 265 with Main profile instead of M...

Страница 103: ...103 Kaleido IP X320 X120 Installation Service Manual Codec Model 2022 6 SD HD 3G 1080p50 59 X120 32a a Preliminary Contact Grass Valley for more information 32a 16a X320 32a 32a 16a...

Страница 104: ...network and or encryption mode Please contact Grass Valley to submit a playlist file for review d A maximum of 512 elementary streams per program is supported e One license is required to decode all H...

Страница 105: ...al power Kaleido IP X320 Frame 325 W Nominal power Kaleido IP X120 Frame 250 W AC 100 240 V 60 50 Hz Operating temperature 10 35 C 50 95 F Max storage humidity 90 RH non condensing Max functional humi...

Страница 106: ...of the driver for a solution Company Protocol Text database download Routers Controllers Datatek D 2815 Control Module Protocol No ETL ETL Matrix Yes ETL Matrix Evertz Quartz Type 1 Yes EQX Grass Vall...

Страница 107: ...used in most cases Supports native locks and aliases from router provided system controller has NV9000 router control system version 6 0 6 or later c To be used in very specific scenarios involving ph...

Страница 108: ...ication must support the NVEP Router NP0016 protocol The supported communications protocols are listed in the following table with an indication of the supported connection types TCP IP and the dedica...

Страница 109: ...109 Kaleido IP X320 X120 Installation Service Manual...

Страница 110: ...tain a local phone number for the support center nearest you consult the Contact Us section of Grass Valley s website www grassvalley com An online form for e mail contact is also available from the w...

Отзывы: